Levels
This option allows defining Levels and their Environments, which can be assigned to a IKAN ALM Project Lifecycle.
A Level is a logical environment, a step in the Lifecycle. It consists of one (or more) Build and/or Deploy Environment(s) which are physical environments.
There are three Level Types:
-
Build Level: must have at least one Build Environment.
-
Test Level: must have at least one Build or Deploy Environment. A typical Test Level may have one or more Build Environments for Rebuilds and one or more Deploy Environments for Deployment and Testing.
-
Production Level: must have at least one Build or Deploy Environment. A typical Production Level has one or more Deploy Environments.
|
Before you can define Build or Deploy Environments, the required Machines and Scripting Tools must have been defined. This is the task of the IKAN ALM Global Administrator. Once you have created the Levels, you need to assign them to a Lifecycle in order to use them. |
The Levels submenu option lets you start the following procedures:
-
Creating Levels
The Levels Overview screen lets you verify and change the information concerning Levels. The following actions are possible:
-
Modifying Level definitions
-
Modifying the Level Phases
-
Modifying the Level Approvals
-
Displaying the Level History View
Creating a Build Level
-
In the Project Administration context, select Levels > Create Build Level.
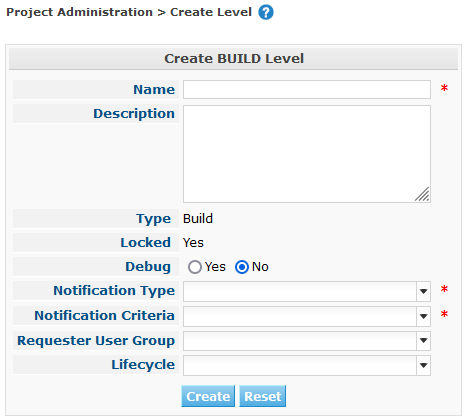
The Create BUILD Level screen is displayed:
You can also switch to this screen via the Edit Lifecycle screen. Select Lifecycles > Overview, select the required Lifecycle and click the Create Build Level link.
-
Fill out the fields for the new Build Level.
The following fields are available. Fields marked with a red asterisk are mandatory:
Field Meaning Name
In this field, enter the name of the new Build Level.
Description
In this field, you may enter a description for the new Build Level.
Type
This read-only field indicates the Level Type, in this case Build.
Locked
This read-only field indicates that the new Level is currently still Locked.
You need to audit the Project to unlock the Build Level. Auditing Projects
Debug
Indicate whether or not the Debug option must be activated for this Level.
If Debug is activated for a Level, the Clean-up Work Copy Phase will not be performed, so that the contents of this directory may be verified by an Administrative User and he can run a Custom Phase manually for testing purposes.
Notification Type
From the drop-down list, select the required Notification Type for this Build Level.
The following options are available:
-
Mail
-
No Notification
If Mail is chosen, notifications will be created at the end of a Level Request on the Level, depending on the Notification Criteria. The notification is sent to the members of the Project User, Project Admin and Level Requester User Groups.
Notification Criteria
From the drop-down list, select the required Notification Criteria for this Build Level.
The following options are available:
-
Always
A Notification will be sent when a Level Request for this Level has ended with status Fail, Warning or Success.
-
Fail
A notification will be sent when a Level Request for this Level has ended with status Fail.
-
Successful
A notification will be sent when a Level Request for this Level has ended with status Warning or Success.
-
Never
No notification will be sent when a Level Request for this Level has ended.
Schedule
From the drop-down list, you may select a Schedule for this Build Level. The purpose of this Schedule is to determine the interval for generating automatic Builds.
Schedules are defined by the Global Administrator. They verify at the requested time or interval whether the code in the VCR was changed. If this is the case, a Level Request is created automatically.
Examples:
At global administration level, define:
-
Nightly Build: define a schedule that will verify the code each night and generate a Level Request, if the code was changed.
-
Continuous Build: define a schedule that will verify the code every 10 or 20 minutes and generate a Level Request, if the code was changed.
Note: This option is not available for Package-based projects.
Requester User Group
From the drop-down list, you may select the required Requester User Group. Members of this User Group and any nested User Groups have the right to create Level Requests for this Build Level.
Lifecycle
From the drop-down list, select the Lifecycle to which the Level must be assigned.
Note: If you create a Build Level using the Create Build Level link on the Edit Lifecycle screen, the name of the Lifecycle will already be filled in.
-
-
Additional Information
The Build Levels Defined in Project panel displays the different Build Levels defined for the Project.
For more information on this panel, refer to Levels Overview.
-
Click Create to confirm the creation of the new Build Level.
You can also click
-
Reset to clear the fields and restore the initial values.
-
Back to return to the previous screen without saving the changes.
-
Creating a Test or Production Level
|
The procedure for creating Test and Production Levels is identical. |
-
In the Project Administration context, select Levels > Create Test Level or Create Production Level.
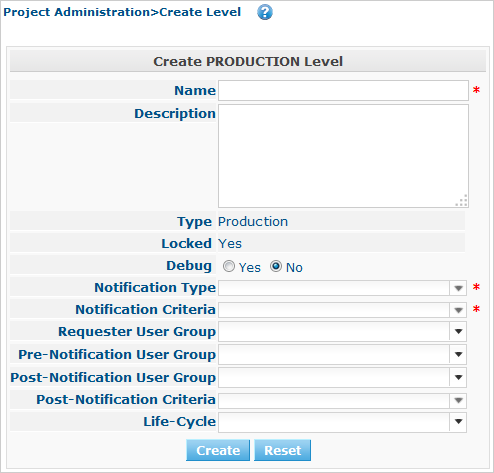
The Create TEST Level or Create PRODUCTION Level screen is displayed:
You can also switch to this screen via the Edit Lifecycle screen. Select Lifecycles > Overview, select the required Lifecycle and click the Create Test Level or Create Production Level link.
-
Fill out the fields for the new Test or Production Level.
The following fields are available. Fields marked with a red asterisk are mandatory:
Field Meaning Name
In this field, enter the name of the new Test or Production Level.
Description
In this field, you may enter a description for the new Test or Production Level.
Type
This read-only field indicates the Level Type, in this case Test or Production.
Locked
This read-only field indicates that the new Level is currently still Locked.
You need to audit the Project to unlock the Test or Production Level. Auditing Projects
Debug
Indicate whether or not the Debug option must be activated for this Level.
If Debug is activated for a Level, the Clean-up Work Copy Phase will not be performed, so that the contents of this directory may be verified by an Administrative User and he can run a Custom Phase manually for testing purposes.
Notification Type
From the drop-down list, select the required Notification Type for this Test or Production Level.
The following options are available:
-
mail
-
No notification
If Mail is chosen, notifications will be created at the end of a Level Request on the Level, depending on the Notification Criteria. The notification is sent to the members of the Project User, Project Admin and Level Requester User Groups.
Notification Criteria
From the drop-down list, select the required Notification Criteria for this Test or Production Level.
The following options are available:
-
Always A Notification will be sent when a Level Request for this Level has ended with status Fail, Warning or Success.
-
Fail
A notification will be sent when a Level Request for this Level has ended with status Fail.
-
Successful
A notification will be sent when a Level Request for this Level has ended with status Warning or Success.
-
Never
No notification will be sent when a Level Request for this Level has ended.
Requester User Group
From the drop-down menu, you may select the required Requester User Group. Members of this User Group and any nested User Groups have the right to create Level Requests for this Test or Production Level.
Pre-Notification User Group
From the drop-down menu, you may select the required Pre-Notification User Group. Members of this User Group and any nested User Groups will be notified when a Level Request is created for this Level.
Post-Notification User Group
From the drop-down menu, you may select the required Post-Notification User Group. Members of this User Group and any nested User Groups will be notified when a Level Request for this Level has ended, depending on the Post-Notification Criteria.
Post-Notification Criteria
From the drop-down list, select the required Post-Notification Criteria for this Test or Production Level.
The following options are available:
-
Always
A Post-notification will be sent if the Level Request ends with status Success, Warning, Fail or in case of a rejected Post-Approval.
-
Fail/Reject
A Post-notification will be sent if the Level Request fails or in case of a rejected Post-Approval.
-
Success
A Post-notification will be sent if the Level Request ends with status Success or Warning.
Sequence Level After
This field is only available if you create a Test or Production Level using the Create Test Level or Create Production Level link on the Edit Lifecycle screen.
From the drop-down menu, select the level that must precede the Test or Production Level you are defining.
If you used the Levels > Create Test (or Production) Level option on the Project Administration submenu, the new Test or Production Level will be created after the existing Test or Production Level, if any.
You can always modify the Level Sequence using the
 Up or
Up or  Down options on the Defined Levels panel on the Edit
Lifecycle screen. Changing the order of the Levels
Down options on the Defined Levels panel on the Edit
Lifecycle screen. Changing the order of the LevelsLifecycle
From the drop-down list, select the Lifecycle to which the Level must be assigned.
Note: If you create a Test or Production Level using the Create Test Level or Create Production Level link on the Edit Lifecycle screen, the name of the Lifecycle will already be filled in.
-
-
Verify the settings of the other Test or Production Levels defined in the Project.
The Test Levels Defined in Project or Production Levels Defined in Project panel displays the different Test or Production Levels defined for the Project.
For more information on this panel, refer to Levels Overview.
-
Click Create to confirm the creation of the new Test or Production Level.
You can also click
-
Reset to clear the fields and restore the initial values,
-
Back to return to the previous screen without saving the changes.
-
Levels Overview
The Levels Overview screen displays the information concerning the Build, Test and Production Levels defined for a Project.
The following actions are possible:
-
Modifying Level definitions
-
Modifying the Level Phases
-
Displaying the Level History View
The Levels Overview Screen
-
In the Project Administration context, select Levels > Overview.
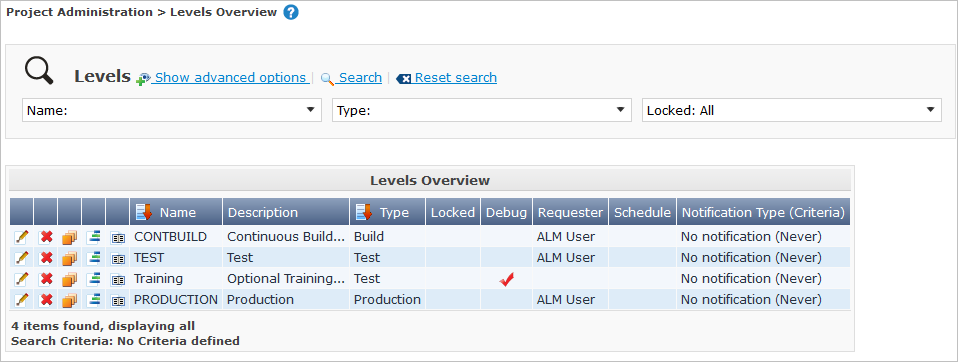
The Levels Overview screen is displayed:
-
Define the required search criteria on the search panel.
The list of items on the overview will be automatically updated based on the selected criteria.
You can also:
-
click the Show/hide advanced options link to display or hide all available search criteria,
-
click the Search link to refresh the list based on the current search criteria,
-
click the Reset search link to clear the search fields,
-
-
On the Levels Overview, verify the Level information fields.
For a description of the fields, refer to the sections Creating a Build Level and Creating a Test or Production Level.
-
The following links are available:
Editing a Level
-
Switch to the Levels Overview screen.
-
On the Levels Overview panel, click the
 Edit link for the required Level.
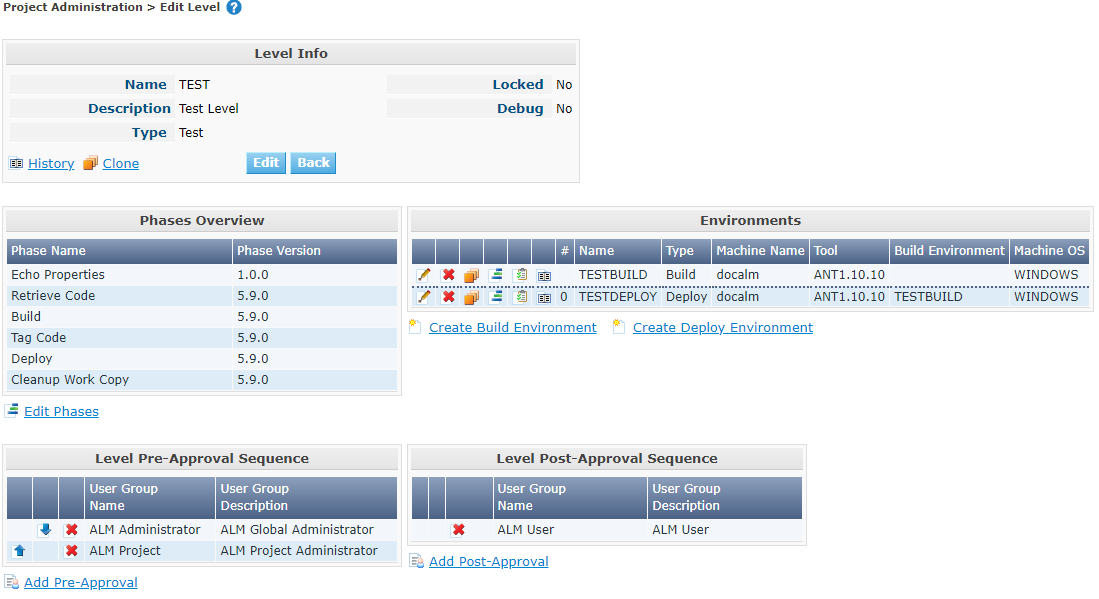
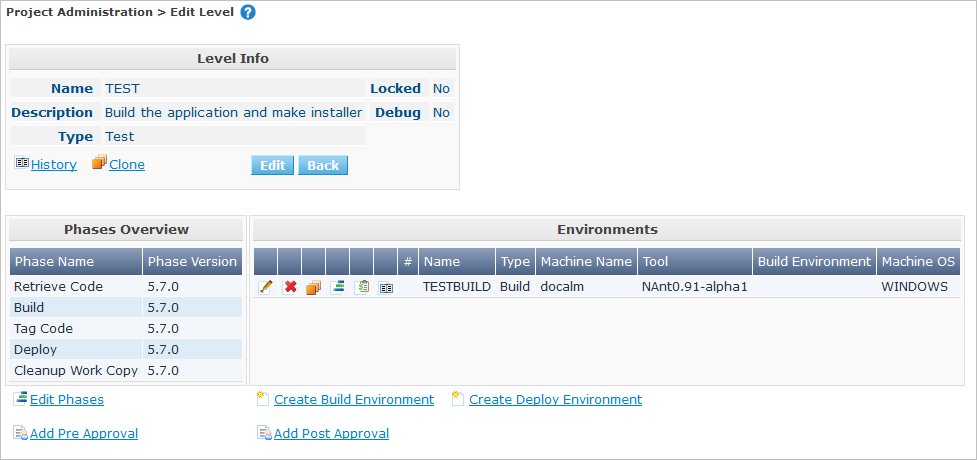
The Edit Level screen is displayed.
-
Click the Edit button on the Level Info panel.
The following pop-up window will be displayed:
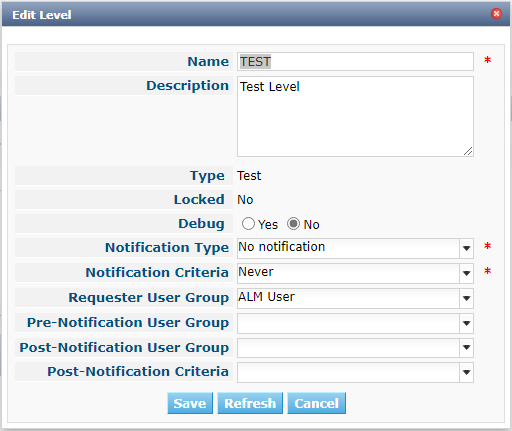
-
Edit the fields on the Edit Level pop-up window.
For a description of the fields, refer to the sections Creating a Build Level and Creating a Test or Production Level.
-
Click Save to save your changes.
You can also click Refresh to retrieve the settings from the database or Cancel to return to the previous screen without saving your changes.
-
-
Underneath the Level Info panel, an overview of the defined Phases, Environments and, optionally, Pre- and Post-Approvals is displayed, as well as the necessary links to edit Phases, to create Build and Deploy Environments and, optionally, to edit the Deploy Sequence and the Approvals.
For more information, refer to the sections:
Level Phases
When creating a Level (Build, Test or Production), IKAN ALM will automatically link the default flow of core Level Phases to it.
The core Phases are:
-
Retrieve Code
-
Build
-
Tag Code
-
Deploy
-
Cleanup Work Copy
Levels for Projects that are linked to an Issue Tracking System will have an extra Issue Tracking Phase. On a Build Level, the search for handled Issue Numbers in the VCR commit comments will happen during this Phase.
The Build and Deploy Phases will communicate with the Agent running the Build(s) or Deploy(s) in order to start, follow up and set the end status of Build and Deploy actions.
|
The behavior of the Phase is dependent of the Level Type to which it is connected. For example; both Test and Production Levels will have a Tag Code Phase connected by default, but nothing will happen during this Phase as tagging will only be done on a Build Level type. This behavior may change in future releases. At present you can manually remove the Tag Code Phase from Test and Production Levels. |
When executing a Level Request for this Level, a log will be created for each of the Phases. The logs will be shown on the Level Request Details page. For more information, see : Level Request Detail.
Refer to the following procedures for more information:
The Level Phases Overview Screen
-
In the Project Administration context, select Levels > Overview.
-
Click the Edit Phases
 link on the Levels Overview panel.
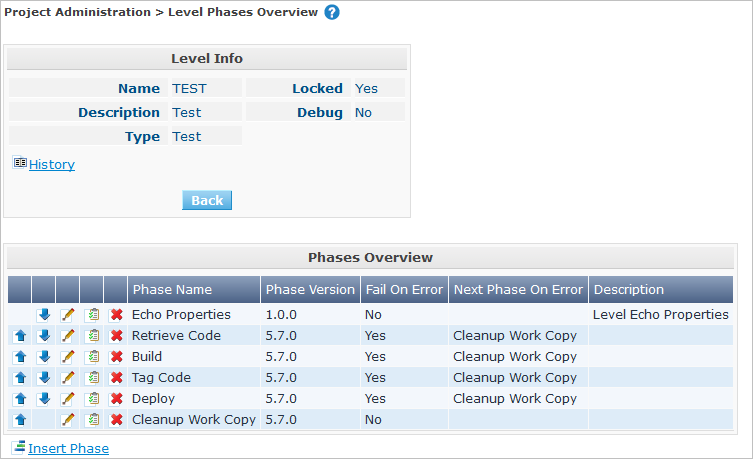
The Level Phases Overview screen is displayed:
-
Use the links on the Phases Overview panel to edit a Phase.
The following links are available:
-
The
Up and Down links to change the order of the Phases. Changing the Order of the Level Phases -
The
Edit link to edit the Phase’s settings. Editing a Level Phase -
The
 View Parameters link to manage the mandatory and optional Phase Parameters. Viewing the Level Phase Parameters
 -
The
 Delete link to delete a Phase. Deleting a Level Phase
Changing the Phases can have undesirable consequences on the Lifecycle. For more information, refer to the document HOW TO Using and Developing a Phase in IKAN ALM.
-
-
Insert a Phase, if required.
Select the Insert Phase link underneath the Phases Overview panel. Inserting a Level Phase
-
When done, click Back to return to the Levels Overview screen.
Changing the Order of the Level Phases
-
Switch to the Levels Overview screen.
-
Click the Edit Phases
link on the Levels Overview panel. -
Use the
Up and Down links in front of a Level Phase to change its position in the sequence. -
Click Back to return to the Levels Overview screen.
Avoid changing a Phase’s position in such a way that its Next Phase on Error is in an earlier position in the workflow: this could result in an infinite loop.
Editing a Level Phase
-
Switch to the Levels Overview screen.
-
Click the Edit Phases
link on the Levels Overview panel. -
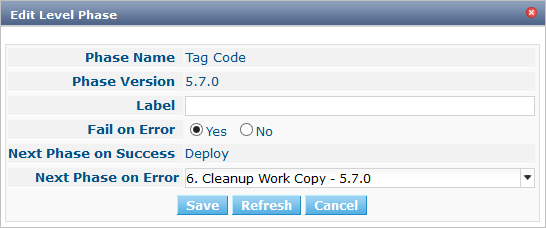
Click the
Edit link in front of the Phase you want to edit.The Edit Level Phase screen is displayed.
-
Edit the fields on the Edit Level Phase window.
For a description of the fields, refer to the section Inserting a Level Phase.
-
Click Save to save your changes.
You can also click Refresh to retrieve the settings from the database or Cancel to return to the previous screen without saving your changes.
Viewing the Level Phase Parameters
-
Switch to the Levels Overview screen.
-
Click the Edit Phases
link on the Levels Overview panel. -
Click the
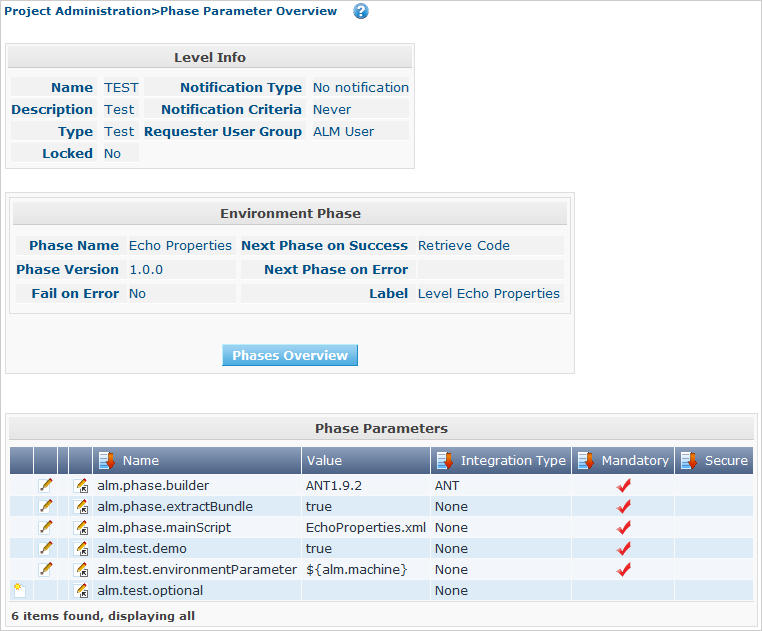
View Parameters links in front of a Level Phase you want to manage the Phase Parameters for.The Phase Parameter Overview screen is displayed.
-
Verify the Level Phase Parameters.
The Phase Parameters panel displays all the defined Parameters of the Level Phase and allows you to create non-mandatory Phase Parameters.
The following fields are available:
Field Meaning Name
The name of the Parameter.
This field may not be changed since it is defined in Global Administration.
Value
The Value of the Parameter.
Initially, when the Phase is inserted, the value will be copied from the Default Value in Global Administration (if provided).
This field may be changed by Editing the Phase Parameter.
Integration Type
This field indicates whether the value of the Parameter is a simple text value, or whether it represents a link (an integration) to an IKAN ALM Global Administration object type.
The possible values are:
-
None: the value is simple text
-
Transporter: link to a Transporter
-
VCR: link to a Version Control Repository
-
ITS: link to an Issue Tracking System
-
Scripting Tool: link to a Scripting Tool
-
ANT: link to an Ant Scripting Tool
-
GRADLE: link to a Gradle Scripting Tool
-
NANT: link to a NAnt Scripting Tool
-
MAVEN2: link to a Maven2 Scripting Tool
This field may not be changed since it is defined in Global Administration.
Mandatory
This field indicates whether the Parameter has been created automatically when the Phase is inserted in the Level. This is the case for Mandatory Parameters.
Non-mandatory Parameters must be created after the Phase has been inserted in the Level, using the Create Parameter link.
This field may not be changed since it is defined in Global Administration.
Secure
This field indicates whether the Parameter is secured or not.
This field may not be changed since it is defined in Global Administration.
-
-
Click the
Edit Parameter link next to a Phase Parameter.The following pop-up window will be displayed.
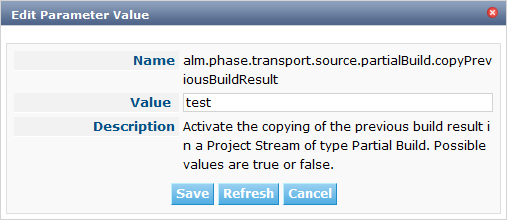
Set the value of the Level Phase Parameter and click Save to save the value.
You can also click:
-
Refresh to retrieve the settings from the database.
-
Cancel to return to the Phase Parameter Overview screen without saving a value.
-
-
If you want to create a non-mandatory Phase Parameter, click the
 Create Parameter link next to a Phase Parameter.
The following pop-up window will be displayed.
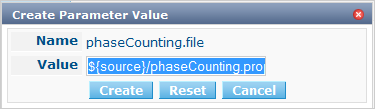
If a default Parameter value has been set in Global Administration, that value will be suggested.
Set the value of the Level Phase Parameter and click Create.
-
Reset to retrieve the settings from the database.
-
Cancel to return to the Phase Parameter Overview screen without saving a value.
-
-
If you want to delete a non-mandatory Phase Parameter, click the
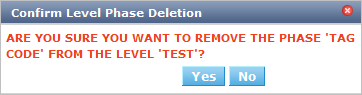
Delete Parameter link next to a Phase Parameter.The following pop-up window will be displayed.

Click Delete to confirm the deletion of the mandatory Level Phase Parameter.
You can also click Cancel to close the pop-up window without deleting the Parameter.
-
Click the
 Edit Global Phase Parameter link next to a Phase Parameter.
The User will be redirected to the Edit Phase screen (in the Global Administration context) and the Edit Phase Parameter pop-up window is opened.
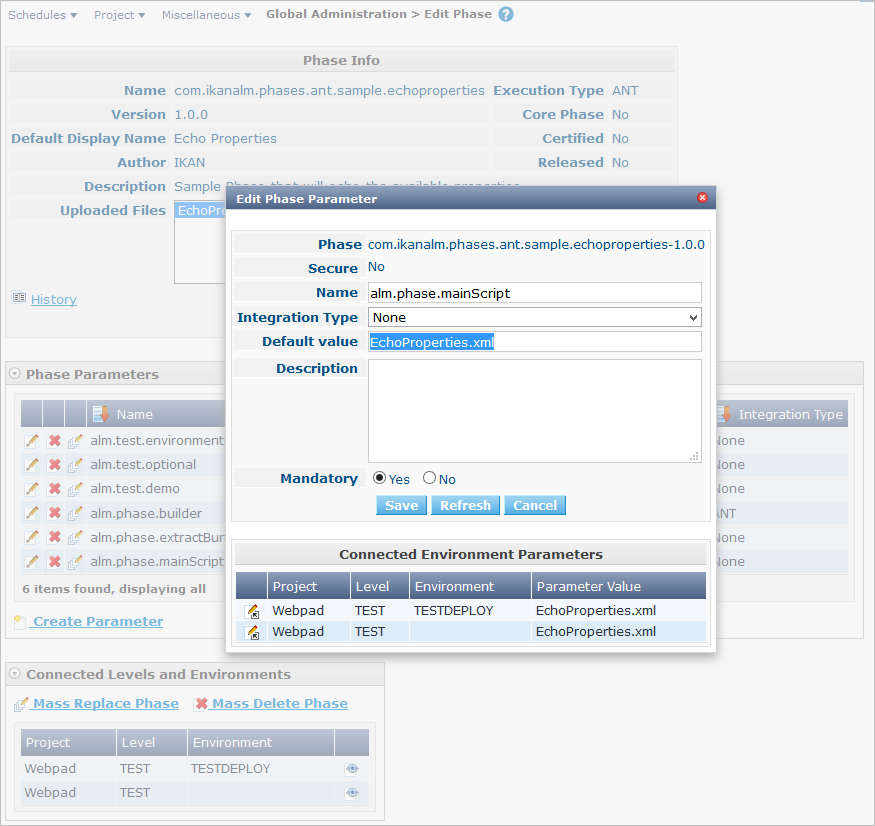
You can edit the Global Phase Parameter as described in the section Editing Phase Parameters.
To go back to the Phase Parameter in the Project Administration context, click the appropriate
Edit Environment Phase Parameter link in the Connected Environment
Parameters panel.
Deleting a Level Phase
-
Switch to the Levels Overview screen.
-
Click the Edit Phases
link on the Levels Overview panel. -
Click the
Delete link in front of the Level Phase you want to delete.The Delete Level Phase screen is displayed.
-
Confirm the deletion by clicking the Yes button.
You can also click No to return to the previous screen without deleting the Level Phase.
Inserting a Level Phase
-
Switch to the Levels Overview screen.
-
Click the Edit Phases
link on the Levels Overview panel. -
On the Phases Overview, click the Insert Phase link.
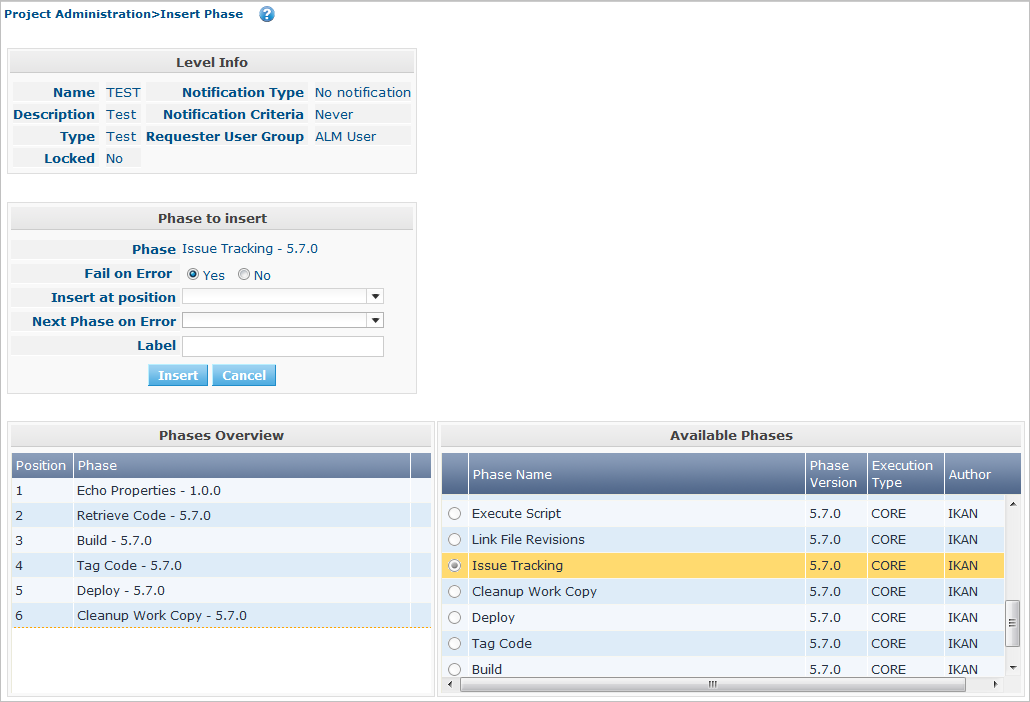
The Insert Phase screen is displayed.
-
Select a Phase to insert from the Available Phases panel.
-
Fill out the fields for the new Phase.
The following fields are available:
Field Meaning Phase
From the Available Phases panel, select the Level Phase to add.
Fail on Error
In this field, indicate whether the Level Request is considered failed when this Phase goes in Error.
Insert at Position
This field indicates at which position the Phase will be inserted into the Level workflow. The Phase Position is also indicated on the Phases Overview panel.
Next Phase On Error
This field indicates the next Phase to execute in case this Phase goes in Error.
Label
In this optional field you can add a Label for the Phase to be inserted.
In case you use the same Phase several times, adding a label is useful to provide additional information concerning the usage of the Phase.
-
Click Insert to confirm the creation of the new Phase.
You can also click Cancel to return to the previous screen without saving the changes.
Build and Deploy Environment Settings
On the Edit Level screen, you will also find the information concerning the Build and Deploy Environments defined for the different Levels.
Links for creating Build and Deploy Environments as well as for Changing the Deploy Sequence are available on the Environments Panel.
|
You can also use the Build Environments and Deploy Environments submenu options for creating Environments. The Deploy sequence, however, can only be modified on the Edit Level screen. |
Refer to the following procedures for more information:
Creating a Build Environment
-
Switch to the Edit Level screen.
-
Underneath the Environments panel, click Create Build Environment.
The following screen is displayed:
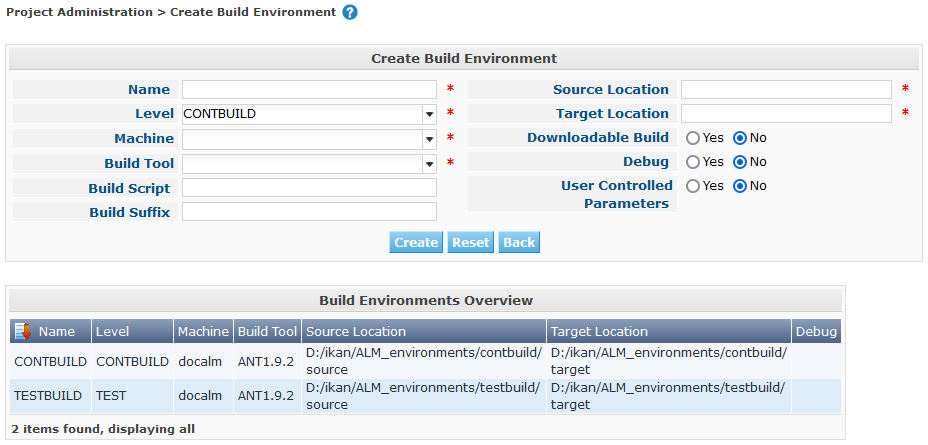
For a complete description of the Create Build Environment procedure, refer to Creating a Build Environment.
Creating a Deploy Environment
-
Switch to the Edit Level screen.
-
On the Environments panel, click Create Deploy Environment.
The following screen is displayed:
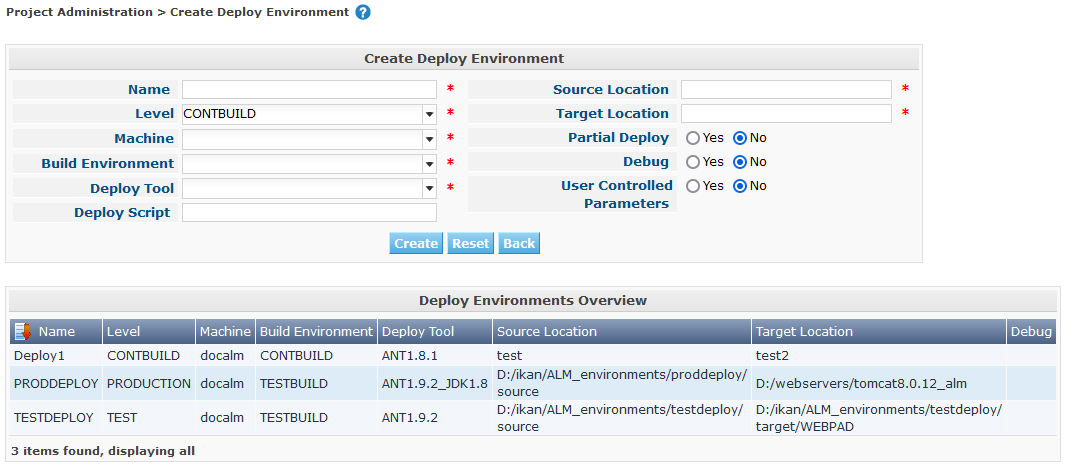
For a complete description of the Create Deploy Environment procedure, refer to Creating a Deploy Environment.
Editing the Deploy Sequence
When a Deploy Environment is created, it will automatically get Sequence Number 0. When there are multiple Deploy Environments linked to a Level, they will be treated in parallel, since they all have 0 as Sequence Number. In order to handle them sequentially, you must change the Sequence Number. When executing a Level Request with multiple Deploys, first the Deploys with sequence number 0 will be executed in parallel. When all of them have executed successfully, the Deploys with sequence number 1 will be executed in parallel, and so on.
When creating a Level Request, this Sequence Number will also be displayed in front of the Deploy Environment name.
This functionality is useful in case a Deploy Environment depends on another and you do not want to create multiple Levels. For example, one Deploy Environment first updates an application database, and a second Environment will deploy the application code (if the database deploy is successful).
-
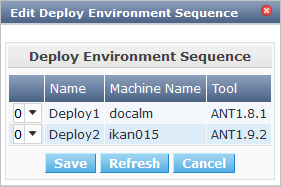
Underneath the Environments panel on the Edit Level screen, click Edit Deploy Environment Sequence.
This link is only available if there is more than one Deploy Environment linked to the Level.
The following screen is displayed:
-
Change the Sequence Number.
Use the drop-down menu at the left of the Deploy Environment to change the Sequence Number.
-
Click Save to save the new sequence order.
You can also click Refresh to retrieve the settings from the database or Cancel to return to the previous screen without saving your changes.
Level Approvals
For Test and Production Levels, you can specify the sequence of Pre- and Post-Approvals. For more information on Approvals, refer to Approvals
-
Switch to the Levels Overview screen.
-
On the Levels Overview panel, click the
Edit link for the required Level.The Edit Level screen is displayed.
Approvals can only be defined for Test and Production Levels.
-
Click the
 Add Pre-Approval or Add Post-Approval link at the bottom of the Edit Level screen.
The Add Approval window is displayed:

-
Select the required User Group from the drop-down list.
Pre-Approvals need to be given before the Level Request is started, as they allow to avoid the execution of a Level Request. Post-Approvals need to be given after the Level Request is executed, as they allow to avoid the delivering of a Build to the next Level in the Lifecycle.
-
Define where the new approving User Group should be inserted.
Select the User Group after which the new User Group should be inserted from the Insert After drop-down list.
If you do not select an existing Approval User Group from the Insert after drop-down list, the new Approval User Group will be inserted at the top of the sequence.
-
Click the Insert button, to confirm your changes.
The Approval is added to the Sequence on the Edit Level screen.
-
If necessary, you can use the
Up and Down buttons to modify the order of the different User Groups, or use the Remove button to remove a User Group from the Sequence list. -
Repeat this procedure to define all required Pre- and Post-Approvals.
Deleting a Level
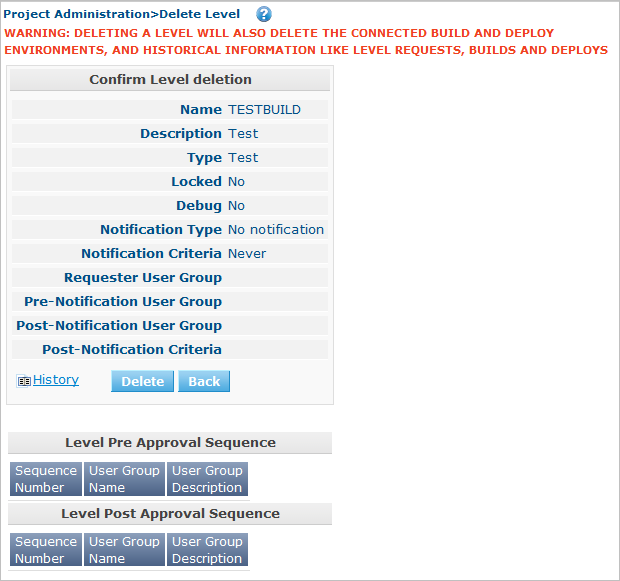
Deleting a Level will also delete the connected Build and Deploy Environments, as well as the historical information concerning Level Requests, Builds and Deploys.
|
If the Level is still linked to a Lifecycle you cannot delete the Level. |
-
Switch to the Levels Overview screen.
-
Click the Delete link on the Levels Overview panel.
The following screen is displayed:
-
Click Delete to confirm the deletion or Back to return to the previous screen without deleting the Level.
-
If you try deleting a Level that is assigned to a Lifecycle, the following screen is displayed:
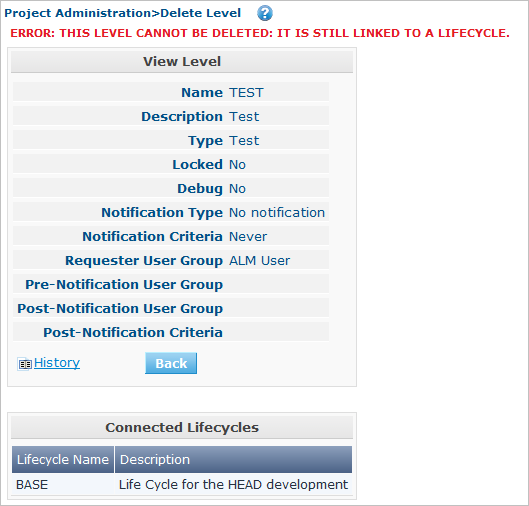
Remove the Level from the Lifecycle before deleting it. Removing a Level
Cloning a Level
-
Switch to the Levels Overview screen.
-
Click the Clone
 link in front of the Level you want to clone.
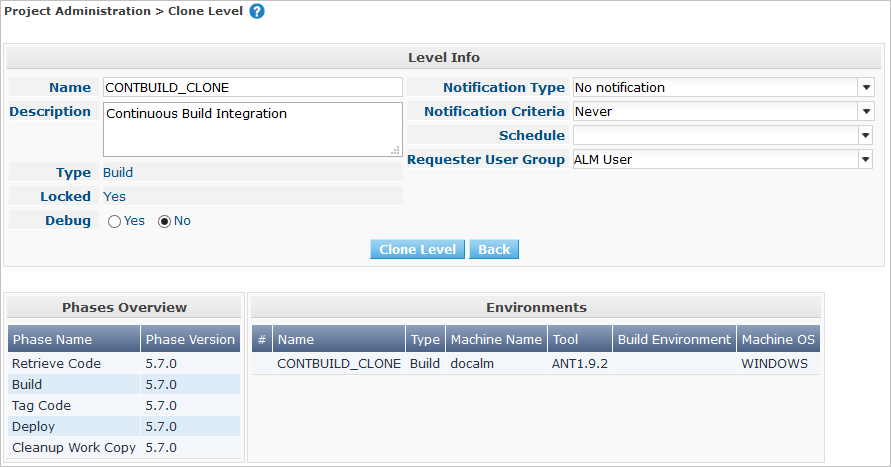
The Clone Level screen is displayed.
-
Edit the fields on the Level Info panel.
For a description of the fields, refer to the sections Creating a Build Level or Creating a Test or Production Level.
-
Click Clone Level to confirm the action.
You can also click Back to return to the Levels Overview screen.
The Environments linked to the Level will be automatically cloned together with the Level. The environment names will be set automatically by adding a “CLONE” suffix. You might want to change this after the Level has been cloned. You also might want to change the Source and/or Target Locations, especially the Target Locations of cloned Deploy Environments.
Viewing the Level History
-
Switch to the Levels Overview screen.
-
Click the History
 link on the Levels Overview panel.
For more detailed information concerning this History View, refer to the section History and Event Logging.
Click Back to return to the previous screen.