Getting Started Guide
Purpose
This Getting Started Guide explains how to set up a very basic Project, called Docgen, in IKAN ALM, using Build and Deploy tasks. It contains an introduction to the most important IKAN ALM concepts. The target audience are ALM engineers who want to know how to configure the IKAN ALM Global Administration and how to create and manage a Project that builds sources and deploys them to a Test or Production server.
We assume that you have some basic DevOps or Application Lifecycle Management knowledge, including working with a versioning system and creating (build or deploy) scripts. We also assume that you already had a look at the IKAN ALM demo installation (note that it is possible to configure the Docgen Project starting from the Demo installation) and have grasped the basic stuff, such as logging on and navigating through the Global Administration, Project Administration and Desktop sections within IKAN ALM.
During the Build process, the sample Docgen Project will convert a standardized XML document into a PDF and an HTML file and, next, deploy them to a web server.
We will use the Apache ANT scripting tool and the Apache Tomcat web server, but no prior knowledge of either tool is necessary since the samples are kept very basic.
The source XML file is very simple and follows the docbook format.
You will find it in the GettingStarted.zip file under /init_svn/sources/docbook.xml.
Prerequisites
IKAN ALM Installation
-
A correctly installed IKAN ALM Server 5.8, with the web application preferably being deployed to Apache Tomcat. The Demo project contains a Test level, whereby results will be deployed to the Tomcat web server running the IKAN ALM web application.
-
A correctly installed IKAN ALM Agent 5.8, with access to an Apache ANT scripting tool (minimum version 1.8.2). The recommended way is to install that IKAN ALM Agent on the same Machine as the IKAN ALM Server since it has an integrated and configured ANT definition (Global Administration: Defining Subversion and Creating a Project). If that Agent on the Server machine does not fit into your ALM architecture, you may always disable it later on by removing the service (Windows) or daemon process (Linux/Unix).
-
Tomcat version 7 or higher is required.
|
The IKAN ALM Demo installation will also fulfill the following requirements: the IKAN ALM Server and Agent will be installed and the Ant scripting tool and Subversion repository will be installed and configured. On Windows, it also includes the Subversion server; on Linux, you have to install Subversion separately. |
Subversion Versioning System
This Getting Started Guide includes the creation of a Subversion repository. In order to connect to this repository, you need Subversion version 1.6 or higher installed on the IKAN ALM Server. The Apache Subversion website provides links for downloading a binary subversion package for your system.
For example, on a Windows operating system you can easily install the Win32Svn package. If you download the current (November 2017) svn-win32-1.8.16.zip archive, the installation is as easy as an unzip action.
The installation on Linux is mostly done through a Package manager. For example, on Suse Linux, you can do this using zypper:
$ zypper install subversion$zypper install subversion-serverFor more information on how to work with Subversion, refer to the Subversion Quick Start Guide at http://svnbook.red-bean.com/en/1.7/svn.intro.html.
IKAN ALM Installation Information
The following additional information is needed to complete the procedures explained in this Getting Started Guide:
-
ALM_HOME
This is the installation folder of the IKAN ALM Server. You can derive this location from the Local File Copy Locations under Global Administration > System Settings.
For example: if the Work Copy Location is set to
E:/ALM/system/workCopy, ALM_HOME =E:/ALM. -
ANT_HOME
Normally Ant is installed in the ALM_HOME folder. If not, the exact location can be found in the field Java ANT Classpath under Global Administration > Scripting Tools > Overview ANT Scripting Tools.
For example: if the Java ANT Classpath is set to E:/ALM/ant/lib/ant-launcher.jar; …, ANT_HOME=E:/ALM/ant.
-
JAVA_HOME
Location of the Java Runtime on the IKAN ALM Server.
For example: the location provided during the installation procedure or the JAVA_HOME location of the ANT tool as mentioned above.
-
TOMCAT_HOME
Root location of the Apache Tomcat web server that is hosting the IKAN ALM web application.
If you are using the Demo version, the root location will be
ALM_HOME/appServer.For example: the location provided during the installation of IKAN ALM.
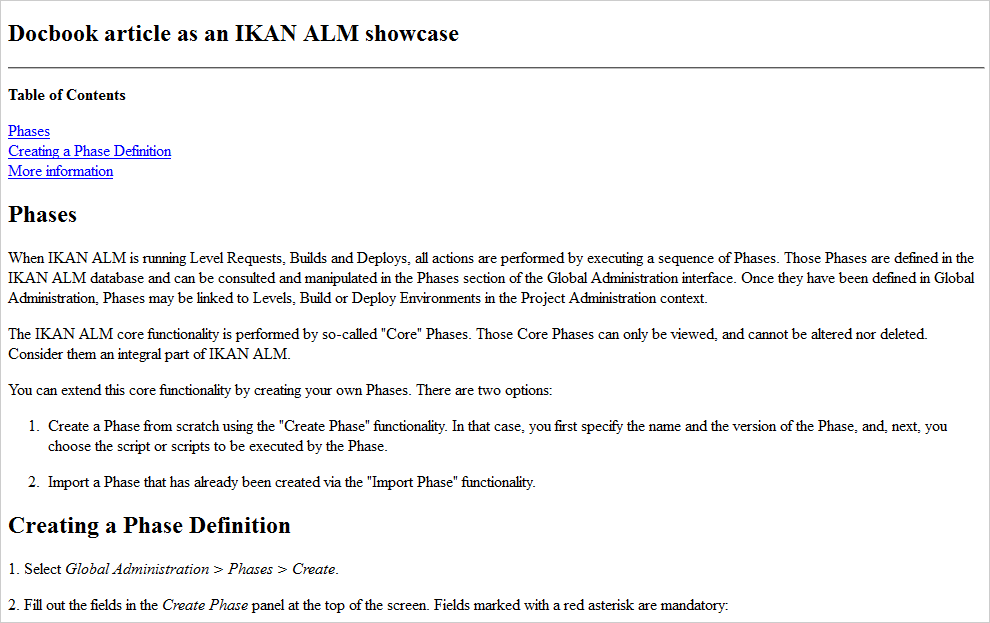
-
ALM URL Elements
tomcathost and tomcatport: the ALM webapplication is accessible through a URL which consists of serveral elements:
http://tomcathost:tomcatport/alm.You can retrieve the elements from the IKAN ALM URL which you can find on the Mail tab under Global Administration > System Settings.For example
http://localhost:9080/almwith tomcathost=localhost and tomcatport=8080.Note: 9080 is the standard port defined for the Demo installation, 8080 is the standard tomcatport.
-
For the deployment of our application to the web server, we need some information about the Tomcat setup, so that we can stop and start it. Check the documentation on the Tomcat website, for more information on how to do that.
|
If you did not install IKAN ALM yourself, you should ask your system manager to provide you with the correct installation paths and variables. |
Global Administration: Defining Subversion and Creating a Project
So far, so good. Now, let’s dive into IKAN ALM.
First, we will:
-
verify what is already preconfigured in the Global Administration section,
-
initialize and connect to the Subversion repository,
-
and create our first project.
Global Administration: Initial Overview
Let’s start with verifying what is already set up in the IKAN ALM Global Administration after a clean installation. We will describe it shortly without going into detail as, after all, we are eager to create our own project. If however, you want to know more about a specific topic, have a look at the respective chapters in the Global Administration part of the IKAN ALM User Guide.
Log on to IKAN ALM with user global and password global, and select Global Administration from the Main Menu. Via this starting place (or via one of the submenus) you can verify the following settings:
-
Under System > System Settings, you will see the Build Archive Location on the IKAN ALM Server, where all the Build Artifacts (e.g., PDFs, deployable archives, …) will be stored after a successful build, so that they can be deployed later in the lifecycle. It is a local path on the server, something like
C:/ALM/system/buildArchive, or/opt/alm/system/buildArchive. -
Under Machines > Overview, you will find the definition of the IKAN ALM Server. You should also have an Agent installed on this Machine, and both Agent and Server processes should be running.
Verify this by clicking the
 _ Installed
Phases_ link on the overview: you will be forwarded to the Installed Phases Overview which displays a column for the Current Server Activity and one for the Current Agent Activity, which both should have a green
_ Installed
Phases_ link on the overview: you will be forwarded to the Installed Phases Overview which displays a column for the Current Server Activity and one for the Current Agent Activity, which both should have a green  icon as status.
If the icon is red
icon as status.
If the icon is red  , verify the topic on how to Start the IKAN ALM Agent/Server in the respective Agent or Server
Installation Guide.
, verify the topic on how to Start the IKAN ALM Agent/Server in the respective Agent or Server
Installation Guide. -
Under Scripting Tools > Overview ANT Scripting Tools, an ANT 1.9.3 scripting tool is defined pointing to the installed Ant version on the IKAN ALM server. We will use that Ant scripting tool to generate a PDF and an HTML file from the docbook XML, and to deploy those results to a web server.
After having verified those Global Administration settings, we are now almost ready to create a Project and start a Build. Almost … as we of course need some sources to build. We will retrieve them from a Subversion repository that we will create and define in the next section.
Subversion Setup and Definition
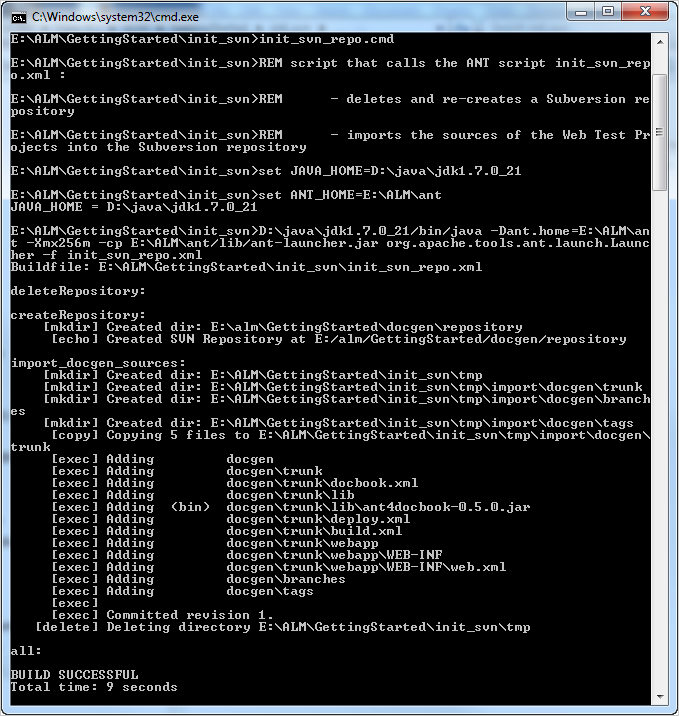
The archive delivered with this Getting Started Guide contains scripts and sources to create a Subversion repository to which we will connect using the file protocol. As specified in the requirements, we assume you have Subversion installed on the IKAN ALM server. Extract the GettingStarted.zip in a temporary directory in the IKAN ALM installation folder.
Adapt the JAVA_HOME and ANT_HOME in the file init_svn/init_svn_repo.cmd (Windows) or init_svn/init_svn_repo.cmd/sh (Linux). Point the JAVA_HOME to the one used for IKAN ALM, and use ANT that is installed with the IKAN ALM Server under ALM_HOME/ant.
Sample file:
@attrib *.* -R /S /DREM script that calls the ANT script init_svn_repo.xml :REM 	- deletes and re-creates a Subversion repositoryREM 	- imports the sources of the Web Test Projects into the
Subversion repositoryset JAVA_HOME=D:\java\jdk1.8set ANT_HOME=E:\ALM\ant@echo JAVA_HOME = %JAVA_HOME%@SET CLASSPATH=%ANT_HOME%/lib/ant-launcher.jar@SET ANTCMD=%JAVA_HOME%/bin/java -Dant.home=%ANT_HOME% -Xmx256m
-cp %CLASSPATH% org.apache.tools.ant.launch.Launcher%ANTCMD% -f init_svn_repo.xml
Adapt the repository location (path and svn url, make sure that you have write access) and the svn bin path in the init_svn/init_svn_repo.properties file.
Sample properties file:
# properties file used by init_svn_repo.xml# if true, the repository is on the local machine and will
be deleted and re-createdisLocalRepository=true# path to the Subversion binariessvn.bin.path=D:/vcrs/server/svn/1.8.5/bin# local path to the Subversion repositorysvn.repo.local.path=E:/ALM/GettingStarted/Docgen/repository# remote URL of the Subversion repositorysvn.repo.remote.URL=file:///E:/ALM/GettingStarted/Docgen/repository|
Do not use backward slashes. |
Remember the svn.bin.path and svn.repo.remote.URL properties as we will need them when defining the Subversion repository in IKAN ALM.
Run init_svn_repo.cmd (Windows) or init_svn_repo.sh (Linux):
Now that the repository has been created, we need to define it in IKAN ALM. In the Global Administration context, select Version Control Repositories > Create Repository.
The following screen is displayed:
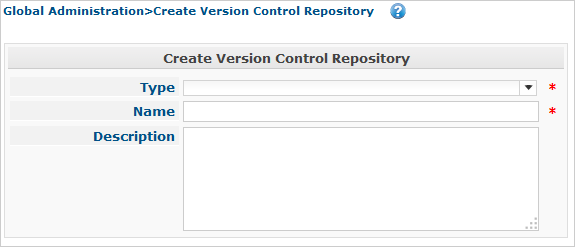
Select Subversion from the drop-down list in the Type field. The Connection Details panel will be displayed.
Set the Command Path and Repository URL to what was set in the properties file (svn.bin.path and svn.repo.remote.url). The User ID and Password are not needed since we connect using a file URL. Set the Repository Layout to Project-oriented, and the Time-Out to 30 seconds.

|
You can first click the Test Connection button before you Create the repository. |
Creating the Docgen Project
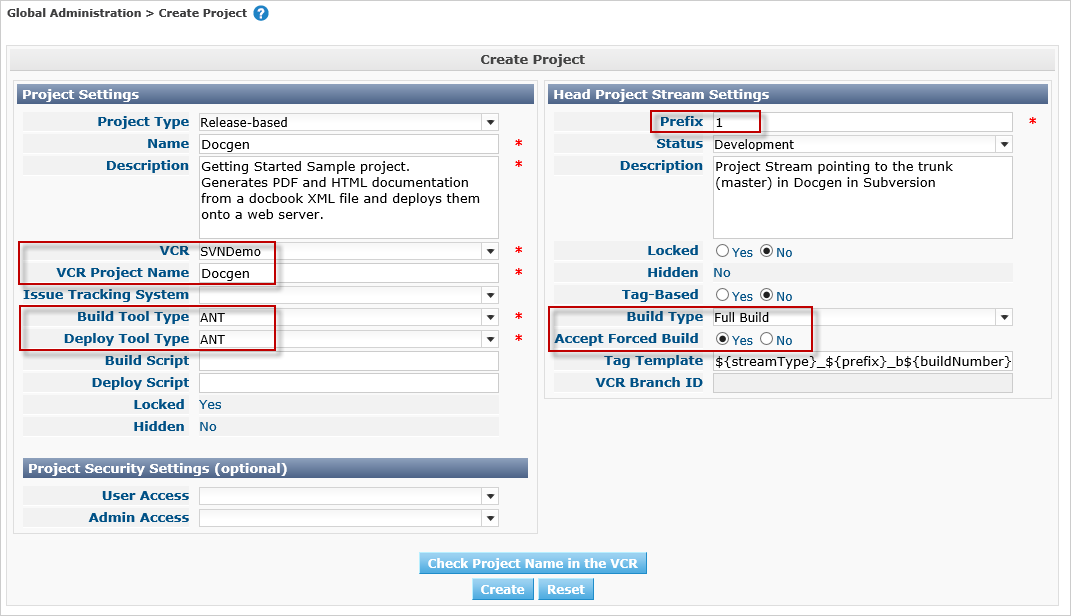
Now we can start with the actual creation of our Release-based Project.
In the Global Administration context, select Project > Create Project and fill out the fields as required.
Set the Project Type to Release-based. Specify the SVN repository containing the Docgen project and its project name in the VCR (Docgen). Choose ANT for the Build and Deploy Tool Type. Together with the Project, a Head Project Stream is created that points to the trunk in the Docgen project in Subversion. Provide a Build Prefix, make sure to set the Build Type to Full Build and to set Accept Forced Build to Yes.
|
The name of the project in the SVN repository is case-sensitive! |
|
You can first use the Check Project Name in the VCR button before you Create the Project. |
Setting up the Build Level: Generating HTML and PDF
Let’s do some work in our new Project, so that we can “build” the documentation!
Creating the Build Level
Under Lifecycles > Overview you will notice that the BASE Lifecycle has been created which is linked to the HEAD Project Stream. Select the Edit link next to this Lifecycle.
To be able to build, we first have to create a first step (Level) in the Lifecycle by selecting the Create Build Level link underneath the empty table of Defined Levels.
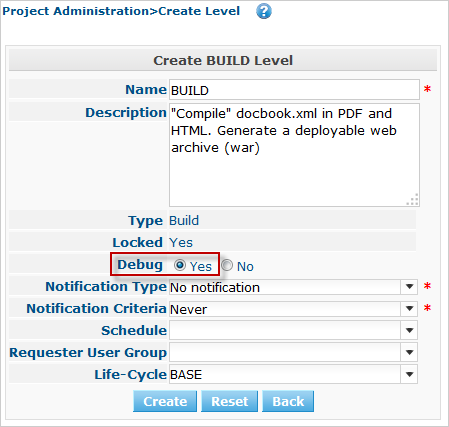
Most fields speak for themselves (let’s neglect the Notification, Schedule and Requester fields for now). Activating the Debug option makes it easier to track stuff in the beginning, especially when a Build fails. Once everything runs smoothly, set it to No. Together with the Level, the Phases linked to the Level are created. Those Phases will be executed when a Request will be executed on the IKAN ALM Server (see later).
You can check those Phases by selecting the ![]() _ Edit
Phases_ link underneath the Build Level under Levels
> Overview.
_ Edit
Phases_ link underneath the Build Level under Levels
> Overview.
Creating the Build Environment
A Level is a conceptual step in the Lifecycle. As we need a concrete Machine to execute our Build on, we need to link a Build Environment to the Level.
Select Create on the Build Environments submenu.
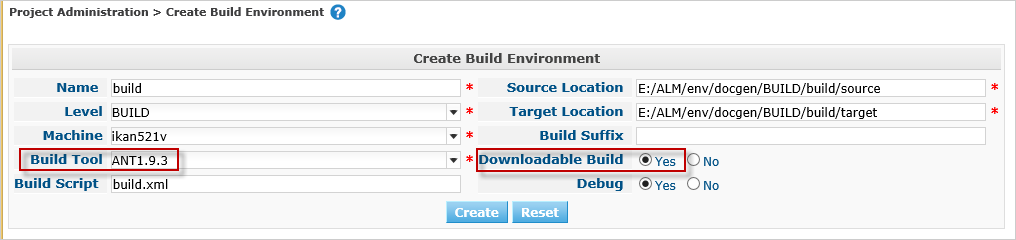
The Build will be executed by the IKAN ALM Agent on the Machine that we will select, and more precisely by the selected (1.9.3) Ant
Scripting Tool.
The defined build.xml is an Ant script that you can inspect in the sources under /init_svn/source and that is imported in the Subversion trunk of the Docgen project.
The script is not very complex: it will execute four Ant targets: (1) generate an HTML file and (2) generate a PDF file based on the docbook.xml, (3) copy the resulting files to the target location so that they will end up in the build result and finally (4) generate a deployable web archive in the target that we can deploy (see later).
The sources will be transferred to a subdirectory of the Source Location. The result must be placed in the Target Location. Note that, normally, those locations will be cleaned up after the Build, unless you activate the Debug option, what we do for the same reason as explained for the Build Level.
|
The source and target location are preferably located in the ALM_HOME installation folder. You are free to specify the location of those folders. The structure will be automatically created. In our example we use
In order to distinguish Levels from Environments, we use uppercase for the level and lowercase for the environment directories. |
Set Downloadable Build to Yes, so that we can download and check the build result.
Just as for the Level, the Phases linked to the Environment are created together with the Build Environment.
They will be executed when the Build of a Level Request will be executed on the IKAN ALM Agent (see later). You can check those Phases by selecting the ![]() _ Edit
Phases_ link next to the Build Environment under Build
Environments > Overview.
_ Edit
Phases_ link next to the Build Environment under Build
Environments > Overview.
Auditing the Project
Everything is ready to start a Build, except that the Level was locked when we created it: first we need to verify if our definitions are consistent. Do so by selecting Audit Project on the Main Menu.
On the overview, you will see most of the different objects we created.
The information screen for the Docgen Project displays the Build Archive of the Head Project Stream (where our future Builds will be stored) and the Build Level containing one Build Environment on the IKAN ALM Agent, where the build.xml script will be executed by an Ant scripting tool.
Click the Unlock link, and we are ready to build!
Creating the Build Level Request
First we will add the Head Project Stream of the Docgen Project to our Desktop. Go to your Desktop and click the Add to Desktop button at the bottom of the screen. In the pop-up window, find the Head Project Stream (1) of the Docgen project, select it and click Add to Desktop.

Click the ![]() _ Request
icon_ in the Action column of our Project Stream.
_ Request
icon_ in the Action column of our Project Stream.
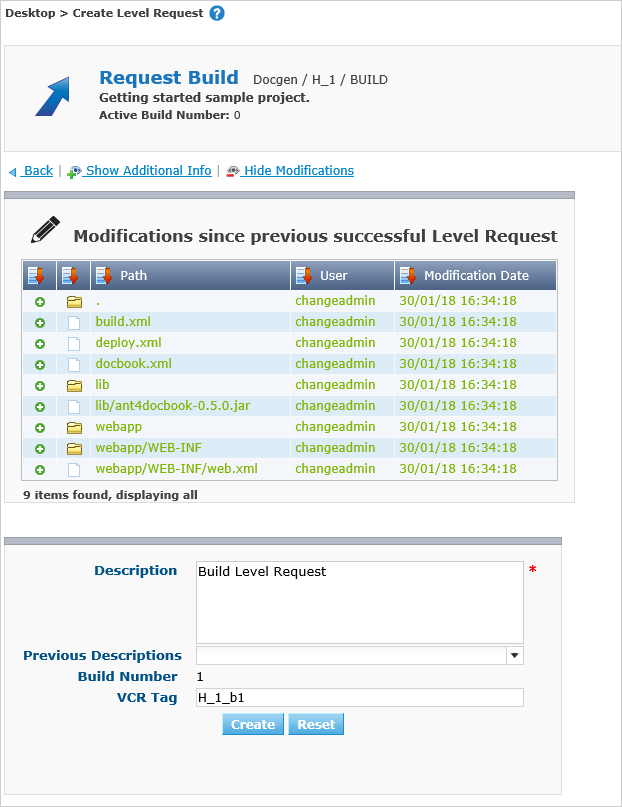
Click the Show Additional Info link.
Notice that the Build Environment is linked to the Level.
Provide a meaningful description, do not modify the Indicative VCR Tag that will be created in Subversion when the Build is successful, click the Show Modifications link and have a look at all the sources we have imported in Docgen/trunk (our docbook.xml, the build and deploy script, …) when creating the Subversion repository.
Finally, select the Create button.
Verifying the Build Level Request
You are forwarded to the Desktop on which the Request you created is displayed.
Click through on its link (H_1_b1 if you started on a clean installation) to see what has happened during the Build.
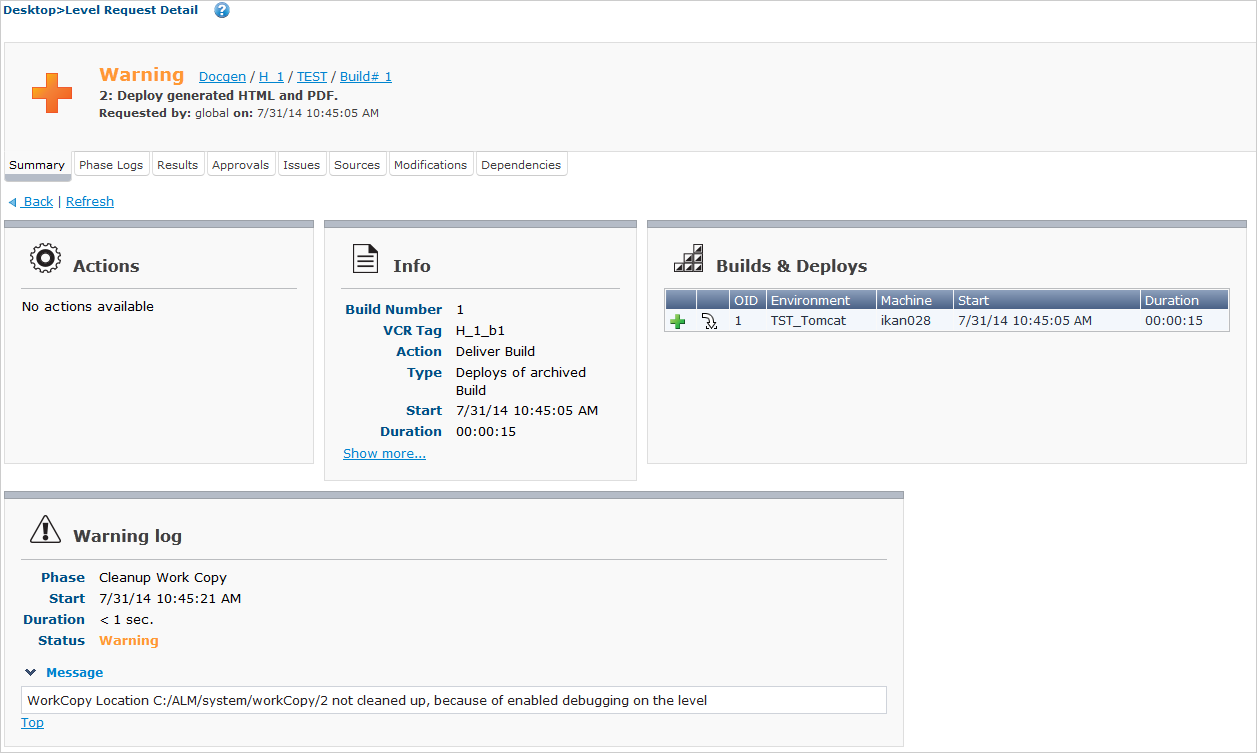
Level Request Detail
The header of the Level Request Detail screen displays information on the status of the Level Request. The different tab pages underneath the header display additional information such as the status of each of the Phases (on the Phase Logs tab).
This is how it should look when the Request is finished:

Select the Results tab page. This page shows the result of the Build executed by the IKAN ALM Agent on the Build Environment.
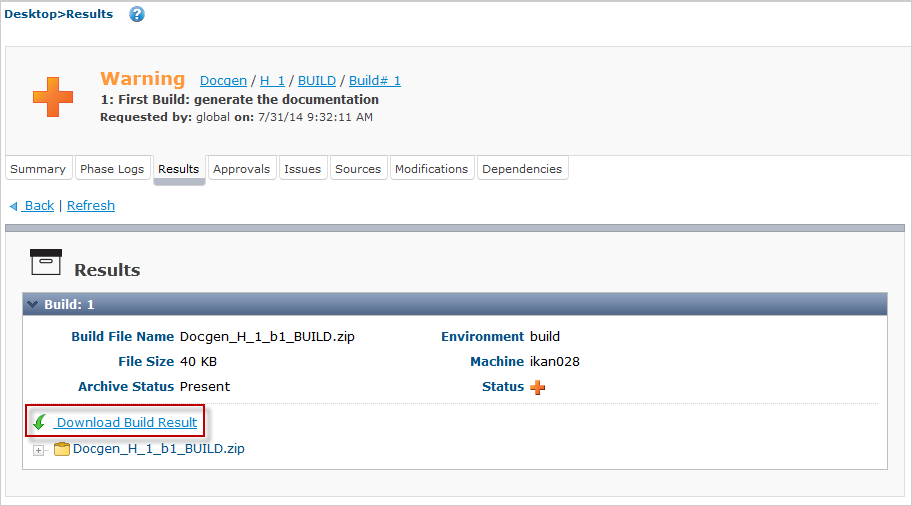
Click the Download Build Result link to download and check the Build Result.
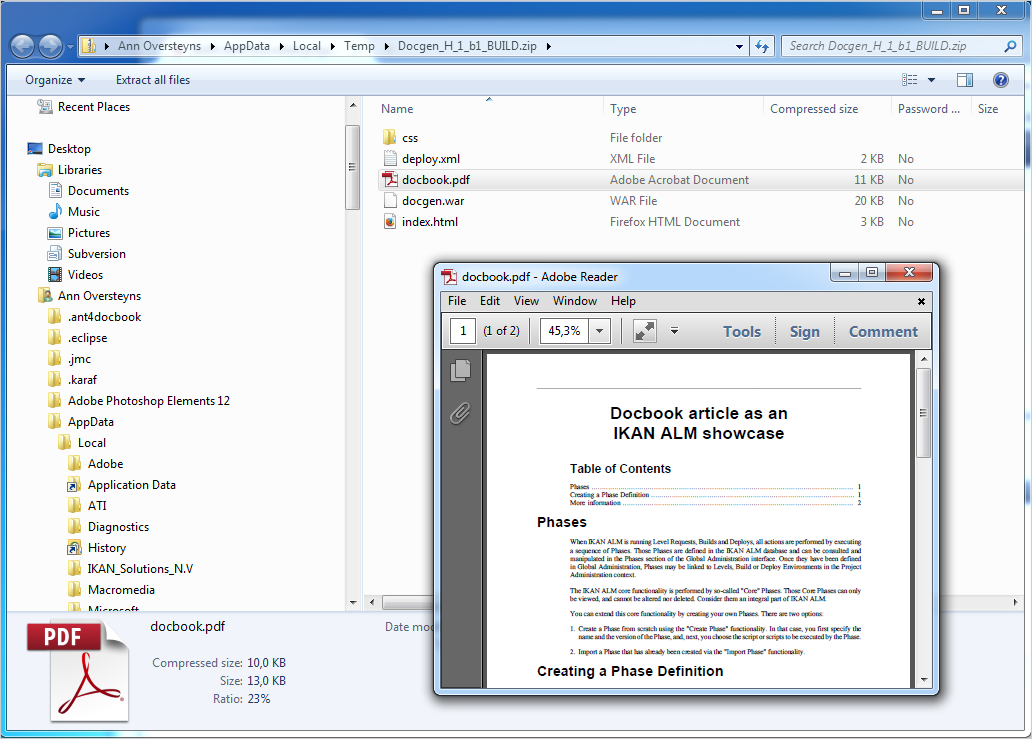
Open docbook.pdf/index.html to check if the conversion to PDF/HTML was successful. Also, have a look at the docgen.war that was created. That web archive will be used later on.
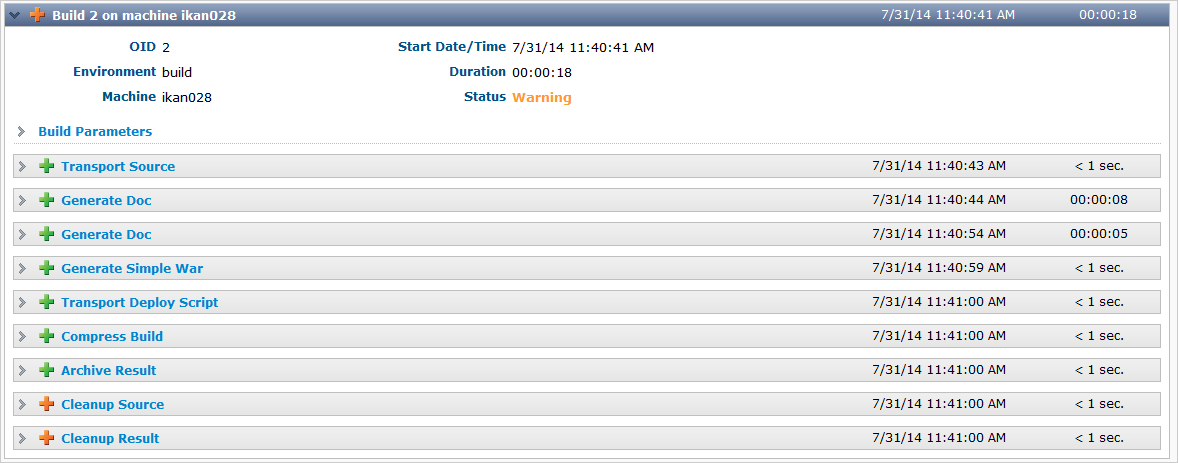
Build Phases Log
The different Build Phases form the workflow of a build. They are automatically created together with the Build environment.
Select the Phase Logs tab page. The grey lines on the overview represent the different Phases, the white lines represent the Build or Deploy actions.
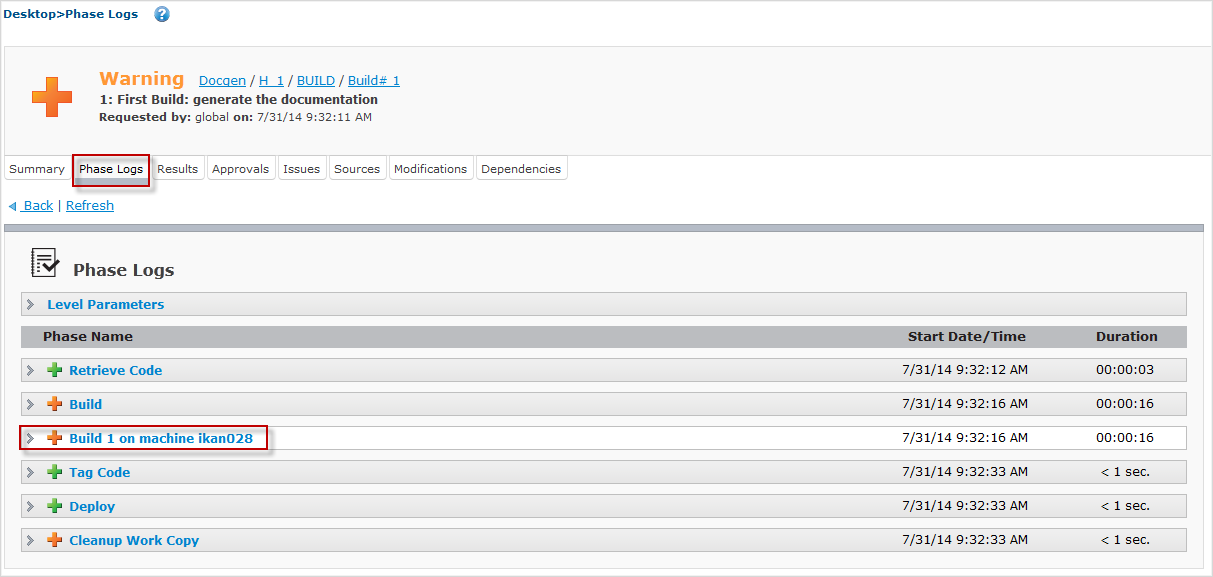
Click the Build name (in our example: Build 1 on machine ikan028) to expand the information panel displaying the Phase details.
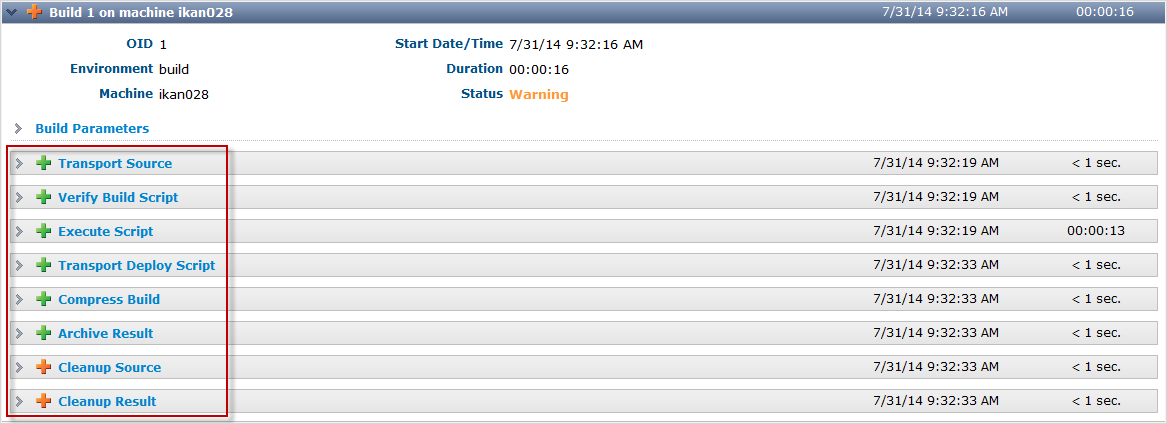
Next, you can click one of the Phases to immediately jump to its Phase Log.
The Execute Script Phase Log shows the result of the build.xml script executed by the Ant scripting tool.

Setting up the Test Level: Deploy to the Web Server
In the previous step, we have created the web archive docgen.war. Now, we want to deploy that to the web server which is running IKAN ALM, so that testers may have a look at it. Therefore we need an extra step in our lifecycle, namely a Test Level.
Creating the Test Level
In the Project Administration section, edit the Docgen Project.
Go to Lifecycles > Overview, edit the BASE Lifecycle and select the Create Test Level link at the bottom.
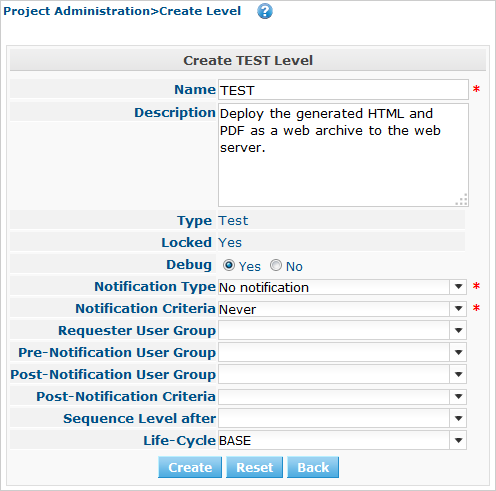
Creating a Test Level is pretty much the same as creating a Build Level. There are some extra fields for notification which we will neglect for the time being. The new Level will automatically be positioned after the Build level.
Creating the Deploy Environment
Just as for the Build Level, the Test Level is not more than a conceptual step in the Lifecycle. As we require a concrete Machine to deploy our Build result to, we need to link a Deploy Environment to the Level.
Select Create on the Deploy Environments submenu.

This is also very similar to creating a Build Environment.
The deploy will be executed by the IKAN ALM Agent on the selected Machine, and more precisely by the selected (1.9.3) ANT scripting Tool.
We indicate that we deploy the result of our Build Environment by linking it to our Deploy Environment.
The defined deploy.xml is an Ant script that you can inspect in the sources under /init_svn/source and that is also imported in the Subversion trunk of the Docgen project.
The script is not very complex: there’s a special target for a rollback which we neglect for now; the real action is in the deploy target where the web archive docgen.war will be copied to an appropriate directory (webapps) under the Tomcat target, and we will use the Tomcat manager app to “reload” our web archive.
In the source location the Build result previously created will be extracted. The target location must point to our Tomcat web server (TOMCAT_HOME). That’s where the deploy.xml script will transfer the build result (docgen.war) to.
|
If you installed the IKAN ALM Demo, this location will be similar to |
Don’t bother with the details on this, it just puts the generated HTML and PDF files on the web server so that we can browse to them!
Together with the Deploy Environment, Phases are also linked to it.
They will be executed when the Deploy of a Level Request will be executed on the IKAN ALM Agent.
You can check those Phases by selecting the ![]() _ Edit
Phases_ icon next to the Deploy Environment in the Deploy
Environments >Overview.
_ Edit
Phases_ icon next to the Deploy Environment in the Deploy
Environments >Overview.
Creating the Deploy Parameters for Authenticationon the Web Server Manager Application
If you already checked the deploy script, you perhaps noticed that some parameters need to be provided to the reload task applied to the Tomcat manager application: a URL, and a user and password for authentication.
The Tomcat manager application needs to be correctly configured so that authentication by a user with manager-rights is possible. Basically, this comes down to configuring TOMCAT_HOME/conf/tomcat-users.xml as follows:
  <role rolename="manager-script"/>  <user name="tomcat" password="tomcat" roles="tomcat,admin,manager-script"
/>  <user name="role1"  password="tomcat" roles="role1,admin,manager-script"
 />  <user name="both"   password="tomcat" roles="tomcat,role1,admin,manager-script" />
We need to restart Tomcat to have those settings applied. This can be done by running the shutdown and startup scripts (when Tomcat runs in a prompt/shell) or by stopping and starting the Tomcat service/daemon (when Tomcat runs as a Windows Service/Unix daemon). Check the Tomcat documentation for more information.
In order to provide the parameters to the script when it is executed, we will define them on our Deploy Environment.
Select Deploy Environments > Deploy Parameters.
On the Parameters Overview, click the ![]() _ Create
Parameter_ icon in front of the TST_Tomcat Deploy Environment.
_ Create
Parameter_ icon in front of the TST_Tomcat Deploy Environment.
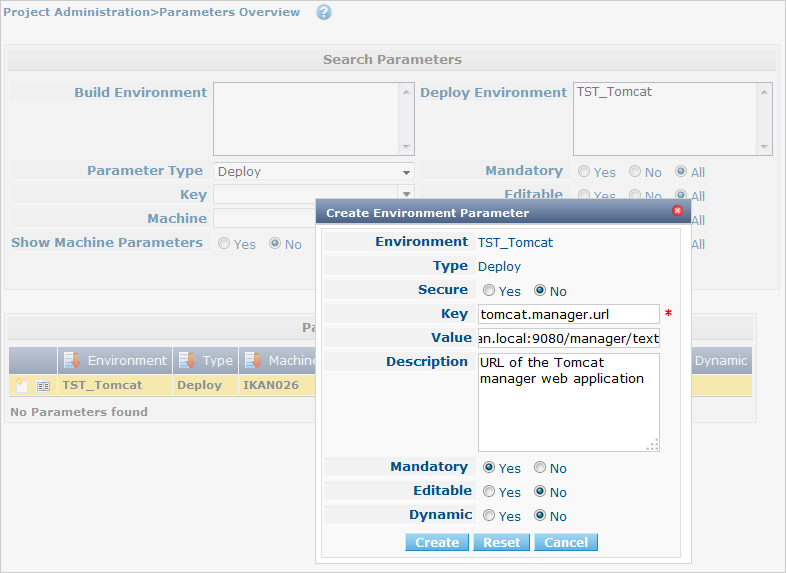
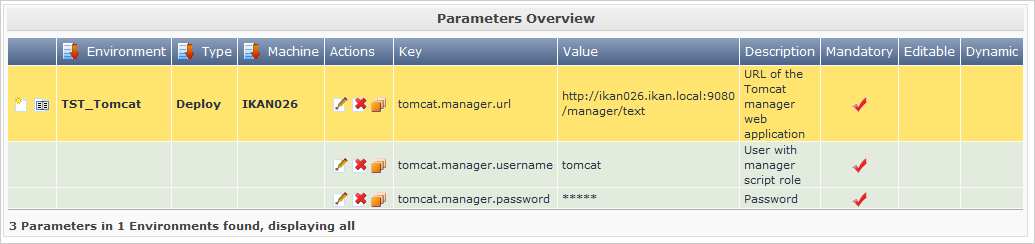
We will first create its URL in the tomcat.manager.url Parameter as a mandatory parameter.
It is using the same machine and port as the URL for the IKAN ALM web application (e.g., http://localhost:9080) followed by /manager/text.
Next, create the mandatory Parameters tomcat.manager.username (value tomcat) and tomcat.manager.password (value tomcat), and make the password a secure parameter (note that you have to enter the password twice).
Auditing the Project
Just as for the Build Level, we need to unlock the TST_Tomcat Level.
Select Audit Project from the menu and click the Unlock button after you verified the modified Project setup which now contains the Test Level with the TST_Tomcat Deploy Environment.
Creating the Deliver Level Request
Just like when we created the Build Level Request, we create the Deploy Level Request via the Desktop.
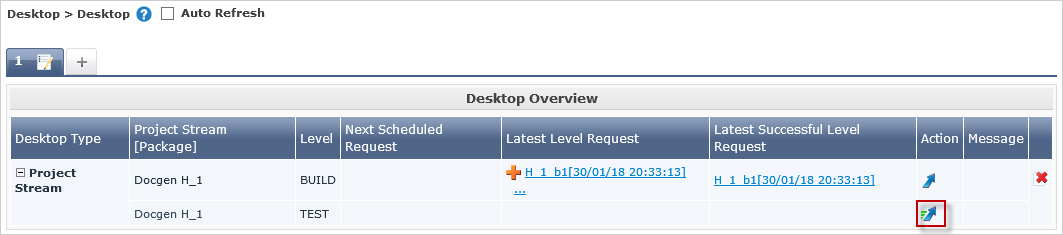
Select the ![]() _ Deliver_ icon in the Action Column of the Test Level to create the Deliver Level Request.
_ Deliver_ icon in the Action Column of the Test Level to create the Deliver Level Request.
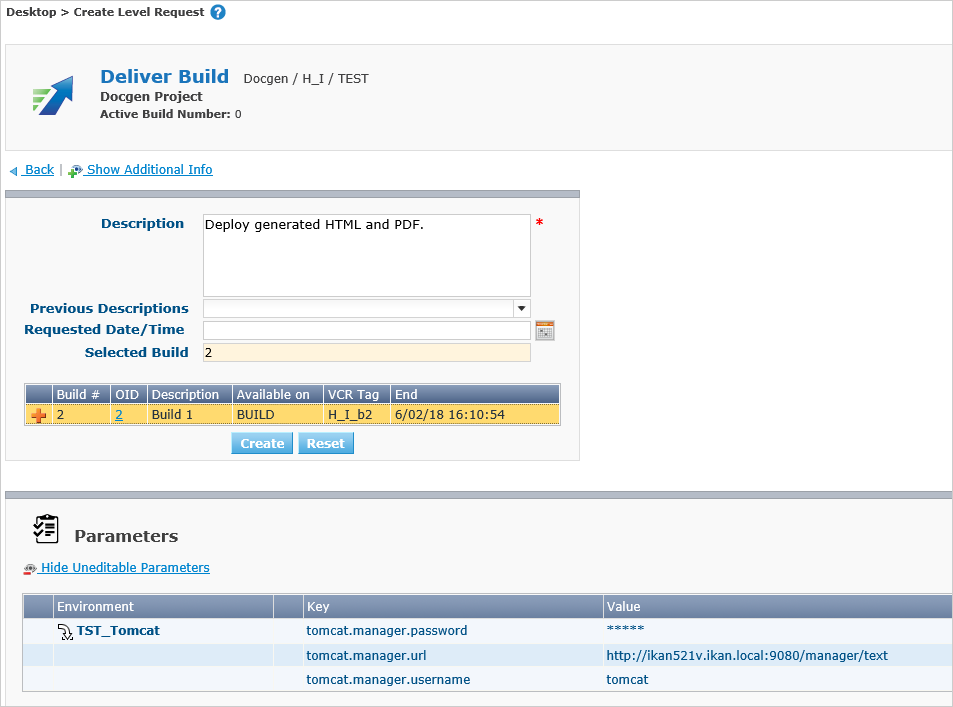
Provide a meaningful description, select the Build that was created earlier on our Build Level, and verify the Tomcat manager Parameters that we created on our Deploy Environment. If everything is OK, click the Create button.
Verifying the Deliver Level Request
Level Request Detail
The Detailed Overview for the Deploy Level Request is similar to the one for the Build Level Request. The differences are to be found in the Phases. If you expand the information panels for the Retrieve Code, Build and Tag Code Phases, you will notice that nothing happened since there is no Build Environment linked to it.
Note that the Deploy ended in warning. That is due to the fact that the Debug option is still set for the Level.
Deploy Phases log
The different Deploy Phases form the workflow of a Deploy. They are automatically created together with the Deploy environment.
Select the Phase Logs tab page. The grey lines on the overview represent the different Phases, the white lines represent the Build or Deploy actions.
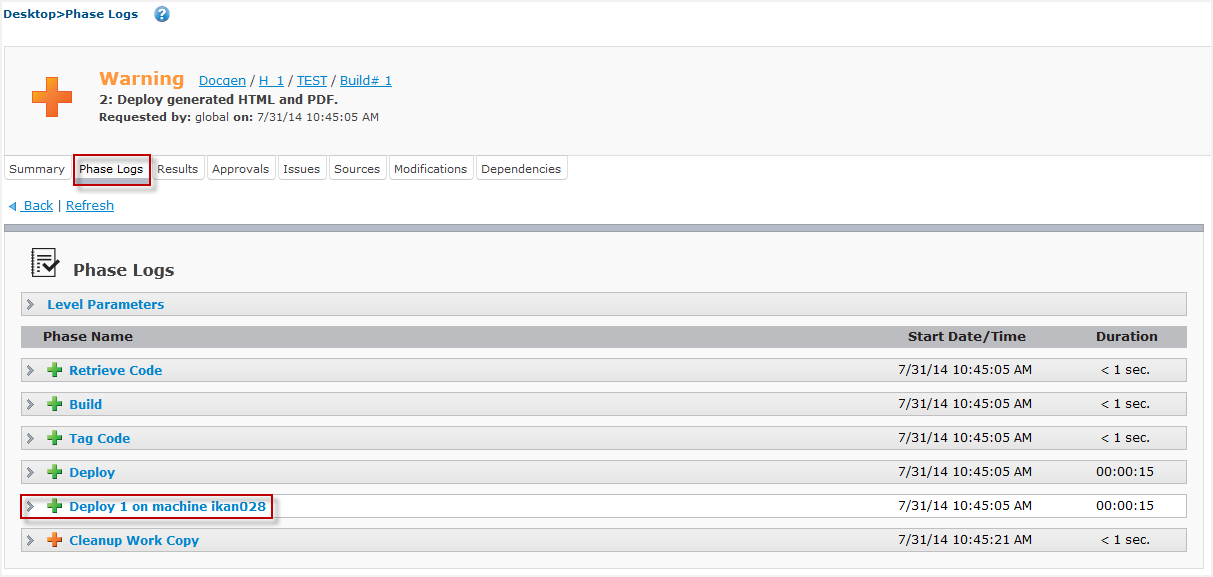
Click the Deploy name (in our example: Deploy 1 on machine ikan028) to expand the information panel displaying the Phase details.
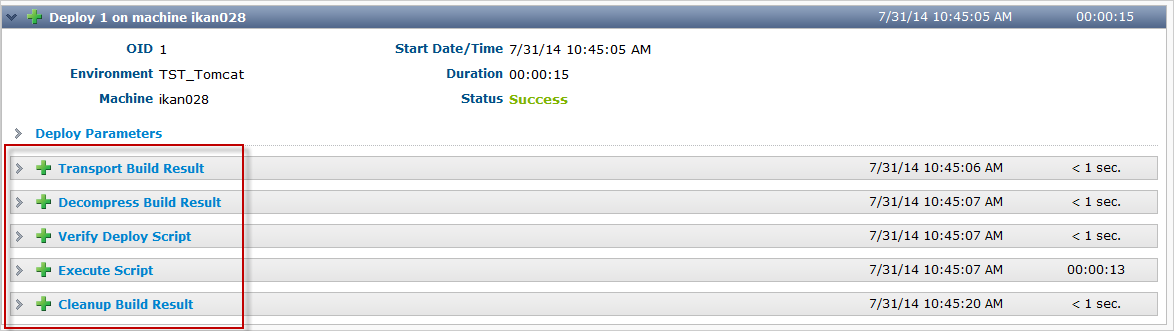
The most important Phase is the Execute Script Phase log where we can find the result of the deploy.xml script executed by Ant.
Click the Execute Script Phase to jump to its Phase Log.
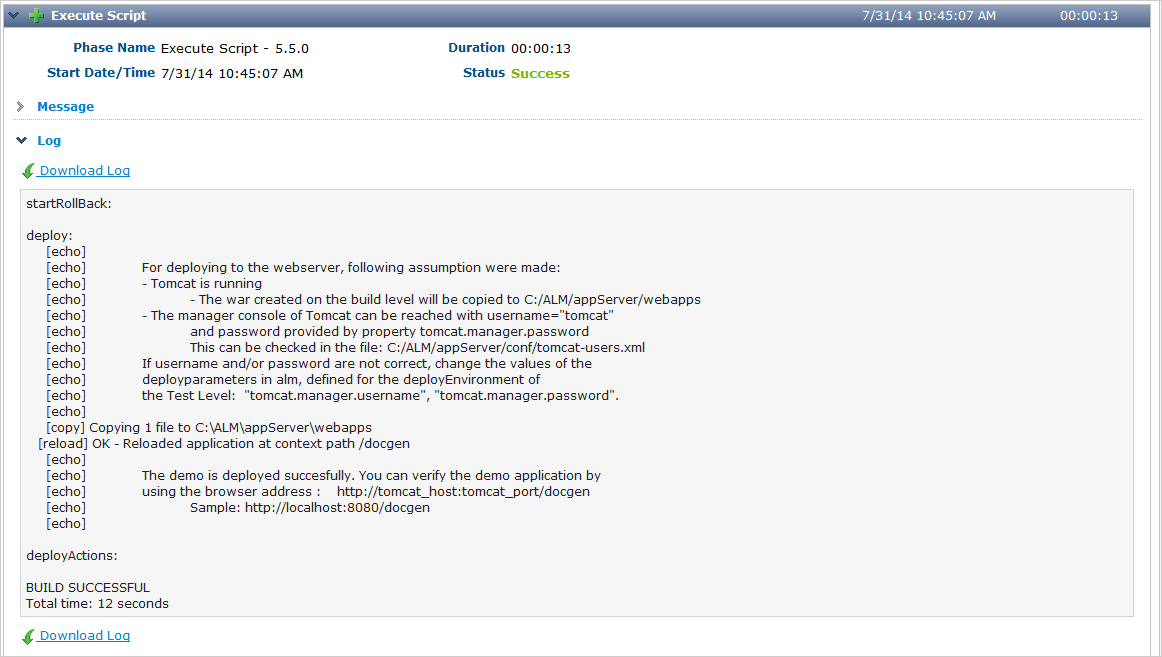
Check the final result on http://tomcat_host:tomcatport/docgen, e.g., http://localhost:8080/docgen.
Also, http://tomcat_host:tomcatport/docgen/docbook.pdf should open the PDF file we verified earlier in the downloaded Build result.
Phases
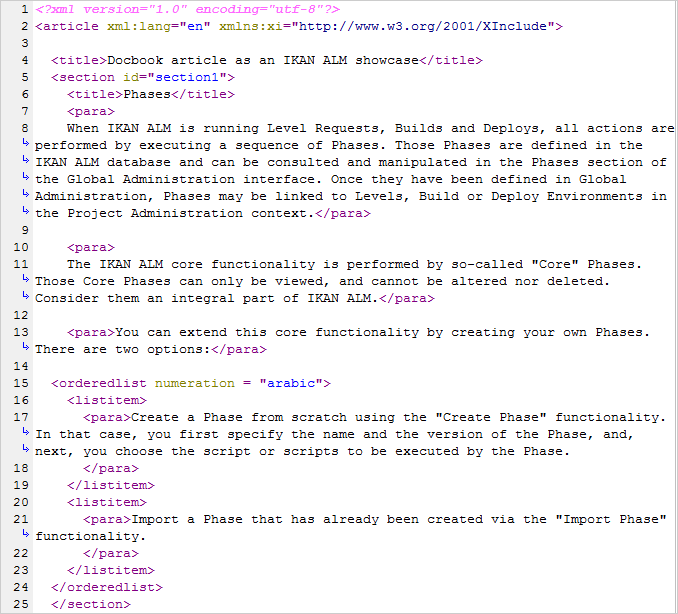
The work on Levels and Environments is done using Phases.
Phases represent specific tasks or actions that must be performed by the system. IKAN ALM comes with a set of “Core” Phases, but you can also create your own Custom Phases, which is even more interesting.
The main advantage of using Phases is that they allow you to customize your project’s workflow with reusable building blocks. On top of that, they can be shared and distributed onto local and remote machines.
Global Administration: Importing Phases
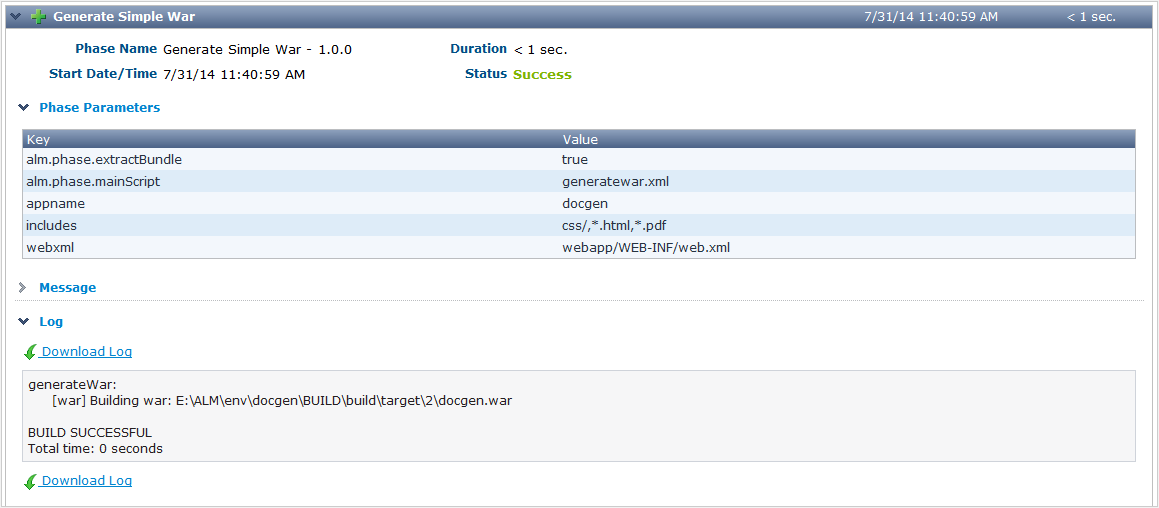
For our example, we created two Phases that take over the work done by the build.xml script: Generate Doc based on the docbook.xml and Generate a simple war.
You can find them in the extracted Getting Started.zip under /phases.
Let’s first import the Phases via Global Administration > Phases > Import.
Click the Select File button and pick the file associated with the Generate Doc phase (com.ikanalm.generate.doc-1.0.0.jar).
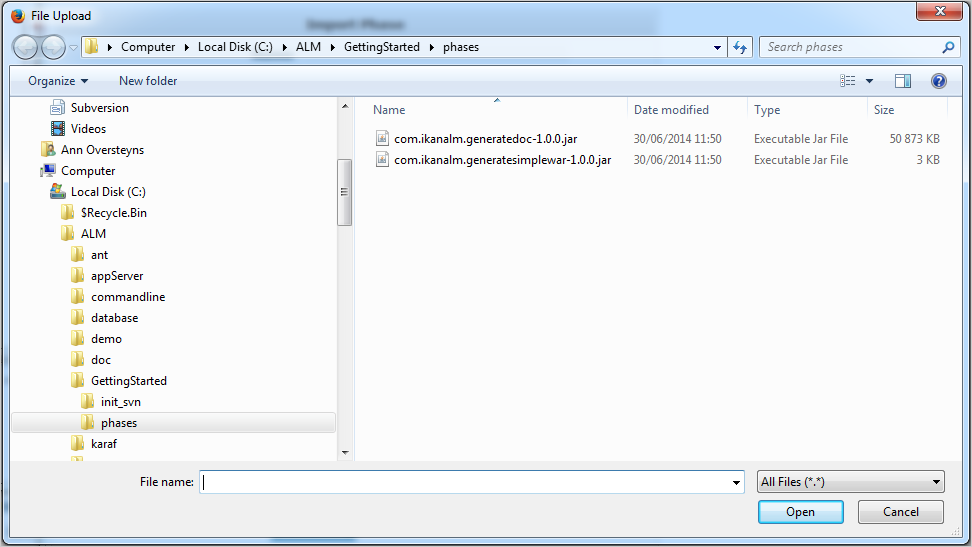
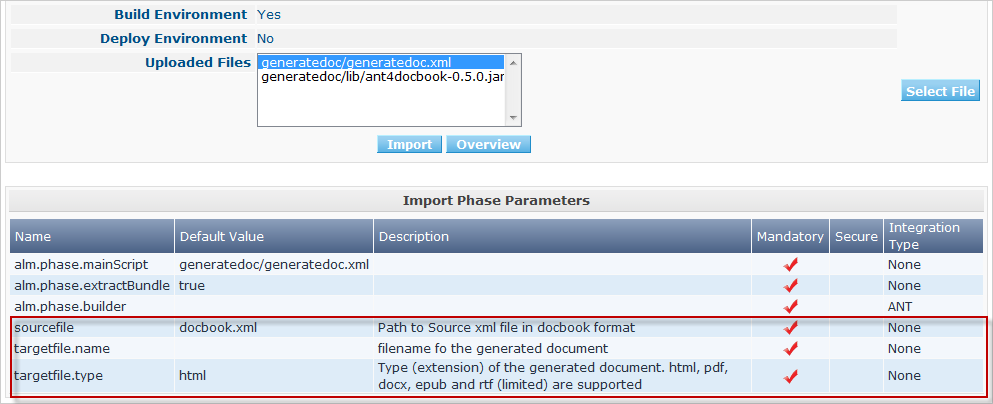
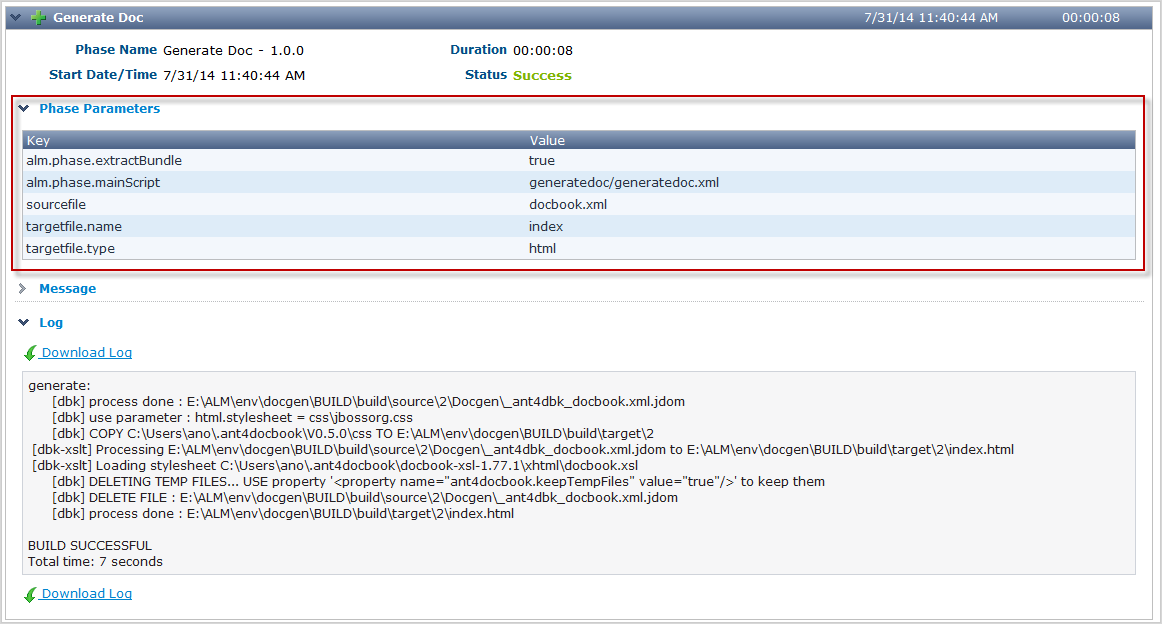
After the import, you will see all the information concerning the phase, the files contained in it (the generatedoc.xml, which is an Ant script, and the depending ant4docbook library), and the parameters, where sourcefile, targetfile.name and targetfile.type are specific for the Generate Doc phase.
Repeat the process for the Generate Simple War Phase.
Build Environment: Inserting and Configuring Phases
In the Docgen Project Administration section, select Build Environments > Overview.
Next, select the ![]() _ Edit
Phases_ icon, next to the “build” Build Environment.
_ Edit
Phases_ icon, next to the “build” Build Environment.
Since the Phases will replace our script, you may remove the Verify Build Script and Execute
Script Phases, by clicking the ![]() _ Remove_ icon on the Phases Overview.
_ Remove_ icon on the Phases Overview.
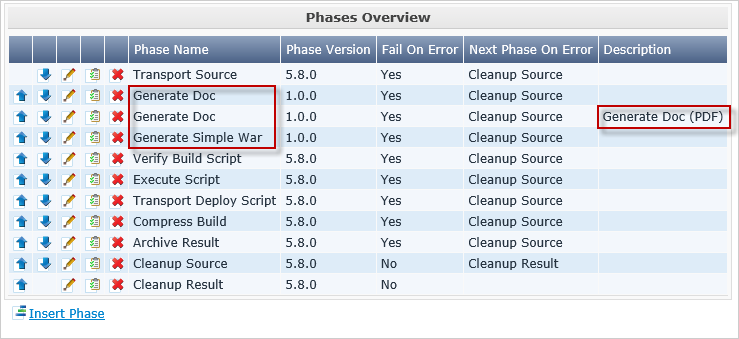
Now we can insert the required Phases. Click the Insert Phase link underneath the Phases Overview.
The Generate Doc Phase will generate the HTML:
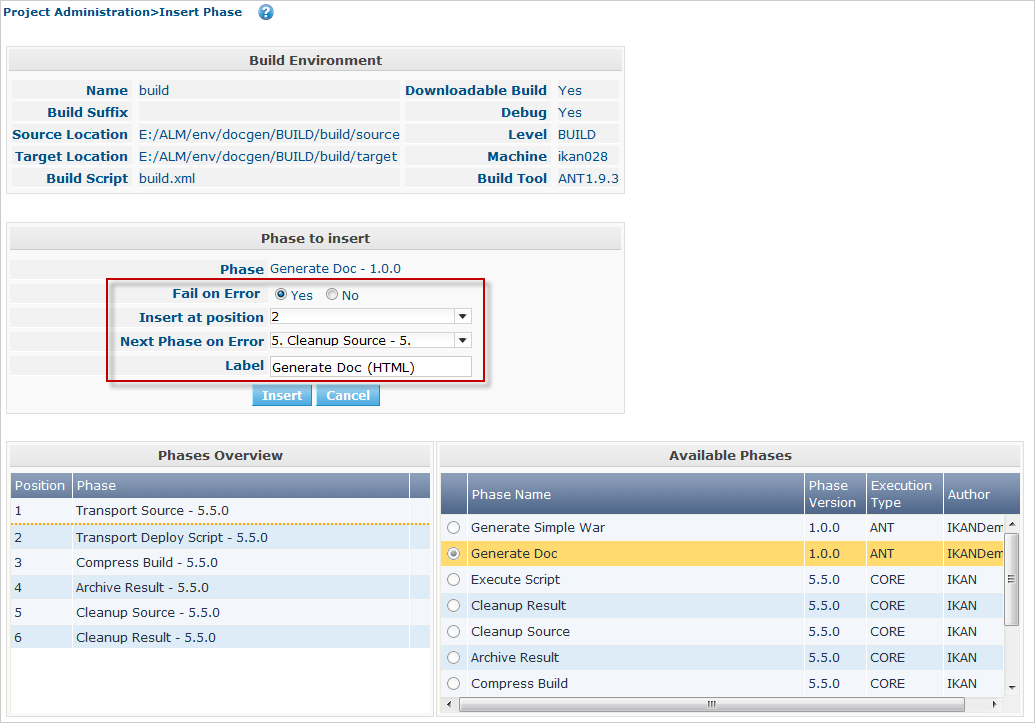
Select it from the Available Phases, set Fail on Error to Yes and insert it after Transport Source Phase (on position 2). When an error happens, we go immediately to the cleanup, by selecting the Cleanup Source Phase in the Next Phase on Error. As we will use the Generate Doc Phase twice, first to generate the HTLM file and next to generate the PDF file, we can add a label (in our example: Generate Doc (HTML)) to distinguish the two.
|
On the Phases Overview, the label is displayed as a tooltip when moving the mouse pointer over the eye icon in the last column. |
Repeat the steps to insert the Generate Doc Phase once again. Insert it after the previous: this will generate the PDF file. Use the same settings for Fail on Error (Yes) and Next Phase on Error (Cleanup Source) and add a label (for example: Generate Doc (PDF)).
Insert the Generate Simple War Phase after the second Generate Doc Phase.
Again, use the same settings for Fail on Error (Yes) and Next Phase on Error (Cleanup Source). As we only use this Phase once, adding a Label is not really necessary.
This will be the result in the Phases Overview:
For the Phases to work correctly, we have to adapt some of the specific parameters.
Click the ![]() _ View
Parameters_ icon in front of the Inserted Phases.
_ View
Parameters_ icon in front of the Inserted Phases.
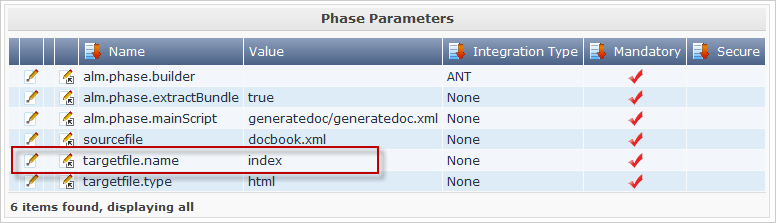
First we will adapt the parameters for the Generate
Doc Phase (the first one for generating the HTML file): click the ![]() _ Edit_ link next to targetfile.name and set its value to index.
The target.type is defaulted to html and must not be changed.
With those settings, the Phase will convert the source docbook.xml into an index.html file.
_ Edit_ link next to targetfile.name and set its value to index.
The target.type is defaulted to html and must not be changed.
With those settings, the Phase will convert the source docbook.xml into an index.html file.
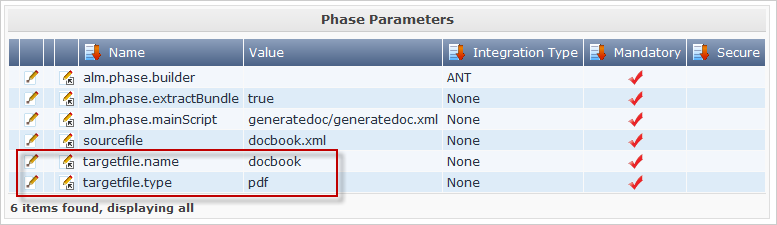
Adapt the second Generate Doc phase for generating the PDF file: targetfile.name = docbook, targetfile.type=pdf, which will result in the generation of a docbook.pdf file.
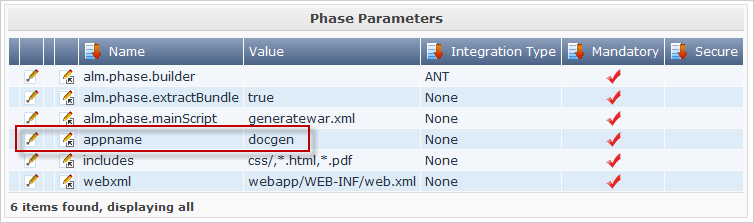
Now, adapt the Generate Simple War Phase: most of the parameters are fine, just set the appname parameter to docgen. With those settings a docgen.war will be generated, containing all files in the source css directory, and the HTML and PDF file that will be generated by the previous phases.
Our Phases are now inserted in the workflow of the Build Environment with the correct Parameter settings. Let’s see whether we get the same Build result.
Creating and verifying the Build Level Request
Go to your Desktop and create a Build Level Request.
Set the Level Request description to something like: “Test imported Phases”.
Verify the Build Level Request by clicking its link on the Desktop (see earlier): check the Level Request details, the Build File content and the Build Phases Log.
Generate Doc (HTML): click the Phase Parameters link to display the used parameters.
Generate Simple War:
Additional Information
In this Getting Started Guide you learned how to
-
define a Subversion repository,
-
create a Project,
-
set up the different Build and Test Levels,
-
execute requests to build and deploy the Project
-
and, last but not least, simplify your workflow by adding and customizing IKAN ALM Phases.
For more in-depth information, refer to the following types of documentation:
-
IKAN ALM User Guide
-
How to Guide - Using and Developing Custom Phases in IKAN ALM
-
IKAN ALM Installation Guides
You can find those documents on our website www.ikanalm.com.
If you still did not find all the answers to your questions, do not hesitate to contact us at info@ikanalm.com.