How To Guide: Integrating GitHub with IKAN ALM
Introduction
The IKAN ALM Issue Tracking functionality provides the possibility to link issues from an external issue tracking system to an IKAN ALM Level Request.
Issues can get linked to a Level Request in the following ways:
-
via an automatic search for handled issues in the comments provided by the developers when committing or checking in sources into the VCR. This automatic search is done in a separate phase during the handling of a Build Level Request, and is based on a regular expression describing the issue tracking number format. Currently, this is only supported for Subversion, Git, Team Foundation and CVS Version Control Repositories.
-
via the enumeration of solved issues when delivering to Test/Production levels enabling easy generation of Release Notes.
-
via manual addition of an issue to a successful Level Request, using the GUI widgets on the Level Request Detail screen.
|
You can only click through from a linked issue in IKAN ALM to the issue in the third-party Issue Tracking tool if the tool offers a web interface. |
On top of this basic Issue Tracking functionality, IKAN ALM offers a more advanced integration for Atlassian Jira, Microsoft Team Foundation Server (TFS), MicroFocus ALM and GitHub with following additional functionality:
-
possibility to test the connection with the Issue Tracking system at the moment you create or edit an Issue Tracking System definition
-
automatic synchronization of handled issues with the Issue Tracking system: IKAN ALM retrieves additional information, such as a short description, the owner, the priority, … from the corresponding Jira Issue, TFS Work Item, MF ALM Defect or GitHub Issue. This information is synchronized each time the build result evolves in the IKAN ALM lifecycle.
-
manual synchronization of issues linked to a Level Request on the Issues tab page of the Level Request Detail screen.
-
option to automatically add a comment to the issue/defect/artifact in Jira/TFS/MF ALM/GitHub after a successful Level Request. This comment will contain a link to the IKAN ALM Level Request.
In this document we will focus on how to set up the GitHub integration of IKAN ALM. First, we will describe how to set up GitHub so that IKAN ALM can connect to it. Next, we will explain how to create an Issue Tracking System in IKAN ALM that represents your GitHub system. After that, we will describe the steps needed to enable GitHub integration in an IKAN ALM Project. Finally, we will give some detailed background information about IKAN ALM’s integration with Issue Tracking Systems.
GitHub Configuration and Prerequisites
Generate an API Token
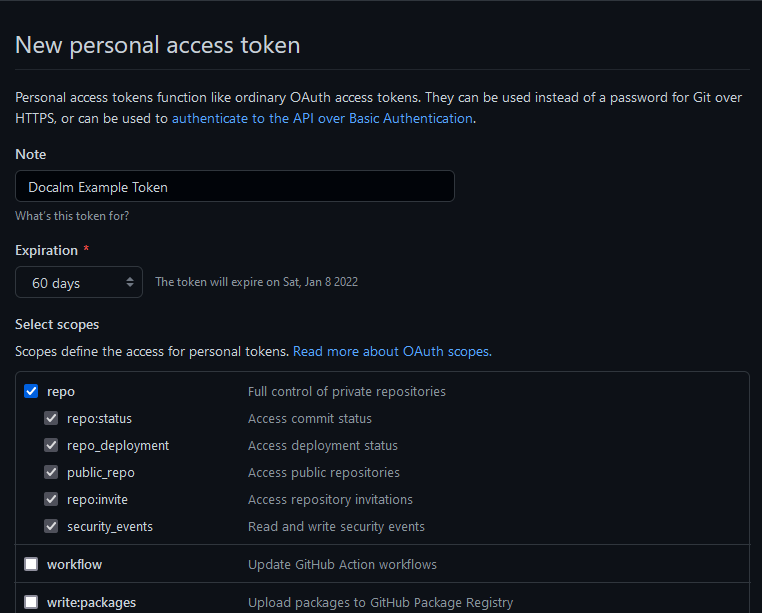
GitHub requires an API token to authenticate with the GitHub REST API. To generate this token for GitHub:
-
Log in as the user you want to use to authenticate with GitHub.
-
Click "Create API token".

-
Enter a memorable name, choose an Expiration time, select the "repo" scope and click create.
-
Copy this token somewhere secure. You will need it later.
Creating an Issue Tracking System in IKAN ALM
You must create an Issue Tracking System in IKAN ALM that represents your GitHub system before you can assign and use it in an IKAN ALM Project.
-
Log on as an IKAN ALM Administrator, and select Global Administration > Issue Tracking > Create Issue Tracking System.
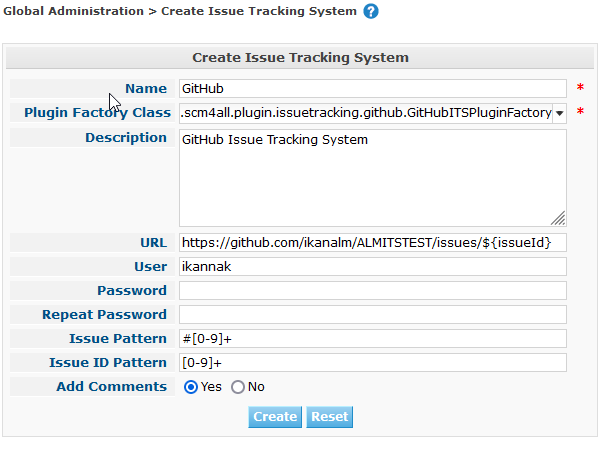
The Create Issue Tracking System screen is displayed:
-
Fill out the fields in the Create Issue Tracking System panel. Fields marked with an asterisk are mandatory.
Field Description Name
The name of the Issue Tracking System, like "GitHub"
Plugin Factory Class
The fully qualified name of the Java Class that can produce IKAN ALM Issue Tracking System Plugin implementations.
You can select a value from the list or type in your own class name .
For GitHub, select "be.ikan.scm4all.plugin.issuetracking.github.GitHubITSPluginFactory"
Description
A meaningful description, like "GitHub Issue Tracking System for project"
URL
The direct URL to the details of 1 Issue. In the URL, the Key of the Issue is represented by the variable ${issueId}.
For GitHub, this URL should take the form of:
https://github.com/ORGANIZATION/REPOSITORY/issues/${issueId}User
The GitHub user that IKAN ALM will use to connect to GitHub
Password
The password of the GitHub user that IKAN ALM will use to connect to GitHub.
This can be left empty since GitHub does not support password based authentication.
Issue Pattern and Issue ID Pattern
Both fields should contain a regular expression that IKAN ALM uses to find Issue keys in the VCR commit messages. Issue Pattern is the pattern to find a reference to an Issue in the commit text, Issue ID Pattern is the pattern to find the actual Issue ID (or key) inside the matched Issue reference.
Since GitHub uses the same format to list issues for all users, the Issue Pattern should always be
#[0-9]+and thee Issue ID Pattern should always be[0-9]+.Add Comments
If you set this to “Yes”, then IKAN ALM will add a comment to an Issue when it is linked to an IKAN ALM Level Request. See later for a more detailed explanation.
-
Once you have filled out the fields, click Create.
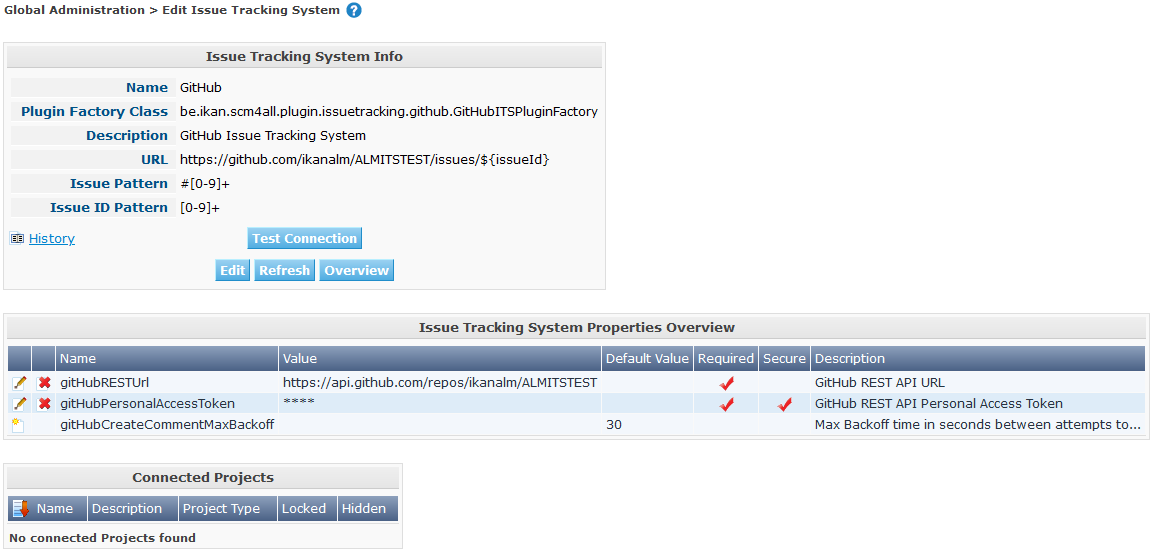
You will be redirected to the Edit page for the GitHub Issue Tracking System you just created, and a warning will be displayed at the top of the page:
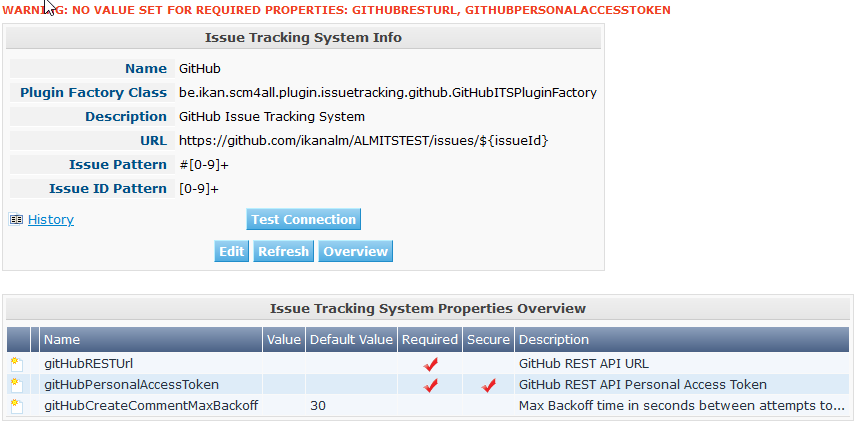
This warning is displayed because the GitHub Issue Tracking System plugin has two properties that needs to be set: gitHubRESTUrl and gitHubPersonalAccessToken. gitHubRESTUrl represents the GitHub REST API URL and is needed by IKAN ALM for its connection with GitHub. gitHubPersonalAccessToken represents the access token generated during GitHub preparation and is needed by IKAN ALM to authenticate to GitHub.
-
Next, click the
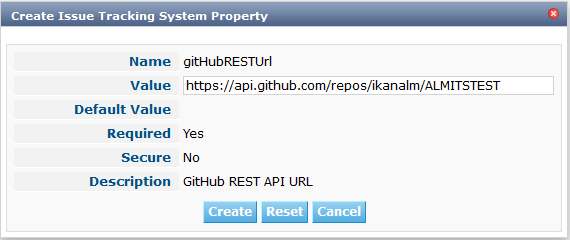
 Create link next to the gitHubRESTUrl property.
 -
Specify the value for the REST API URL.
The valid value for this endpoint is always of the format
https://api.github.com/repos/${ORGANIZATION}/${REPOSITORY}, with ORGANIZATION and REPOSITORY depending on the setup of the GitHub repository. -
Click Create to confirm the creation of the Property and close the dialog.
-
repeat steps 4 through 6 for the gitHubPersonalAccessToken property, using the Personal Access Token generated during GitHub preparation.
-
The warning about the missing values should now have disappeared.
-
Test whether IKAN ALM can connect with GitHub by clicking the Test Connection button.
If the test is not successful, correct the errors reported in the Stack Trace field and perform the test again.
Now that we have defined a GitHub Issue Tracking System, we can start using it in our IKAN ALM Projects.
For that we need to link the Issue Tracking System to a Project.
Linking an Issue Tracking System to a Project
-
Log on as an IKAN ALM user that has administrator access to the Project to be linked.
-
Go to Project Administration and select the Project from the Projects Overview.
-
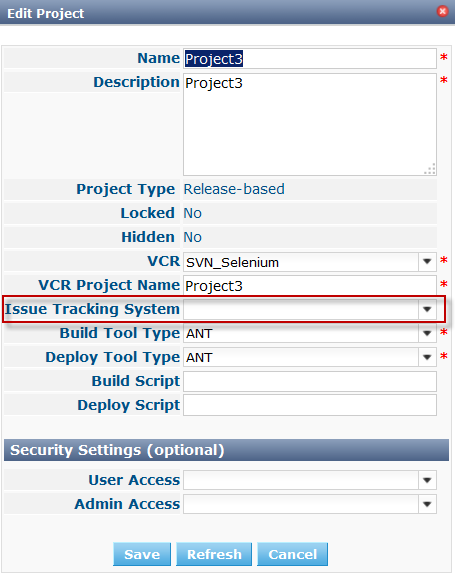
Underneath the Project Info panel, click the Edit button.
-
Select the created Issue Tracking System from the “Issue Tracking System” drop-down box and click the Save button.
Next, we need to add an "Issue Tracking Phase" to each existing Level. This is crucial, because all Issue Tracking related operations performed by IKAN ALM are executed during this Issue Tracking Phase. If a Level has no Issue Tracking Phase, then no issues are linked to Level Requests of that Level, and no comments are added to the issues!
-
For each existing Level in the Project, you must do the following:
We only need to perform this procedure for Levels created before the Project was linked to an Issue tracking System. Levels created after an Issue Tracking System has been linked will get the Issue Tracking Phase by default!
-
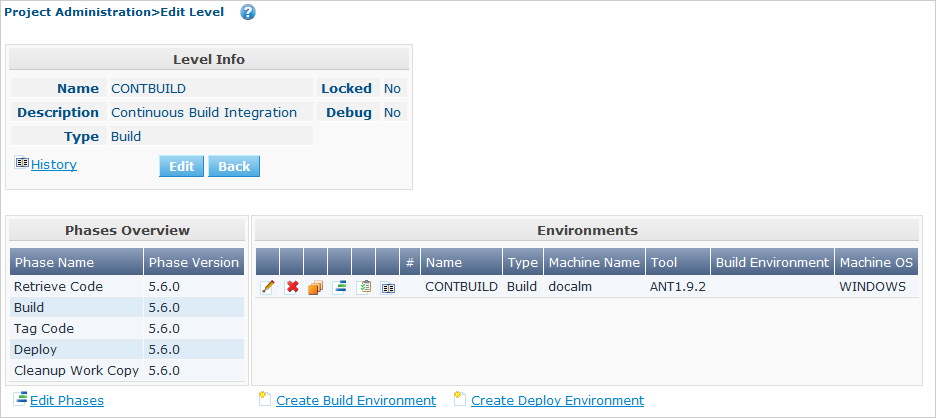
Edit the Level, either from the Levels Overview or from the Lifecycles Overview page.
-
Next, click the
 Edit Phases link underneath the Phases Overview.
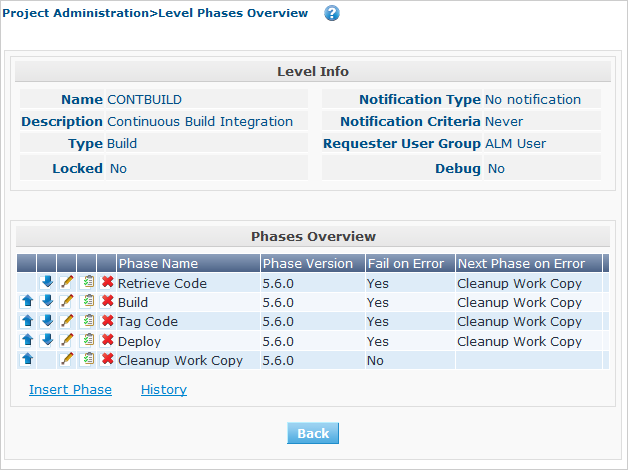
-
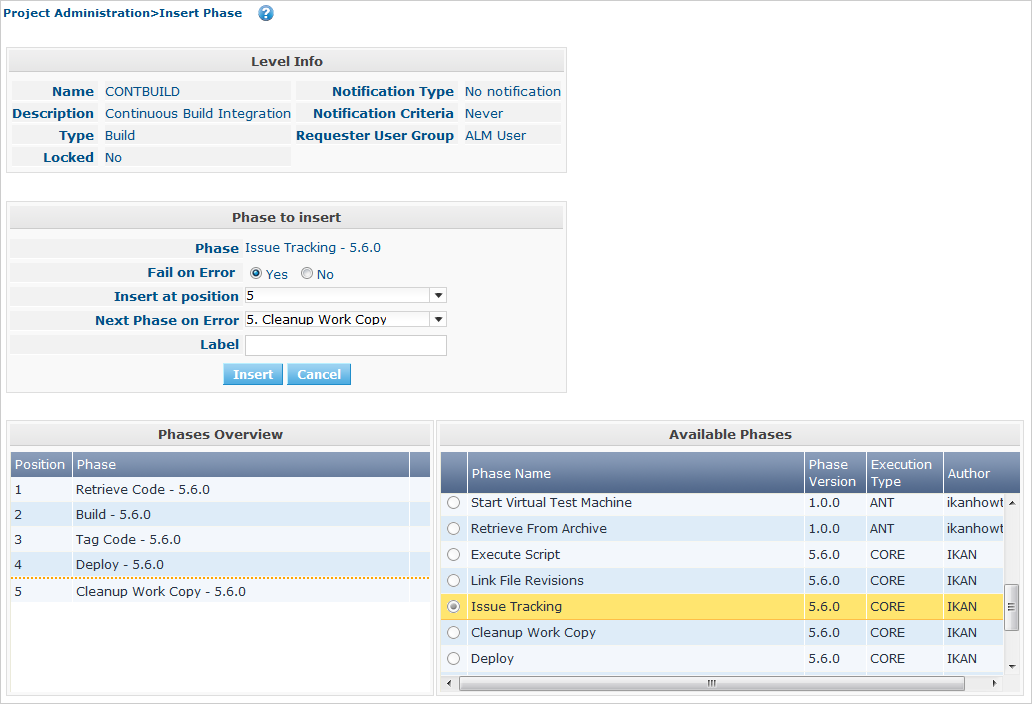
Next, click the Insert Phase link.
The Insert Phase screen is displayed.
-
Fill out the fields for the new Phase.
The following fields are available:
Field Meaning Phase
From the Available Phases panel, select the Level Phase to add.
Fail on Error
In this field, indicate whether the Level Request is considered failed when this Phase goes in Error.
Insert at Position
This field indicates at which position the Phase will be inserted into the Level workflow. The Phase Position is also indicated on the Phases Overview panel. It is a good practice to insert the Issue Tracking Phase before the Cleanup Work Copy Phase.
Next Phase On Error
This field indicates the next Phase to execute in case this Phase goes in Error. It is recommended to select the Cleanup Work Copy Phase.
Label
In this field you can add a Label for the Phase to be inserted.
In case you use the same Phase several times, adding a label is useful to provide additional information concerning the usage of the Phase.
-
Click Insert to confirm the creation of the new Phase.
-
Integrating an External Issue Tracking System
This section provides detailed information on how IKAN ALM integrates with an external Issue Tracking system. More specifically, it describes what tasks are performed by the IKAN ALM Issue Tracking Phase that is executed during a Level Request.
Issue Tracking Phase log
As said before, all Issue Tracking related operations are performed during the Issue Tracking Phase. The logs produced by these operations can be consulted in the IKAN ALM user interface, on the Phase Logs tab of the Level Request Detail page:
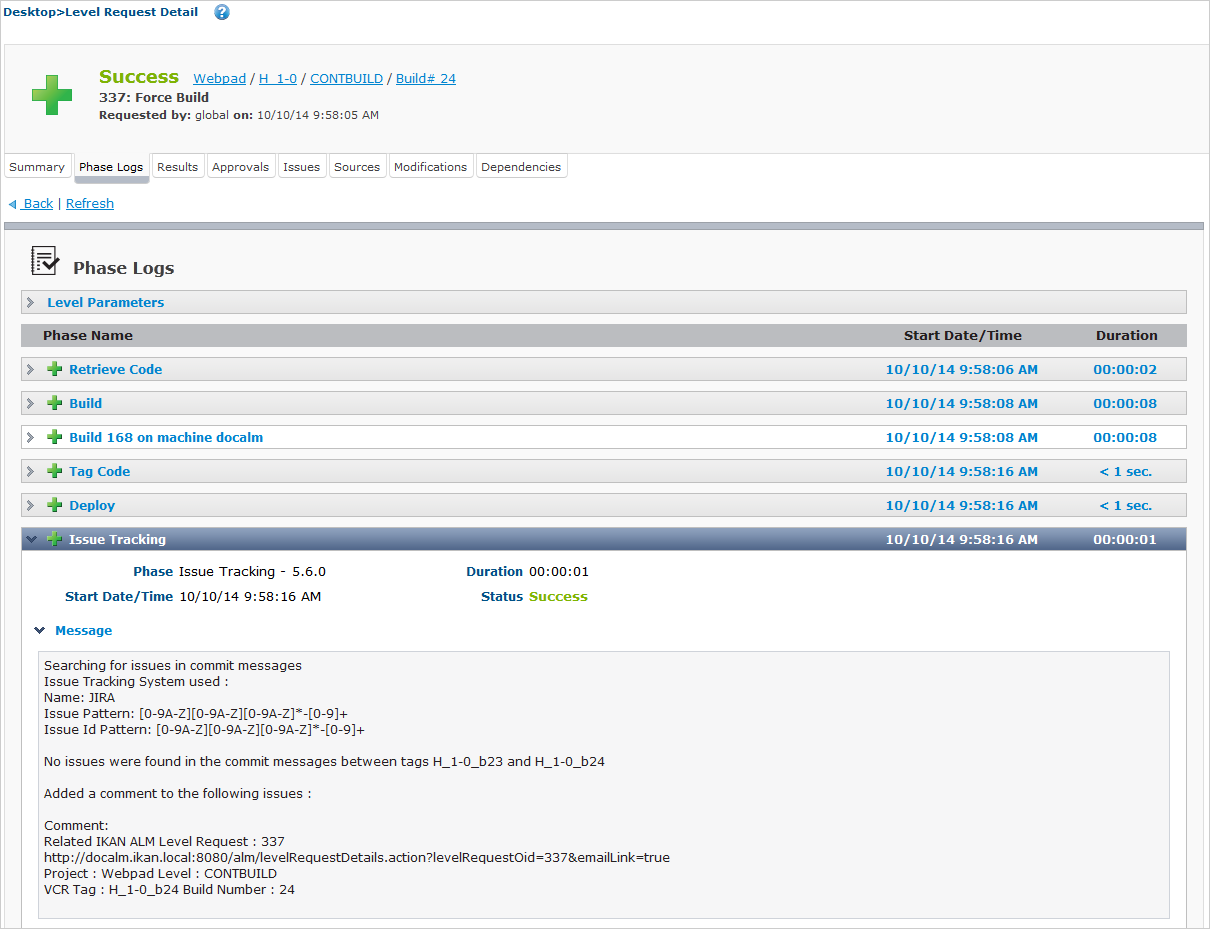
The "Message" field contains the log messages of the operations performed by the Issue Tracking Phase.
Build Level Requests
A Build Level Request is a Level Request of a Build Level. A Build Level Request will typically retrieve the latest source code from the VCR (Version Control Repository), build it, and then label it in the VCR for later reference.
The Issue Tracking Phase in a Build Level Request performs the following operations:
-
parse the VCR commit messages and find references to issues,
-
link the identified issues to the Level Request,
-
synchronize the data of the linked issues with the most recent information present in GitHub
First, the messages are retrieved from commits performed since the latest successful Level Request. In these messages, Issue IDs (Keys) are searched for using the patterns defined in the Issue Tracking System (Issue Pattern and Issue ID Pattern fields). The pattern-matching is case-insensitive.
From the found issues, duplicates are removed, and they are linked with the current Level Request.
Finally, IKAN ALM tries to match the issue in the GitHub repository. If the issue is found, the description, status, owner, owner and priority is retrieved from GitHub, and this information is stored in the IKAN ALM representation of the Issue.
Deliver, Re-deliver and Rollback Level Requests
When you create a Level Request for a Test or Production Level, in IKAN ALM terminology that means you “Deliver” to that Test or Production Level. The “Current Active Build” of a Level is the last successfully delivered Build on that Level.
We speak of a “Deliver Level Request” when you Deliver a Build with a build number that is higher than the Current Active Build on that Level.
We speak of a “Re-deliver Level Request” when you Deliver a Build with a build number that is the same than the Current Active Build on that Level.
We speak of a “Rollback Level Request” when you Deliver a Build with a build number that is lower than the Current Active Build on that Level.
The Issue Tracking Phase in a Deliver Level Request performs the following operations:
-
Find the Issues that were linked to Build Level Requests executed since the last successful Deliver Level Request
-
Link the Issues from all these Build Level Request to the current Deliver Level Request, eliminating duplicates
-
synchronize the data of the linked issues with the most recent information present in GitHub
For a Re-deliver or a Rollback Level Request there always exists a previous Deliver Level Request. Instead of enumerating through all Build Level Requests, the Issues are copied from the previous Deliver Level Request, and finally their data synchronized with the most recent information present in GitHub.
It is important to understand that in Deliver, Re-deliver and Rollback Level Requests issues are always linked by “copying” them from other Level Requests, either from Build Level Requests or other Deliver Level Requests. Issues are never parsed from the commit messages when running Deliver, Re-deliver or Rollback Level Requests!
An example may help to clarify things.
Suppose the following set of chronological Level Requests (LR):
-
Build LR producing Build 1: issue1 is parsed from the VCR comments
-
Build LR producing Build 2: issue 2 is parsed from the VCR comments
-
Deliver LR, delivering Build 2: issue1 and issue2 are linked (from the 2 previous Build Level Requests)
-
Build LR producing Build 3: issue 3 is parsed from the VCR comments
-
Build LR producing Build 4: issue 4 is parsed from the VCR comments
-
Deliver LR, delivering Build 4: issue3 and issue4 are linked (from the 2 previous Build Level Requests)
-
Re-Deliver LR (re-delivers Build 4): issue3 and issue4 are linked (copied from the Deliver Level Request that delivered Build 4)
-
Rollback LR rolls back to Build 2: issue1 and issue2 are linked (copied from the Deliver Level Request that delivered Build 2)
Add Comments
Apart from retrieving information from GitHub and linking it in IKAN ALM, information about IKAN ALM Level Requests is also sent to GitHub, in the form of comments to GitHub Issues. Whether comments are added or not is controlled by the "Add Comments" field of the IKAN ALM Issue Tracking System.
The issue comments are currently not configurable, and look generally like this:
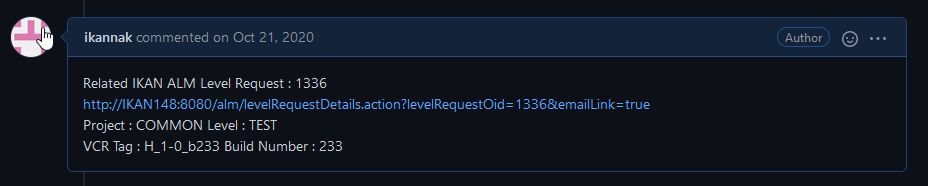
As you can see, the Issue comment contains a direct link to the related IKAN ALM Level Request, making it easy for users to see the details of a Build that addresses the Issue.
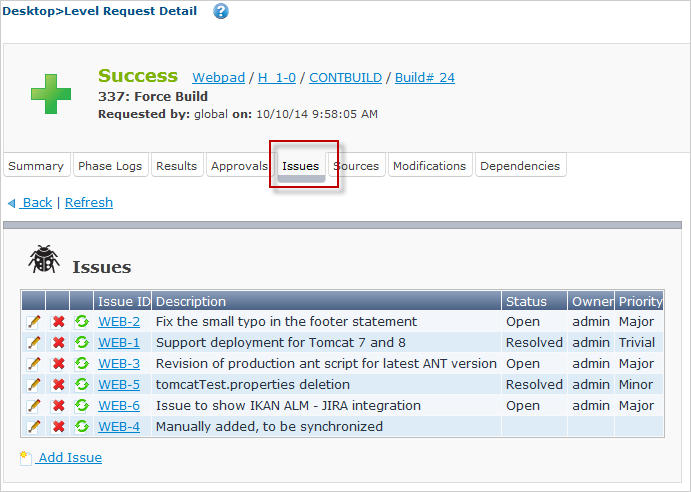
Manual Editing and Synchronization of Issues
Automatic linking and synchronization of Issues is only as good as the quality of the matching patterns and the quality of the commit messages. Sometimes issue references are forgotten in commit messages, not all issue IDs parsed from the messages, or invalid issue IDs parsed (false positives). In these cases it may be needed to manually add, edit, delete and/or synchronize Issues.
Luckily, all these functions are available in the IKAN ALM user interface, on the Issues tab page of the Level Request Detail page.
For more detailed information, refer to the IKAN ALM User Guide.
Troubleshooting
Generally, you should use the "Test Connection" button on the “Edit Issue Tracking System” page. Examine the errors reported in the Message and Stack Trace fields, they should contain helpful information. The other problems mentioned here assume the "Test Connection" did not report any errors.
No Issues are added to the Level Request
Issues are expected to have been linked to the Level Request, but the Issues page on the Level Request Detail screen does not show them.
Possible causes:
-
The Level of the Request doesn’t have the Issue Tracking Phase added. Is the Issue Tracking Phase displayed on the Phase Logs page of the Level Request Detail screen? If not, edit the phases of the Level and add the Issue Tracking Phase. Linking an Issue Tracking System to a Project
-
The Issue Tracking Phase failed. Check the Issue Tracking Phase log for errors.
-
The Issue Tracking Phase succeeded, but no issues were parsed. Check the log, it should mention the patterns used, the VCR tags it used to search for commit messages, and the issues it detected.