Using Phase Parameters
Purpose
This document is intended for advanced users of IKAN ALM.
It describes how to optimize the use of the IKAN ALM Phase Parameters.
IKAN ALM Phases
IKAN ALM Phases are predefined, parameter-driven, reusable building blocks. They represent specific tasks or actions that are executed to automate the Lifecycle Management Process.
For more general information on IKAN ALM Phases, refer to the appendix Phases - General Information in the IKAN ALM User Guide or the document Using and Developing Phases. Both can be found on the IKAN ALM website.
IKAN ALM Setup - example
Throughout this document, we will use the following IKAN ALM setup to illustrate the different aspects of defining and refining the value of the Phase Parameters.
In our setup, we have two Machines and on each of them one or more Environments have been defined. Machine 1 is using three Environments, for Build, Test and Acceptance, and Machine 2 is being used for Production.
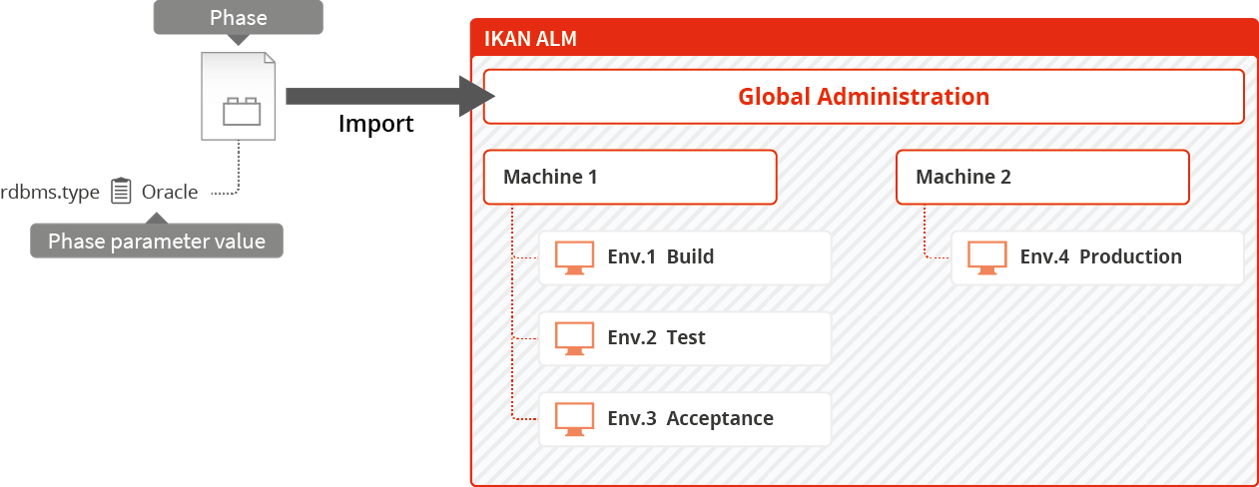
Each Environment uses one or more Phases.
When you import the Phase into IKAN ALM, the initial parameter values from the script are set in the Global Definition of the Phase. The first thing to do will be to verify and adapt those values to your own configuration.
Next, you link the Phase to the Build and/or Deploy Environments where you want to use the Phase. The initial values will be set as the values of the Environment Phase Parameters.
When that is done, and if required, you can refine the parameter values on Machine and Environment level. On top of that, Machine and Environment Parameter can be defined as editable and dynamic so hat their value can be chosen at the moment the Phase is executed.
As the Environment Phase Parameter value is the value that will be used when creating the Level Request, you might need to override that value by the value of the Machine or Environment Parameter value.
How all that is done, is explained in the remaining of this document:
Step-by Step Overview
The process of defining and refining the parameter values in IKAN ALM can be schematised as follows.
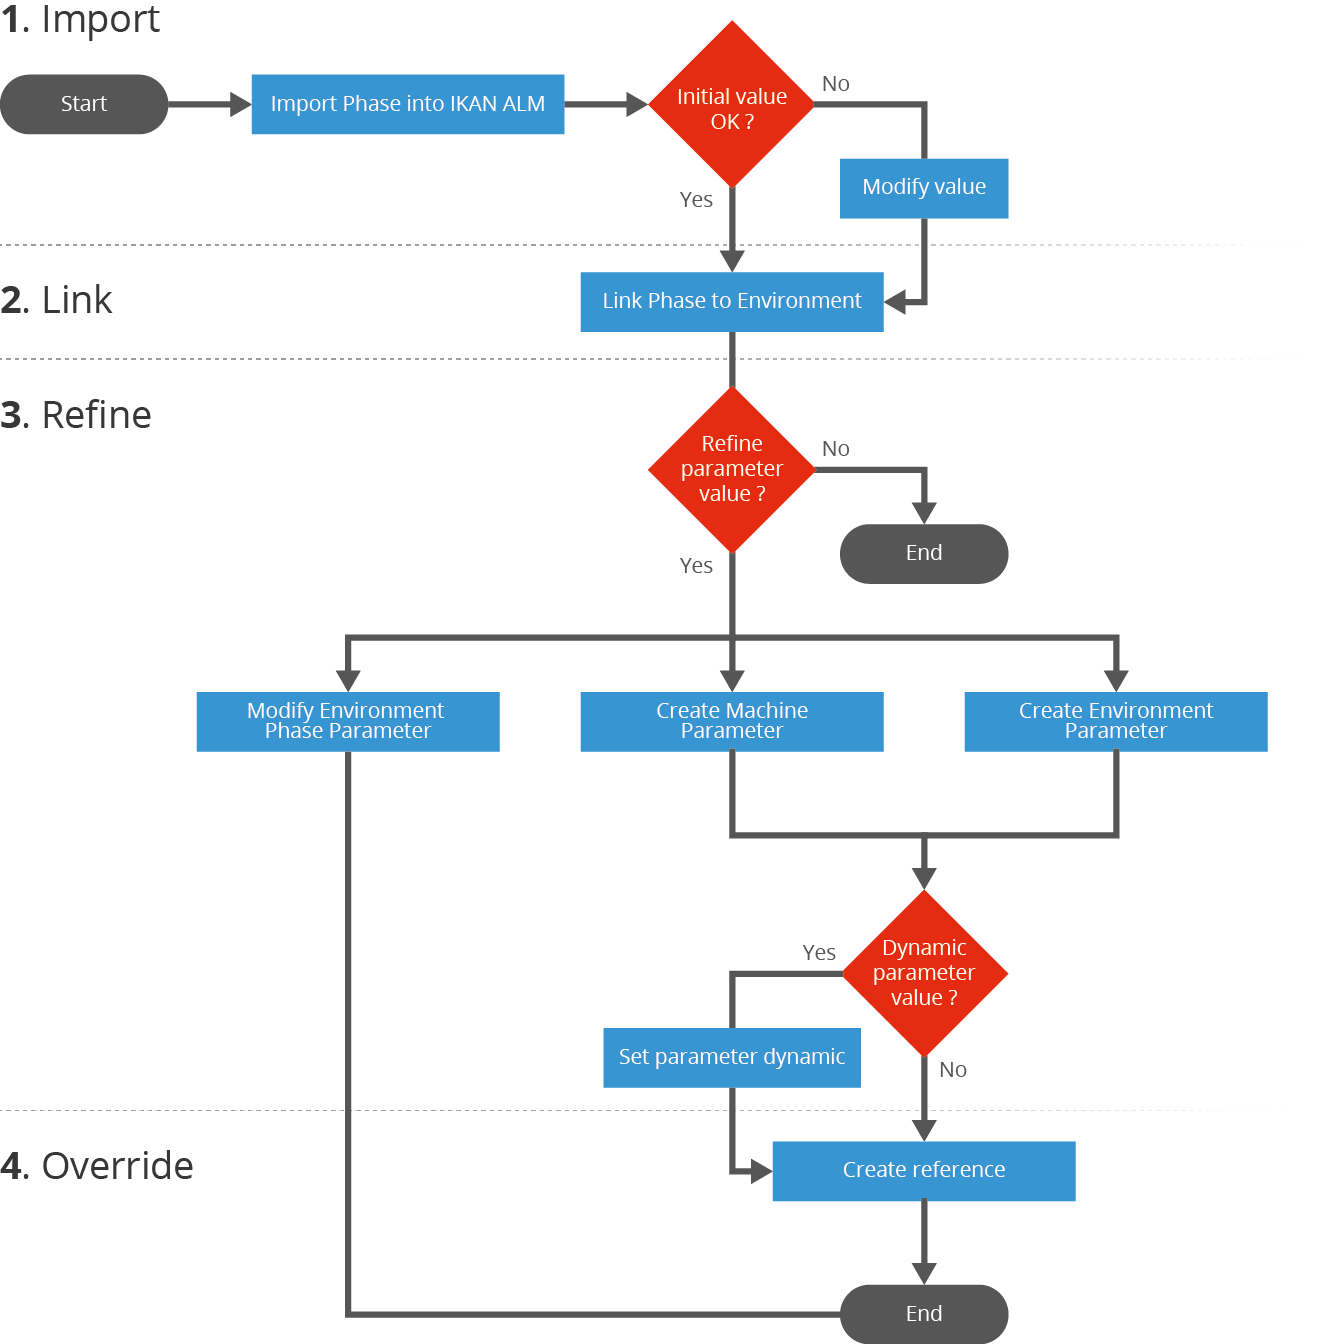
Introduction
General Definition of the Phase
All parameters used by the Phase are defined in the phase definition XML file that is included in the phase bundle.
When you import an IKAN ALM phase, all defined parameters will be listed with the following information: name, default value, description, mandatory and/or secure and integration type.
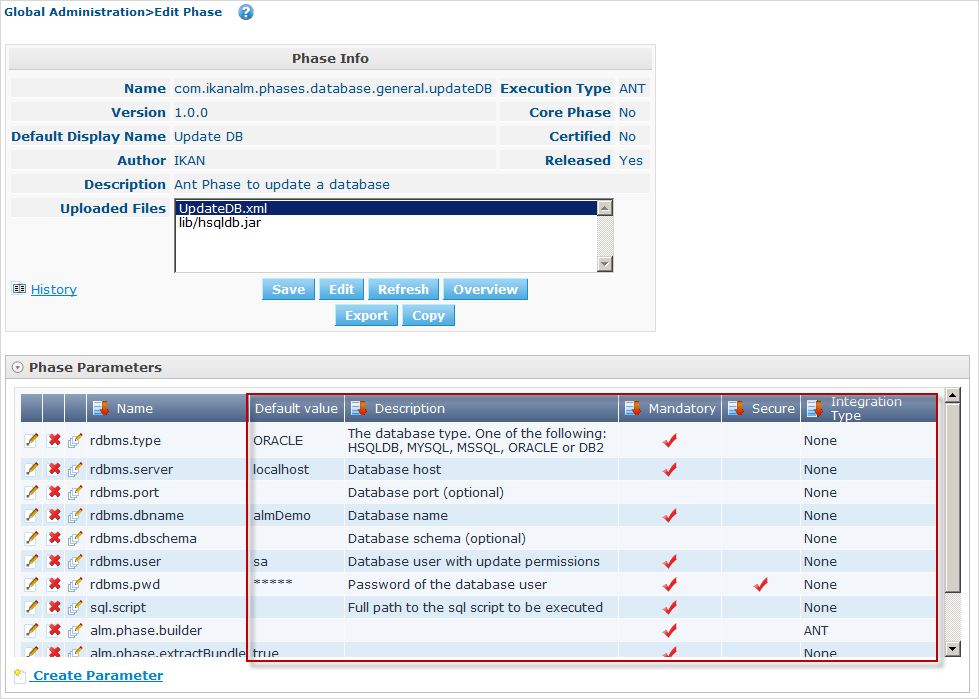
Modifying the Default Initial Values in IKAN ALM
Before adding the imported Phase to a Build or Deploy environment, you can modify the default values at Global Administration level.
Those default values will be used to initialize the Environment Phase Parameters when you add the Phase to a Build or Deploy Environment.
Refining the Parameter Values on Different Levels
The value of the Phase Parameter can be specified at different levels.
Environment Phase Level
At the moment the Phase is linked to an Environment, the Environment Phase Parameters are set. Their value is taken from the initial value specified in the Global Definition of the Phase.
Important: The value of the Environment Phase Parameter is the value that will be used when executing the Phase (see also Order of Precedence.
If required, you can modify this value for a particular Environment Phase. For example, suppose the default value of the Environment Phase Parameter is set to MYSQL, but for the Test Environment you are using DB2. In that case, you could modify the value of the Environment Phase Parameter.
For more information, refer to the section Environment Phase Parameters.
|
The value of an Environment Phase Parameter is always fixed. If you want to be able to choose the value at the moment you create the Level Request, you will have to use a dynamic or editable Machine or Environment Parameter. |
Machine Level
Machine Parameters are parameters defined for a specific Machine. They will be automatically available for all Environments using that Machine. This avoids having to define (Build or Deploy) Environment Parameters for each Environment linked to a Machine.
Machine Parameters can be defined as editable or dynamic. This allows the user to choose their value at the moment they create the Level Request.
For example, suppose you have several machines, all using MYSQL except for one machine which is using HSQLDB. In that case it will be interesting to define a Machine Parameter for that particular machine.
For more information, refer to the section Machine Parameters.
Environment Level
Environment Parameters are parameters defined for a specific Build or Deploy Environment.
Environment Parameters can be defined as editable or dynamic. This allows the user to choose their value at the moment they create the Level Request.
To elaborate further on our example: suppose that for one particular environment you are using a different database. If the value of that database is fixed, you can modify the value of the Environment Phase Parameter for that particular environment (as explained above) OR create an Environment Parameter. If you want to be able to choose the value at the moment you create the Level Request, you must use an Environment Parameter as the value of an Environment Phase Parameters is always fixed. In case of a dynamic parameter, the first value in the list will be the default value.
For more information, refer to the section Environment Parameters.
Order of Precedence
Very important: when processing a Phase in the context of a specific Level Request, the value of the Environment Phase Parameter is ALWAYS USED.
If the value of a Machine or Environment parameter should be used instead, you will need to replace the value of the Environment Phase Parameter by a reference to the value of the Machine or Environment Parameter that need to be used. Influencing the Order of Precedence
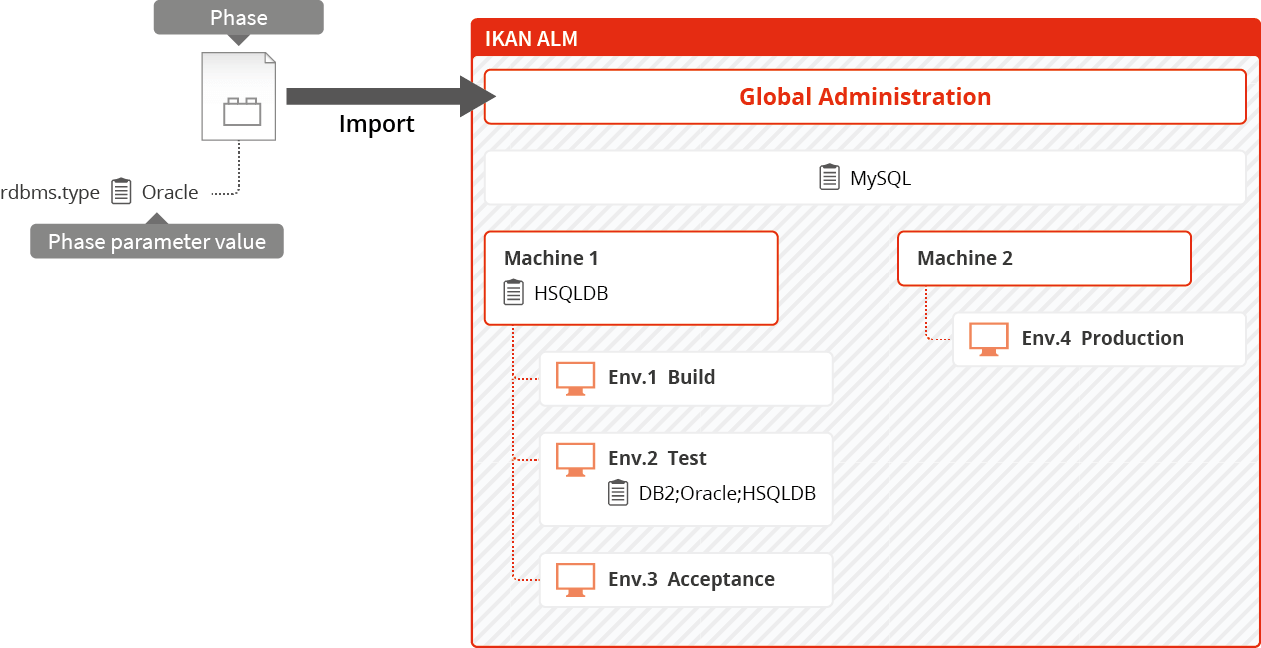
The above example, shows the values for the “rdbms.type” parameter used by the UpdateDB Phase.
In the phase definition XML file, the value of the parameter is set to ORACLE.
The initial value has been modified to MYSQL before linking the Phase to the Environment, so the value of the Environment Phase Parameter is set to MYSQL.
On Machine Level, the value of the parameter is set to HSQLDB for Machine 1. On the Test environment, a dynamic Environment Parameter has been created.
As the value of the Environment Phase Parameter always takes precedence, when running a Level Request, the value MYSQL will be used.
To enforce the usage of a Machine or Environment Parameter, you have to use the solution explained in the section Influencing the Order of Precedence.
Influencing the Order of Precedence
How to proceed to make sure that instead of the value of the original Environment Phase Parameter the value of the Machine or Environment Parameter will be used?
To do so, you will need to replace the value of the Environment Phase Parameter with a reference to the value of the Machine or Environment Parameter value.
The syntax to be used is: ${ReplacingParameter}.
For more information, refer to the section Replacing the Value of the EnvironmentPhase Parameter.
Best Practices
Unique Name
When using Ant Phases, the name of the replacing Machine or Environment Parameter must be unique, as Ant will not accept a reference to a parameter with the same name.
Naming Convention
We recommend you to use the name of the original Phase parameter preceded by the machine or environment name.
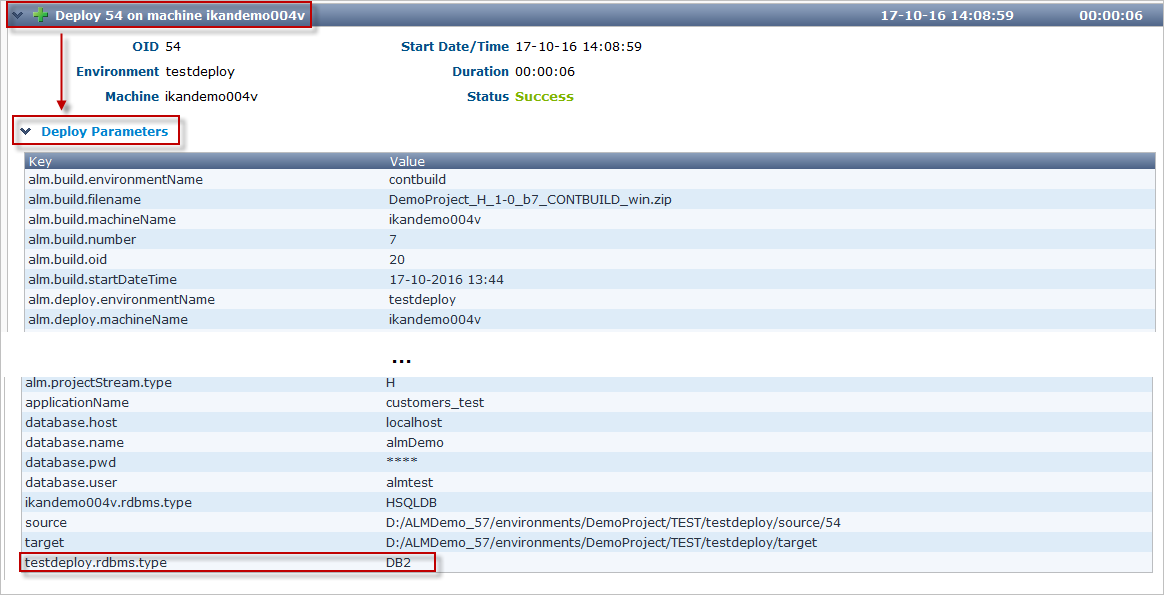
That way it will be easy to track where the value used by the Level Request has been taken from, e.g. ikanalm004v.rdbms.type.
See also Phase Logs.
Parameter characteristics
Environment Phase Parameters always have a fixed value.
Machine and Environment Parameters on the other had can have the following additional characteristics:
-
Editable Parameters have a default value, but you can change this value each time you create a Level Request.
-
Dynamic Parameters dispose of a list of allowed values. You can select one of these allowed values from the drop-down list, when you create a Level Request.
Example UpdateDB Phase: Parameter “rdbms.type”
Parameter values used when creating the Level Request WITHOUT using a reference to a Machine or Environment Parameter
| Refinement Level | Value for the “rdbms.type” parameter at the different Levels | ||||
|---|---|---|---|---|---|
General Phase Definition at import |
ORACLE |
ORACLE |
ORACLE |
ORACLE |
ORACLE |
Modified Initial Value (Global Admin) |
MYSQL |
MYSQL |
MYSQL |
MYSQL |
|
Machine Parameter |
HSQLDB |
HSQLDB |
HSQLDB |
||
(Build/Deploy) Environment Parameter |
DB2 |
DB2 |
|||
Modified Environment Phase Parameter |
MSSQL |
||||
Value you want to use when creating the Level Request |
ORACLE |
MYSQL |
HSQLDB |
DB2 |
MSSQL |
Value that will be used when creating the Level Request (due to the Order of Precedence) |
ORACLE |
ORACLE |
ORACLE |
ORACLE |
MSSQL |
Parameter values used when creating the Level Request USING a reference to a Machine or Environment Parameter
| Refinement Level | Value for the “rdbms.type” parameter at the different Levels | ||||
|---|---|---|---|---|---|
General Phase Definition at import |
ORACLE |
ORACLE |
ORACLE |
ORACLE |
ORACLE |
Modified Initial Value (Global Admin) |
MYSQL |
MYSQL |
MYSQL |
MYSQL |
|
Machine Parameter, e.g., machine.rdbms.type |
HSQLDB |
HSQLDB |
HSQLDB |
||
(Build/Deploy) Environment Parameter, e.g., environment.rdbms.type |
DB2 |
DB2 |
|||
Modified Environment Phase Parameter |
MSSQL |
||||
Value of the Environment Phase Parameter |
ORACLE |
MYSQL |
${machine.rdbms.type} |
${environment.rdbms.type} |
MSSQL |
Value that will be used when creating the Level Request (using references) |
ORACLE |
MYSQL |
HSQLDB |
DB2 |
MSSQL |
For more detailed information, refer to the following sections:
-
General Phase Definition at import: Overview
-
Modified Initial Value (Global Admin): Modifying the Initial ParameterValues
-
Machine Parameters: Machine Parameters
-
(Build/Deploy) Environment Parameters: Environment Phase Parameters
-
Environment Phase Parameters: Modifying the Environment PhaseParameter Value, Replacing the Value of the EnvironmentPhase Parameter
-
Final value used when creating the Level Request: Phase Logs
Initial Parameter Values
Overview
When you import a Phase into IKAN ALM, the initial parameter values from the script are set in the Global Definition of the Phase. Next, when you add the Phase to a Build and/or Deploy Environment, those initial values will be set as the values of the Environment Phase Parameters, which will be used when executing the Phase.
Of course, it is unlikely that all initial parameter values are correct for your configuration. So, the first thing to do will be to verify and, if required, modify the values.
This must be done BEFORE you link the Phase to a Build and/or Deploy Environment. Once the Phase has been linked to an Environment, modifying the default value will not update the value everywhere the Phase is being used.
Modifying the Initial ParameterValues
|
To modify the initial parameter values you need Global Administrator Access Rights. |
-
Select Global Administration Phases Overview.
-
Click the
 Edit icon in front of the Phase whose initial parameter values need to be modified.
The Edit Phase screen will be displayed.
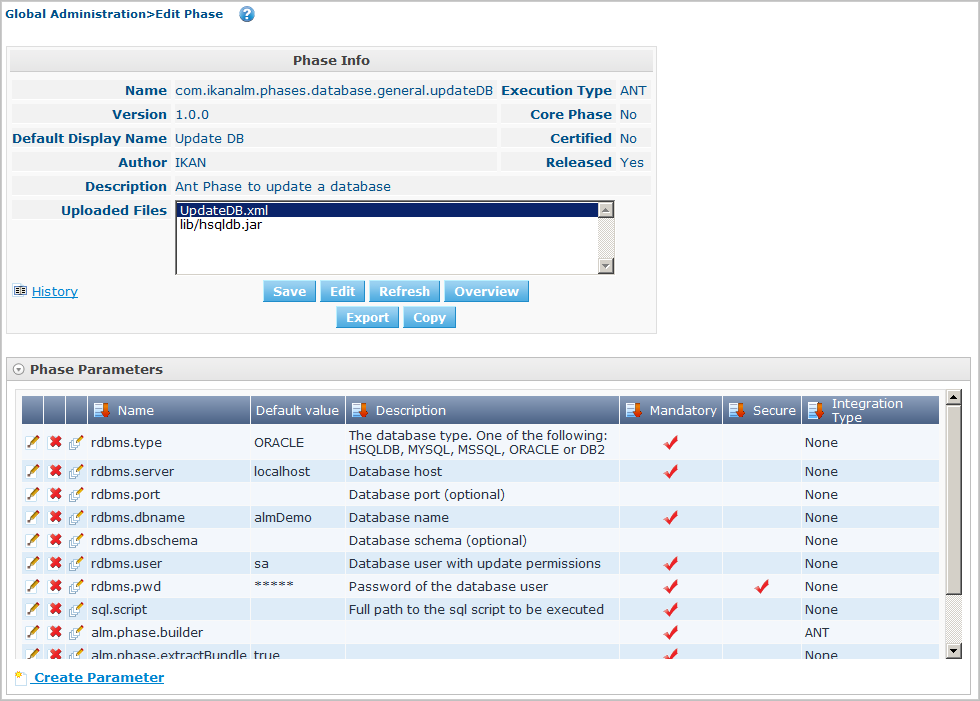
-
Click the
 Edit icon in front of the parameter whose value you want to modify.
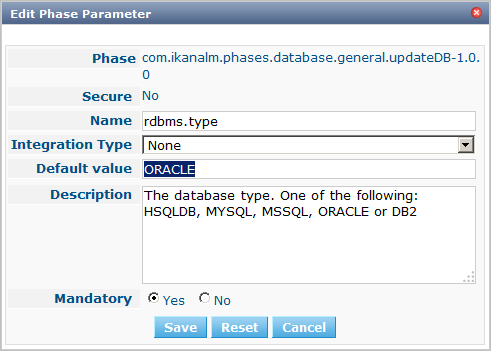
The Edit Phase Parameter window will be displayed.
-
Modify the Default value and click Save.
The modified default value will be displayed in the Phase Parameters overview.
When linking the Phase to an Environment, all default values will be set as Environment Phase Parameter values.
The Environment Phase Parameter value is the parameter value that will be used when executing a Level Request using the Phase.
Environment Phase Parameters
The Environment Phases Overview
When a Phase is linked to a Build and/or Deploy Environment, the initial values specified in the Global Definition of the Phase (Initial Parameter Values) are set as the values of the Environment Phase Parameters.
You can verify the value of the Environment Phase Parameters on the Phases Parameters Overview in the Build or Deploy Environment section for the Project.
-
On the main menu, select Project Administration.
-
On the Projects Overview panel, click the
 Edit icon in front of the Project.
 -
Select Build (Deploy) Environments Overview from the submenu.
The Build (Deploy) Environment Phases Overview will be displayed.

-
On the Build (Deploy) Environments Overview panel, click the
 _ Edit_ Phases icon in front of the required Phase.
The Phases Overview will be displayed.
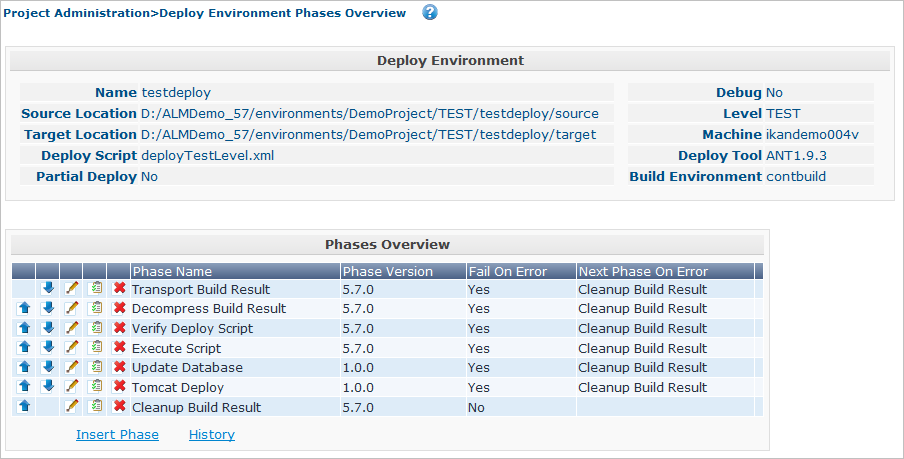
-
Click the
 View Parameters icon in front of the required Phase.
The Phase Parameter Overview will be displayed.
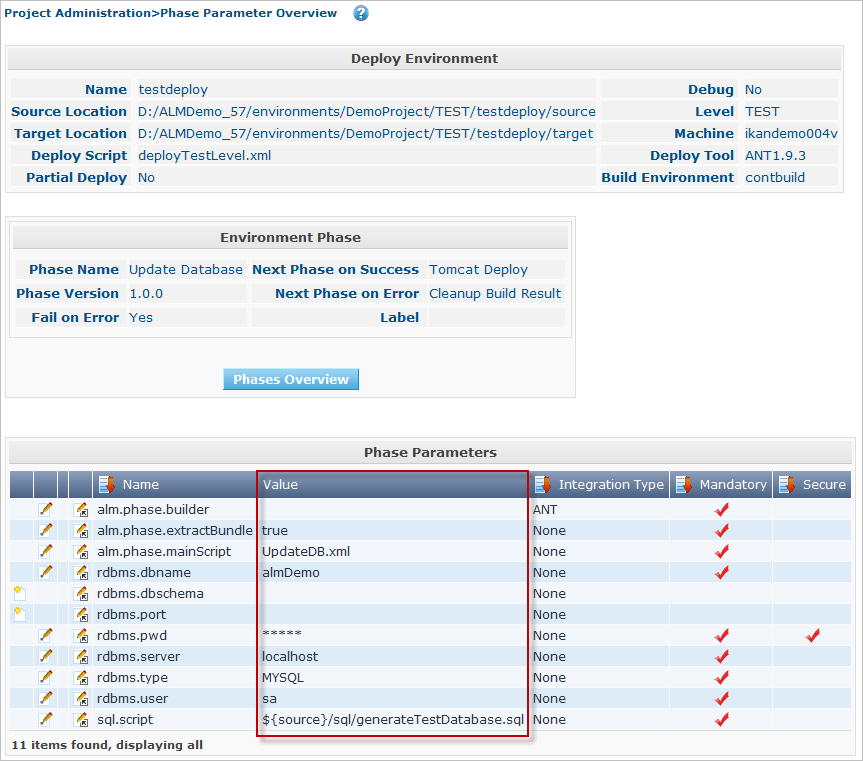
Modifying the Environment PhaseParameter Value
The recommended way of working is to adapt the initial values imported BEFORE you link the Phase to an Environment.
After having linked the Phase to one or more Environments, it is still possible to modify the value on Project Level.
-
Go to the Phase Parameter Overview screen for the required Phase, as described in the previous section (The Environment Phases Overview.)
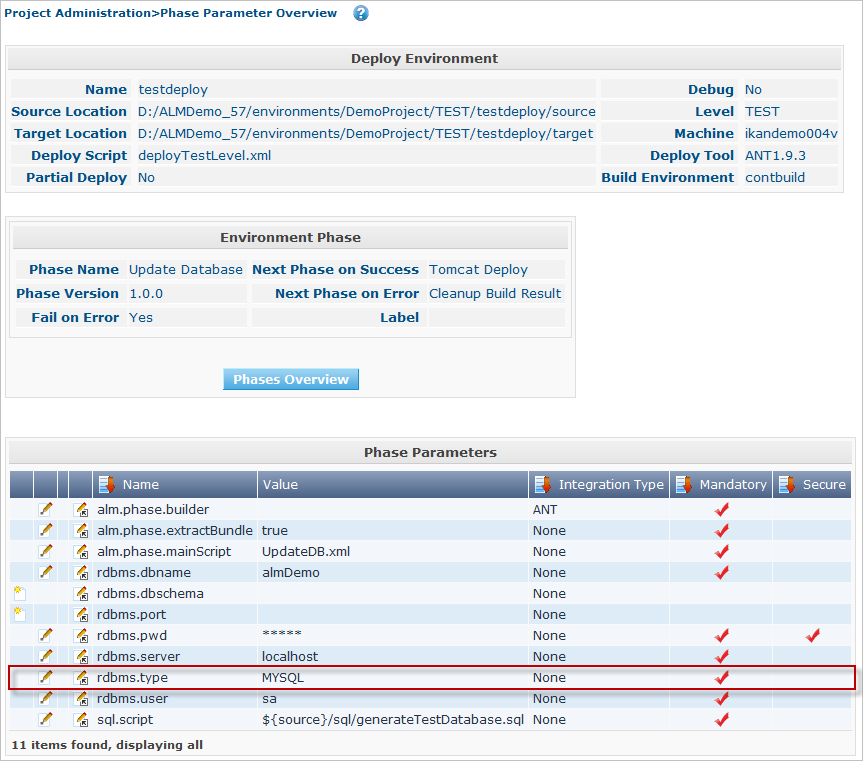
-
Click the
 Edit icon in front of the parameter.
The Edit Parameter Value window will be displayed.
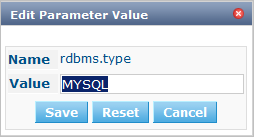
-
Modify the value of the parameter and click Save.
The value of the Environment Phase Parameter will now be modified for that particular environment only.
-
Alternative method for modifying the parameter value for more than one environment:
On the Phase Parameters panel, click the
 Edit
Global Phase Parameter icon in front of the parameter.
Edit
Global Phase Parameter icon in front of the parameter.Clicking this icon will display the Edit Phase Parameter window showing all Environments the Phase Parameter is used on.
For this functionality, you need Global Administrator Access Rights.
-
Next, you can use the
 Edit Environment Phase Parameter links on the Connected Environment Parameters panel as a shortcut to easily switch to the same parameter on another Environment. This is particularly easy if you need to modify several parameters.
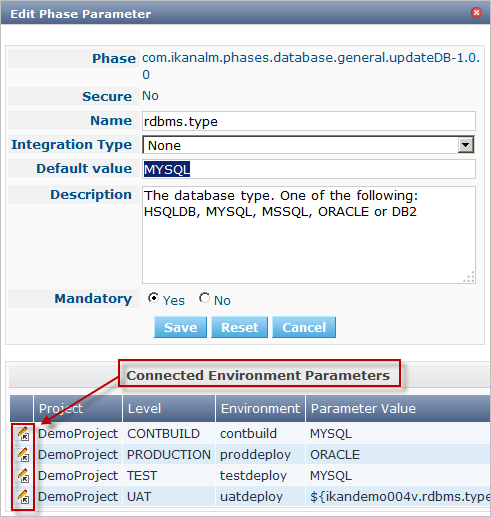
|
If you have Global Administrator Access Rights, you can modify the value of Environment Phase Parameters for several environments at once using the Mass Edit functionality in the Global Definition of the Phase. For more information, refer to the IKAN ALM User Guide. |
Machine Parameters
If a parameter value is valid for an entire machine, it might be interesting to create a Machine Parameter.
|
When used in combination with Ant Phases, the name of the Machine Parameter must be unique as Ant will not accept a reference to a parameter with the same name. |
Creating a Machine Parameter
|
For creating Machine Parameters, you need Global Administrator Access Rights. |
-
Select Global Administration Machines Machine Parameters.
-
Click the
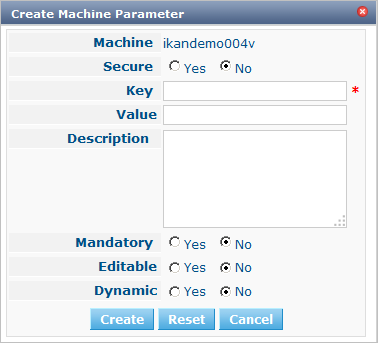
 Create Parameter link in front of the Machine to display the Create Machine Parameter window.
-
Fill out the fields for the new Machine Parameter.
The following fields are available. The Key field is mandatory:
Field Meaning Machine
This field displays the current Machine.
Secure
This field indicates whether the Parameter is secured or not.
Key
In this field, enter the Key (Name) for the Machine Parameter.
Important: this name must be unique.
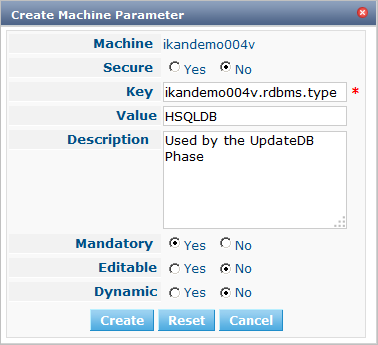
We recommend you to use the name of the original Phase parameter preceded by the machine name. That way it will be easy to track where the value used by the Level Request has been taken from, e.g.
ikanalm004v.rdbms.type.Value
In this field, enter the value(s) for the new Machine Parameter.
The following possibilities apply:
-
Enter the fixed value, if you are creating a non-editable Machine Parameter.
-
Enter the default value, if you are creating an editable Machine Parameter.
-
Enter the list of possible values, separated by a semicolon (;), if you are creating a dynamic Machine Parameter (for example:
DB2;ORACLE;HSQLB). Subsequently, these values can be selected from a drop-down list when creating a Level Request
Repeat Value
Required field for secured Machine Parameters: repeat the secured value.
Description
In this field, enter a description for the Parameter.
Note: We recommend you to put in the description which Phase is using this parameter.
Mandatory
If the original Phase Parameter is mandatory, this new Machine Parameter should be set to mandatory as well.
Editable
-
Select Yes, if the new Machine Parameter must be defined as editable. When you create a Level Request, you can accept the default value (the one you enter in the Value field during creation) or specify the value of your choice for the Parameter.
-
Select No, if the new Machine Parameter should not be defined as editable. When you create a Level Request, only the preset value (the one you entered in the Value field during creation) for this Parameter can be offered to the Build/Deploy Script.
This field is not provided for secured Machine Parameters.
Dynamic
-
Select Yes, if the new Machine Parameter must be defined as dynamic. When you create a Level Request, you can select one of the predefined values from the drop-down list. These are the values you enter in the Value field during creation and which you separate by a semicolon (;). The selected value will be offered to the Build/Deploy Script.
The first value in this list will be the default value, i.e., the first value on the drop-down list.
-
Select No, if the new Machine Parameter should not be defined as dynamic.
This field is not provided for secured Machine Parameters.
-
-
Click Create to confirm the creation of the Machine Parameter.
Replacing the Value of the EnvironmentPhase Parameter
As explained before, the value of the Environment Phase Parameter is always used when executing the Phase. To enforce the usage of the Machine Parameter, you have to create a reference to its value.
-
Go to the Phase Parameter Overview as explained in the section Modifying the Environment PhaseParameter Value
-
Click the
 Edit icon in front of the parameter.
The Edit Parameter Value window will be displayed.

-
Replace the value of the parameter with a reference to the Machine Parameter and click Save.
The syntax of the parameter is: ${replacingParameter}.
In our example, the reference would be
${ikanalmdemo004v.rdbms.type}.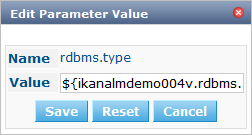
When creating the Level Request, the value of the Machine Parameter will replace the value of the Environment Phase Parameter.
|
For more information on alternative ways of editing the value of the Environment Phase Parameter, refer to the section Modifying the Environment PhaseParameter Value. |
Environment Parameters
Parameters can be further refined on Environment level.
Here, the same principle applies as for the Machine Parameters.
|
When used in combination with Ant Phases, the name of the Environment Parameter must be unique as Ant will not accept a reference to a parameter with the same name. |
Creating an Environment Parameter
|
For creating Environment Parameters, you need Global Administrator Access Rights. |
-
Go to the Projects Overview in the Project Administration section and select the required project.
-
From the submenu, select Build (Deploy) Environments) Build (Deploy) Parameters.
-
Click the
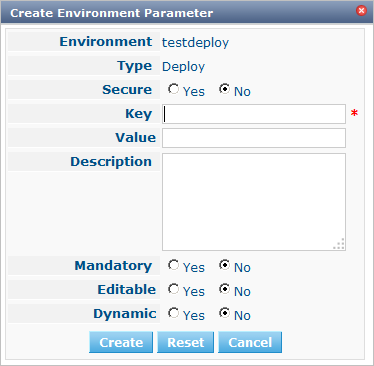
 Create Parameter link in front of the Environment for which you want to create a Parameter.
-
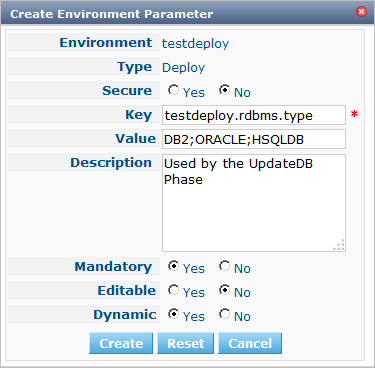
Fill out the fields for the Environment Parameter.
The following fields are available. The Key field is mandatory:
Field Meaning Environment
This field displays the name of the current Environment.
Type
This field displays the type of Parameter being created: Build or Deploy.
Secure
This field indicates whether the Parameter is secured or not.
Key
In this field, enter the Key (Name) for the Environment Parameter.
Important: this name must be unique.
We recommend you to use the name of the original Phase parameter preceded by the environment name. That way it will be easier to track where the value used by the Level Request has been taken from, e.g.
testdeploy.rdbms.type.Value
In this field, enter the value(s) for the new Environment Parameter.
The following possibilities apply:
-
Enter the fixed value, if you are creating a non-editable Environment Parameter.
-
Enter the default value, if you are creating an editable Environment Parameter.
-
Enter the list of possible values, separated by a semicolon (;), if you are creating a dynamic Environment Parameter (for example:
DB2;ORACLE;HSQLB). Subsequently, these values can be selected from a drop-down list when creating a Level Request
Repeat Value
Required field for secured Environment Parameters: repeat the secured value.
Description
In this field, enter a description for the Parameter.
Note: We recommend you to put in the description which Phase is using this parameter.
Mandatory
If the original Phase Parameter is mandatory, this new Environment Parameter should be set to mandatory as well.
Editable
-
Select Yes, if the new Environment Parameter must be defined as editable. When you create a Level Request for this Environment, you can accept the default value (the one you enter in the Value field during creation) or define a value yourself for this Environment Parameter.
-
Select No, if the new Environment Parameter should not be defined as editable. When you create a Level Request for this Environment, only the preset value (the one you enter in the Value field during creation) for this Environment Parameter can be offered to the Script.
This field is not provided for secured Environment Parameters.
Dynamic
-
Select Yes, if the new Environment Parameter must be defined as dynamic. When you create a Level Request for this Environment, you can select one of the predefined values from the drop-down list. These are the values you enter in the Value field during creation and which you separate by a semicolon (;). The selected value will be offered to the Script.
The first value in this list will be the default value, i.e., the first value on the drop-down list.
-
Select No, if the new Environment Parameter should not be defined as dynamic.
This field is not provided for secured Environment Parameters.
-
-
Click Create to confirm the creation of the Environment Parameter.
Replacing the Value of the Environment Phase Parameter
Just as for the Machine Parameters, the value of the Environment Parameter will be overridden by the value of the Environment Phase Parameter is when executing the Phase. To enforce the usage of the Environment Parameter, you have to create a reference to its value.
-
Go to the Phase Parameter Overview as explained in the section Modifying the Environment PhaseParameter Value
-
Click the
 Edit icon in front of the parameter.
The Edit Parameter Value window will be displayed.

-
Replace the value of the parameter with a reference to the Environment Parameter and click Save.
The syntax of the parameter is:
${replacingParameter}.In our example, the reference would be
${testdeploy.rdbms.type}.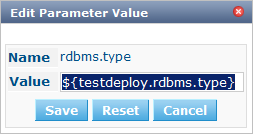
When creating the Level Request, the value of the Machine Parameter will replace the value of the Environment Phase Parameter.
|
For more information on alternative ways of editing the value of the Environment Phase Parameter, refer to the section Modifying the Environment PhaseParameter Value. |
Overview Connected Environment Parameters
|
To use this functionality, you need Global Administrator Access Rights. |
An overview of all values defined on the environments connected to a Phase, can be found on the Mass Edit Phase Parameter window which can be accessed via the Global Definition of the Phase in the Global Administration section.
-
Go to the Global Administration Phases Overview.
-
Click the
 Edit icon in front of the required Phase.
 -
Next, click the
 Mass Edit icon in front of the required parameter.
The Mass Edit Phase Parameter window is displayed. Here you can see for each of the Environments which parameter will be used when creating the Level Request.
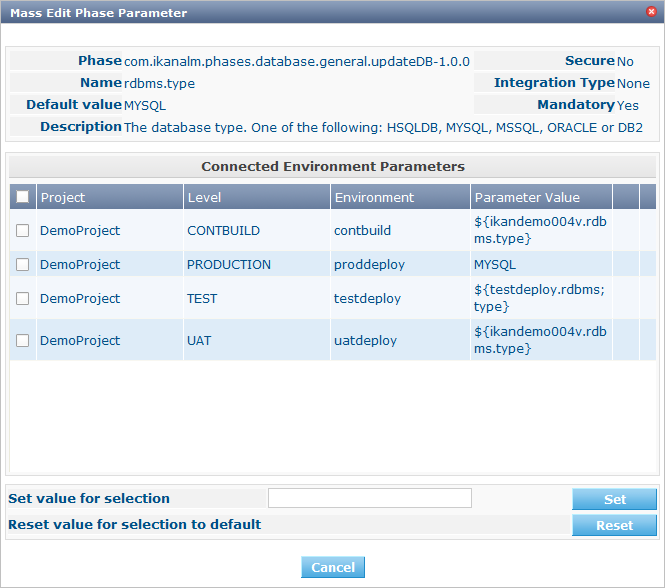
To know the actual value that has been used for a specific Level Request, you can consult the Phase Logs (Phase Logs).
On this window, you can also mass-edit the parameter values for several environments at once. For more information, refer to the IKAN ALM User Guide.
Phase Logs
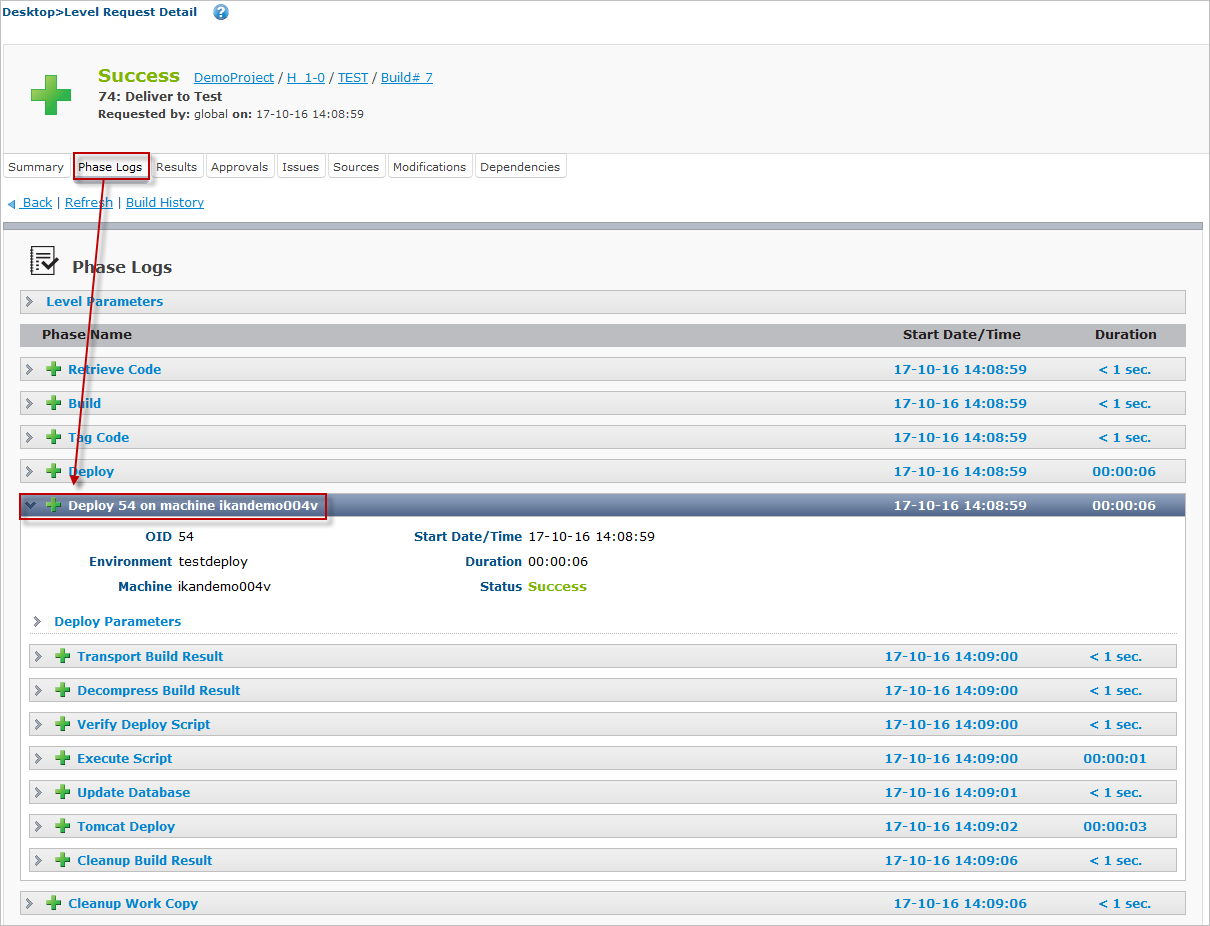
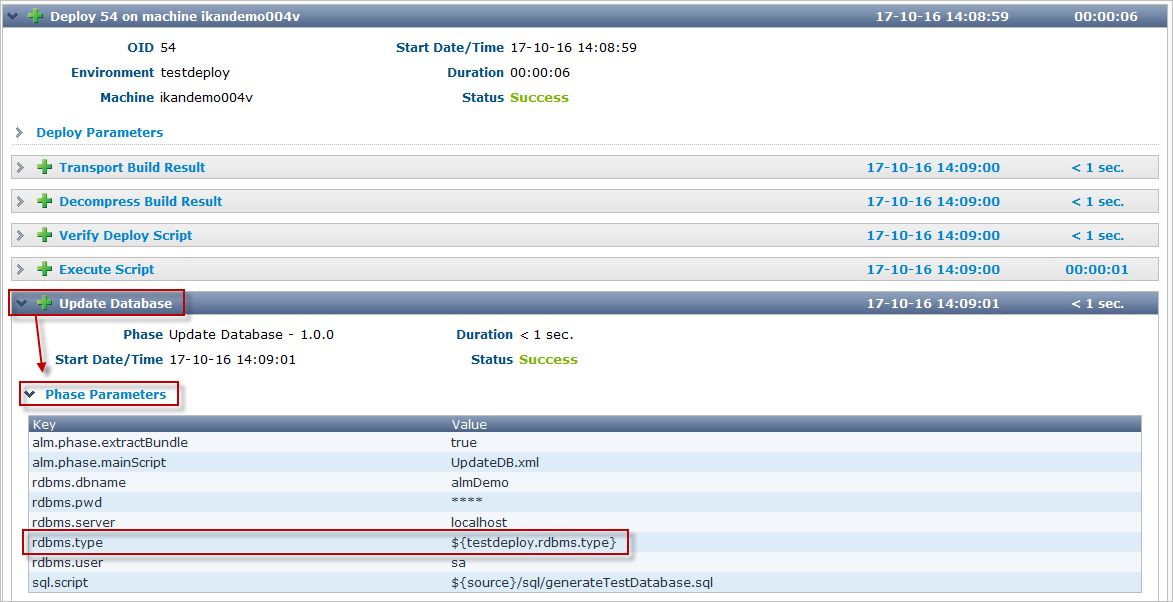
To verify the actual value that has been used when creating the Level Request, you can display the Phase Logs on the Level Request Detail screen.
-
After having created a Level Request, you can click the OID link on the Level Requests Overview to display the Level Request Detail screen.
-
Next, select the Phase Logs tab and select the Build or Deploy Phase from the list.
-
Next, click the Phase link and display the Phase Parameters.
-
To know the exact value of the parameter, you click the Deploy (or Build) Parameters link for the Deploy (or Build) Phase.
