How To Guide Using and Developing Custom Phases in IKAN ALM
Introduction
Custom Phases are the major innovation for the IKAN ALM 5.5 release and have been further optimized in IKAN ALM 5.6 (Mass replace or delete Phases functionality, …).
By creating Custom Phases, Users can extensively customize the workflow of their projects, using highly reusable building blocks. Users can create a Phase, upload their scripts (Ant, Gradle, NAnt, …) into it, define the Phase Parameters their scripts react to, and, next, use that Phase in their Projects. By using the import/export features, Phases can not only be shared between different Projects, but also between different IKAN ALM installations.
The benefits of creating a Phase to perform a task instead of running one large monolithic script are:
-
Reusability
Phases can be shared between projects as well as between IKAN ALM installations.
-
Improved logging
By using many small Phases, the workflow is split up into smaller fractions. That facilitates the understanding and monitoring of the workflow as it will be much easier to exactly detect which step in the workflow failed.
-
Versioning
A Phase is identified by a unique name/version combination. When the scripts inside a Phase change, the version number will change as well. That enables users to see exactly which version of a script they are running, and also enables them to use different versions of the same Phase in one single IKAN ALM installation.
-
Maintainability
By using many small, limited-purpose Phases, the scripts being used tend to be smaller, what makes them simpler and easier to maintain.
-
Improved management of parameters
By formally declaring the parameters the scripts of a Phase react to, it is easier to set the required parameters. On top of that, IKAN ALM contains features for mass manipulation of parameters.
In this document we will focus on how to work with Custom Phases in IKAN ALM.
First, we will describe the concept of Phases, explaining the default setup of Levels and Environments with the Core Phases, and how that setup can be improved by introducing specific Custom Phases.
Next, we will explain how to create and develop a simple Custom Phase in Global Administration, how to apply such a Phase on a Level or Environment and how this Phase acts on a Level and an Environment.
Finally, we will discuss the Phase’s Lifecycle and some best practices when developing Phases and working with phase versions.
The Concept of Phases
When IKAN ALM is running Level Requests, Builds and Deploys, all actions are performed by executing a sequence of Phases. Those Phases are defined in the IKAN ALM database and can be consulted and manipulated in the Phases section of the Global Administration interface. Once they have been defined in the Global Administration context, Phases may be linked to Levels, Build Environment or Deploy Environments in the Project Administration context.
Core Phases
The IKAN ALM "Core" Phases perform the basic functionality of Application Lifecycle Management, such as retrieving and tagging code from a versioning system, transporting resources and building artifacts from and to local and remote Agents, integrating with Issue Tracking systems, etc. They can be viewed, but not altered nor deleted. Consider them an integral part of IKAN ALM. All IKAN ALM releases lower than 5.5 only deal with those Core Phases.
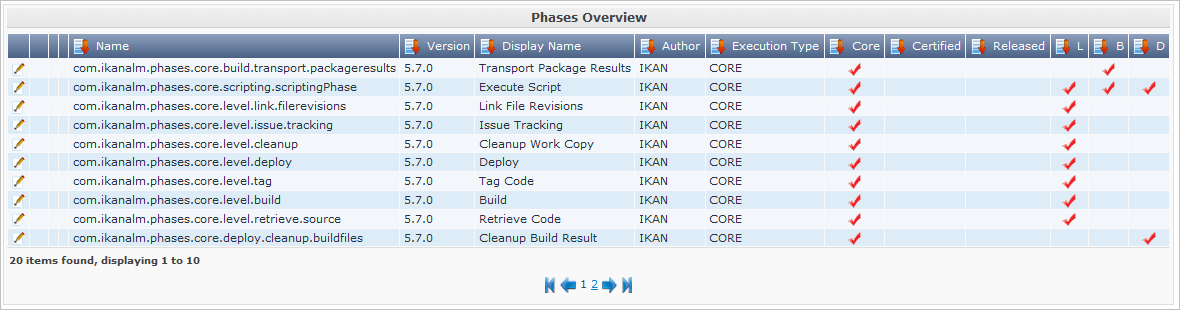
Initially, after installing a vanilla IKAN ALM, only Core Phases are available in the Phase Catalog. They can be consulted via Global Administration > Phases > Overview:
Core Phases in the Default Workflow of a Build Leveland Environment
To give an example, we have set up a Web Project that has a BASE Lifecycle, containing a Build and a Test Level.
The Build Level has a Build Environment on which the Project is built.
After creating this Level, we can see the default workflow by selecting the ![]() Edit
Phases icon in the Level definition:
Edit
Phases icon in the Level definition:
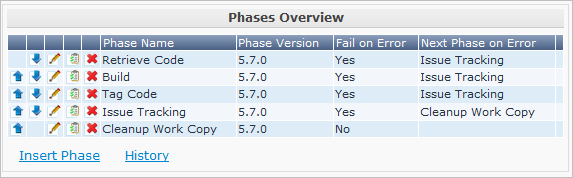
As mentioned earlier, the Core Phases handle the basic actions necessary for a Build Level on the IKAN ALM Server: checking out sources from the versioning system, starting and monitoring the Build on the Build Environment, tagging the sources in the versioning system, checking commit comments for issues and linking them to the Level Request, and cleaning up the Work Copy Location.
|
We optimized the workflow by removing the Deploy Phase, since there is no Deploy Environment. |
Next, have a look at the default workflow of the Build Environment (by selecting Edit Phases in the Build Environment definition):
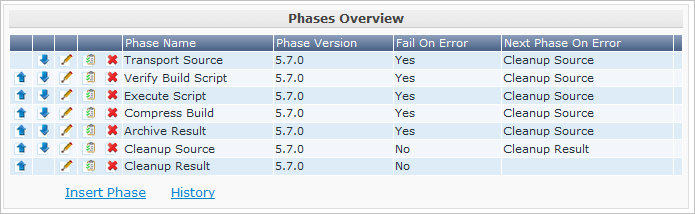
Once again, the different Core Phases perform the basic actions, but this time on the Build Environment, which is run on the IKAN ALM Agent and which might be a different machine than the IKAN ALM Server.
The most important work is done by the “Execute Script” Core Phase: first there may be a compilation process, followed by unit tests and packaging of the compiled sources. On larger projects, there might be more tasks, like code checking, finding bugs, generating documentation etc. In such a case, you might end up with a large build script, difficult to maintain, not reusable in other projects, steered by a lot of build or machine parameters and for which it might be a tough task to investigate the log and find out the exact cause of failure in case of a failed build.
Enhancing the Workflow of the Build Level and Environmentwith Custom Phases

In this example, we have created our own Custom Phases in the IKAN ALM Phase Catalog. We have a Phase that compiles the sources, another Phase that runs the unit tests and a third one that packages the compiled code into a deployable entity (e.g., a war, exe or dll file).
In the next chapter, we will describe how you can actually create those Phases, but first we will explain how you can apply them.
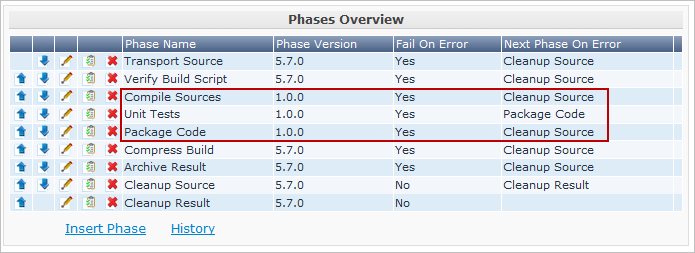
In the workflow of the Build Environment, the “Execute Script” phase has been removed and replaced by inserting the three newly created Phases. As a result, we can now clearly see whether a compilation fails, without having to investigate the complete build log in detail.
|
We allow the unit test to fail and nevertheless to continue packaging the code (by setting the “Fail On Error” property of the phase to “No”), which could be useful in an unstable experimental stream. |
Each of those phases may have its own set of Parameters that will influence the underlying script and that may differ per Environment and Project, which makes it easier to reuse the Phase.
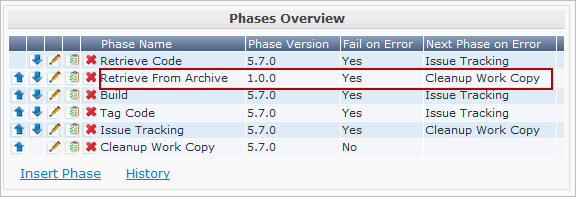
It is also possible to use Custom Phases on a Level, which is extremely useful if you want to execute specific actions on the IKAN ALM Server. In our example, we created a Phase that Retrieves files (e.g., “ready to use” components or libraries, like dll, jar, exe or other files) from an Archive/Repository that is reachable from the IKAN ALM Server.
Enhancing the Workflow of the Test Level and Deploy Environmentwith Custom Phases
In order to show the many opportunities of Custom Phases, we also show the adapted workflow on the Test Level and its Deploy Environment.
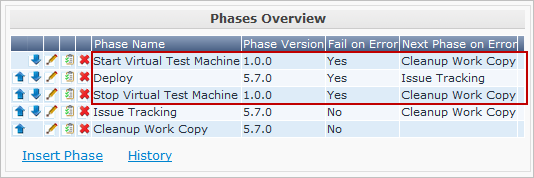
The Start/Stop Virtual Test Machine Phases on the Test Level interact with the Virtual Machine client on the IKAN ALM Server to Start/Stop the Test Machine where the deployment will be done and where the automated tests will run.
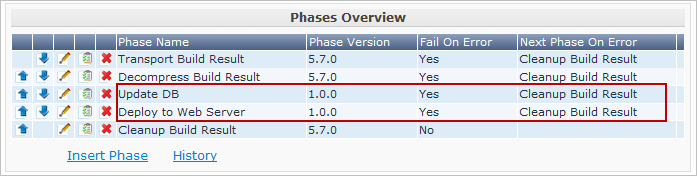
On the Deploy Environment, Custom Phases also do the most important work: the Update DB phase will update the database in case the SQL script is present in the Build Result, the Deploy To Webserver phase will update a web server with the deployable archive (dlls, war, config files …) that has been created on the Build Archive.
Now that you understand the concept of the Custom Phases and you know how they enrich the workflow of Levels and Environments in IKAN ALM, we will describe how you can develop your own Phases.
Developing a Custom Phase
In order to create a Custom Phase in IKAN ALM, you should start with a working script (Ant, Gradle, Maven and NAnt are supported), upload it and create the Phase in the Global Administration section together with the mandatory and optional Phase Parameters.
Once all that has been defined, you may insert the Custom Phase in the workflow of a Level or Environment, set values for the Parameters and see the result when running a Level Request.
In this example, we develop a Custom Phase that will update a database.
|
Notice that it is possible to use a scripting language different from the supported one, as most of the scripting tools have possibilities to launch other scripts and capture the output log (e.g., using the exec task in Ant (see http://ant.apache.org/manual/Tasks/exec.html). |
Creating the Script
We will start with a working script, created following the best practices of a suitable scripting tool. You can find the first version of the UpdateDB.xml Ant script in The UpdateDB.xml Ant Script and its Variables.

Refer to the Ant manual for more information on how to develop Ant scripts (see http://ant.apache.org/manual/using.html#buildfile).
The UpdateDB.xml script executes 3 targets in the following order:
-
init
Sets the path of the SQL script that will update the database to
${source}/update.sql(later more on this). -
validateRdbmsParams
Verifies the chosen database (MS SQL Server, MySQL, Oracle or DB2).
-
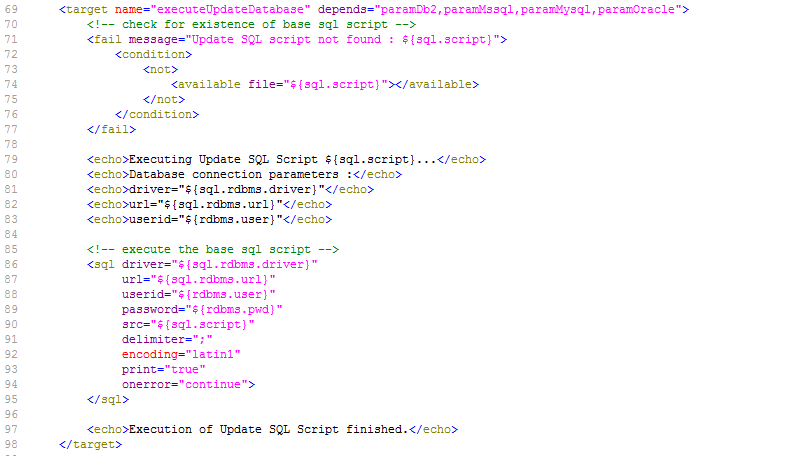
executeUpdateDatabase
Depending on the chosen database, a sub target is called to set the database connection variables (driver, url). Subsequently, it verifies if the update.sql script exists in the given path and, finally, it uses the Ant SQL task (see http://ant.apache.org/manual/Tasks/sql.html) to execute the SQL script on the database. Some _echo messages will log different information during the execution of this target.
The script has several variables (Ant properties), like ${rdbms.type} (the database type, possible values: MYSQL, MSSQL, DB2 or ORACLE) and other database connection variables, which are all described in the Appendix and which need to be provided when running the script.
We tested this script with a property file against the supported databases.
Creating the Phase and its Parameters
Once the script has been tested and the variables have been identified, you may wrap it in a Custom Phase: make sure that you have Global Administration rights and select Phases > Create in the Global Administration context.
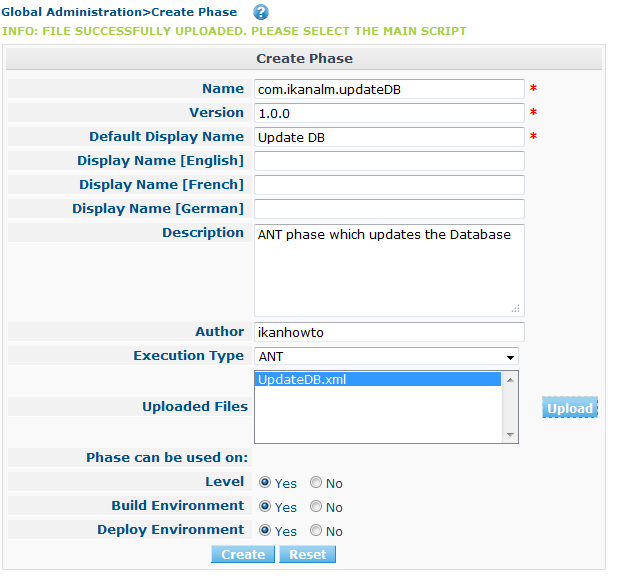
Provide the necessary input to create the new Custom Phase: the unique name (preferably a reverse dns name), the version (e.g., major.minor.maintenance) and the display name (used when inserting, or showing it in a Level Request Detail).
Because we are using an Ant script, set the execution type to Ant. Upload the script UpdateDB.xml from the file system. Finally, select where the Phase may be used: on a Level (thus executed by the IKAN ALM Server), or on a Build or Deploy Environment (thus executed by an IKAN ALM Agent).
We also provided a description and an author. For more information regarding those fields, refer to the chapter “Phases” in the Global Administration part of the IKAN ALM User Guide.
After you click the Create button, the Phase will be created in the Phase Catalog on the IKAN ALM Server (the Phase Catalog Location is specified in Global Administration > System > System Settings):
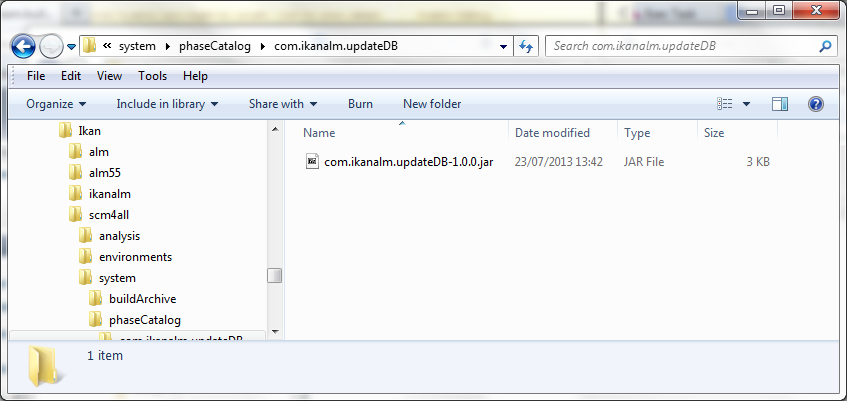
The resulting archive file (name-version.jar) contains the script and some metadata, and will be automatically transported to the IKAN ALM Server or Agent runtime environment upon handling the Level Request (see further).
Go to Global Administration> Phases > Overview and select the ![]() Edit link in front of the newly created Update DB Phase in order to add the necessary Parameters.
Edit link in front of the newly created Update DB Phase in order to add the necessary Parameters.
|
Three parameters have been created automatically: alm.phase.builder, alm.phase.mainScript and alm.phase.extractBundle. They are necessary for executing the Phase and may not be deleted. |
Since the execution type of the Phase is ANT, the Integration Type of alm.phase.builder is also ANT. Its default value may be set to one of the Ant Scripting Tools that are defined in Global Administration.
Create the Parameters as specified in the Appendix (see The UpdateDB.xml Ant Script and its Variables) by selecting the Create Parameter link underneath the Phase Parameters overview panel.

All created Parameters are mandatory, except for the sql.script parameter and the rdbms.dbschema, which are optional. The sql.script parameter is already defined in the script. By making it optional, we use that default value from the script. You may always override this value (see later on when we insert the Phase in a Level or Environment). The rdbms.schema is only needed for a DB2 rdbms.type; you can also set it after inserting the Phase.
|
You can use a secure flag for the rdbms.pwd Parameter, so that its value is never exposed to other Users. In the screenshot above, you can also see that we have set default values for the Parameters, in this case in order to connect with a MySQL database named "almtest" on localhost. They may be overridden when applied in a Level or Environment. |
Inserting the Phase in the Workflow of a Level and/or Environment
Tip to make things easier: insert the Phase in a Build or Deploy Environment that already has an Ant scripting tool linked to it.
Once the Phase and its Parameters have been defined in Global Administration, you may insert it (depending on where you allowed to use it in the definition) in the workflow of a Level or Environment of one of your projects.
Make sure that you have Project Administration rights, navigate to the target Level or Environment and select the Edit Phases link.
|
For a Level, select the Edit Phases link on the Levels Overview screen. For a Build/Deploy Environment, click the |
Next, select the Insert Phase link underneath the Phases Overview panel:
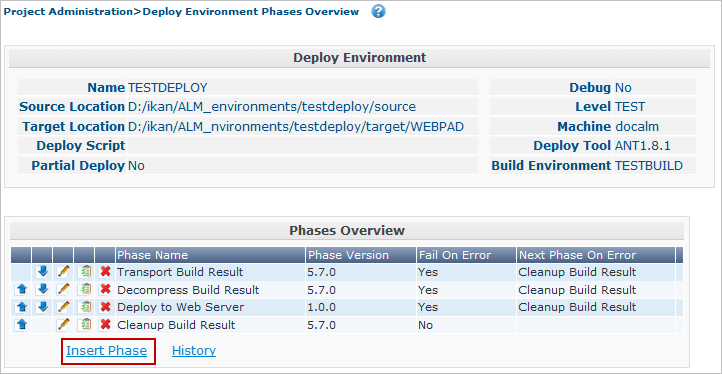
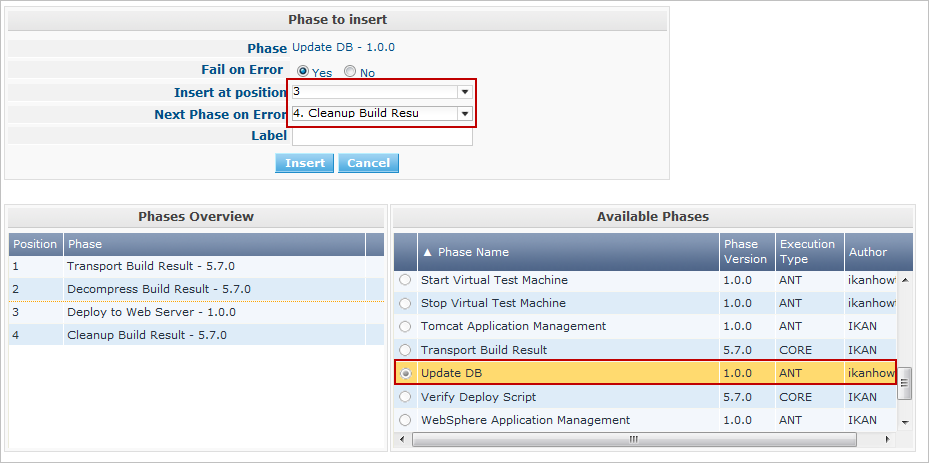
In this document, we assume that the Phase has been inserted in a Deploy Environment. Select the Update DB Phase from the Available Phases, set the Fail on Error attribute to Yes or No, set its Insert Position, indicate which Phase should be executed in case of a failure, and, next, click the Insert button:
On the Phases Overview, select the ![]() View
Parameters link next to the freshly inserted Update DB script, in order to verify all the Phase Parameters we defined in Global Administration:
View
Parameters link next to the freshly inserted Update DB script, in order to verify all the Phase Parameters we defined in Global Administration:

All mandatory Parameters are automatically created when the Phase is inserted in the workflow of a Level and Environment, and their values are copied from the default values in Global Administration.
If you want this Phase to update a DB2 database, you must override the defaults by clicking the ![]() Edit Parameter link next to the parameters.
However, the optional Parameters must be created if you want to provide them when executing the script.
So, for updating a DB2database you need the optional rdbms.dbschema Parameter for the jdbc url.
Edit Parameter link next to the parameters.
However, the optional Parameters must be created if you want to provide them when executing the script.
So, for updating a DB2database you need the optional rdbms.dbschema Parameter for the jdbc url.
Click the ![]() Create Parameter link next to the required parameter.
Create Parameter link next to the required parameter.
Use the ![]() Edit Global Phase Parameter link (only available if you have Global Administration rights) next to the Parameter to jump to the Edit
Phase Parameter screen in Global Administration.
There, you will see that your Phase is now connected to a Deploy Environment, and you may jump back to the Project context by clicking the same cross link icon Edit Environment Phase Parameter.
Edit Global Phase Parameter link (only available if you have Global Administration rights) next to the Parameter to jump to the Edit
Phase Parameter screen in Global Administration.
There, you will see that your Phase is now connected to a Deploy Environment, and you may jump back to the Project context by clicking the same cross link icon Edit Environment Phase Parameter.
|
If you neglected the tip in the beginning of this paragraph and inserted the link in a Level or in a Build/Deploy Environment not linked to an Ant definition, make sure that the alm.phase.builder Parameter gets the value of an Ant definition that exists a) on the IKAN ALM Server in the case of a Level, or b) on the IKAN ALM Agent (identified by the linked Machine) in the case of a Build or Deploy Environment. |
Since you changed the workflow, you have to select Audit Project from the Project Administration menu and click the Unlock button to unlock the Project before you can create a Level Request.

Running the Phase: Creating a Level Request
Before we can actually run the Phase, we need to make sure that we provide a) the update.sql script and b) the jdbc driver, otherwise our Phase will fail.
The update.sql script is preferably checked into the versioning system connected to your project.
Since we set its default location to ${source}/update.sql, it will be provided for a Build Environment if you commit it in the root folder of the branch or trunk you are working with in the project.
If you want it to be available on the Deploy Environment (which is our case since we inserted the Update DB Phase in a Deploy Environment), make sure that you copy it from ${source} to ${target} while creating the Build result that will be deployed.
Notice that you can also opt to set the value of the sql.script Parameter, by creating it as an editable Environment Parameter on the Deploy Environment. That way, you can always change its value when creating the Level Request. The jdbc driver must be present in the class path when running the Phase. One way to do this is by copying it to the ANT_Home/lib directory of the Ant installation on the IKAN ALM Agent that will run the Phase:
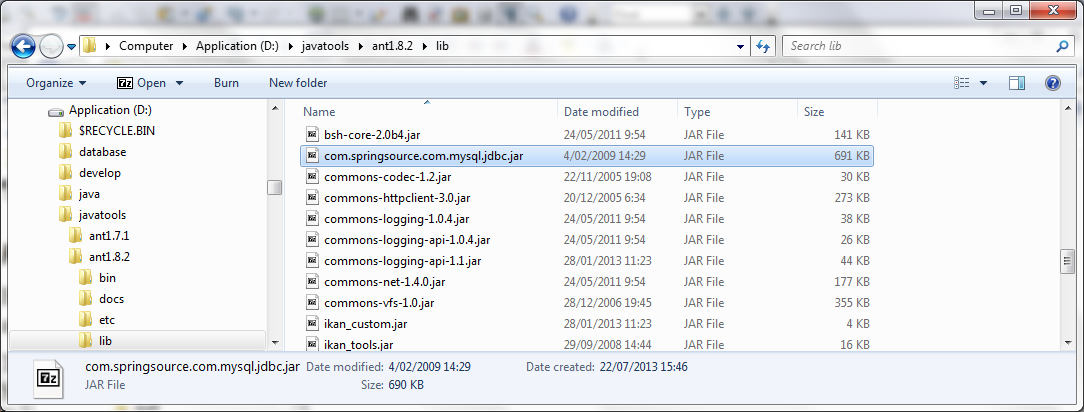
We will optimize this driver provisioning when we handle the Phase’s Lifecycle in the next chapter.
Now that the update.sql script and the jdbc driver are correctly distributed, we can run a Level Request for the Level that contains the Deploy Environment that contains our Update DB Phase. In order to see the output of the script, have a look at the Level Request Detail Phase Logs (by selecting the Phase Logs tab on the Level Request Detail screen). Here you will find the log of the Update DB Phase.
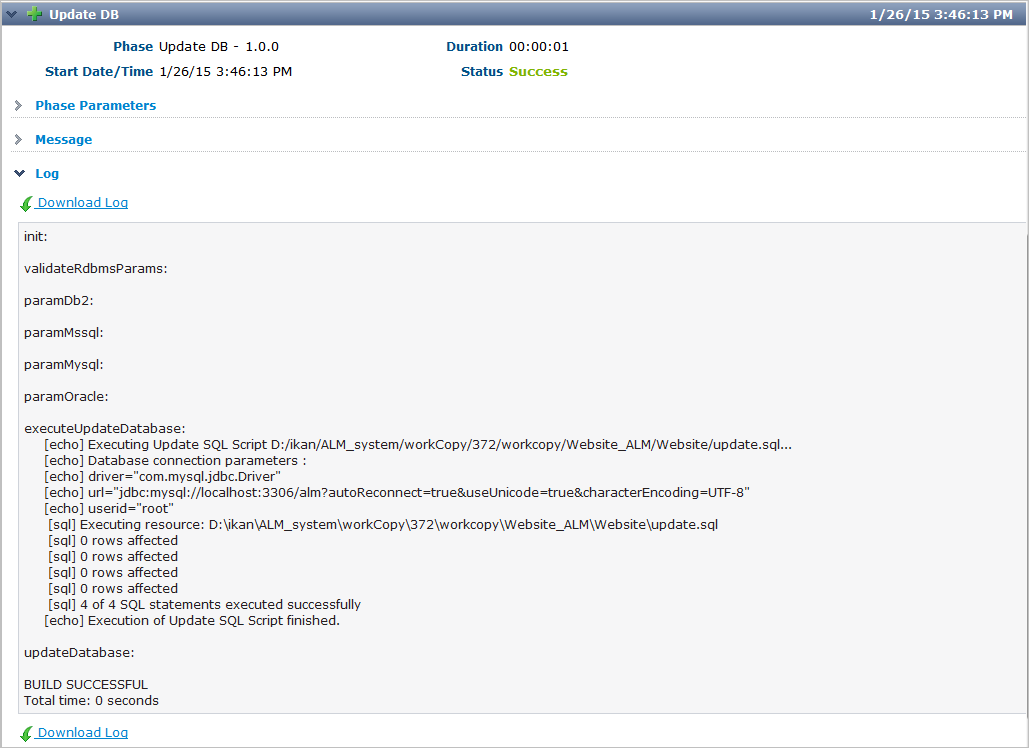
You will recognize the target and echo statements as discussed in the section Creating the Script.
Click the Phase Parameters link in the Update DB Phase Log to display the provided properties:
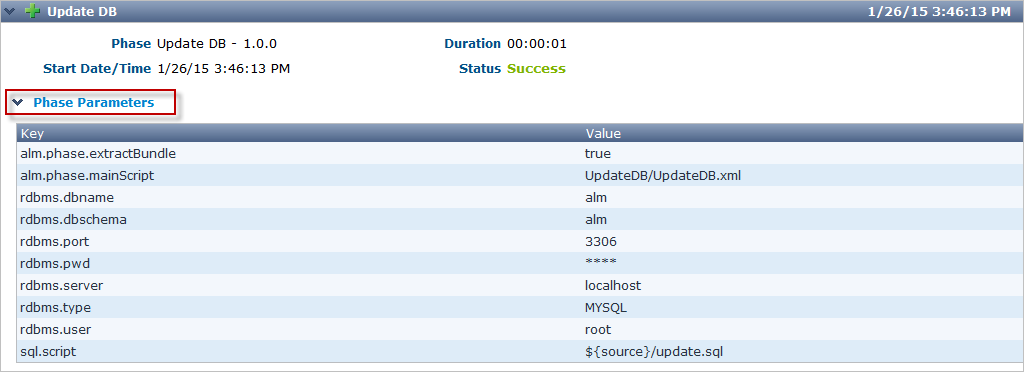
In addition to those Phase Parameters, the script may also use the Deploy Parameters (displayed in the “Deploy Parameters” section near the top of the "`Deploy Action Log"). These are the Predefined Deploy Parameters (see the specific Appendix in the IKAN ALM User Guide), together with (optionally) defined Deploy Environment Parameters and Machine Parameters. When you enable the Debug flag of the Deploy Environment, you may verify the parameters in the alm_ant.properties file that contains all available properties you can use in the script. You will find it in the extracted Phase subdirectory under the Deploy Environment source directory:
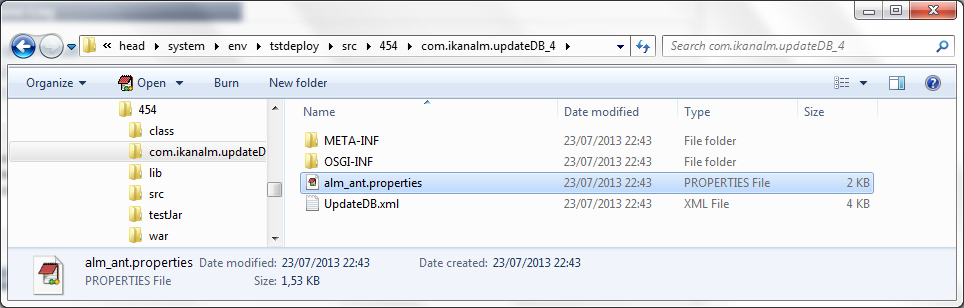
In this directory, you will also find the extracted UpdateDB.xml script.
Before any Phases of the Deploy were executed, the Update
DB Phase was transported automatically from the Phase Catalog location on the IKAN ALM Server and installed in the IKAN ALM Agent, using the Transporter (FileCopy, FTP or SCP) connected to the Machine representing the Agent.
As long as your Phase is in a non-released state (the default for a newly created Phase), this process will be repeated before each Deploy action.
We will go into detail on the Phase’s Lifecycle in the next chapter.
You can see which Phases are currently installed on an Agent Machine by selecting the ![]() Installed Phases link next to the Agent Machine on the Machines
Overview page:
Installed Phases link next to the Agent Machine on the Machines
Overview page:

The Lifecycle of a Phase
Enhancing the Phase: New Version of the Script
The newly created Update DB Phase has been tested and proven to work during a Deploy.
However, we still have a problem with the provisioning of the database driver, which we must copy manually to the ANT_Home/lib directory of the Ant installation on the IKAN ALM Agent, otherwise it cannot be loaded and the Phase execution will fail.
We can solve this by setting a class path ref in the SQL task of the UpdateDB.xml script:
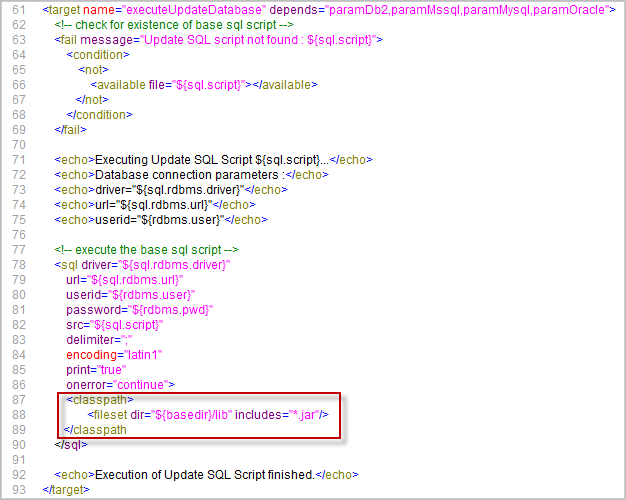
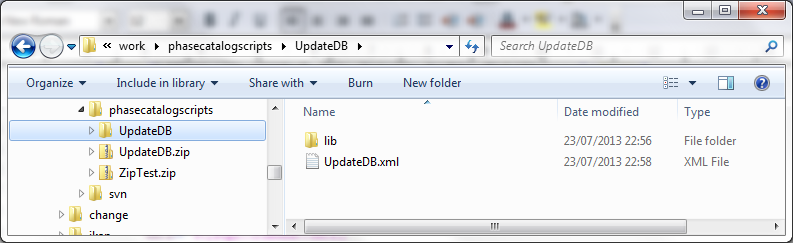
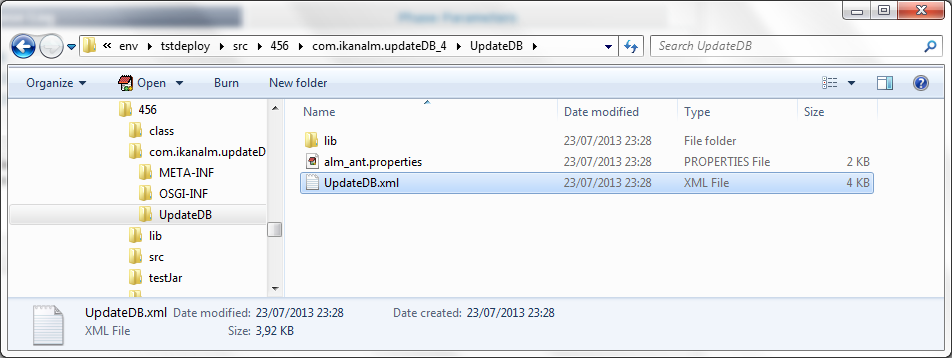
Since the base dir has been set to “.” (the root) in the project definition of the Ant script, this line says that the driver may be found in a sub folder named “lib” from our script. So, create the following directory structure in a temporary environment: a root Update DB directory, with the new version of the script, and a lib directory, to which you copy the drivers for all the databases that you want to support with this phase. Zip the Update DB directory, so that you get an UpdateDB.zip file.
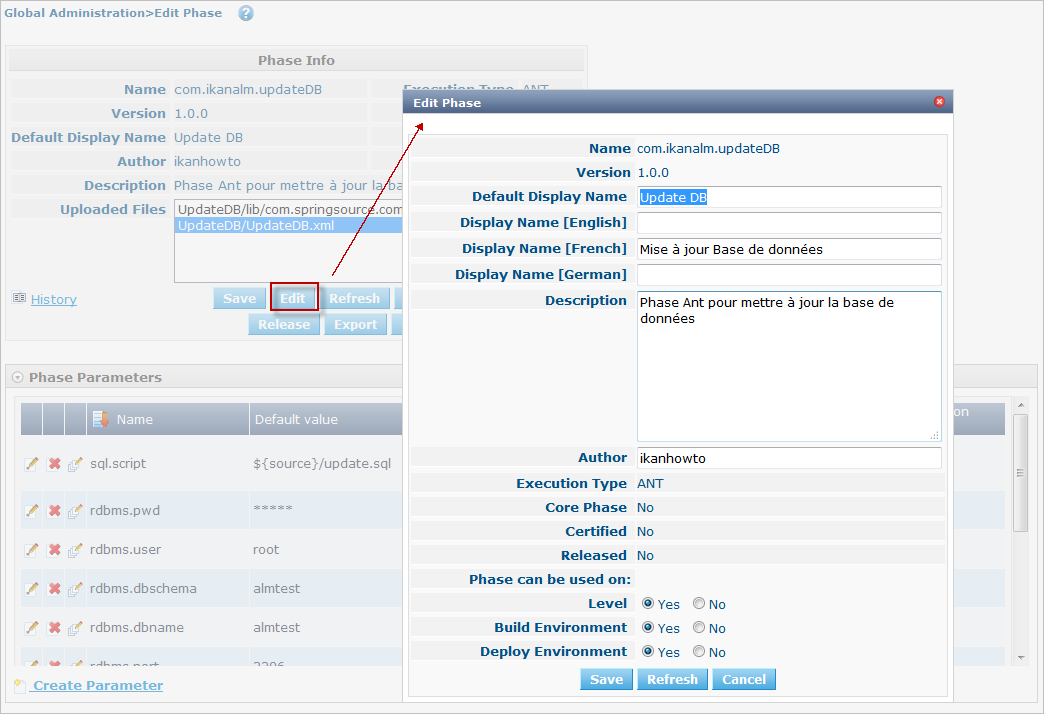
Now you can update the Phase in Global Administration. Select Phases> Overview from the Main Menu, and click the Edit link next to the Update DB Phase. Next, click the Edit button at the bottom of the Phase Info panel.
|
Except for the Phase name and the version, most attributes can still be changed as the Phase is not yet Released. |
Click the Upload button to upload the UpdateDB.zip file we have created. Notice the new structure of the Uploaded Files: the drivers in the lib sub folder (in the example above, a MySQL driver), and the updated script are all located under the Update DB directory. Make sure that you select the UpdateDB/UpdateDB.xml file in the Uploaded Files as the main script, before clicking the Save button.
When you edit the Phase, you will see that the alm.phase.mainscript Parameter of the Phase has been updated to UpdateDB/UpdateDB.xml. Before we can test our new Phase, we need to make sure that this parameter is also updated in the Deploy Environment where it is used.
Click the ![]() Mass Edit link next to the alm.phase.mainscript Parameter to do so.
Mass Edit link next to the alm.phase.mainscript Parameter to do so.
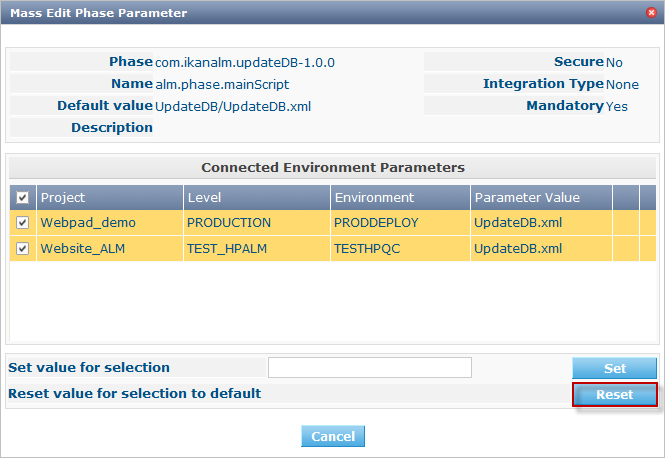
In the Connected Environment Parameters panel, you will see all the Levels and Environments where the Update DB Phase has been inserted, and as a result, the mandatory Parameter alm.phase.mainScript has been created. You also see that these Parameters have the old UpdateDB.xml value. Select all the Parameters by selecting the check box in the header, and click the Reset button in order to change all Parameter values to the new default UpdateDB/UpdateDB.xml.
Now you can remove the driver you provided earlier from the ANT_HOME/lib directory (Running the Phase: Creating a Level Request) and run the Level Request again.
Since our Phase is still not released, it will be distributed and installed again on the IKAN ALM Agent before the Deploy is run.
After the Level Request has finished, and if you had set the Deploy Environment to debug, you will see in the Deploy Environment’s source directory that the driver is now provided in the lib directory of the extracted Phase:
Phase Ready for Production: Releasing the Phase
Now that we have solved the driver provisioning problem and we have tested the Update DB Phase against several databases, it is ready for use in a Production environment. At this point, you want your Phase to be protected, so that the script cannot be changed anymore. In the Edit Phase interface, click the Release button at the bottom of the Phase Info panel. Since this action cannot be undone, you need to confirm it. Now try to edit the Phase again:

Since the Phase is Released, you may not change the scripts anymore, so the Upload button next to the Uploaded Files has gone. Another consequence is that the Phase is not distributed and installed again in the IKAN ALM Server or Agent each time a Level Requester Build/Deploy that uses the Phase is handled. The only way to get it redistributed, is to manually uninstall it. You can do this on the Installed Phases Overview by clicking the Delete icon next to the Update DB Phase.
Exporting/Importing a Phase
Once your Phase is stable, you can export it along with its metadata (all the defined Parameters), so that it can be re-used in other IKAN ALM Installations. This may be helpful if you have setup IKAN ALM on a test system, where you experiment with Lifecycles, scripts and thus also probably with creating Phases, next to your Production IKAN ALM configuration.
In the Global Administration section, select the Export icon in the Phases Overview, or use the Export button in the Edit Phase interface. A new archive file will be downloaded (name-version.jar) that you can import in another IKAN ALM via the Phase > Import menu.
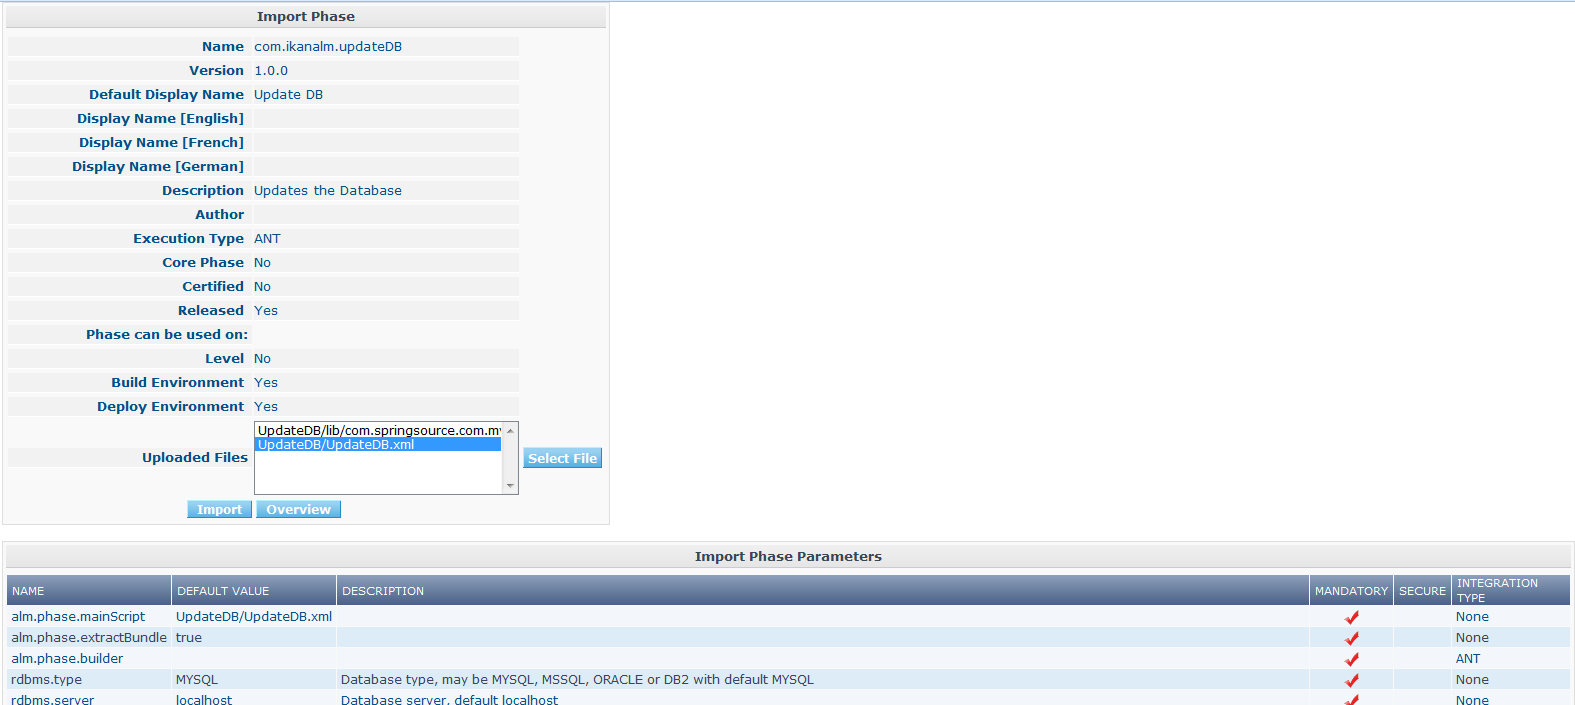
After selecting the exported archive file, you will see that all the metadata, including the Uploaded Files and the Parameters, are imported with the script. Only the values of secured Parameters need to be set to start working with the Imported Phase.
|
If you’ve set a default value for alm.phase.builder, this will also not be set when you export and import it. This is because it’s not sure that a builder (Ant, Maven, …) definition exists in the IKAN ALM installation where you import it. |
Creating a New Phase Version
It is logical that Phases can evolve: for example, the integration you solved with the Phase has a new version, or you find a bug in the handling of a Phase that has been released. In both cases, you need to be able to change the scripts, but this is not possible anymore for a released Phase. An example for our Update DB Phase would be the support of an additional database. The solution for this is to create a new Phase Version. This enables you to change the scripts and the Parameters.
You can create it from scratch, but the easiest way to do this is by copying the existing Phase you want to upgrade.
In Global Administration > Phases Overview, click the ![]() Copy link next to the Phase you want to use to create a new version.
Copy link next to the Phase you want to use to create a new version.
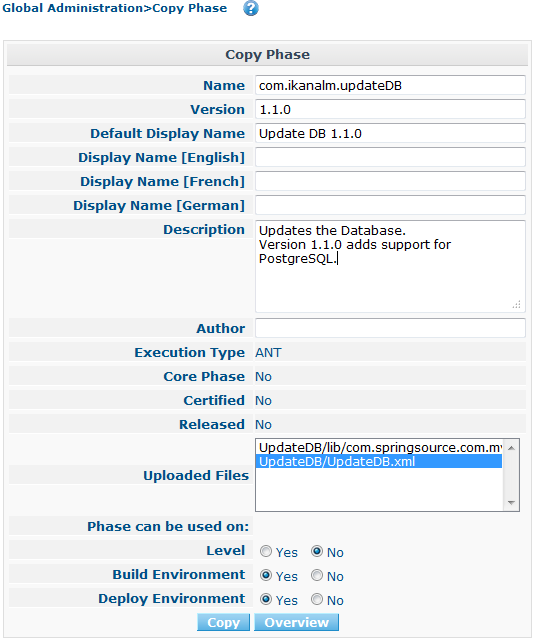
Change the version, the default display name and the description, and select the Copy button. Once your Phase is copied, you may upload a new version of the script and other files that must be distributed together with your Phase. All the Parameters of the original Phase Version are also copied, and may be changed completely (modified, deleted, added). Once your Phase is ready, you may start using it, by inserting it (replacing it, by removing first the previous version) into the workflow of Levels and Environment. Notice that the IKAN ALM Agent and Server architecture allow to have different versions of one Phase being installed and executed on the same Machine.
Appendix A: The UpdateDB.xml Ant Script and its Variables
UpdateDB.xml Ant script
<?xml version="1.0" encoding="UTF-8"?>
<project name="updateDatabase" default="updateDatabase"
basedir=".">
<description>
ANT script to update a database. Currently supports MySQL, MS SQL, Oracle and DB2.
Prerequisites: the database driver must be in the ANT lib path.
</description>
<target name="updateDatabase" depends="init,validateRdbmsParams,executeUpdateDatabase"/>
<!-- get properties and set conditions :-->
<target name="init">
<!-- default location of the update SQL script, you may overwrite this as a Phase Param -->
<property name="sql.script" value="${source}/update.sql"/>
</target>Ant
<!-- validate Database type and set is<DBTYPE> property: -->
<target name="validateRdbmsParams" description="Validate Database Parameters">
<fail message="Invalid database type : ${rdbms.type}">
<condition>
<not>
<or>
<equals arg1="${rdbms.type}" arg2="MYSQL" trim="true"/>
<equals arg1="${rdbms.type}" arg2="MSSQL" trim="true"/>
<equals arg1="${rdbms.type}" arg2="ORACLE" trim="true"/>
<equals arg1="${rdbms.type}" arg2="DB2" trim="true"/>
</or>
</not>
</condition>
</fail>
<condition property="isMYSQL" >
<equals arg1="${rdbms.type}" arg2="MYSQL" trim="true"/>
</condition>
<condition property="isMSSQL" >
<equals arg1="${rdbms.type}" arg2="MSSQL" trim="true"/>
</condition>
<condition property="isORACLE" >
<equals arg1="${rdbms.type}" arg2="ORACLE" trim="true"/>
</condition>
<condition property="isDB2" >
<equals arg1="${rdbms.type}" arg2="DB2" trim="true"/>
</condition>
</target>
<!-- Set properties depending on database type -->
<target name="paramDb2" if="isDB2">
<property name="sql.rdbms.driver" value="com.ibm.db2.jcc.DB2Driver"/>
<property name="sql.rdbms.url" value="jdbc:db2://${rdbms.server}:${rdbms.port}/${rdbms.dbname}:currentSchema=${rdbms.dbschema};"/>
</target>
<target name="paramMssql" if="isMSSQL">
<property name="sql.rdbms.driver" value="net.sourceforge.jtds.jdbc.Driver"/>
<property name="sql.rdbms.url" value="jdbc:jtds:sqlserver://${rdbms.server}:${rdbms.port}/${rdbms.dbname}"/>
</target>
<target name="paramMysql" if="isMYSQL">
<property name="sql.rdbms.driver" value="com.mysql.jdbc.Driver"/>
<property name="sql.rdbms.url" value="jdbc:mysql://${rdbms.server}:${rdbms.port}/${rdbms.dbname}?autoReconnect=true&useUnicode=true&characterEncoding=UTF-8"/>
</target>
<target name="paramOracle" if="isORACLE">
<property name="sql.rdbms.driver" value="oracle.jdbc.driver.OracleDriver"/>
<property name="sql.rdbms.url" value="jdbc:oracle:thin:@${rdbms.server}:${rdbms.port}:${rdbms.dbname}"/>
</target>
<target name="executeUpdateDatabase" depends="paramDb2,paramMssql,paramMysql,paramOracle">
<!-- check for existence of base sql script -->
<fail message="Update SQL script not found : ${sql.script}">
<condition>
<not>
<available file="${sql.script}"></available>
</not>
</condition>
</fail>
<echo>Executing Update SQL Script ${sql.script}...</echo>
<echo>Database connection parameters :</echo>
<echo>driver="${sql.rdbms.driver}"</echo>
<echo>url="${sql.rdbms.url}"</echo>
<echo>userid="${rdbms.user}"</echo>
<!-- execute the base sql script -->
<sql driver="${sql.rdbms.driver}" url="${sql.rdbms.url}" userid="${rdbms.user}" password="${rdbms.pwd}" src="${sql.script}" delimiter=";" encoding="latin1" print="true" onerror="continue"></sql>
<echo>Execution of Update SQL Script finished.</echo>
</target>
</project>Variables of the UpdateDB.xml script (may be created as Phase Parameters)
| Variable | Description |
|---|---|
rdbms.type |
Database type. Currently MYSQL, MSSQL, ORACLE and DB2 are supported. |
rdbms.server |
Hostname or IP address of the database server, used in the jdbc connection url. |
rdbms.port |
Connection port of the database server, used in the jdbc url (e.g., 3306 for MySQL, 1433 for MS SQL, 1521 for Oracle, 50000 for DB2), used in the jdbc connection url. |
rdbms.dbname |
Name of the database that will be updated, used in the jdbc connection url. |
rdbms.dbschema |
Database schema, used in the jdbc connection url for DB2. |
rdbms.user |
User for setting up the jdbc connection, the user must have update rights. |
rdbms.pwd |
Password of database user, for setting up the jdbc connection. |
sql.script |
Path to the SQL script that will be executed on the database. |