Projects
|
The Project menu is only available to users with Global Administrator Access Rights. |
The Project menu options are explained in the following procedures:
Creating a Project
There are 2 types of Projects:
-
Release-based Projects: IKAN ALM will work with the existing structure in the VCR (Version Control Repository) system, so that the objects to be extracted from the VCR will be retrieved automatically when starting the build process.
-
Package-based Projects: IKAN ALM introduces the Package concept, which enables to work with isolated files from the VCR system. Objects must be selected manually in a Package structure created in IKAN ALM before starting the Build process.
|
Package-based Projects must connect to a VCR of type Subversion, TFVC or Git. Other VCR types do not support working with isolated files and thus not with Packages in IKAN ALM. |
-
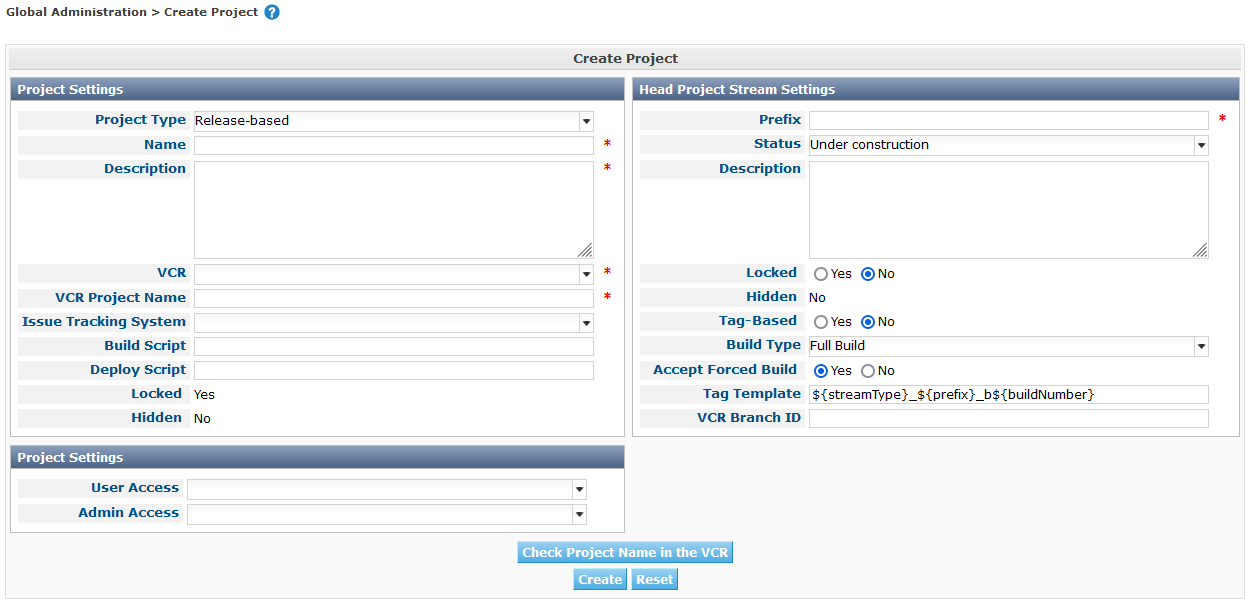
In the Global Administration context, select Project > Create Project.
The following screen is displayed:
-
Fill out the fields in the different sections.
Fields marked with a red asterisk are mandatory.
-
Project Settings
Field Meaning Project Type
Select the type of Project you want to create: Release-based or Package-based.
Depending on the type of Project you select, other fields will be available for editing on the Head Project Stream Settings panel.
Name
Enter the name of the new Project in this field.
Description
Enter a description for the new Project in this field.
VCR
From the drop-down list, select the VCR to be used for this IKAN ALM Project.
VCR Project Name
Enter the name of the VCR Project matching this IKAN ALM Project. It is possible that the VCR Project Name does not match the IKAN ALM Project Name.
You can verify whether the project with the specified VCR Project Name exists in the linked VCR by clicking the Check Project Name in the VCR button.
Note: This field stays empty for Subversion VCRs with single-project layout and for Git VCRs.
Issue Tracking System
Select one of the available Issue Tracking Systems from the drop-down menu.
If an Issue Tracking System is specified in this field, IKAN ALM will always automatically create an Issue Tracking Level Phase when a new Level is created for the Project.
This field is only visible if external Issue Tracking Systems have been defined in IKAN ALM.
For more information on Issue Tracking systems, refer to the chapter Issue Tracking
Build Script
In this field, enter the name of the Build Script to be used for this IKAN ALM Project.
This script will be used by default when executing Builds in the Project, but may be overwritten when defining a Build Environment.
Deploy Script
In this field, enter the name of the Deploy Script to be used for this IKAN ALM Project.
This script will be used by default when executing Deploys in the Project, but may be overwritten when defining a Deploy Environment.
Locked
This read-only field is set to Yes, because an IKAN ALM Project can only be unlocked when is audited and fully configured.
Hidden
This read-only field is defaulted to No, because an IKAN ALM Project cannot be hidden when it is still being created.
-
Project Security Settings (Optional)
Field Meaning User Access
From the drop-down list, select the User Group that will have User Access Rights for the new IKAN ALM Project.
If defined, this setting overrides the User Group with User Access Rights defined in the System Settings dialog. See: System Settings
This group is the default group that is set as Requester when creating a Level Request.
Admin Access
From the drop-down list, select the User Group that will have Administrator Access Rights for the new IKAN ALM Project.
If defined, this setting overrides the User Group with Admin Access Rights defined in the System Settings dialog. See: System Settings
-
Head Project Stream Settings
Field Meaning Build Prefix
Enter the Build Prefix to be used for the HEAD Project Stream of the new IKAN ALM Project.
Status
Select the required status for the HEAD Project Stream of the new IKAN ALM Project.
Description
Enter a description for the HEAD Project Stream of the new IKAN ALM Project.
Locked
Select whether or not the HEAD Project Stream of the new IKAN ALM Project must be locked.
By default, this option is set to No.
Hidden
This read-only field is defaulted to No, because an IKAN ALM Project Stream cannot be hidden when it is still being created.
Tag-Based
When creating a Release-based Project, select whether or not the HEAD Project Stream of the new IKAN ALM Project must be Tag-based.
By default, this option is set to No.
In a Tag-Based Project Stream, the Builds on the Build Level will be executed on sources with a pre-applied tag in the VCR, whereas in non Tag-Based projects these Builds will be executed on the latest sources.
When creating a Package-based Project, this option is unchangeably set to No.
Build Type
When creating a Release-based Project, select the required Build Type from the drop-down menu.
The following options are available:
-
Full Build
-
Partial Build: based on a user-selected tag
-
Production-based Partial Build: based on the tag of the Build currently in production
When creating a Package-based Project, this option is unchangeably set to Full Build.
Accept Forced Build
When creating a Release-based Project, select whether or not the HEAD Project Stream of the new IKAN ALM Project must accept Forced Builds, i.e., allow Builds to bypass the Schedule set on the Build Level.
By default, this option is set to Yes.
When creating a Package-based Project, this option is unchangeably set to No.
Tag Template
This field contains the Template that should be used for tagging Builds generated in this Project Stream. The Tags will be used to display these Builds in the VCR.
A template can be a combination of constants and variables.
The following constants are allowed:
-
letters
-
numbers
-
underscores
-
hyphens
-
Some other characters (such as , ; $ @) may be illegal, depending on the VCR type.
The following variables are available. They all have the format ${name}:
-
${prefix}: This variable returns the Build Prefix defined for the Project Stream.
-
${suffix}: This variable returns the Build Suffix defined for the Branch Stream. (If this variable is included in a Template for a Head Stream, it is ignored.)
-
${streamType}: This variable returns the Type indication for a Stream: H for Head Stream or B for Branch Stream.
-
${buildNumber}: This variable returns the number of the Build, so that the Build can be matched with its Tag.
-
${projectName}: This variable returns the name of the IKAN ALM Project.
-
${vcrProjectName}: This variable returns the VCR name of the Project.
-
$\{dateTime(dateformat)}: This variable returns the timestamp of the Building action in the indicated format. yyyy-MM-dd is a valid format. For other valid formats, refer to https://docs.oracle.com/en/java/javase/11/docs/api/java.base/java/text/SimpleDateFormat.html
-
${packageName}: This variable returns the name of the Package associated to the Level, when the Build is executed (only used for Package-based Projects).
VCR Branch ID
This field contains the VCR Branch ID. The same ID must be available in the VCR linked to the Project.
This field is required in case of a Team Foundation Project (mapped to Main Branch ID). For Head Streams belonging to other VCR Project types, this field remains empty.
The following table contains some examples of Tag Templates and the resulting tags:
Tag Template Resulting VCR Tag ${streamType}_${prefix}_${suffix}_b${buildNumber}
H_1.0_b5
where:
-
H = Head Stream Type
-
1.0 = Build Prefix
-
5 = Build Number
Note: The Suffix variable was ignored for the Head Stream!
B_1.0_bugfix_b5
where:
-
B = Branch Stream Type
-
1.0 = Build Prefix
-
bugfix = Build Suffix
-
5 = Build Number
${projectName}_${packageName}_b $\{dateTime(yyyy-MM-dd)}_b${buildNumber}
DEMOCVS Package2_2006-03-27_b5_
where:
-
DEMOCVS = Project Name
-
2006-03-27 = Creation timestamp of the Build
-
Package2 = Name of the Package used for the Build
-
5 = Build Number
-
-
-
Click the Project Name in the VCR button to check the availability of the VCR Project Name.
If the test is successful, the following message is displayed:
Info: The Project Name exists in the VCR.
If the test is not successful, the following pop-up window is displayed:
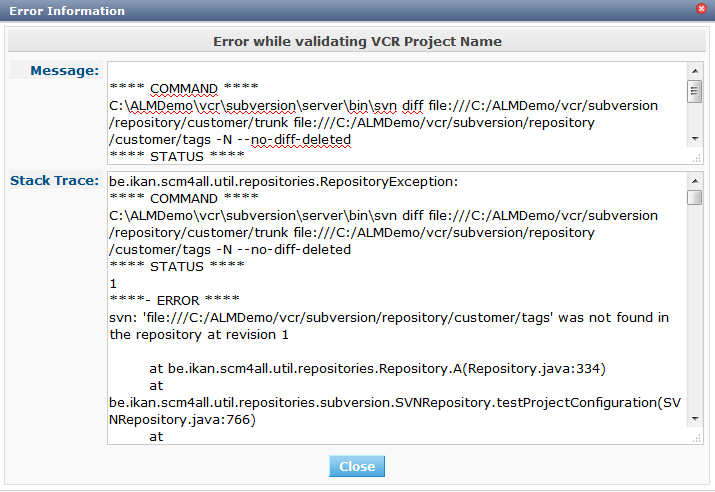
Correct the errors reported in the Stack Trace field and perform the test again.
-
Once the test is successful, click Create.
The Project will be created and you are forwarded to the Project Info screen in the Project Administration context. You can now administer the newly created Project by creating Levels etc. For more information, refer to the section Editing Project Settings.
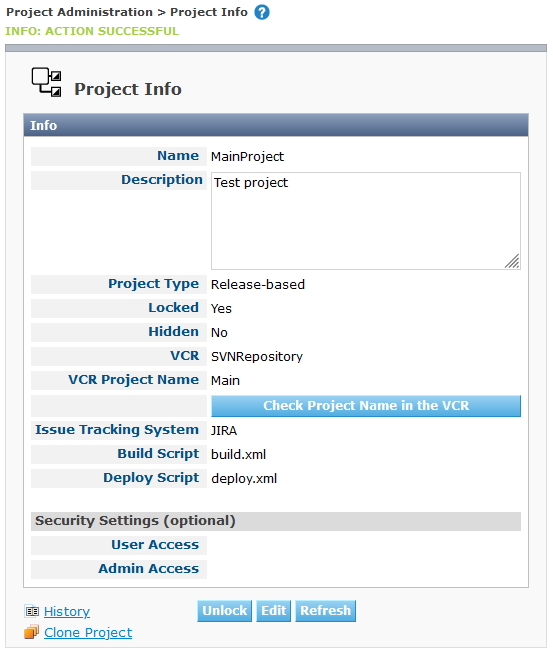
Underneath the Project Info panel, the following links and buttons are available:
-
History. This link will display the Project History View screen.
-
Unlock to lift the blocking of all activity on this Project, like manual or scheduled Level Request. You must unlock a Project after having completed the maintenance.
-
Edit to edit the Project Settings.
-
Refresh to retrieve the settings from the database.
-
Cloning an Existing Project
-
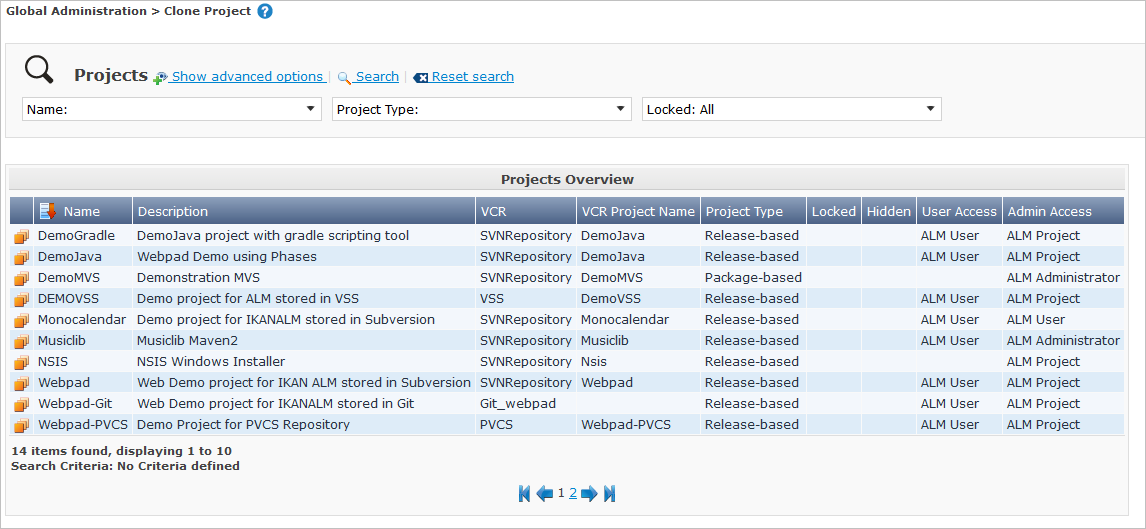
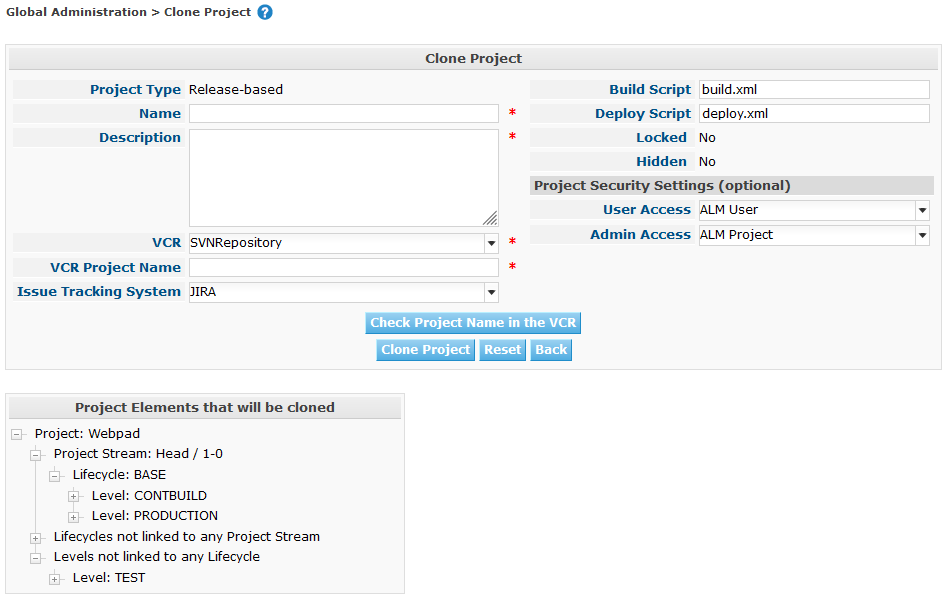
In the Global Administration context, select Project > Clone Project.
The following screen is displayed:
-
Define the required search criteria on the search panel.
The list of items on the overview will be automatically updated based on the selected criteria.
You can also:
-
click the Show/hide advanced options link to display or hide all available search criteria,
-
click the Search link to refresh the list based on the current search criteria,
-
click the Reset search link to clear the search fields.
-
-
Next, click the
 clone link in front of the required Project.
The following screen is displayed:
-
Fill out or edit the available fields.
The following fields are available:
Field Meaning Project Type
The Project Type used for the cloned Project is displayed and cannot be changed.
Name
Enter the name of the new Project in this field.
Description
Enter a description for the cloned Project in this field.
VCR
By default, the VCR used for the cloned Project is displayed. You may select another VCR from the drop-down list, if required.
VCR Project Name
Enter a VCR Project name for the new Project in this field.
Issue Tracking System
By default, the Issue Tracking System used for the cloned Project will be selected. You can select another Issue Tracking System from the drop-down list, if required.
Build Script
By default, the Build Script used for the cloned Project is displayed. You may select another Build Script from the drop-down list, if required.
Deploy Script
By default, the Deploy Script used for the cloned Project is displayed. You may select another Deploy Script from the drop-down list, if required.
Locked
This read-only field is set to No, because a new IKAN ALM Project is configured accordant to the cloned Project.
Hidden
This read-only field is defaulted to No, because an IKAN ALM Project cannot be hidden when it is still being created.
Project Security Settings - User Access
By default, the User Group with User Access Rights used for the cloned Project is displayed. You may select another User Group from the drop-down list, if required.
If defined, this setting overrides the User Group with User Access Rights defined in the System Settings dialog. See: System Settings
This group is the default group that is seen as Requester when creating a Level Request.
Project Security Settings - Admin Access
By default, the User Group with Admin Access Rights used for the cloned Project is displayed. You may select another User Group from the drop-down list, if required.
If defined, this setting overrides the User Group with Admin Access Rights defined in the System Settings dialog. See: System Settings
-
Expand the tree structure of the Project Elements to be cloned and check the validity of the Elements.
It contains the following object types:
-
Project Streams
-
Lifecycles
-
Levels
-
Level Phases
-
Build Environments
-
Deploy Environments
-
Environment Phases
-
Build Parameters
-
Deploy Parameters
-
Phase Parameters
-
Approvals
-
-
Fill out the fields as required and click Check Project Name in the VCR.
-
If the Project exists in the VCR, click clone Project.
The Project will be cloned.
-
Edit the definition of the required Objects.
All objects belonging to the new Project are exact copies of their counterparts in the cloned Project. It is the responsibility of the User to verify which objects need to be changed in the new Project. For instance, the Target Location of Deploy Environments in the new Project most likely need to be changed.
-
Audit the Project to unlock it.
Exporting an Existing Project
-
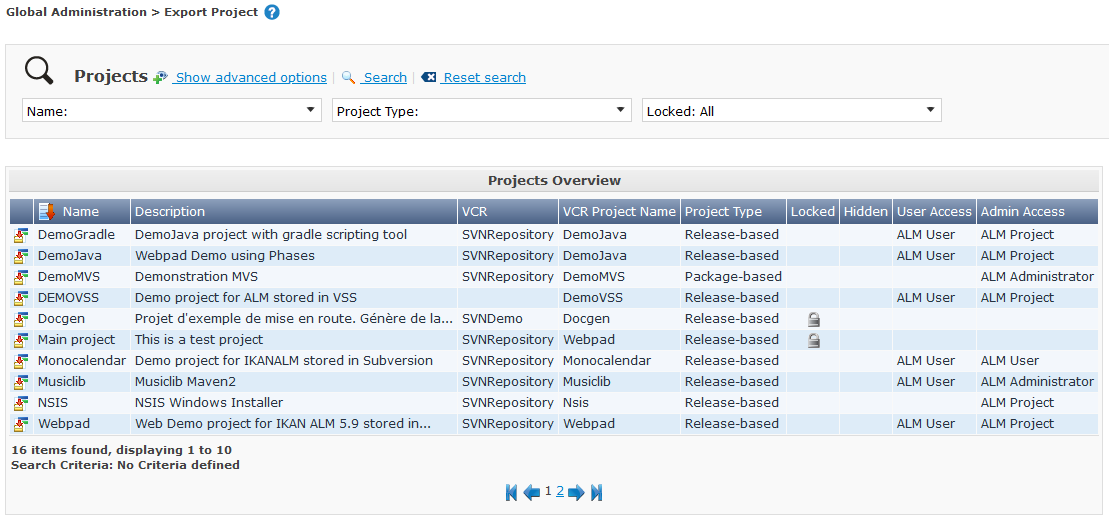
In the Global Administration context, select Project > Export Project.
The following screen is displayed:
-
Define the required search criteria on the search panel.
The list of items on the overview will be automatically updated based on the selected criteria.
You can also:
-
click the Show/hide advanced options link to display or hide all available search criteria,
-
click the Search link to refresh the list based on the current search criteria,
-
click the Reset search link to clear the search fields.
-
-
Next, click the
 Export link in front of the required Project.
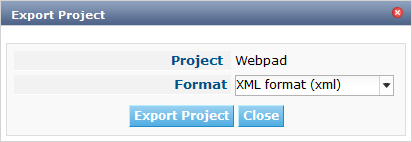
The following dialog is displayed:
-
Select the preferred format: XML format (xml) or JSON format (json) and click Save. The web browser will download the file and then either save the file automatically or ask where it should be saved.
-
The XML or JSON file can be easily edited using any text editor to make the necessary changes.
|
When editing the Project export file, always change the Project name, since IKAN ALM will refuse to import a Project when another Project with the same name already exists. |
Importing a Project
-
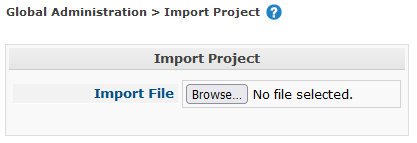
In the Global Administration context, select Project > Import Project.
The following screen is displayed:
-
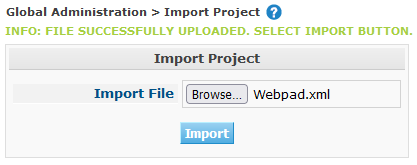
Click Browse… in the Import Project panel. Next the web browser will ask to select a file from the local computer. The format of the file should be either XML or JSON. On successful upload the following screen is displayed:
-
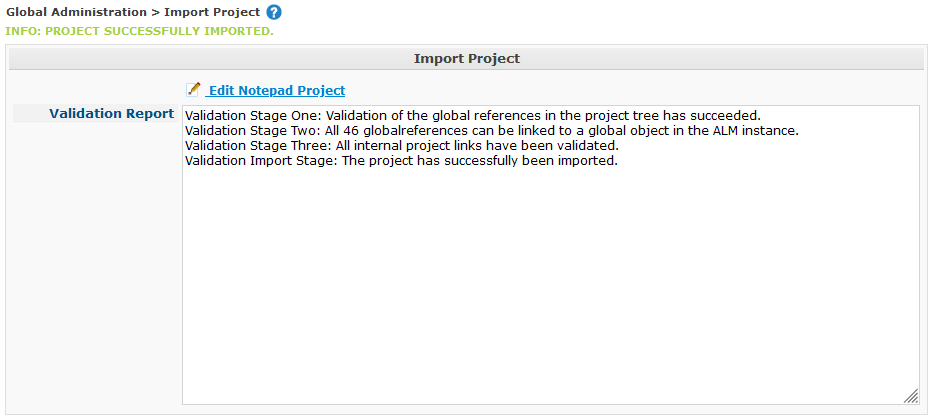
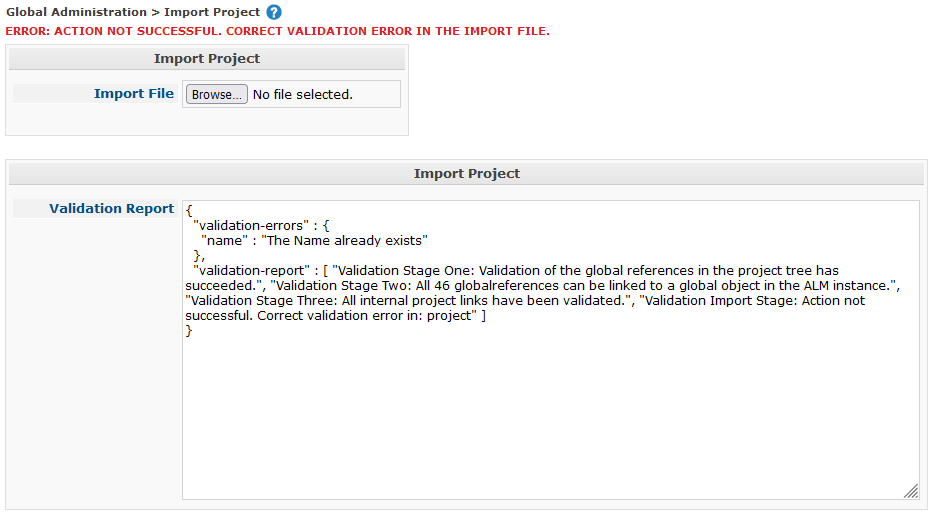
Next, press the Import button to import the uploaded project file into IKAN ALM.
-
When the import process is finished, IKAN ALM will display either an info message (when successful) or an error message. The Validation Report in the Import Project panel provides more details about the result.
-
Example: Info
-
Example: Error
-
-
When successful, press the link Edit <chosen-project-name> Project in the Import Project panel to go to the Project Administration screen for the newly imported project.