Issue Tracking
The IKAN ALM Issue Tracking functionality provides the possibility to link issues from an external issue tracking system to an IKAN ALM Level Request.
Issues can get linked to a Level Request in the following ways:
-
via an automatic search for handled issues in the comments provided by the developers when committing or checking in sources into the VCR. This automatic search is done in a separate Phase during the handling of a Build Level Request, and is based on a regular expression describing the issue tracking number format.
-
via the enumeration of solved issues when delivering to Test/Production levels enabling easy generation of Release Notes
-
via a manual addition of an issue to a successful Level Request, using the GUI widgets on the Level Request Detail screen.
|
You can only click through from a linked issue in IKAN ALM to the issue in the third-party Issue Tracking tool if the tool offers a web interface. |
On top of this basic Issue Tracking functionality, IKAN ALM offers an extra tight integration for Atlassian JIRA, Microfocus ALM, Microsoft Team Foundation and GitHub with following additional functionality:
-
possibility to test the connection with the Issue Tracking system at the moment you create or edit an Issue Tracking System definition
-
automatic synchronization of handled issues with the Issue Tracking system: IKAN ALM retrieves additional information, such as a short description, the owner, the priority, …from the corresponding JIRA Issue, Microfocus ALM Defect, Team Foundation Work Item or GitHub Issue. This information is synchronized each time the build result evolves in the IKAN ALM Lifecycle.
-
manual synchronization of issues linked to a Level Request on the Level Request Detail screen
-
option to automatically add a comment to the issue/defect/work item in JIRA/MF ALM/Github/Team Foundation after a successful Level Request. This comment will contain a link to the IKAN ALM Level Request.
Refer to the following sections for detailed information.
Issue Tracking System
Issue Tracking System Properties
Once the Issue Tracking System has been defined in the Global Administration section, you must activate it on the Project. Editing Project Settings
If you want Issues to be automatically linked to Level Requests for certain Levels, the Issue Tracking Phase must be linked to those Levels. This will be done automatically when creating Levels for Projects which have an Issue Tracking System activated. If you activate the Issue Tracking System for a Project with existing Levels, you have to link the Issue Tracking Phase manually to each of those Levels. For more information, refer to the sections Issue Tracking Phaseand Level Phases.
Creating an Issue Tracking System
|
This option is only available if you have Global Administrator Access Rights in IKAN ALM. |
-
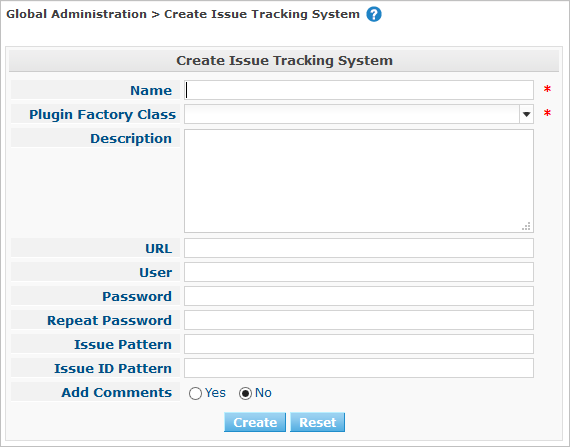
In the Global Administration context, select Issue Tracking > Create.
The following screen is displayed:
-
Fill out the fields in the Create Issue Tracking System panel at the top of the screen. Fields marked with a red asterisk are mandatory:
Field Meaning Name
Enter the Name of the external Issue Tracking System.
This field is the only mandatory field. However, if only the Name is provided, the integration capability is confined to being very basic, meaning that issues will have to be created and linked manually to the IKAN ALM Level Requests.
Description
Enter a description for the Issue Tracking System.
Plugin Factory Class
Select the name of the class to be used for the Issue Tracking System. The classes are available in IKAN ALM as system functions:
-
"generic" system (Bugzilla, Track, Mantis, …):
be.ikan.scm4all.plugin.issuetracking.generic.GenericITSPluginFactory
IKAN ALM has a basic integration with these Issue Tracking System.
-
JIRA:be.ikan.scm4all.plugin.issuetracking.jira.JiraITSPluginFactory
-
MicroFocus ALM: be.ikan.scm4all.plugin.issuetracking.mfalm.MFAlmITSPluginFactory
-
GitHub: be.ikan.scm4all.plugin.issuetracking.github.GitHubITSPluginFactory
-
Microsoft Team Foundation: be.ikan.scm4all.plugin.issuetracking.tfs.TFSITSPluginFactory
Note: The integration with JIRA, MF ALM, Team Foundation and GitHub also retrieves information about individual issues, such as status, description and owner. Issues are synchronized with the external Issue Tracking System at each Level Request deliver in the Lifecycle.
URL
Enter the template URL used to click through from an issue in IKAN ALM to the issue in the external Issue Tracking System.
Obviously, the Issue Tracking System must have a web interface that will guide you (perhaps after having provided the necessary login parameters) to the detailed description of an Issue. In the URL, the issue number variable must be provided as "${issueId}".
Some examples:
For JIRA:
http(s)://host:port/browse/PROJECTKEY-${issueId}For Trac:
http(s)://host/ticket/${issueId}For Bugzilla:
http(s)/host/bugs/show_bug.cgi?id=${issueId}For Team Foundation:
http(s)://host[:port/tfs]/DefaultCollection/PROJECT_NAME/_workitems#_a=edit&id=${issueId}User
Enter the User ID having the necessary rights to connect to the system.
Password
Enter the Password for the User ID.
The characters you enter are displayed as asterisks.
Repeat Password
Re-enter the Password for the User ID.
Issue Pattern
Enter the Issue Pattern.
This Issue Pattern must be a valid regular expression. For more information on how to provide valid regular expressions that may be interpreted by IKAN ALM, refer to https://docs.oracle.com/en/java/javase/11/docs/api/java.base/java/util/regex/Pattern.html.
If provided, this pattern will be used to detect issue numbers in the commit comments in the VCR. This pattern matching is done in a separate Phase at the end of a successful Build Level Request.
The pattern matching is case insensitive, this is reflected in the examples below.
Note that the field may be neglected (together with the Issue ID Pattern) for a Team Foundation ITS when it is connected to a Project with a Team Foundation versioning system: in that case the Work Items are directly connected to a Commit, so it’s not necessary that IKAN ALM parses the issue comments to detect the connected Work Items.
Examples (the bold text is the text that will be matched):
Example 1: webpad(\s)((\s)*,(\s)*[0-9])
- Solving issue webpad 333 by adapting.
- Added file x, and changed file y in order to solve Webpad 45, 46.
Example 2: [#([A-Z0-9])-([0-9])\]
- Small fix in the about menu [#WEBPAD-7]. - Also fixed a general IKAN ALM problem [#ALM-3788]. - Finally also tackled issue [#gen-344].
Issue ID Pattern
Enter the Issue ID Pattern.
This pattern is needed to retrieve the exact Issue Number out of a matched Issue in the commit comment. It is part of the Issue Pattern and must also be a valid regular expression.
This will allow to select the numbers in bold in the comments of the VCR.
The field may be neglected (together with the Issue Pattern) for a Team Foundation ITS when it is connected to a Project with a Team Foundation versioning system.
Example 1:
[0-9]+- Webpad 45 , 46
- [#gen-344]
Example 2:
[A-Z0-9]+-[0-9]+- WEBPAD-7
- ALM-3788
Add Comments
This option has no effect if you use the GenericITSPlugin.
Select the Yes option to automatically add a comment to the Issue in the Issue Tracking System. This comment will contain a link to the IKAN ALM Level Request.
The addition of this comment will also be listed in the Level Request Issue Tracking Phase Log.
For more detailed information on the specific Issue Tracking system settings, refer to the appropriate Integration Guide (HowToALM_Integrating MF ALM, HowToALM_Integrating JIRA, HowToALM_Integrating GitHub or HowToALM_Integrating Team Foundation).
-
-
Once you have filled out the fields, click Create.
A warning may appear indicating that some required properties must be set. Refer to the section The Issue Tracking System Properties Overview Panel for editing the Issue Tracking System properties.

Once the Issue Tracking System has been defined, you must activate it on the Project. Editing Project Settings
-
In case you defined a JIRA, MF ALM, GitHub or Team Foundation Issue Tracking System, you can test if IKAN ALM can establish the connection.
RELATED TOPICS |
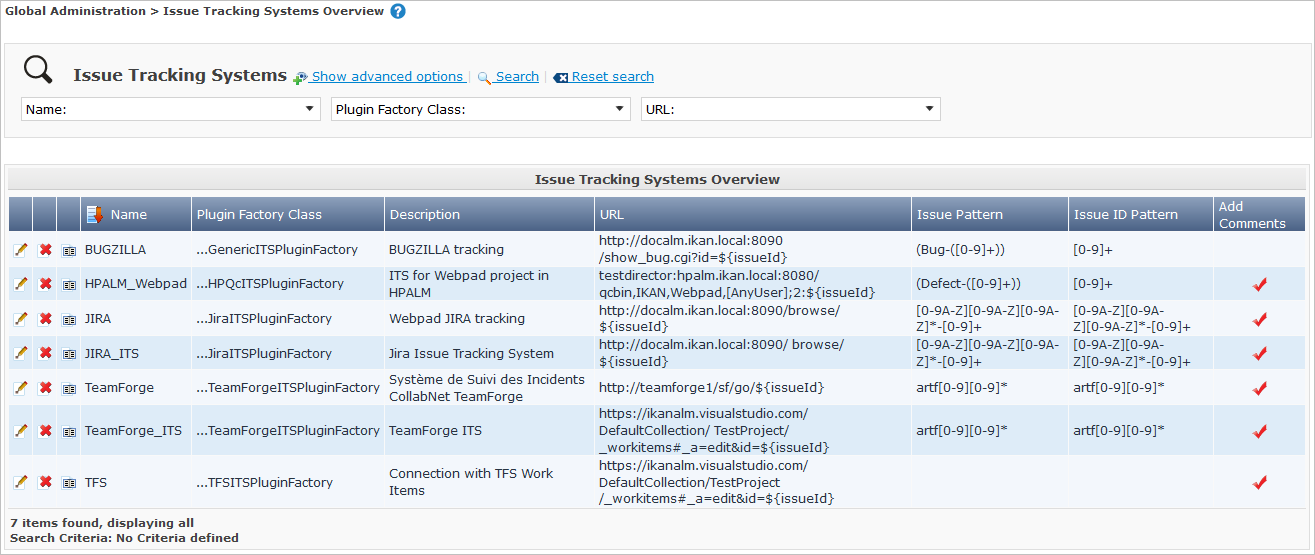
The Issue Tracking Systems Overview Screen
-
In the Global Administration context, select Issue Tracking > Overview.
The following screen is displayed:
-
Define the required search criteria on the search panel.
The list of items on the overview will be automatically updated based on the selected criteria.
You can also:
-
click the Show/hide advanced options link to display or hide all available search criteria,
-
click the Search link to refresh the list based on the current search criteria,
-
click the Reset search link to clear the search fields,
-
-
Verify the information on the Issue Tracking Systems Overview panel.
For a detailed description of the fields, refer to Creating an Issue Tracking System.
-
Depending on your access rights, the following links may be available on the Issue Tracking Systems Overview panel:

Edit
This option is available to IKAN ALM Users with Global Administrator Access Rights. It allows editing an Issue Tracking System definition.

Delete
This option is available to IKAN ALM Users with Global Administrator Access Rights. It allows deleting an Issue Tracking System definition.

History
This option is available to all IKAN ALM Users. It allows displaying the History of all create, update and delete operations performed on an Issue Tracking System and its properties.
Editing an Issue Tracking System Definition
-
In the Global Administration context, select Issue Tracking > Overview.
-
Click the
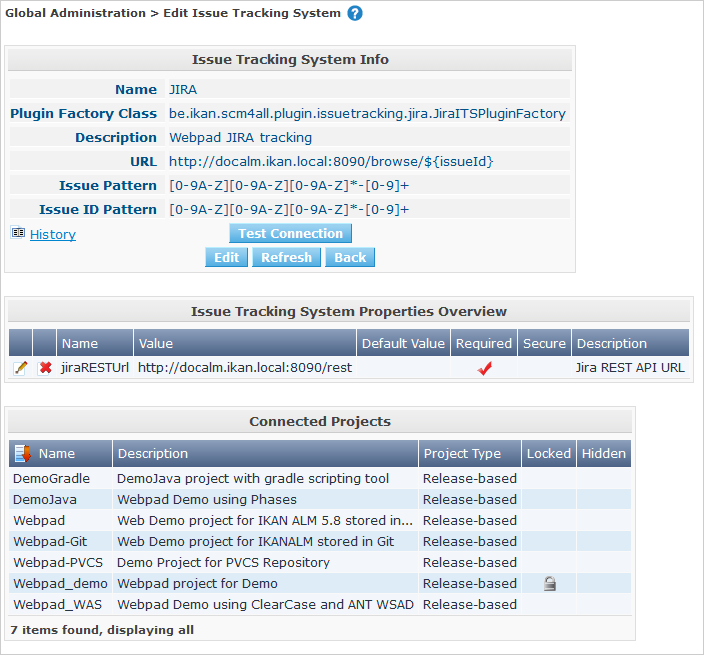
Edit link in front of the Issue Tracking System you want to modify.The following screen is displayed:
-
Click the Edit button on the Issue Tracking System Info panel.
The following screen is displayed:

-
Edit the fields as required.
For a description of the fields, refer to Creating an Issue Tracking System.
The Connected Projects panel displays the Projects the Issue Tracking System is linked to.
-
Click Save to save your changes.
You can also click:
-
Refresh to retrieve the settings from the database.
-
Cancel to return to the previous screen without saving the changes
-
-
In case you defined a JIRA, MF ALM, GitHub or Team Foundation Issue Tracking System with its required properties, you can test if IKAN ALM can establish the connection.
Click the Test Connection button.
Info: Could successfully establish a connection with the Issue Tracking System.
If the test is not successful, the following screen is displayed:
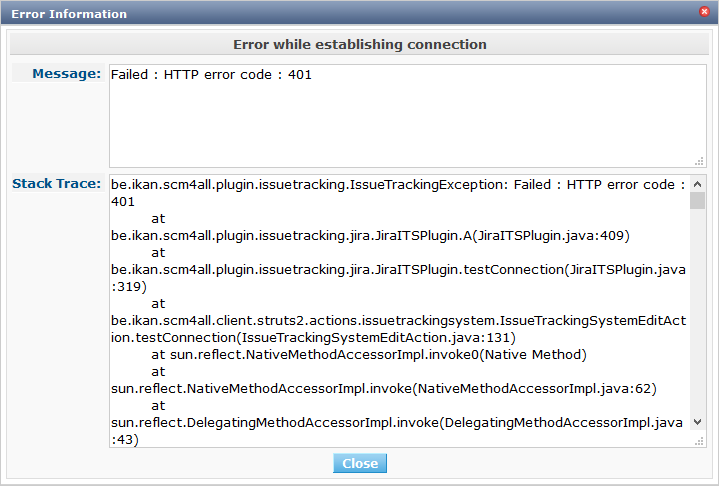
Correct the errors reported in the Stack Trace field and perform the test again.
-
On the Issue Tracking System Properties Overview panel, you can create and edit the Isue Tracking System Properties.
For more information, refer to the section The Issue Tracking System Properties Overview Panel
Deleting an Issue Tracking System Definition
. In the Global Administration context, select Issue Tracking > Overview.
-
Click the
Delete link to delete the selected Issue Tracking System definition.The following screen is displayed:
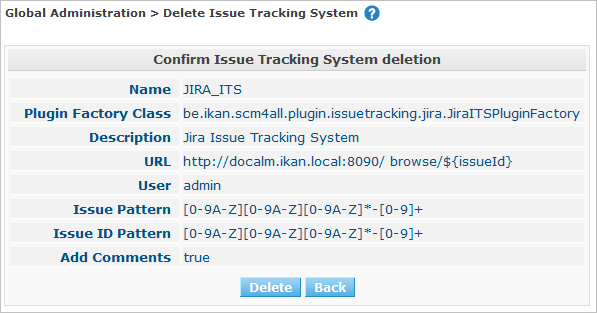
-
Click Delete to confirm the deletion.
You can also click Back to return to the previous screen without deleting the entry.
Note: If the Issue Tracking System is still linked to one (or more) Project(s), the following screen is displayed:
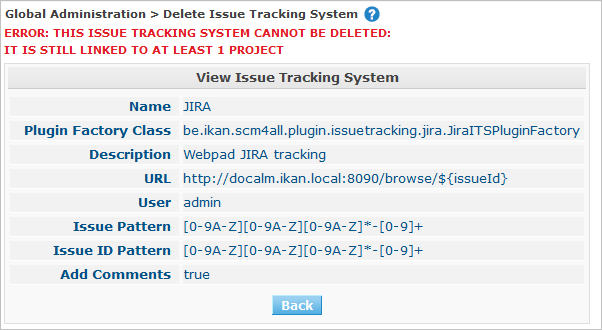
You must change the definition of the listed Projects, before you can delete the Issue Tracking System.
Viewing the Issue Tracking System History
-
In the Global Administration context, select Issue Tracking > Overview.
-
Click the
History link to display the Issue Tracking System History View.For more detailed information concerning this History View, refer to the section History and Event Logging.
-
Click Back to return to the Issue Tracking Systems Overview screen.
RELATED TOPICS |
The Issue Tracking System Properties Overview Panel
The Issue Tracking System Properties Overview panel is available on the Edit Issue Tracking System screen.
-
Access the Edit Issue Tracking System screen.
In the Global Administration context, select Issue Tracking > Overview and click the
Edit link in front of the Issue Tracking System for which you want to display the Properties. -
This screen contains the Issue Tracking System Properties Overview panel.
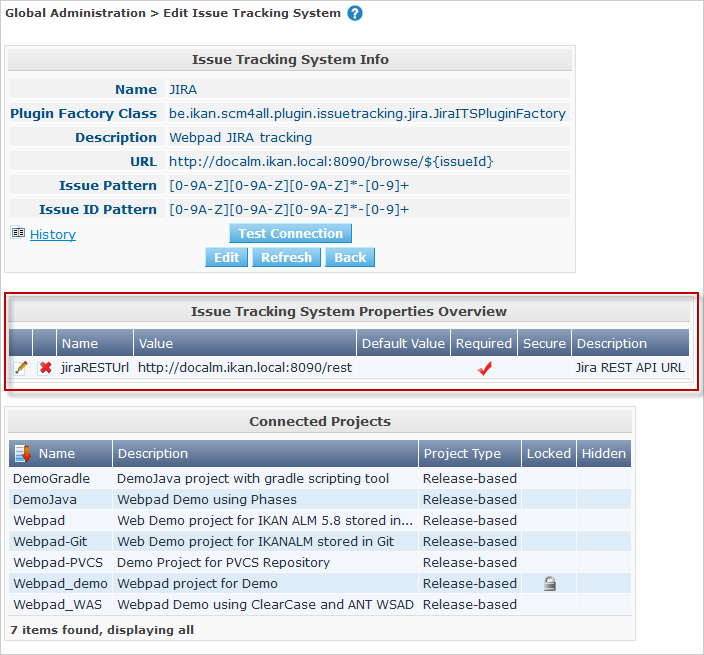
This screen lets you create, edit or delete ITS Properties.
Depending on the Properties available in the Issue Tracking System and on your access rights, the following links may be available on the Issue Tracking Systems Properties Overview panel:
You can only define Properties which have been implemented by the Plugin Factory Class.

Create
This link is only available if a Property has been defined by the Plugin Factory Class, but its value has not been specified yet. Otherwise, only the links Edit, Delete and History are available.
This option is available to IKAN ALM Users with Global Administrator Access Rights. It allows creating an Issue Tracking System Property definition.
Edit
This option is available to IKAN ALM Users with Global Administrator Access Rights. It allows editing an Issue Tracking System Property definition.
Delete
This option is available to IKAN ALM Users with Global Administrator Access Rights. It allows deleting an Issue Tracking System Property definition.
Creating an Issue Tracking System Property
-
On the Issue Tracking System Properties Overview panel, click the
Create link for the required Property.The following screen is displayed:
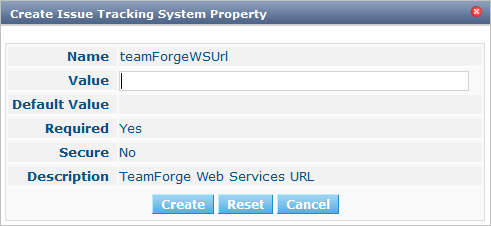
The following fields are displayed:
Field Meaning Name
The name is predefined by IKAN ALM in function of the type of Issue Tracking System.
Value
Depending on the Issue Tracking system and the property, this field is mandatory or optional.
Enter the value needed for correct usage of the Issue Tracking System.
Example for the JIRA jiraRESTUrl property:
http(s)://machine:8090/restExample for the GitHub gitHubRESTUrl property:
https://api.github.com/repos/{organization}/{repository}Example for the Team Foundation collectionURL property:
http(s)://ServerName[:8080/tfs]/DefaultCollectionDefault Value
This field contains the default value.
Required
Option managed by IKAN ALM.
Required properties must be provided in order to have a full functional Issue Tracking integration.
Possible values: Yes or No.
Secure
Option managed by IKAN ALM.
The value of secured properties will be hidden (replaced by *) from the user.
Possible values: Yes or No.
Description
Option managed by IKAN ALM.
The description for the Issue tracking System Property.
-
Fill out the value in the Value field and click Create to confirm the creation of the new Property.
You can also click:
-
Reset to clear the fields and restore the initial values.
-
Cancel to return to the previous screen without saving your changes.
-
Editing an Issue Tracking System Property
-
On the Issue Tracking System Properties Overview panel, click the
_Edit _link for the required Property.The following screen is displayed:
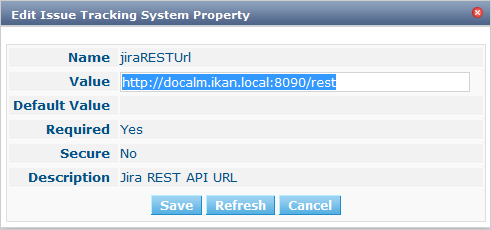
For a description of the fields, refer to the section Creating an Issue Tracking System Property.
-
If required, modify the value in the Value field and click Save.
You can also click:
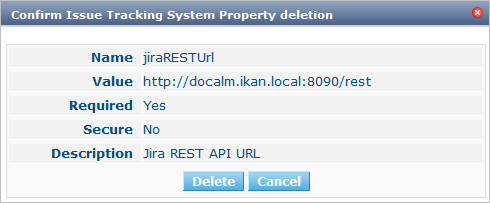
Deleting an Issue Tracking System Property
-
On the Issue Tracking System Properties Overview panel, click the
Delete link for the required Property.The following screen is displayed:
-
Click Delete to confirm the Deletion of the Property.
You can also click Cancel to return to the Issue Tracking Systems Overview without deleting the Property.