Command Line Interface (Optional)
IKAN ALM can be extended with an optional Command Line interface, allowing the creation of Level Requests and Packages and the generation of Reports by means of a shell interface instead of the IKAN ALM Web Application.
Possible uses:
-
Manual creation of Level Requests (CLR Command): Creating Level Requests by Specifying Options and Parameters
-
Manual creation of Packages (Package Command): Creating Packages by Specifying Options and Parameters
-
Manual generation of Reports (Report Command): Generating Reports by Specifying Options and Parameters
-
Creation of Level Requests in an external IDE. This guide describes the integration procedure for Visual Studio Code and Eclipse.
-
Automated creation of Level Requests using a Scripting Tool. A scripting tool is used to define the triggers (e.g., server backup) for Level Request creation. This guide describes the use of an ANT script.
The IKAN ALM Command Line interface can be installed on each client machine requiring its functionality. It requires a connection (TCP/IP) to the central IKAN ALM Server. The connection with the IKAN ALM Server is established using XML-RPC.
The CLR and Package commands can also be executed through the IKAN ALM REST API. Consult the IKAN ALM REST API documentation for more information.
Manual Usage of the Command Line interface
Refer to the following procedures for detailed information:
Creating Level Requests by Specifying Options and Parameters
-
Prepare the Level Request creation.
On a Windows platform:
-
Open a Command prompt.
-
Browse to the IKAN ALM Command Line working folder. After a standard installation, this is: C:\alm\commandline
You may add this location to the PATH Environment variable, so that it becomes accessible through other working directories.
On a Unix platform:
-
Open a terminal console.
-
Browse to the IKAN ALM Command Line working directory.
After a standard installation, this is: /opt/ikan/alm/commandline
You may create a symbolic link to the
alm.shscript so that it becomes accessible through other working directories.
-
-
Enter the required Level Request creation instruction.
Format:
alm -serverhost:$HOSTNAME [-serverport:$PORTNUMBER] -user:$USERID -password:$PASSWORD [-secured=true|false] clr parameters
The following elements are available:
Element Description Mandatory alm
This element calls the alm.cmd (Windows) or alm.sh (Linux) file.
Yes
serverhost
This element allows defining the DHCP name or IP address of the host running the IKAN ALM Server.
Yes
serverport
This element allows defining the port number used to establish the connection to the IKAN ALM Server via XML-RPC.
If this element is not provided, the default port number (20021) will be used.
No
user
This element allows defining a User ID with IKAN ALM access rights.
Yes
password
This element allows defining the password associated with the User ID used to access IKAN ALM.
Yes
secured
This element allows determining whether an encrypted connection must be used or not.
If the IKAN ALM Server is using an encrypted connection, set the secured element to true:
-secured=true
If the IKAN ALM Server is not using an encrypted connection, set the secured element to false or omit the secured parameter out.
No
clr
This command stands for Create Level Request.
Yes
parameters
The Level Request creation parameters are explained in the following step.
Yes
-
Define the Level Request creation parameters.
Format:
clr -project:[project name] [-projectstream:[build prefix[-build suffix]]] [-package:[package name]] -level:[level name] [-description:[description]] [-buildnumber:[buildnumber]] [-tag:[vcr tag]] [-redeliver=true|false] [-startdate:[startdate]] [-paramfile:[parameter file]]
Parameter Description Mandatory project
This parameter allows defining the Project for which you create a Level Request.
Use the Project name as defined in IKAN ALM.
Yes
projectstream
This parameter allows defining the Project Stream for which you create a Level Request.
Use the Build Prefix (and Build Suffix) as defined in IKAN ALM to identify the Project Stream to create a Level Request for.
If this parameter is not provided, the Level Request will be created for the Head Project Stream.
No
package
This parameter allows defining the name of the Package for which a Level Request must be created.
Yes (only for Package-based projects)
level
This parameter allows defining the Level name for which you create a Level Request.
Use the Level Name as defined in IKAN ALM.
Yes
description
This parameter allows defining the description of the Level Request.
No
tag
This parameter allows defining the Tag with which the Build will be tagged in the VCR. Only has effect on Level Requests of a Build Level. If omitted, a tag name will be generated using the Tag Template of the Project Stream.
No
redeliver
This parameter allows redelivering previously delivered Build Results on Test and Production Levels.
By default, this parameter is set to false: if no Level Request is available on the previous Level in the Lifecycle with a higher build number, the current active Level Request will NOT be redelivered via the commandline.
In case you want to allow a redeliver, you must explicitly set the redeliver parameter to true.
No
startdate
This parameter allows defining the requested starting date and time of the Level Request. The accepted format is yyyy-MM-ddTHH:mm:ss (for example : 2021-11-29T23:15:00). Only has effect on Level Requests of a Test or Production Level. If omitted, the Level Request will run as soon as possible.
No
deploysToExecute
This parameter allows choosing the Deploy Environments to Deploy to if the Level has Optional Deploys enabled in the chosen Lifecycle. Accepts a case sensitive comma separated list of names. If omitted when available, no Deploy Environments will be deployed to.
No
paramfile
This parameter allows defining the name of the property file containing Build and Deploy Parameters in key=value format.
No
Note that you do not need to define the Level Request Type. The Level Request Type is determined automatically:
-
For Build Levels with a Schedule, a Force Build Level Request will be created.
-
For Build Levels without a Schedule, a Request Build Level Request will be created.
-
For Test and Production Levels, a Deliver Level Request will be created, which will deliver the latest successful Level Request on the previous Level in the Lifecycle (whereas in the web application, you can select the Build to be delivered).
-
-
Once you have entered the complete command, press Return.
Result:
-
If the Level Request is created successfully, the following screen is displayed:

These messages only indicate that the Level Request was created successfully. Refer to the Level Requests Overview in the web application to verify if the Level Request was executed successfully as well.
-
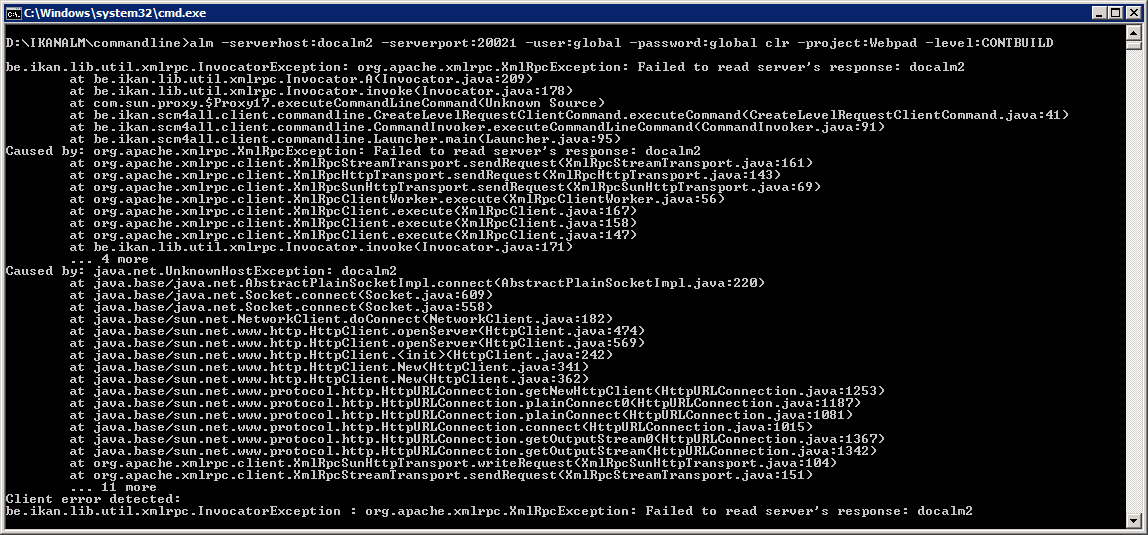
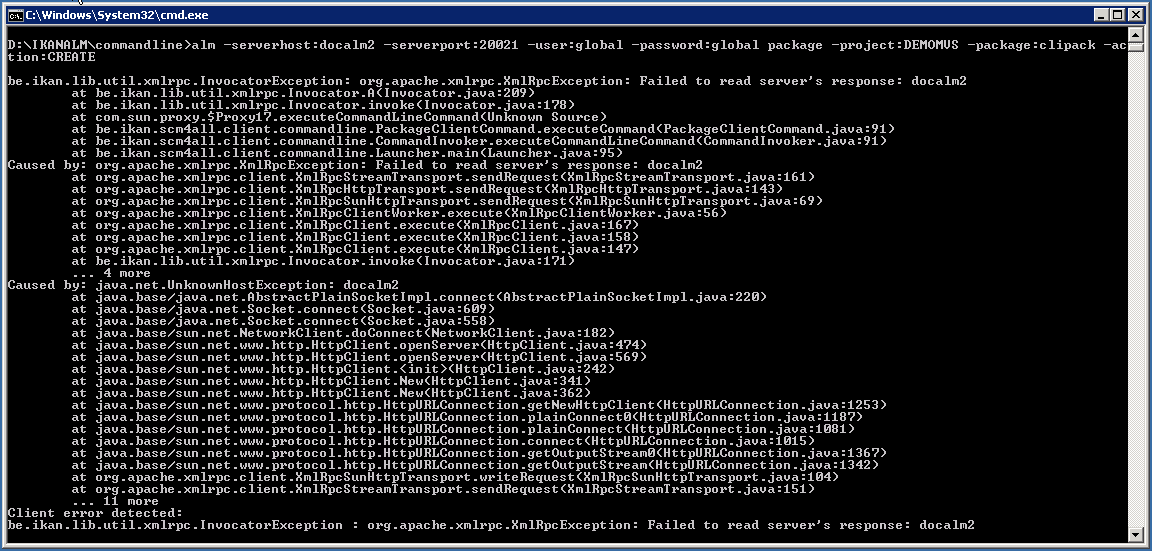
If the Level Request cannot be created, because there is no connection with the IKAN ALM Server, the following screen is displayed:
-
If the user entered an unknown command, the following screen is displayed:

-
If the user entered unknown or incorrect command options, the screen similar to the following is displayed:
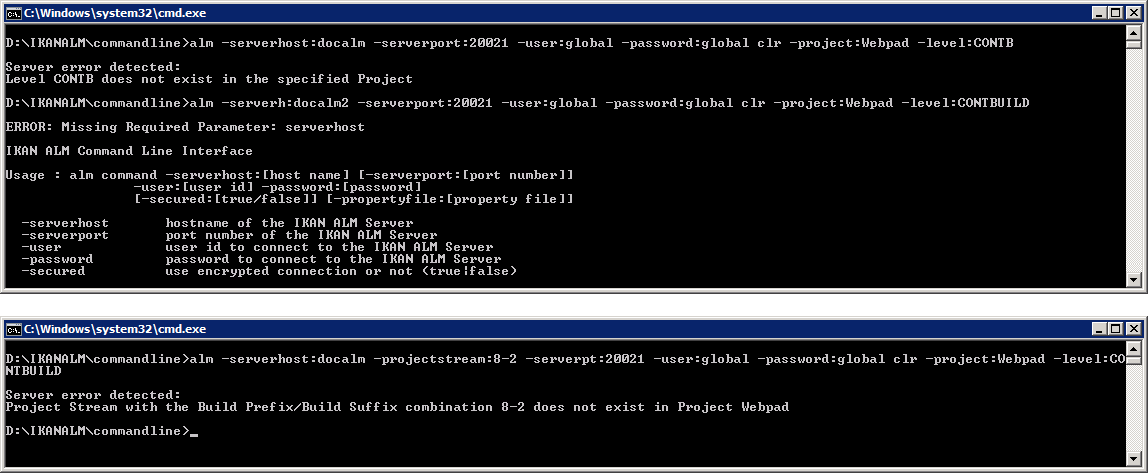
Similar error messages are provided for unknown Project or Package names and incorrect User ID/Password combinations.
-
If the Level Request cannot be created because of pending Level Requests for the Level, the following screen is displayed:

Similar error messages are shown if there is no suitable Build result to be delivered, the Level is locked, the Project Stream is locked or if there is an authorization error.
-
Creating Level Requests Using a Properties File
It is possible to save frequently used settings in a Properties file, so that you do not have to enter the complete Level Request creation parameters. After a standard installation, one such properties file, called clr.properties is available in the Command Line installation folder.
Open the file in a text editor to display its content:
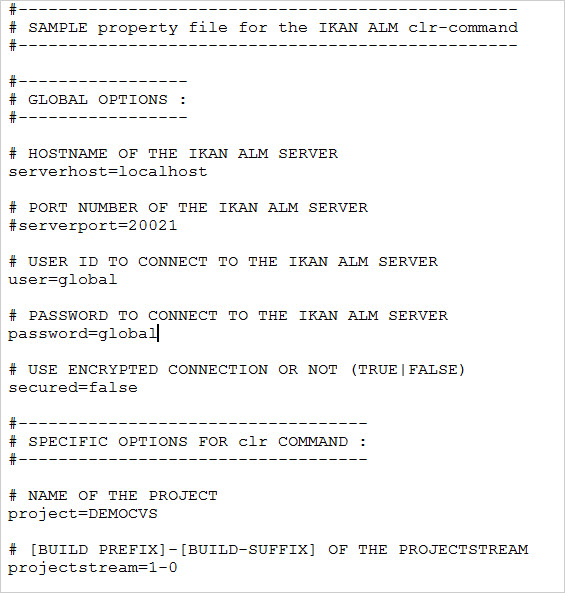
You can edit this standard file so that the settings match your requirements. Refer to the Creating Level Requests by Specifying Options and Parameters for a description of the options and parameters. You can also create any number of specific properties files by copying the standard file, editing the copies and saving them under logical names for later usage.
-
Prepare the Level Request creation.
On a Windows platform:
-
Open a Command prompt.
-
Browse to the IKAN ALM Command Line working folder. After a standard installation, this is: C:\alm\commandline
You may add this location to the PATH Environment variable, so that it becomes accessible through other working directories.
On a Unix platform:
-
Open a terminal console.
-
Browse to the IKAN ALM Command Line working directory. After a standard installation, this is: /opt/ikan/alm/commandline
You may create a symbolic link to the
alm.shscript so that it becomes accessible through other working directories.
-
-
Make sure that the properties file to be used is available and that the settings match the requirements.
If not, create the properties file and/or edit the settings with a text editor.
-
Create the Level Request by entering a command in the following format:
alm clr -propertyfile:$PROPERTYFILENAME [-options] [-parameters]
The following elements are available:
Element Description Mandatory alm
This element calls the alm.cmd (Windows) or alm.sh (Linux) file.
Yes
clr
This element indicates that you want to create a Level Request.
Yes
propertyfile
This element allows selecting the properties file that must be used to create the Level Request.
Yes
options or parameters
Any option or parameter defined after the properties file overrides the setting in the selected properties file.
No
-
Once you have entered the complete command, press Return.
The results and console outputs are similar to those of the section above: Creating Level Requests by Specifying Options and Parameters. Refer to step 4 of that section for more information.
Creating or updating Packages by Specifying Options and Parameters
-
Prepare the Package creation.
On a Windows platform:
-
Open a Command prompt.
-
Browse to the IKAN ALM Command Line working folder. After a standard installation, this is: C:\alm\commandline
You may add this location to the PATH Environment variable, so that it becomes accessible through other working directories.
On a Unix platform:
-
Open a terminal console.
-
Browse to the IKAN ALM Command Line working directory.
After a standard installation, this is: /opt/ikan/alm/commandline
You may create a symbolic link to the
alm.shscript so that it becomes accessible through other working directories.
-
-
Enter the required Level Request creation instruction.
Format:
alm -serverhost:$HOSTNAME [-serverport:$PORTNUMBER] -user:$USERID -password:$PASSWORD [-secured=true|false] package parameters
The following elements are available:
Element Description Mandatory alm
This element calls the alm.cmd (Windows) or alm.sh (Linux) file.
Yes
serverhost
This element allows defining the DHCP name or IP address of the host running the IKAN ALM Server.
Yes
serverport
This element allows defining the port number used to establish the connection to the IKAN ALM Server via XML-RPC.
If this element is not provided, the default port number (20021) will be used.
No
user
This element allows defining a User ID with IKAN ALM access rights.
Yes
password
This element allows defining the password associated with the User ID used to access IKAN ALM.
Yes
secured
This element allows determining whether an encrypted connection must be used or not.
If the IKAN ALM Server is using an encrypted connection, set the secured element to true:
-secured=true
If the IKAN ALM Server is not using an encrypted connection, set the secured element to false or omit the secured parameter out.
No
package
This command creates or updates a Package.
Yes
parameters
The Package creation or update parameters are explained in the following step.
Yes
-
Define the Package creation or update parameters.
Format:
package -project:[project name] [-projectstream:[build prefix[-build suffix]]] -package:[package name] [-description:[description]] -action:[CREATE | UPDATE] [-owner:[owner userId]] [-status=[Status Integer]] [-targetreleasedate:[target release date]] [-filerevisions:[xml file containing file revisions links]]
Parameter Description Mandatory project
This parameter allows defining the Project for which you create or update a Package.
Use the Project name as defined in IKAN ALM.
Yes
projectstream
This parameter allows defining the Project Stream for which you create or update a Package.
Use the Build Prefix (and Build Suffix) as defined in IKAN ALM to identify the Project Stream to create a Package for.
If this parameter is not provided, the Package will be created for the Head Project Stream.
No
package
The name of the package.
Yes
description
This parameter allows defining the description of the Package.
No
action
The action to be performed: CREATE or UPDATE.
Yes
owner
This parameter allows defining the owner for the Package.
No
status
This parameter allows defining the status of the Package. On create, this parameter is always 0, or ACTIVE. On update, the status can be chosen by the user.
No
targetreleasedate
This parameter allows defining the target release date of the Package. The accepted format is yyyy-MM-dd.
No
filerevisions
This parameter allows defining the file revisions the package contains in XML format.
No
-
Once you have entered the complete command, press Return.
Result:
-
If the Package is created or updated successfully, A screen similar to the following is displayed:

-
If the Package cannot be created or updated, because there is no connection with the IKAN ALM Server, the following screen is displayed:
-
If the user entered an unknown command, the following screen is displayed:
-
If the user entered unknown or incorrect command options, the screen similar to the following is displayed:
Similar error messages are provided for unknown Project or Package names and incorrect User ID/Password combinations.
-
Updating Contents of a Package Using an XML File
When creating or updating a package, you may include a filerevisions property referencing an XML file. This XML file should have the following format:
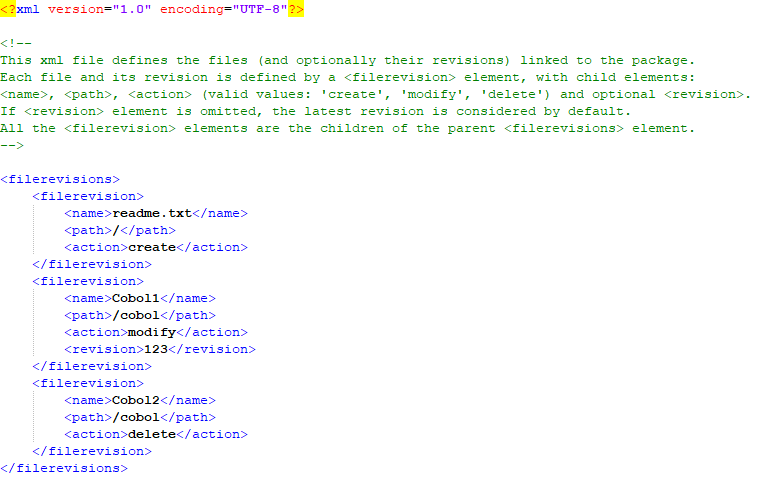
Each File Revision entry matches a single file in the Repository to be created, modified or deleted within the Package Contents definition.
| Parameter | Description | Mandatory |
|---|---|---|
name |
The name of the file to be updated in the Package Contents. |
Yes |
path |
The path to the file to be updated in the Package Contents. |
Yes |
action |
The action to be performed on this file in the Package Contents. Valid values are :
|
Yes |
revision |
The Repository Revision of this file to be used in the Package Contents. |
No |
Creating and updating Packages Using a Properties File
It is possible to save frequently used settings in a Properties file, so that you do not have to enter the complete Package creation/update parameters. After a standard installation, one such properties file, called package.properties is available in the Command Line installation folder.
Open the file in a text editor to display its content:
You can edit this standard file so that the settings match your requirements. Refer to the Creating Packages by Specifying Options and Parameters for a description of the options and parameters. You can also create any number of specific properties files by copying the standard file, editing the copies and saving them under logical names for later usage
-
Prepare the Package creation.
On a Windows platform:
-
Open a Command prompt.
-
Browse to the IKAN ALM Command Line working folder. After a standard installation, this is: C:\alm\commandline
You may add this location to the PATH Environment variable, so that it becomes accessible through other working directories.
On a Unix platform:
-
Open a terminal console.
-
Browse to the IKAN ALM Command Line working directory. After a standard installation, this is: /opt/ikan/alm/commandline
You may create a symbolic link to the
alm.shscript so that it becomes accessible through other working directories.
-
-
Make sure that the properties file to be used is available and that the settings match the requirements.
If not, create the properties file and/or edit the settings with a text editor.
-
Create the Level Request by entering a command in the following format:
alm package -propertyfile:$PROPERTYFILENAME [-options] [-parameters]
The following elements are available:
Element Description Mandatory alm
This element calls the alm.cmd (Windows) or alm.sh (Linux) file.
Yes
package
This element indicates that you want to create a Package.
Yes
propertyfile
This element allows selecting the properties file that must be used to create the Package.
Yes
options or parameters
Any option or parameter defined after the properties file overrides the setting in the selected properties file.
No
-
Once you have entered the complete command, press Return.
The results and console outputs are similar to those of the section above: Creating Packages by Specifying Options and Parameters. Refer to step 4 of that section for more information.
Generating Reports by Specifying Options and Parameters
-
Prepare the Report generation.
On a Windows platform:
-
Open a Command prompt.
-
Browse to the IKAN ALM Command Line working folder.
After a standard installation, this is: C:\alm\commandline
You may add this location to the PATH Environment variable, so that it becomes accessible through other working directories.
On a Unix platform:
-
Open a terminal console.
-
Browse to the IKAN ALM Command Line working directory.
After a standard installation, this is: /opt/ikan/alm/commandline
You may create a symbolic link to the
alm.shscript so that it becomes accessible through other working directories.
-
-
Enter the required Report generation instruction.
Format:
alm -serverhost:$HOSTNAME [-serverport:$PORTNUMBER] -user:$USERID -password:$PASSWORD [-secured=true|false] report PARAMETERS
The following elements are available:
Element Description Mandatory alm
This element calls the alm.cmd (Windows) or alm.sh (Linux) file.
Yes
serverhost
This element allows defining the DHCP name or IP address of the host running the IKAN ALM Server.
Yes
serverport
This element allows defining the port number used to establish the connection to the IKAN ALM Server via XML-RPC.
If this element is not provided, the default port number (20021) will be used.
No
user
This element allows defining a User ID with IKAN ALM access rights.
Yes
password
This element allows defining the password associated with the User ID used to access IKAN ALM.
Yes
secured
This element allows determining whether an encrypted connection must be used or not.
If the IKAN ALM Server is using an encrypted connection, set the secured element to true:
-secured=true
If the IKAN ALM Server is not using an encrypted connection, set the secured element to false or omit the secured parameter.
No
report
This command allows generating Reports.
Yes
PARAMETERS
The Report generation parameters are explained in the following step.
Yes
-
Define the Report generation parameters.
Format:
report -design:$REPORTDESIGNFILE [-dest:$DESTINATIONFILE] -format:$FORMAT [-lang:$LANGUAGE] [-max:MAXRESULT] [-filter:$SEARCHCRITERIAFILE] [-group:[$GROUPINGVALUE]] [-order:[$ORDERINGVALUE]]
Parameter Description Mandatory design
This parameter allows selecting the required Jasper Reports design file (file extension is .jrxml). After a standard installation, the files are located in the directory IKAN ALM_HOME/commandline/classes/reports/design.
Yes
dest
This parameter allows defining the destination file name for the Report.
Do not provide the extension, as IKAN ALM will append the format indication as extension.
If this destination name is not provided, the Report will get a default name (levelrequestoverview_[format].[format]) and it will be saved at the default location (IKAN ALM_HOME/commandline/classes/reports/generated_reports).
No
format
This parameter allows defining the Report format. The following formats are allowed:
-
pdf
-
htm
-
xml
-
csv
-
rtf
-
txt
-
xls
Yes
lang
This parameter allows defining the Report language. The following values are allowed:
-
en (English)
-
fr (French)
-
de (German)
If the language parameter is omitted, the Report will be generated in English.
No
max
This parameter allows defining the maximum number of Level Requests to be included in the Report.
If more Level Requests are available than the defined maximum, only the most recent Level Requests will be included in the Report.
No
filter
This parameter allows selecting a property file containing search criteria. Only Level Requests matching all defined criteria will be included in the Report.
After a standard installation, one such property file, called search.properties is available in the Command Line installation directory.
You can edit this standard file so that the settings match your requirements. See the description in the following step.
You can also create any number of specific search criteria properties files by copying the standard file, editing the copies and saving them under logical names for later usage.
No
group
This parameter allows defining how the reported Level Requests should be grouped together.
The following values are allowed:
-
projectname : group by Project Name
-
levelname : group by Level Name
If this parameter is omitted or left empty, no grouping of Level Requests will occur.
No
order
This parameter allows defining how the reported Level Requests should be ordered.
The following values are allowed:
-
asc : order ascending (=default)
-
desc : order descending
No
-
-
If required, edit the search criteria properties file (search.properties) in a text editor.
The file has the following structure:
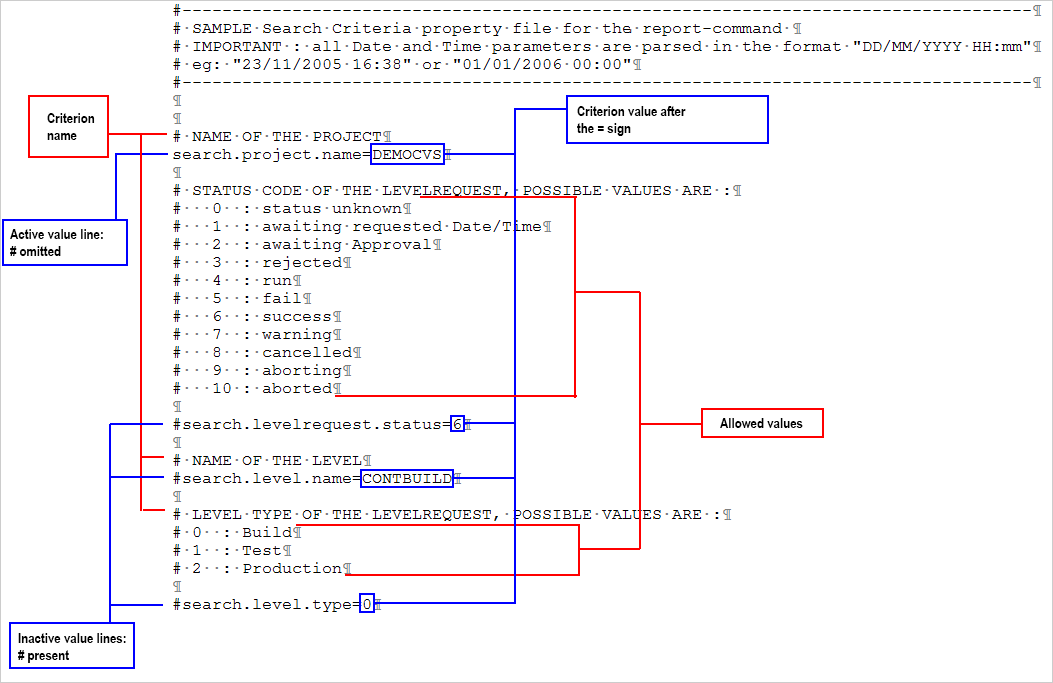
The following selection criteria are available:
Criteria Description Project name
Property:
search.project.nameEnter a Project name, if you want to limit the Report to Level Requests of that Project.
Package name
Property:
search.package.nameEnter a Package name, if you want to restrict the Report to Level Requests for that Package.
Search hidden packages
Property:
search.package.hiddenEnter one of the possible values, if you want to limit the Report to Level Requests for hidden Packages:
-
yes = show Level Requests for hidden (archived) Packages or Level Requests having no Packages associated
-
no = show Level Requests for visible (non-archived) Packages or Level Requests having no Packages associated
-
all = no restriction regarding the Package archived status
Level Request Status code
Property:
search.levelrequest.statusEnter one of the possible status codes, if you want to limit the Report to Level Requests with that status:
-
0 = unknown
-
1 = awaiting requested date/time
-
2 = awaiting Approval
-
3 = rejected
-
4 = run
-
5 = fail
-
6 = success
-
7 = warning
-
8 = cancelled
-
9 = aborting
-
10 = aborted
Level Name
Property:
search.level.nameEnter the name of the Level, if you want to limit the Report to Level Requests for that Level.
Level Type
Property:
search.level.nameEnter one of the possible Level Types, if you want to limit the Report to Level Requests pertaining to that Level Type:
-
0 = Build
-
1 = Test
-
2 = Production
Level Request Start Time interval
Properties:
search.levelrequest.startdatetime.fromsearch.levelrequest.startdatetime.toEnter the start and end timestamp of the Level Request Start Time interval, if you want to limit the Report to Level Requests having started within this interval.
Level Request End Time interval
Properties:
search.levelrequest.enddatetime.fromsearch.levelrequest.enddatetime.toEnter the start and end timestamp of the Level Request End Time interval, if you want to limit the Report to Level Requests having ended within this interval.
Level Request Request Time interval
Properties:
search.levelrequest.requestdatetime.fromsearch.levelrequest.requestdatetime.toEnter the start and end timestamp of the Level Request Request Time interval, if you want to limit the Report to Level Requests requested within this interval.
Requester Name
Property:
search.usernameEnter the name of the Requester, if you want to limit the Report to Level Requests requested by a specific User.
Level Request Action Type
Property:
search.levelrequest.actiontypeEnter one of the possible Level Request Action Types, if you want to limit the Report to Level Requests with this Action Type:
-
0 = Build initiated by Scheduler
-
1 = Force Build
-
2 = Request Build
-
3 = Deliver Build
-
4 = Rollback Build
-
5 = Dependency Build
-
6 = Redeliver Build
Level Request Type
Property:
search.levelrequest.typeEnter one of the possible Level Request Types, if you want to limit the Report to Level Requests with this Type:
-
0 = Build based on latest code
-
1 = Builds based on tagged code
-
2 = Builds and Deploys on latest code
-
3 = Builds and Deploys on tagged code
-
4 = Deploys of archived Build
-
5 = No Builds or Deploys
VCR Tag
Property:
search.vcrtagEnter a VCR tag, if you want to limit the Report to Level Requests pertaining to that VCR Tag.
Project Stream Status
Property:
search.projectstream.statusEnter one of the possible Project Stream Status indications, if you want to limit the Report to Level Requests with this Project Stream Status:
-
0 = under construction
-
1 = planning
-
2 = development
-
3 = testing
-
4 = stable
-
5 = general available
-
6 = frozen
-
7 = closed
Project Stream Prefix
Property:
search.projectstream.buildprefixEnter a Project Stream Prefix, if you want to limit the Report to Level Requests pertaining to that Project Stream Prefix.
Project Stream Build Suffix
Property:
search.projectstream.buildsuffixEnter a Project Stream Build Suffix, if you want to limit the Report to Level Requests pertaining to that Project Stream Build Suffix.
Search Hidden Project Stream
Property:
search.projectstream.hiddenEnter one of the possible values, if you want to limit the Report to Level Requests for hidden Project Streams:
-
yes = show only hidden project streams
-
no = do not show hidden project streams (default value)
-
all = show all project streams
Do not forget to remove the # sign in order to activate a search criterion.
-
-
Once you have entered the complete command, press Return.
The report will be generated.
Generating Reports Using a Properties File
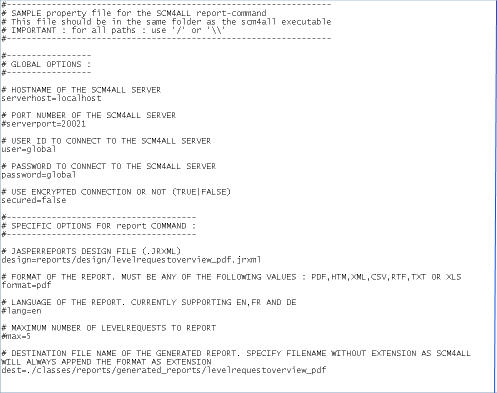
It is possible to save frequently used settings in a Properties file, so that you do not have to enter the complete Report generation parameters. After a standard installation, one such properties file, called report.properties is available in the Command Line installation folder.
Open the file in a text editor to display its content:
You can edit this standard file so that the settings match your requirements. Refer to the section Creating Level Requests by Specifying Options and Parameters for a description of the options and parameters. You can also create any number of specific properties files by copying the standard file, editing the copies and saving them under logical names for later usage
-
Prepare the Report generation.
On a Windows platform:
-
Open a Command prompt.
-
Browse to the IKAN ALM Command Line working folder. After a standard installation, this is: C:\alm\commandline
You may add this location to the PATH Environment variable, so that it becomes accessible through other working directories.
On a Unix platform:
-
Open a terminal console.
-
Browse to the IKAN ALM Command Line working directory. After a standard installation, this is: /opt/ikan/alm/commandline
You may create a symbolic link to the
alm.shscript so that it becomes accessible through other working directories.
-
-
Make sure that the properties file to be used is available and that the settings match the requirements.
If not, create the properties file and/or edit the settings with a text editor.
-
Generate the Report by entering a command in the following format:
alm report -propertyfile:[$PROPERTYFILENAME] [-options] [-parameters]
The following elements are available:
Element Description Mandatory alm
This element calls the alm.cmd (Windows) or alm.sh (Linux) file.
Yes
report
This element indicates you want to generate a Report.
Yes
propertyfile
This element allows selecting the properties file that must be used to generate the Report.
Yes
options or parameters
Any option or parameter defined after the properties file overrides the setting in the selected properties file.
No
-
Once you have entered the complete command, press Return.
The Report will be generated.
Integrating IKAN ALM in an External IDE
Refer to the following procedures for detailed information:
Integrating IKAN ALM in Visual Studio Code
This procedure describes how to set up IKAN ALM as an external tool in Visual Studio Code, so that you can create Level Requests (Forced Build, Requested Build or Deliver Build) from within this IDE
-
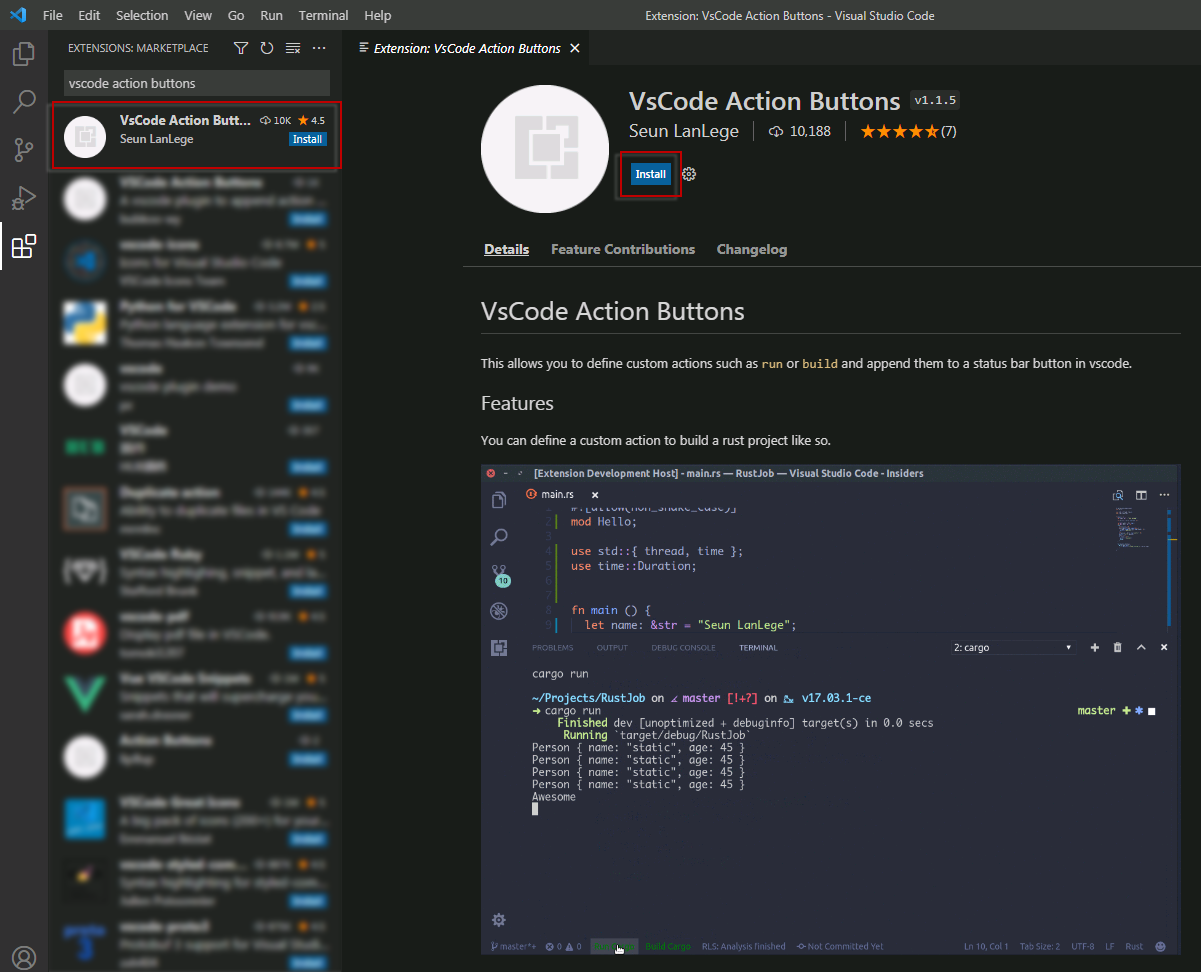
In Visual Sudio Code, click on the Extensions button in the left button menu and search for the VsCode Action Buttons extension. Next, install the extension.
-
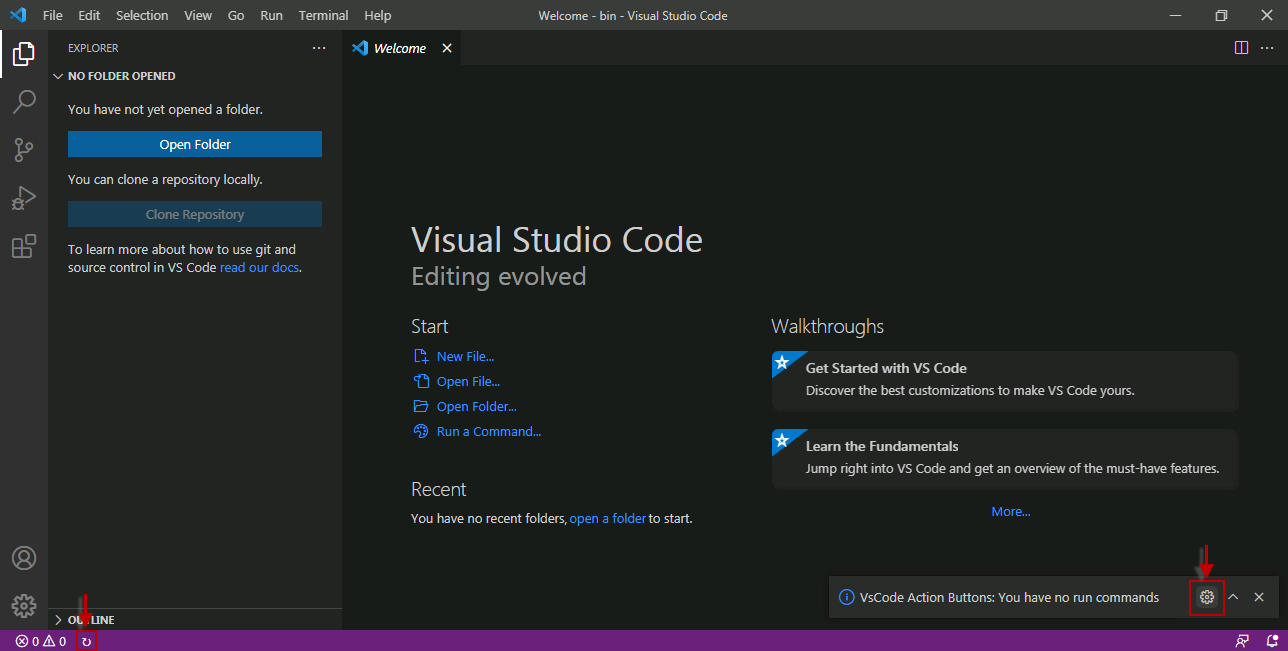
Once the installation has finished, click the Refresh the action buttons icon on the bottom status bar. A popup will display with the following message "VsCode Action Buttons: You have no run commands". Click the cogwheel icon, next click Manage Extension, this will take you to the page of the VsCode Action Buttons extensions. On this page click the cogwheel and select Extension Settings.
-
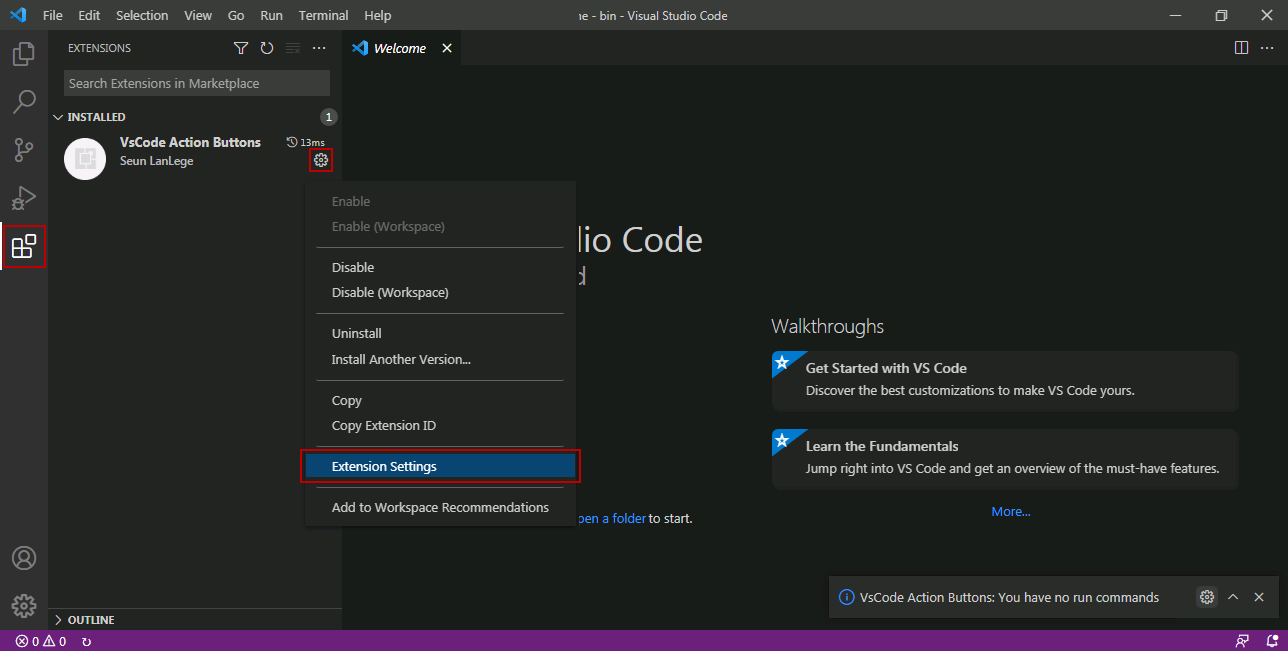
Alternatively you can click the Extensions button in the left button menu, select the VsCode Action Buttons extension, click the cogwheel icon and select Extension Settings.
-
On the Settings window click Edit in settings.json.
"commands": [
    {
    "cwd": "D:\\IKANALM\\commandline", // The path to the command line root directory
    "name": "Create Build Level Request for Webpad", // The label on the button
    "color": "white", // The color of the label
    "singleInstance": true, // if set to true, restarts the terminal each time the button is clicked
    "command": ".\\alm clr -serverhost:docalm -serverport:20021 -user:global -password:global clr -project:Webpad -level:CONTBUILD", // The commandline command to execute.
    }]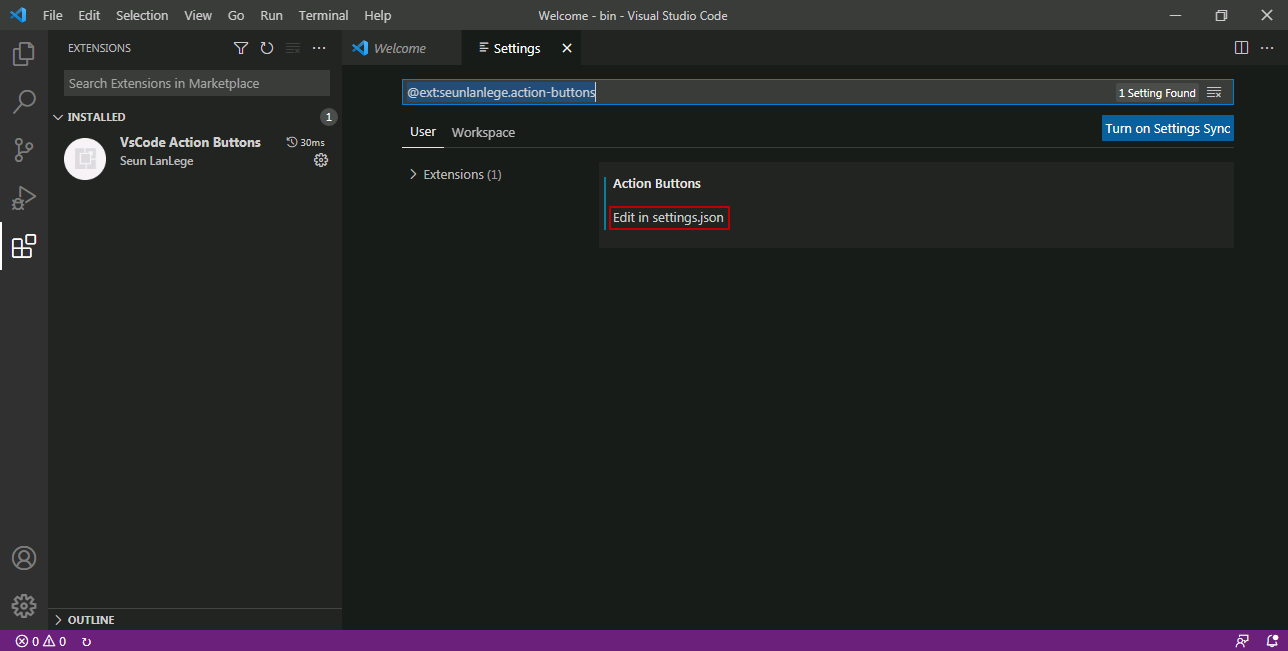
-
Add as many "commands" entries as you like in the settings.json file. Each command will represent a separate Level Request button. Finally, save the file and click the Refresh the action buttons icon on the bottom status bar to apply your changes.

-
To initiate the Level Request, simply click the Level Request button on the bottom status bar.

Integrating IKAN ALM in Eclipse
This procedure describes how to set up IKAN ALM as an external tool in Eclipse, so that you can create Level Requests (Forced Build, Requested Build or Deliver Build) from within this IDE
-
On the Eclipse main menu, select Run | External Tools Configuration…
The following dialog is displayed:
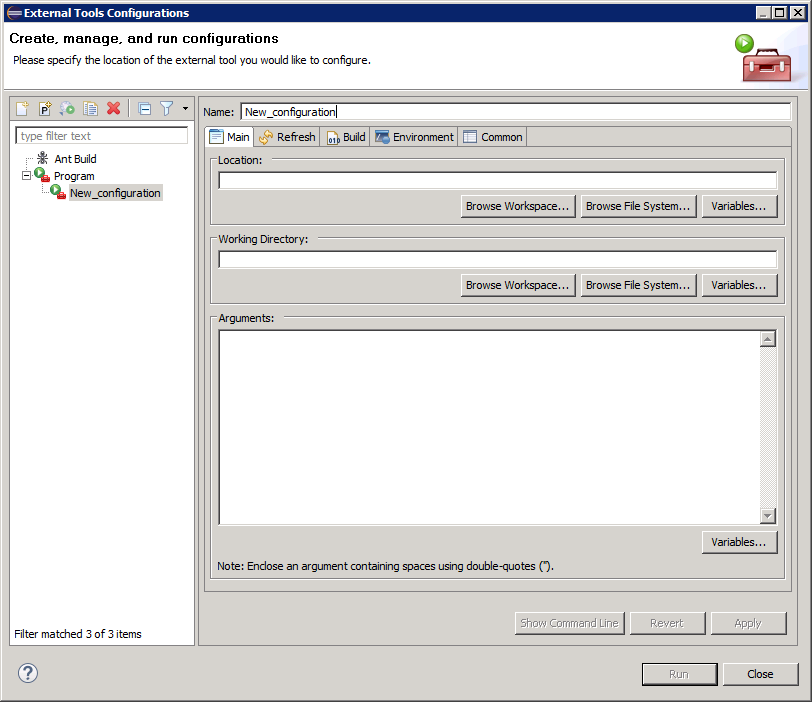
-
Select the New launch configuration icon.
The following dialog is displayed:
-
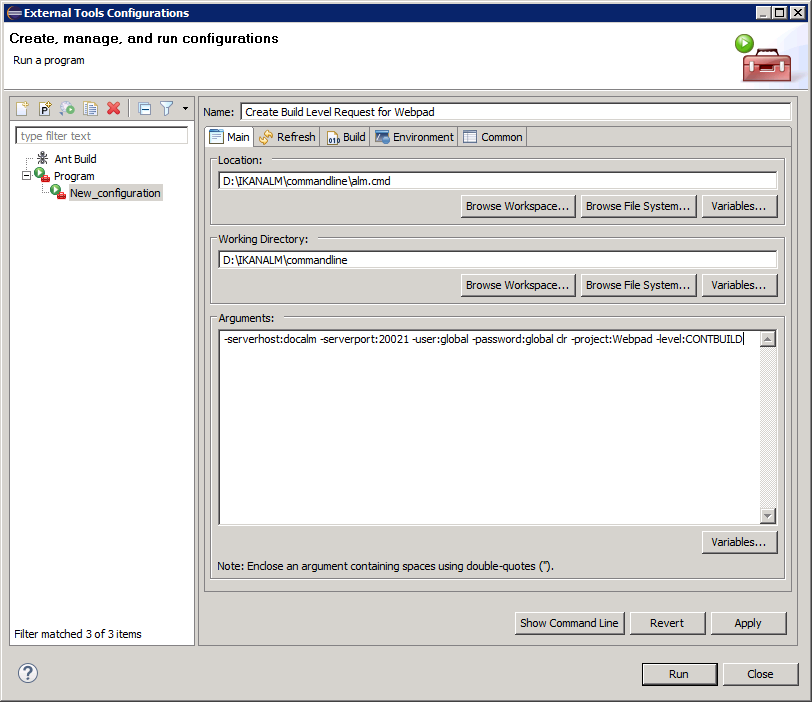
Provide the correct parameters to create a Level Request on the wanted level:
In the example above, the options are given to create a Level Request on the CONTBUILD Level in the Webpad Project.
-
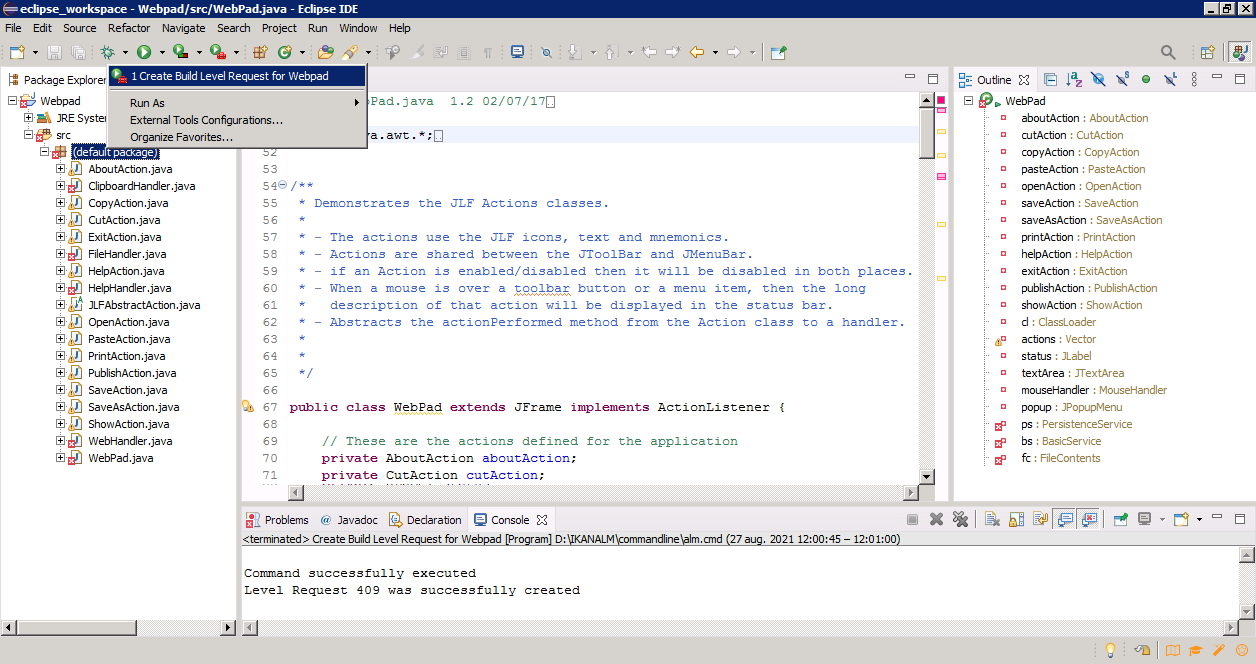
Click Run.
The external tools will be tested and saved.
The output from the command is visible in an Eclipse console:
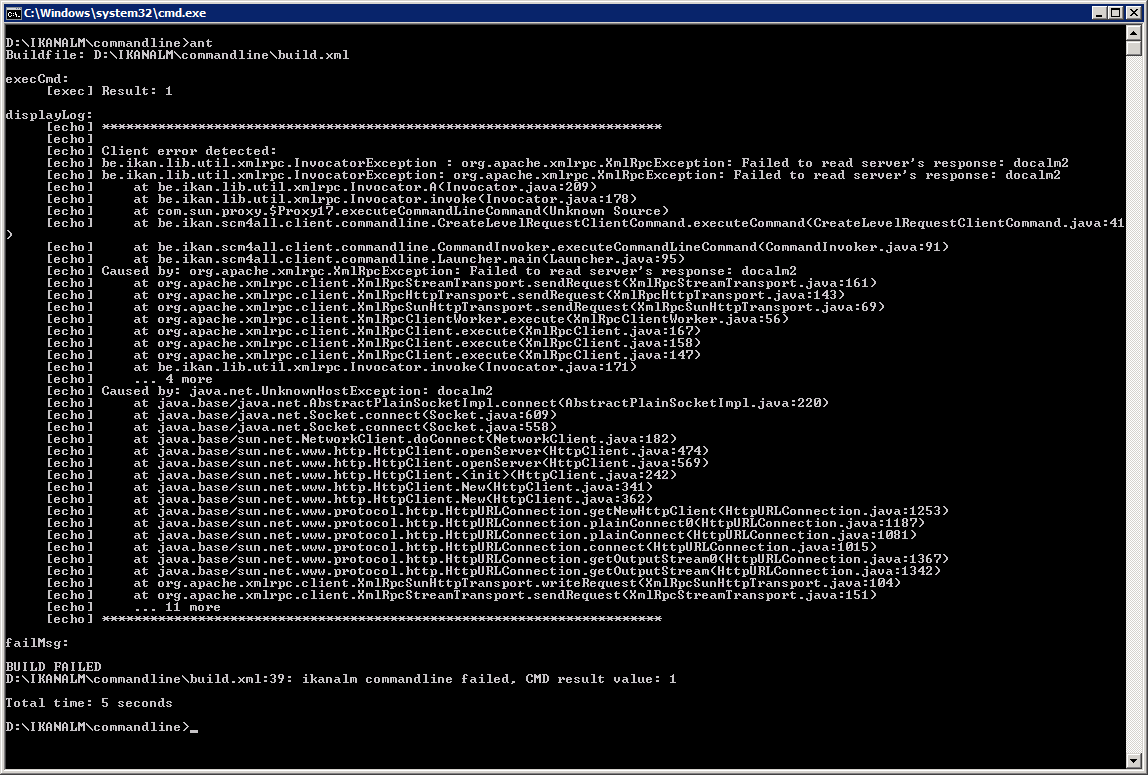
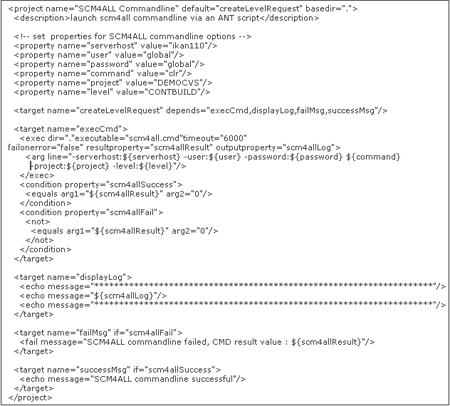
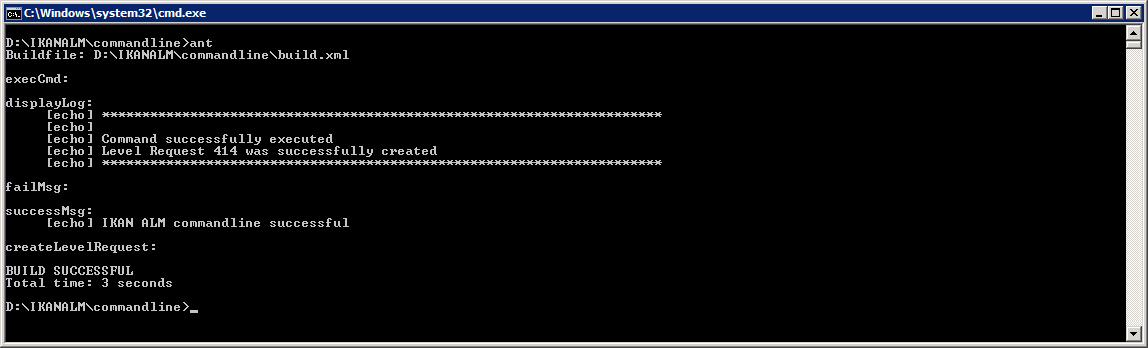
Automating the Creation of Level Requests Using an ANT script
This section provides a sample ANT script that
-
Creates an Level Request using the Command Line interface
-
Reports the status of this action
If you want to use this ANT Script yourself, customize it by:
-
Adapting the values for the IKAN ALM Command Line options (values for serverhost, user, password, etc.)
-
Saving it as build.xml in the IKAN ALM_COMMANDLINE root directory
-
Launching it via the standard ANT command.
Sample script:
Output on success:
Output on failure: