Managing the Desktop
Each IKAN ALM User has access to a personal Desktop made up of adjustable Tab Pages, each of them containing current information about the Project Streams, Levels and Packages he or she is interested in. You can personalize up to 10 Tab Pages on your Desktop and each Tab Page can contain up to 20 Element Types.
Furthermore the personal Desktop provides a shortcut to the Level Request creation and view options.
The following actions are possible:
-
Managing the Desktop Tab Pages
-
Managing the Desktop content
The Desktop Overview Screen
-
Select Desktop on the Main Menu.
Your personal Desktop Overview will be displayed, in either Tiles view or Classic view depending on your preference.
If your Desktop Overview is empty, you can add content to it using the Add to Desktop button. Adding Elements to a Desktop Tab Page
-
Verify the elements on your Desktop.
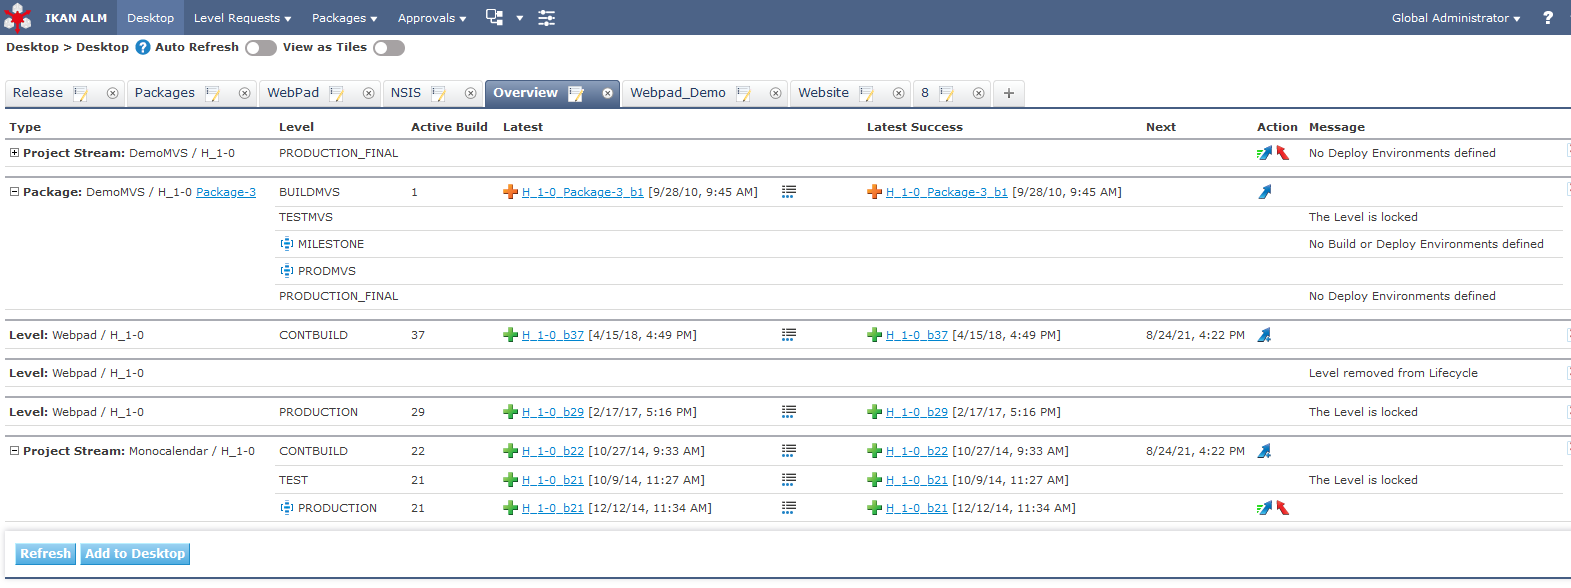
Per Tab Page, the following fields are available in the Classic view for each desktop element type.
Field Description Desktop Type
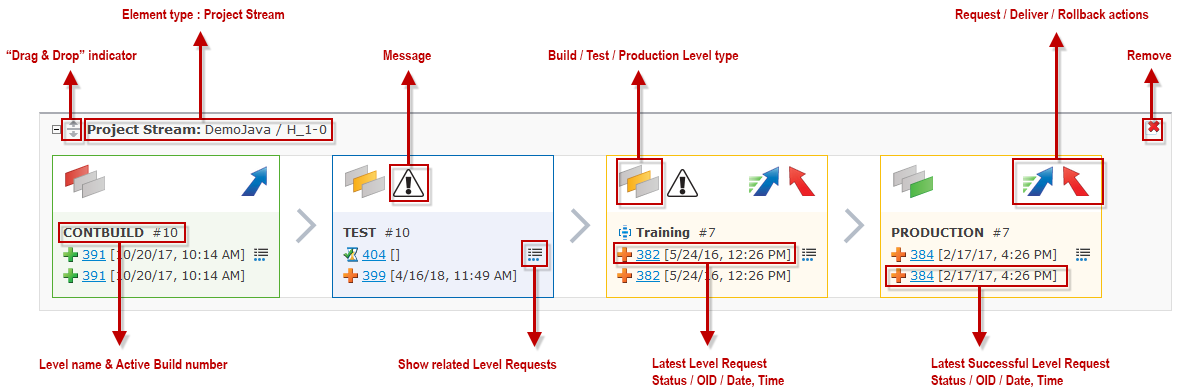
This field contains an indication of the Element type, followed by the Project Stream [Package] assigned to the Desktop.
There are three possibilities for the Element type:
-
Project Stream
-
Level
-
Package
Note: Click the
 icon to expand assigned Project Streams or Packages and to display the Levels that belong to it.
For the Project Stream [Package], there are three possibilities:
-
For assigned Project Streams, this field contains the identification of that Project Stream. Example:
Webpad H_3-0 -
For assigned individual Levels, this field contains the identification of the Project Stream this Level belongs to. Example:
Webpad B_3-1 -
For assigned Packages, this field contains the identification of the Project Stream and the name of the Package-based Project. Example:
DemoMVS H_1-0 DemoMVS_Pack1
The Project Stream identification is composed of:
-
Project Name
-
Project Stream Type: H (Head) or B (Branch)
-
Project Stream Prefix, optionally followed by the Suffix in case of a Branch Project Stream
-
The Build number
Level
For individual Levels, this field contains the name of that Level.
For non-expanded Project Streams, this field contains the name of the highest Level belonging to the Project Stream. This is logically the Production Level.
In case a Level is optional, the
 Optional icon will be displayed in front of the Level Name.
Active Build
Contains the number of the Active Build on this Level.
Latest
This field contains the following information for the latest Request on the displayed Level:
-
Request status icon indicating the status of the latest Request on this Level:
-
 : Success
 -
 : Warning
 -
 : Running
 -
 : Fail
 -
 : Awaiting Pre-Approval or Awaiting Post-Approval
 -
 : Awaiting Run Time
 -
 : Rejected
 -
 : Aborted
 -
 : Canceled
-
-
The VCR Tag (matching the defined template) and timestamp for Requests with status Success, Failed and Warning.
These indications are displayed as a link. Click the link to access the Detailed Overview for the selected Level Request.
-
Link (
 ) to the Level Requests Overview with Project name and Level name already filled in as Search Criteria.
Latest Success
This field contains the VCR Tag (matching the defined template) and timestamp for the latest successful Request on the displayed Level.
These indications are displayed as a link. Click the link to access the Detailed Overview for the selected Level Request.
Next
For Build Levels with an active Schedule, this field displays the date and time on which the next Level Request is expected to run.
The Level Request will not run, if:
-
the code was not changed,
-
the Scheduler is deactivated.
For other Levels, this field remains empty.
Action
This field contains the action icons which are available for the Level:
-
 and
and  : Request or Force a Build Level Request. Also see: Creating a Build Level Request.
 -
 : Create a new Deliver Build Level Request. Also see: Creating a Deliver Build Level Request.
 -
 : Create a new Rollback Build Level Request. Also see: Creating a Rollback Build Level Request.
Message
If it is not possible to create a Request for a specific Level, the messages in this field may indicate the reason.
-
A Level Request is pending for this Level of this Project Stream
This message is displayed, if a Level Request is being executed or waiting for approval. You will need to wait until the current Level Request is completed, before you can create a new Level Request for this Level.
-
The Level is locked
It is not possible to create Level Requests for Locked Levels. You (or the Project Manager) must unlock the Level by Auditing the Project before you can create Level Requests for this Level. See: Auditing Projects.
-
No Request Rights
It is not possible to create Level Requests when the User ID you are logged in with does not have the required access rights. You must connect with a User ID having the right to run Requests or ask the Global Administrator to give this right to your User ID.
-
The Project is locked
It is not possible to create Level Requests for locked Projects.
Unlock the Project first by clicking the Unlock button on the Projects Overview, or by Auditing the Project. See: Editing Project Settings and Auditing Projects.
-
The Project Stream is locked
It is not possible to create Level Requests for locked Project Streams. You (or the Project Manager) can unlock the Project Stream first by clicking the Unlock button on the Edit Project Stream screen. See: Editing Project Stream Settings
-
The Project Stream is frozen
It is not possible to create Build Level Requests for frozen Project Streams. You (or the Project Manager) can unfreeze the Project Stream first by selecting another status from the Status drop-down menu on the Edit Project Stream screen. See: Editing Project Stream Settings

Click this link to remove the selected element from the Desktop Overview.
-
-
Click the Refresh button if you want to verify the changing status of the information on your Desktop.
The screen will be refreshed each time you click the Refresh button.
If the Auto Refresh option is activated, the Desktop will be refreshed according to the Auto Refresh Rate set in System Settings. See: Auto Refresh.
-
Click the Add to Desktop button to open the Add to Desktop pop-up window allowing you to add other elements to your desktop.
-
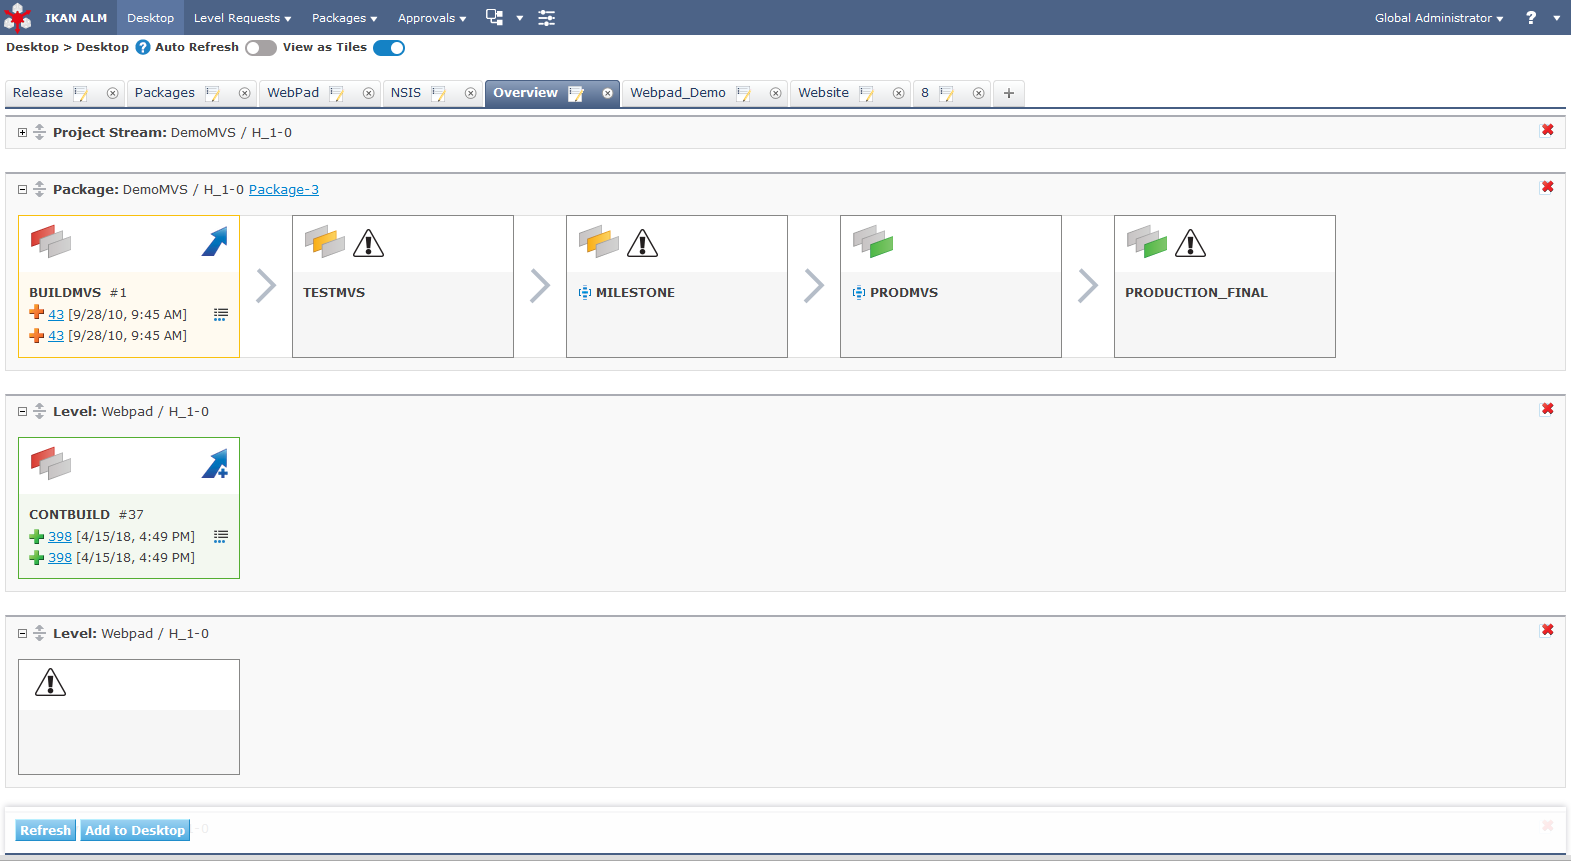
If desired, click the "View as Tiles" button to freely switch between the initial Tiles desktop and the more compact Tiles desktop.
All of the above also applies to the Tiles desktop, albeit in a different form, and with a few exceptions.
Differences in the Tiles desktop are:
-
The Level Type is shown
-
Message text is hidden behind a hoverable icon, next to the Level Type icon
-
The Level Request OID is used for Latest and Latest Successful Level Request in place of the VCR tag
Adding a Desktop Tab Page
-
Select Desktop on the Main Menu.
-
Click the
 New Desktop button.
You can also right-click the Tab Page label of any existing Tab Page and select New Desktop from the menu.
The following screen is displayed:
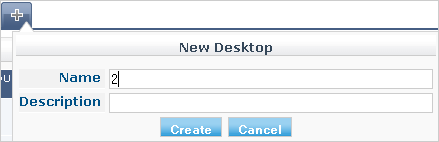
-
Fill out the fields for the new Tab Page.
The following fields are available:
Field Meaning Name
Enter the name of the new Tab Page.
By default, the number of the Tab Page is filled in.
Description
Enter a description for the new Tab Page. This description is shown when you point your mouse cursor to the name of the Tab Page.
-
Click Create to confirm the creation of the new Tab Page.
You can also click Cancel to return to Desktop Overview screen without making any changes.
It is possible to create up to 10 tab pages.
Editing the Desktop Tab Page Label
-
Select Desktop on the Main Menu.
-
Double-click the Tab Page label you want to edit.
You can also right-click the Tab Page label and select Edit Desktop from the menu.
The following screen is displayed:
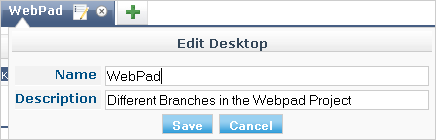
-
Edit the fields for the Tab Page.
For a detailed description of the fields, refer to Adding a Desktop Tab Page.
-
Click Save, once you have finished your changes.
You can also click Cancel to return to Desktop Overview screen without making any changes.
Removing a Desktop Tab Page
To remove a Desktop Tab Page, click the ![]() Remove Desktop button.
Remove Desktop button.
|
You can also right-click the Tab Page label and select Remove Desktop from the menu. |
The following screen is displayed:
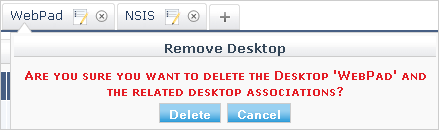
Confirm or cancel the deletion of the Tab Page.
Adding Elements to a Desktop Tab Page
-
Select Desktop on the Main Menu.
-
Select the Tab Page you want to add elements to.
The Desktop Overview screen for the selected Tab Page is displayed.
If you want to add elements to a new Tab Page, you should create the Tab Page first. Adding a Desktop Tab Page
-
Switch to the Add to Desktop screen.
Click the Add to Desktop button underneath the Desktop Overview screen, or right-click the overview and select Add to Desktop.
The following screen is displayed.

-
Define search criteria on the Search Project Stream panel.
If you do not immediately find the element you want to add, you can use the search panel on the left.
The following search criteria are available:
Search Criteria Meaning Project Name
Enter the name of the Project for which you want to display the Project Streams.
VCR
Enter the VCR name.
Project Type
Enter the type of the Project: Release-based of Package-based.
Project Stream Type
Enter the type of the Project Stream: Head or Branch.
Status
Enter the status of the Project Stream:
-
Under construction
-
Planning
-
Development
-
Testing
-
Stable
-
General available
-
Frozen
-
Closed
Locked
Indicate whether or not you want to display locked Project Streams.
Show Hidden Project Streams
Indicate whether or not you want to display hidden Project Streams.
Show Hidden Packages
Indicate whether or not you want to display hidden Packages.
Show Accessible Projects
Indicate whether or not you only want to display the Projects you have User Access to.
By default, only the Projects you have User Access to are shown.
The list of elements displayed in the tree at the right will be limited to the Project Streams matching these search criteria.
Click the Reset button to clear the Search fields.
-
-
Select the element(s) you want to add.
In the tree at the right, select the Project Stream, Level or Package you want to add and click the Add to Desktop button.
-
Adding a complete Project Stream
Expand the tree for the corresponding Project using the
icon to display its Project Streams.
Select the Project Stream you want to add and click the Add to Desktop button.If you add a Project Stream to your Desktop, all Levels belonging to that Project Stream will also be available on your Desktop.
-
Adding an individual Level
Expand the tree for the corresponding Project Stream using the
icon to display its Levels (and Packages). Select the Level(s) you want to add and click the Add to Desktop button. -
Adding a Package
Expand the tree for the corresponding Project Stream using the
icon to display its Packages (and Levels). Select the Package(s) you want to add and click the Add to Desktop button.If you add a Package to your Desktop, all Levels belonging to the Project Stream of the Package will also be available on your Desktop.
Example of the selection of a Package and a Project Stream:
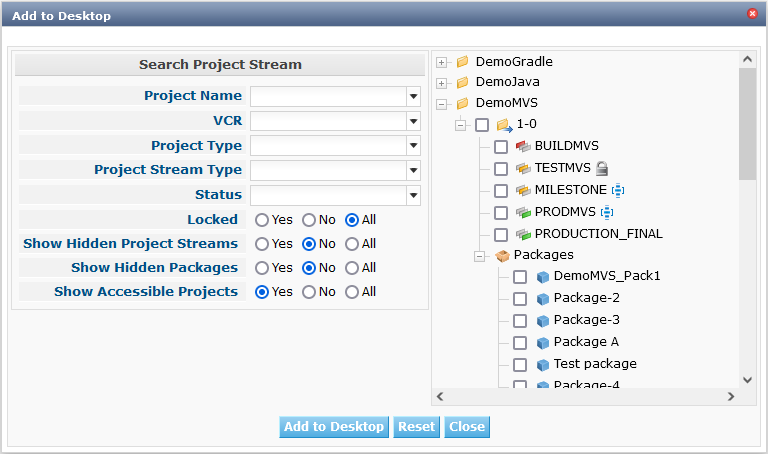
When adding an element to the Desktop, the underlying Desktop Overview is immediately updated.
You can select several Project Streams, Levels and Packages at once.
You can add maximum 20 elements to each of your Desktop Tab Pages.
If you add a Project Stream or Package containing multiple Levels, this Project Stream or Package is considered to be only one element.
-
-
Click the Close button to return to the Desktop Overview screen.
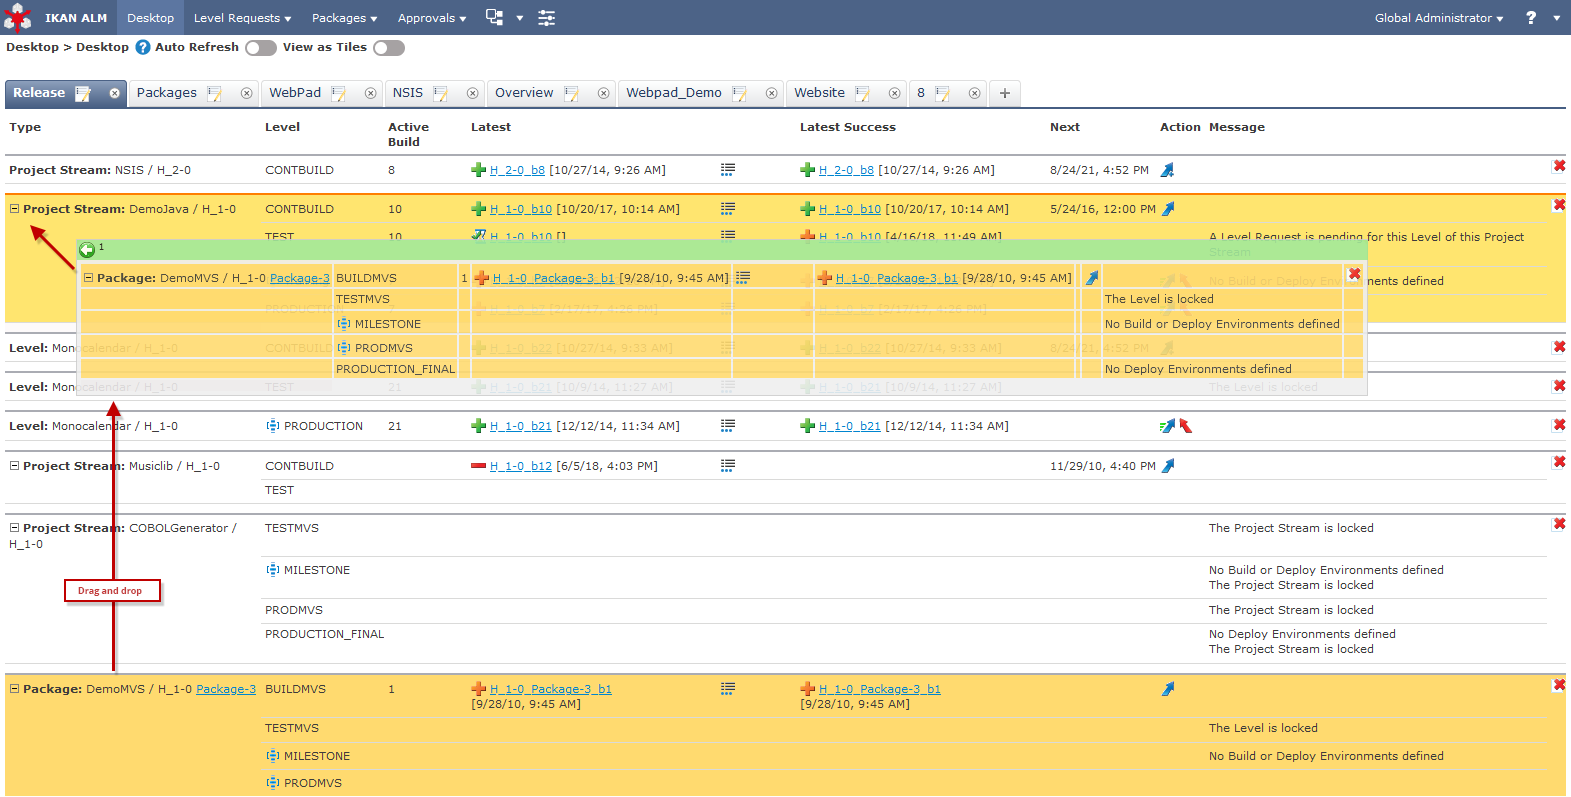
Rearranging Desktop Elements
To modify the order of the elements, select the element(s) using the SHIFT or CTRL keys, and, while holding down the left-hand mouse button, drag the element(s) to the required position on the Overview.
|
The orange line indicates the target position of the selected elements. Valid positions are indicated with a green bar above the selected elements, invalid positions with a red bar. |
Example: