Scripting Tools
IKAN ALM supports the following Scripting Tools:
The following sections explain how to define a Scripting Tool so that the IKAN ALM Agent may use it for Build and Deploy actions.
|
You must always install the defined Scripting Tool on the IKAN ALM Agent in order to execute Build and Deploy scripts. |
Creating a Scripting Tool
|
This option is only available if you have Global Administrator Access Rights in IKAN ALM. |
-
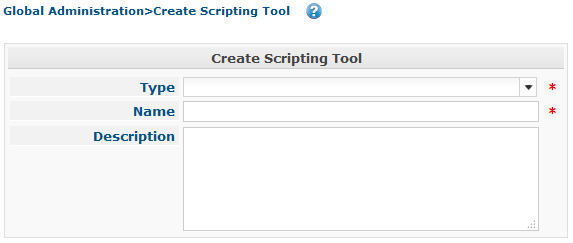
In the Global Administration context, select Scripting Tools > Create.
The following screen is displayed:
-
Select the Type of Scripting Tool you want to create.
The Details panel for the type of Scripting Tool you selected is displayed underneath.
-
Enter the Name of the Scripting Tool and add an optional Description.
-
Fill out the Scripting Tool-specific Details.
For more information on those details, refer to the appropriate sections:
The Scripting Tools Overview Screen
-
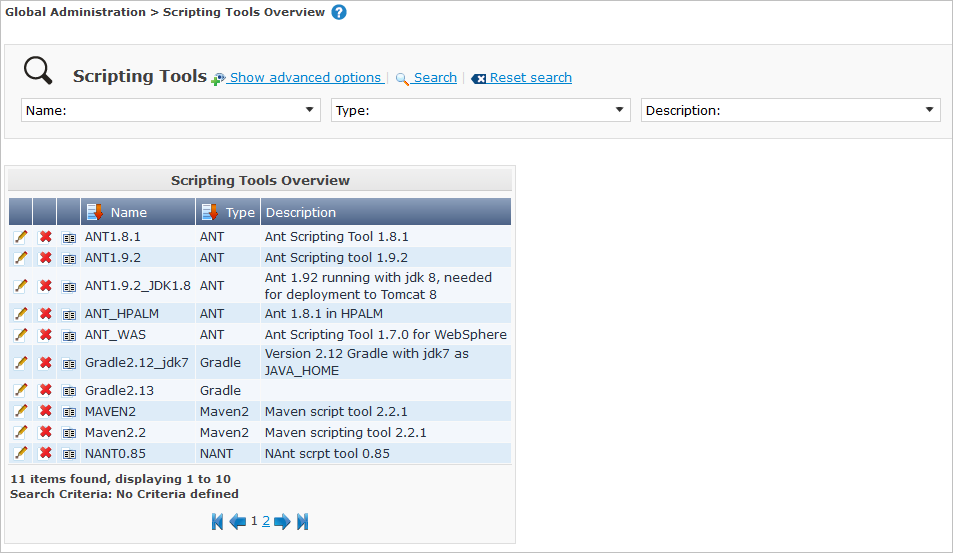
In the Global Administration context, select Scripting Tools > Overview.
The following screen is displayed:
-
Define the required search criteria on the search panel.
The list of items on the overview will be automatically updated based on the selected criteria.
You can also:
-
click the Show/hide advanced options link to display or hide all available search criteria,
-
click the Search link to refresh the list based on the current search criteria,
-
click the Reset search link to clear the search fields.
-
-
Verify the information on the Scripting Tools Overview panel.
-
Depending on your access rights, the following links may be available on the Scripting Tools Overview panel:

Edit
This option is available to IKAN ALM Users with Global Administrator Access Rights. It allows editing a Scripting Tool definition.

Delete
This option is available to IKAN ALM Users with Global Administrator Access Rights. It allows deleting a Scripting Tool definition.

History
This option is available to all IKAN ALM Users. It allows displaying the History of all create, update and delete operations performed on a Scripting Tool.
Refer to the following sections for detailed information:
ANT Scripting Tools
Apache Ant is a Java-based build tool. In theory, it resembles to make, without make's wrinkles. If ANT is installed on a machine connected to your Build/Deploy Environments, IKAN ALM will be able to interact with it. Therefore, you must define the ANT Scripting Tool in the IKAN ALM application and, when creating the Build or Deploy Environment, specify it as being the Build or Deploy Tool to be used.
Refer to the following sections for detailed information:
Creating an ANT Scripting Tool
|
This option is only available if you have Global Administrator Access Rights in IKAN ALM. |
-
In the Global Administration context, select Scripting Tools > Create.
-
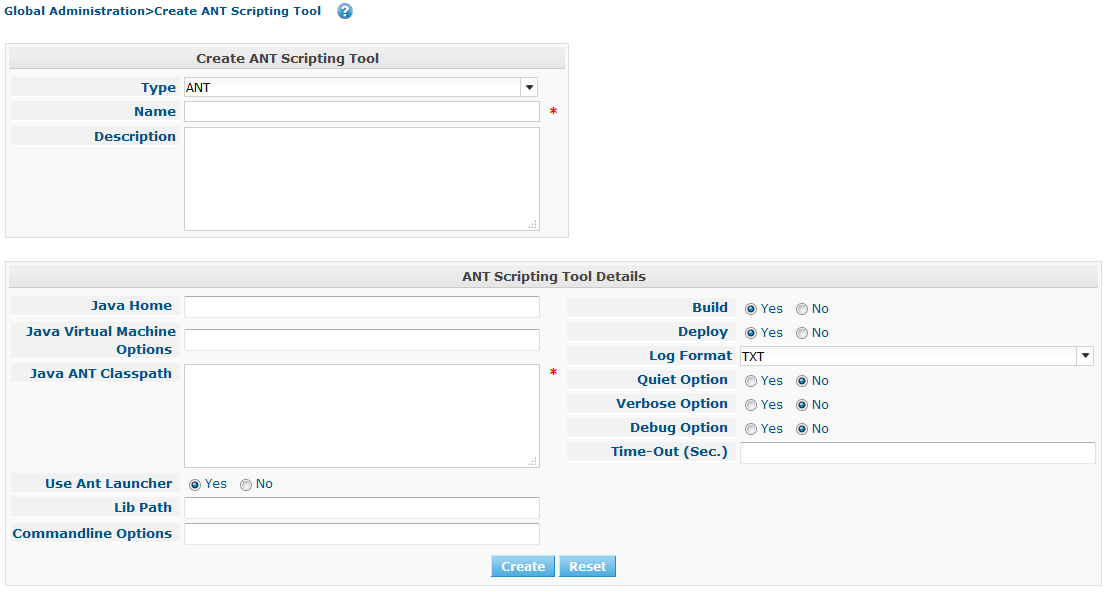
Select ANT from the drop-down list in the Type field on the search panel.
The following screen is displayed:
-
Fill out the fields in the Create ANT Scripting Tool panel at the top of the screen.
Fields marked with a red asterisk are mandatory.
Field Meaning Type
Select the type of Scripting Tool you want to define. This field is mandatory.
After you have selected the type, the appropriate Details panel will be displayed underneath.
Name
Enter the name of the new ANT Scripting Tool in this field. This field is mandatory.
Description
Enter a description for the new ANT Scripting Tool in this field. This field is optional.
-
Fill out the fields in the ANT Scripting Tool Details panel.
Fields marked with a red asterisk are mandatory.
Field Meaning Java Home
Enter the JAVA_HOME path to launch ANT in this field. If you do not enter a value in this field, the system default JAVA_HOME path will be used.
In this case, the _JAVA_HOME _path must be defined as an environment variable on the Machine.
Java Virtual Machine Options
In this field, enter the Java Virtual Machine Options required for starting up ANT. This field is optional.
Example:
-Xmx128M: specifies the maximum size of the memory allocation pool.
JVM Options of Java 8 for example are explained here:
https://docs.oracle.com/javase/8/docs/technotes/tools/windows/java.html
Java ANT Classpath
Enter the JAVA ANT Classpath in this field. This field is mandatory.
Since IKAN ALM launches ANT via Java, you must ensure that all required jar files are available. Some values can be set in this field, but also the Lib Patch can be used (see below).
Depending on the ANT version you use, the CLASSPATH should at least include:
For ANT 1.5.x:
-
ant.jar
-
jars/classes for your XML parser
-
jars/zip files for the JDK
For ANT 1.6.x or higher:
-
ant.jar
-
ant-launcher.jar
-
jars/classes for your XML parser
-
jars/zip files for the JDK
If you launch ANT via the Ant Launcher, ensure that the CLASSPATH includes:
-
ant-launcher.jar
-
required external dependencies (such as tools.jar)
Note: If you use Ant Launcher, do not include ant.jar in the Java Classpath, because the dependencies will not be found and the script will end in error.
Also refer to the section _Running ANT via Java _in the Apache Ant Manual.
Use Ant Launcher
Select Yes, if you want to use the Ant Launcher (default).
Select No, if you do not use the Ant Launcher, but launch Ant via Java.
Lib Path
When using the Ant Launcher, you may enter the path to one or more directories containing additional required jar files (-lib option).
Commandline Options
Enter commandline options in this fields. This field is optional.
The commandline options provided by default by IKAN ALM, like -buildfile, -logfiles, -verbose, -debug ,… will not be accepted.
Sample options are -keep-going, or -noinput.
Build
Indicate whether or not this Scripting Tool can be linked to a Build Environment and thus be used to build code.
Deploy
Indicate whether or not this Scripting Tool can be linked to a Deploy Environment and thus be used to deploy Builds.
Log Format
Select the format of the log file generated by this ANT Scripting Tool. The following options are available:
-
TXT: the log file will be a simple text file
-
XML: the log file will be an XML file
TXT logs will be smaller and their content can be displayed while the Tool is executing.
The display of XML logs can be customized by providing custom XSL templates. However, XML logs are larger and can only be displayed after the Tool has finished executing.
Quiet Option
Select whether or not the Quiet Option must be activated for the new ANT Scripting Tool.
ANT will print less information than normal during the Build and Deploy actions, if this option is activated.
Verbose Option
Select whether or not the Verbose Option must be activated for the new ANT Scripting Tool.
ANT will print verbose debug information during the Build and Deploy actions, if this option is activated.
Debug Option
Select whether or not the Debug Option must be activated for the new ANT Scripting Tool.
ANT will print additional debug information during the Build and Deploy actions, if this option is activated.
Time-Out (Sec.)
In this field, enter a Time-Out value if required.
If a value is provided, a running ANT Build or Deploy process will be interrupted after this number of seconds. In this way, "hanging" Build or Deploy processes are interrupted.
If no value is provided, a running ANT Build or Deploy process will never be interrupted.
-
-
Once you filled out the fields as required, click Create.
The newly created ANT Scripting Tool is added to the ANT Scripting Tools Overview at the bottom of the screen.
The ANT Scripting Tools Overview Screen
-
In the Global Administration context, select Scripting Tools > Overview.
The overview of all defined Scripting Tools is displayed.
-
Specify ANT in the Type field on the search panel.
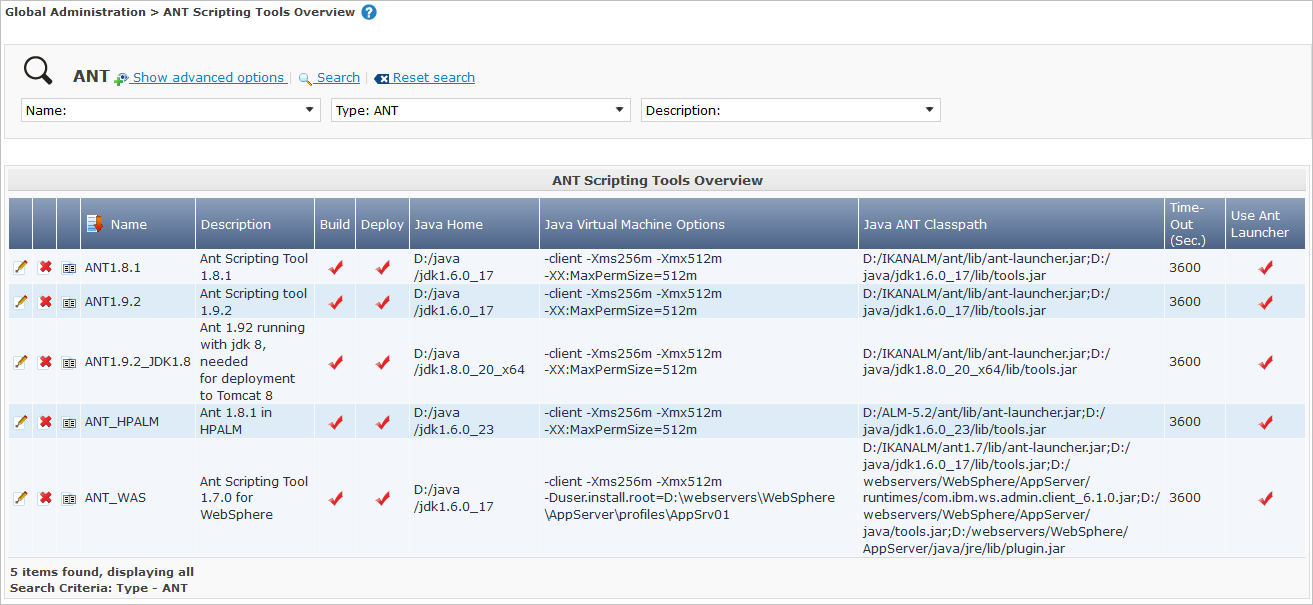
If required, use the other search criteria to refine the items displayed on the overview.
The following options are available:
-
click the Show/hide advanced options link to display or hide all available search criteria,
-
the Search link to refresh the list based on the current search criteria,
-
the Reset search link to clear the search fields.
-
-
Verify the information on the Scripting Tools Overview panel.
For a detailed description of the fields, refer to Creating an ANT Scripting Tool.
-
Depending on your access rights, the following links may be available on the ANT Scripting Tools Overview panel:
Edit
This option is available to IKAN ALM Users with Global Administrator Access Rights. It allows editing a Scripting Tool definition.
Delete
This option is available to IKAN ALM Users with Global Administrator Access Rights. It allows deleting a Scripting Tool definition.
History
This option is available to all IKAN ALM Users. It allows displaying the History of all create, update and delete operations performed on a Scripting Tool
Editing an ANT Scripting Tool Definition
-
In the Global Administration context, select Scripting Tools > Overview.
The overview of all defined Scripting Tools is displayed.
Use the search criteria on the search panel to display the ANT Scripting Tools your are looking for.
-
Click the
Edit link to change the selected ANT Scripting Tool.The following screen is displayed:
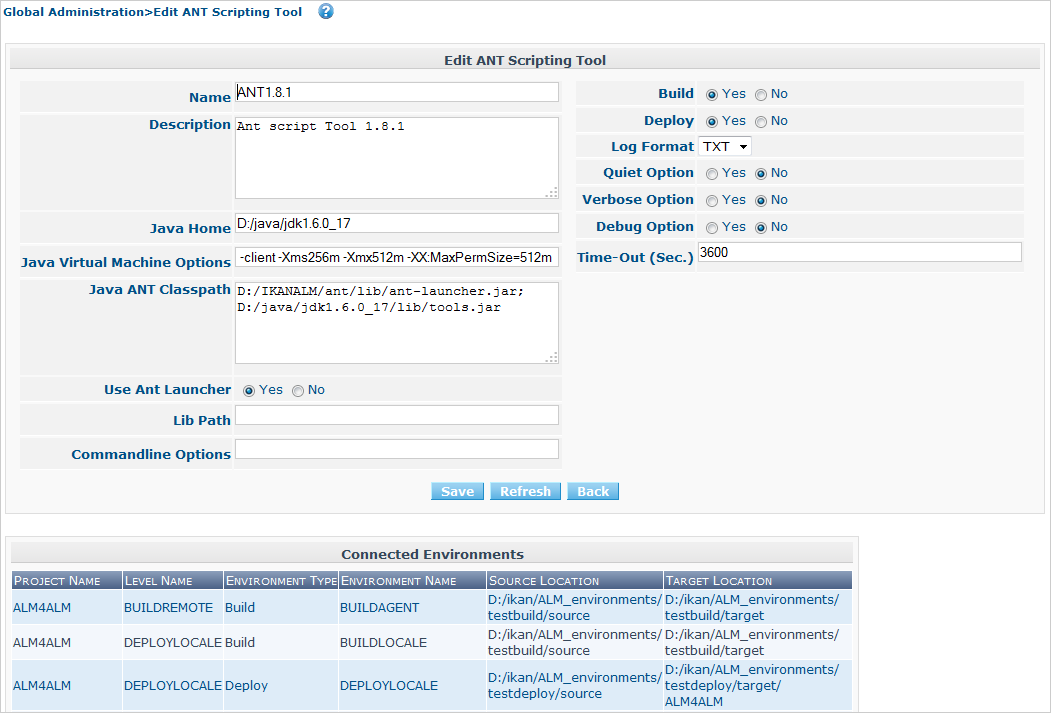
-
Edit the fields as required.
For a description of the fields, refer to Creating an ANT Scripting Tool.
The Connected Environments panel displays the Environments the Scripting Tool is linked to.
-
Click Save to save your changes.
You can also click:
-
Refresh to retrieve the settings from the database.
-
Back to return to the previous screen without saving the changes
-
Deleting an ANT Scripting Tool Definition
-
In the Global Administration context, select Scripting Tools > Overview.
The overview of all defined Scripting Tools is displayed.
Use the search criteria on the search panel to display the ANT Scripting Tools your are looking for.
-
Click the
Delete link to delete the selected ANT Scripting Tool.The following screen is displayed:
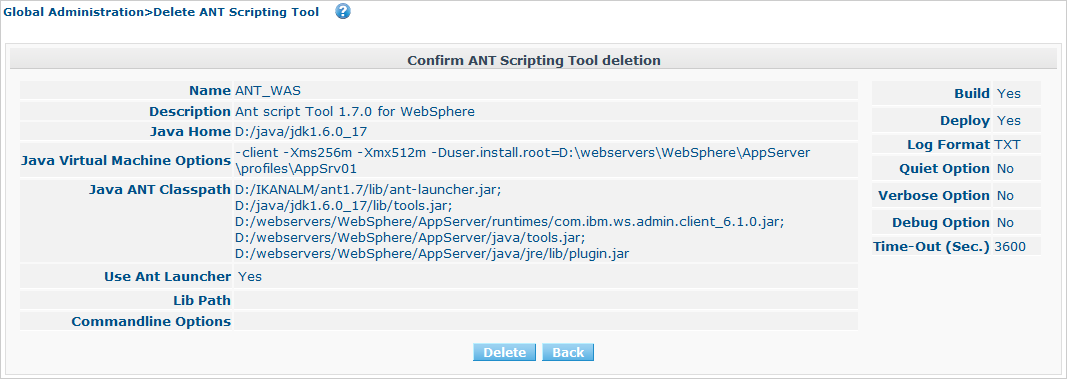
-
Click Delete to confirm the deletion.
You can also click Back to return to the previous screen without deleting the entry.
Note: If the ANT Scripting Tool is linked to one or more Build or Deploy Environments, the following screen is displayed:

You need to assign another Scripting Tool to these Environments, before deleting this ANT Scripting Tool.
Viewing the ANT Scripting Tool History
-
In the Global Administration context, select Scripting Tools > Overview.
The overview of all defined Scripting Tools is displayed.
Use the search criteria on the search panel to display the ANT Scripting Tools your are looking for.
-
Click the
History link to display the ANT Scripting Tool History View.For more detailed information concerning this History View, refer to the section History and Event Logging.
-
Click Back to return to the Scripting Tools Overview screen.
Gradle Scripting Tools
Gradle is an open source build automation system that builds upon the concepts of Apache Ant and Apache Maven and introduces a Groovy-based domain-specific language (DSL) instead of the XML form used by Apache Maven for declaring the project configuration. If Gradle is installed on a machine connected to your Build/Deploy Environments, IKAN ALM will be able to interact with it. Therefore, you must define the Gradle Scripting Tool in the IKAN ALM application and, when creating the Build or Deploy Environment, specify it as being the Build or Deploy Tool to be used.
Refer to the following sections for detailed information:
Creating a Gradle Scripting Tool
|
This option is only available if you have Global Administrator Access Rights in IKAN ALM. |
-
In the Global Administration context, select Scripting Tools > Create.
-
Select Gradle from the drop-down list in the Type field on the search panel.
The following screen is displayed:
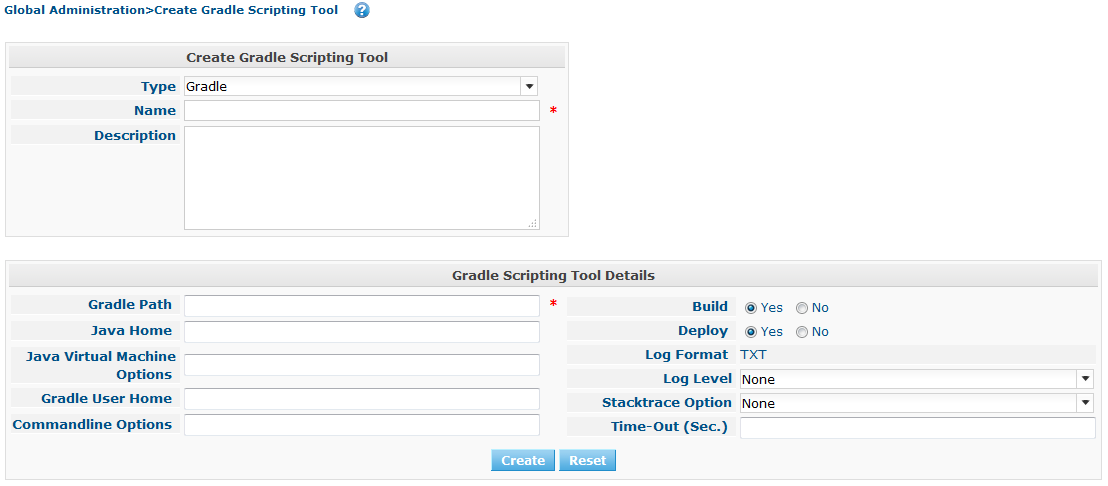
-
Fill out the fields in the Create Gradle Scripting Tool panel at the top of the screen.
Fields marked with a red asterisk are mandatory.
Field Meaning Type
Select the type of Scripting Tool you want to define. This field is mandatory.
After you have selected the type, the appropriate Details panel will be displayed underneath.
Name
Enter the name of the new Gradle Scripting Tool in this field. This field is mandatory.
Description
Enter a description for the new Gradle Scripting Tool in this field. This field is optional.
-
Fill out the fields in the Gradle Scripting Tool Details panel.
Fields marked with a red asterisk are mandatory.
Field Meaning Gradle Path
This field is mandatory.
Enter the path to the Gradle bat (gradle.bat-Windows) or shell file (e.g., gradle - linux).
Example:
d:/javatools/gradle2.10/binor/opt/javatools/gradle2.10/binJava Home
Enter the JAVA_HOME path to launch Gradle in this field. If you do not enter a value in this field, the system default JAVA_HOME path will be used.
In this case, the _JAVA_HOME _path must be defined as an environment variable on the Machine.
Java Virtual Machine Options
In this field, enter the Java Virtual Machine Options required for starting up Gradle. This field is optional.
Example:
-Xmx128M: specifies the maximum size of the memory allocation pool.
JVM Options of Java 8 for example are explained here:
https://docs.oracle.com/javase/8/docs/technotes/tools/windows/java.html
Gradle User Home
This field is optional.
Enter the path to the location of the Gradle User Home, this is the location where (among other things) the Gradle dependency cache will be stored.
If you do not enter a value in this field, the default User Home will be used. This is particularly useful on Linux, where the user running the Agent may lack a User Home.
Example:
/opt/gradle_user_homeNote: This value will be set as a commandline option (--gradle-user-home).
Commandline Options
Enter commandline options in this fields. This field is optional.
The commandline options which might be provided by default by IKAN ALM will not be accepted: .-g, --gradle-user-home, -q, --quiet, -i, --info,-d, --debug, -s, --stacktrace, -S, --full-stacktrace, -b, --build-file
Sample (accepted) options are -keep-going, or -noinput.
Build
Indicate whether or not this Scripting Tool can be linked to a Build Environment and thus be used to build code.
Deploy
Indicate whether or not this Scripting Tool can be linked to a Deploy Environment and thus be used to deploy Builds.
Log Format
By default, the generated log file will be a text file. This format cannot be modified.
Log Level
Refer to the section https://docs.gradle.org/current/userguide/logging.html in the Gradle User Guide for more info regarding the Log Level and the Stacktrace
From the drop-down list, select which logging options should be activated. The following options are available:
-
None
No specific command line options will be set for the Log Level, resulting in the default (normal) LIFECYCLE Log Level: Gradle will print progress information messages.
-
Quiet
Gradle will only print the Important Information messages, so less information than normal (LIFECYCLE level) during the Build and Deploy actions.
-q will be added as a commandline option.
-
Info
Gradle will print information messages during the Build and Deploy actions, so more information than normal (LIFECYCLE level).
-i will be added as a commandline option.
-
Debug
Gradle will print additional debug information during the Build and Deploy actions.
-d will be added as a commandline option.
Stack Trace Option
From the drop-down list, select the required Stack Trace option. The following options are available:
-
None
No stack traces are printed to the console in case of a build error (e.g., a compile error). Stack traces will only be printed in case of internal exceptions. If the option DEBUG log level is chosen, truncated stack traces are always printed.
-
Truncated
Truncated stack traces are printed. We recommend this over full stack traces. Groovy full stack traces are extremely verbose (due to the underlying dynamic invocation mechanisms). They, however, usually do not contain relevant information to find out what has gone wrong in your code.
-s will be added as a commandline option.
-
Full
Full stack traces are printed out.
-S will be added as a commandline option.
Time-Out (Sec.)
In this field, enter a Time-Out value if required.
If a value is provided, a running Gradle Build or Deploy process will be interrupted after this number of seconds. In this way, "hanging" Build or Deploy processes are interrupted.
If no value is provided, a running Gradle Build or Deploy process will never be interrupted.
-
-
Once you filled out the fields as required, click Create.
The newly created Gradle Scripting Tool is added to the Gradle Scripting Tools Overview at the bottom of the screen.
The Gradle Scripting Tools Overview Screen
-
In the Global Administration context, select Scripting Tools > Overview.
The overview of all defined Scripting Tools is displayed.
-
Specify Gradle in the Type field on the search panel.
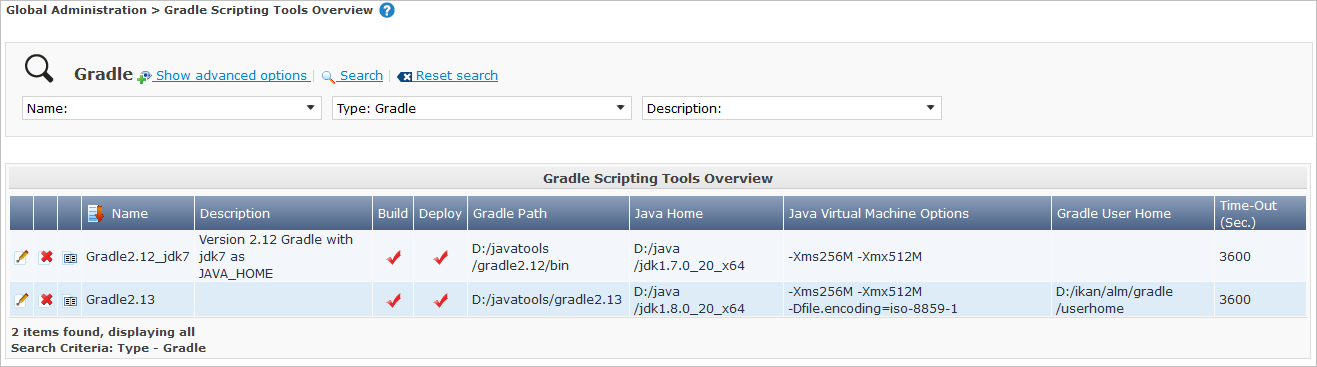
If required, use the other search criteria to refine the items displayed on the overview.
The following options are available: * click the Show/hide advanced options link to display or hide all available search criteria, * the Search link to refresh the list based on the current search criteria, * the Reset search link to clear the search fields.
-
Verify the information on the Scripting Tools Overview panel.
For a detailed description of the fields, refer to The Gradle Scripting Tools Overview Screen.
-
Depending on your access rights, the following links may be available on the Gradle Scripting Tools Overview panel:
Edit
This option is available to IKAN ALM Users with Global Administrator Access Rights. It allows editing a Scripting Tool definition.
Delete
This option is available to IKAN ALM Users with Global Administrator Access Rights. It allows deleting a Scripting Tool definition.
History
This option is available to all IKAN ALM Users. It allows displaying the History of all create, update and delete operations performed on a Scripting Tool
Editing a Gradle Scripting Tool Definition
-
In the Global Administration context, select Scripting Tools > Overview.
The overview of all defined Scripting Tools is displayed.
Use the search criteria on the search panel to display the Gradle Scripting Tools your are looking for.
-
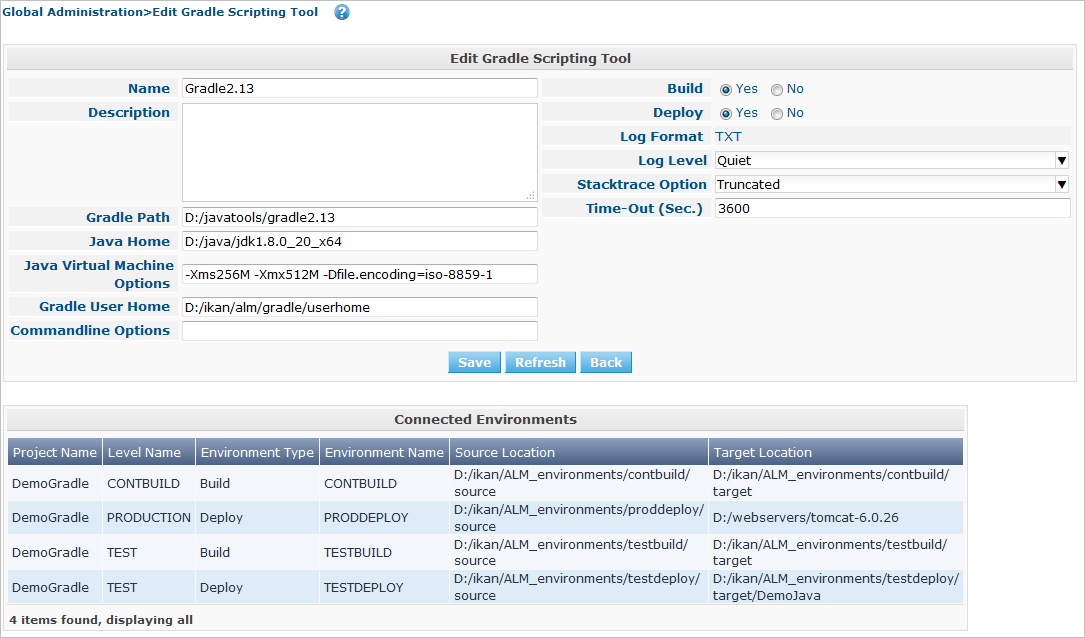
Click the
Edit link to change the selected Gradle Scripting Tool.The following screen is displayed:
-
Edit the fields as required.
For a description of the fields, refer to Creating a Gradle Scripting Tool.
The Connected Environments panel displays the Environments the Scripting Tool is linked to.
-
Click Save to save your changes.
You can also click: * Refresh to retrieve the settings from the database. * Back to return to the previous screen without saving the changes
Deleting a Gradle Scripting Tool Definition
-
In the Global Administration context, select Scripting Tools > Overview.
The overview of all defined Scripting Tools is displayed.
Use the search criteria on the search panel to display the Gradle Scripting Tools your are looking for.
-
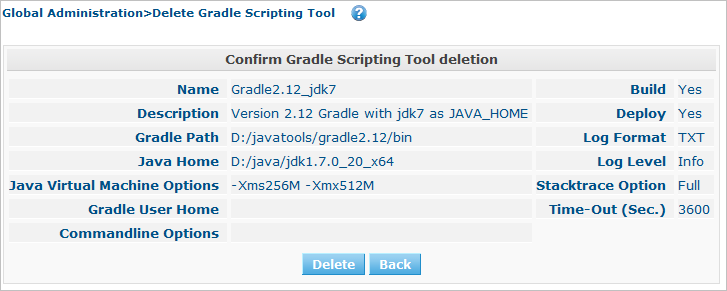
Click the
Delete link to delete the selected Gradle Scripting Tool.The following screen is displayed:
-
Click Delete to confirm the deletion.
You can also click Back to return to the previous screen without deleting the entry.
Note: If the Gradle Scripting Tool is linked to one or more Build or Deploy Environments, the following screen is displayed:
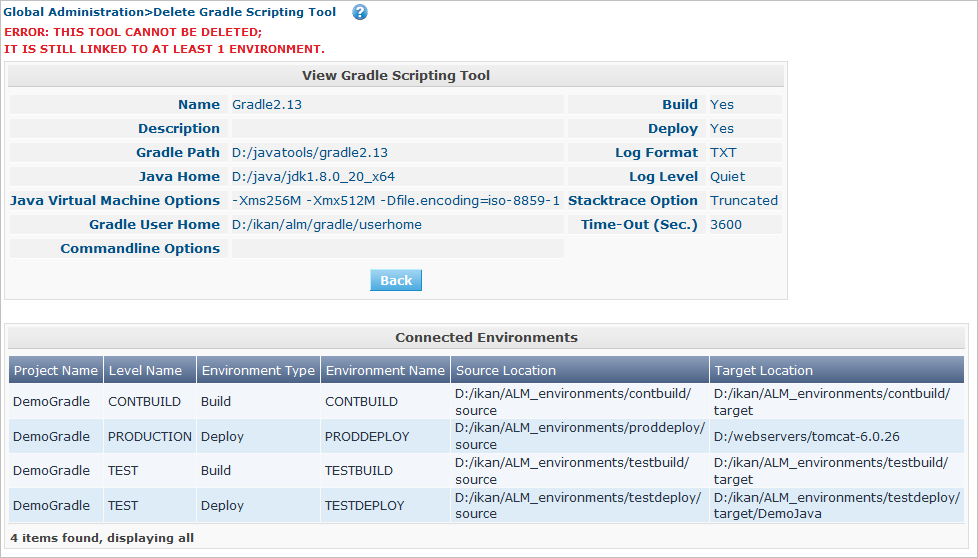
You need to assign another Scripting Tool to these Environments, before deleting this Gradle Scripting Tool.
Viewing the Gradle Scripting Tool History
-
In the Global Administration context, select Scripting Tools > Overview.
The overview of all defined Scripting Tools is displayed.
Use the search criteria on the search panel to display the Gradle Scripting Tools your are looking for.
-
Click the
History link to display the Gradle Scripting Tool History View.For more detailed information concerning this History View, refer to the section History and Event Logging.
-
Click Back to return to the Scripting Tools Overview screen.
NANT Scripting Tools
NANT is a free .NET build tool. In theory it resembles to make without make's wrinkles. In practice it is a lot like Ant.
If NANT is installed on a machine connected to your Build/Deploy Environments, IKAN ALM will be able to interact with it.
Therefore, you must define the NANT Scripting Tool in the IKAN ALM application and, when creating the Build or Deploy Environment, specify it as being the Build or Deploy Tool to be used.
Refer to the following sections for detailed information:
Creating a NANT Scripting Tool
|
This option is only available if you have Global Administrator Access Rights in IKAN ALM. |
-
In the Global Administration context, select Scripting Tools > Create.
-
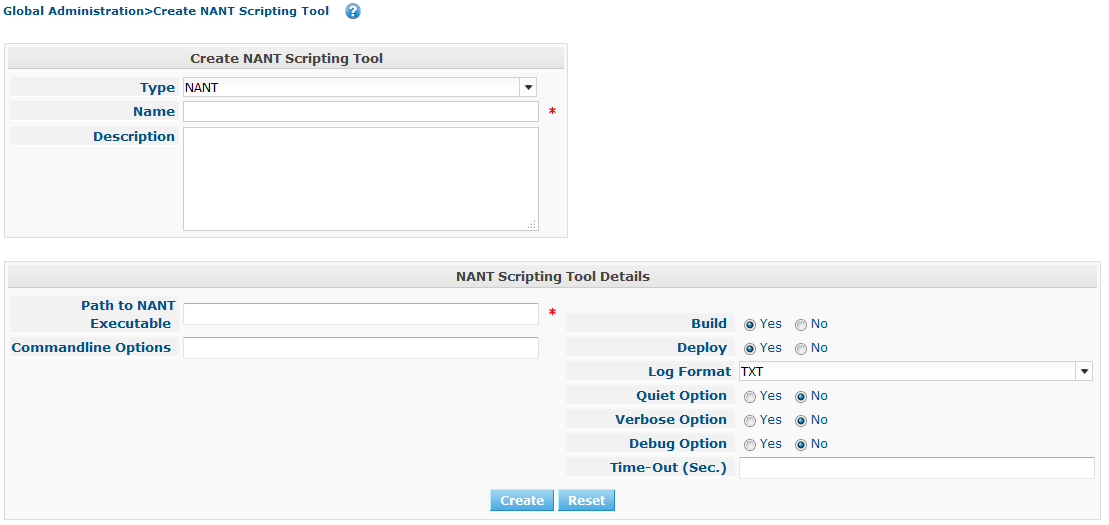
Select NANT from the drop-down list in the Type field on the search panel.
The following screen is displayed:
-
Fill out the fields in the Create NANT Scripting Tool panel at the top of the screen.
Fields marked with a red asterisk are mandatory.
Field Meaning Type
Select the type of Scripting Tool you want to define. This field is mandatory.
After you have selected the type, the appropriate Details panel will be displayed underneath.
Name
Enter the name of the new NANT Scripting Tool in this field. This field is mandatory.
Description
Enter a description for the new NANT Scripting Tool in this field. This field is optional.
-
Fill out the fields in the NANT Scripting Tool Details panel.
Fields marked with a red asterisk are mandatory.
Field Meaning Path to NANT Executable
Enter the path to the NANT executable (NAnt.exe) in this field. This field is mandatory.
Commandline Options
Enter commandline options in this fields. This field is optional.
The commandline options provided by default by IKAN ALM, like -buildfile, -logfiles, -verbose, -debug ,… will not be accepted.
Sample options are -keep-going, or -noinput.
Build
Indicate whether or not this Scripting Tool can be linked to a Build Environment and thus be used to build code.
Deploy
Indicate whether or not this Scripting Tool can be linked to a Deploy Environment and thus be used to deploy Builds.
Log Format
Select the format of the log file generated by this NANT Scripting Tool. The following options are available:
-
TXT: the log file will be a simple text file
-
XML: the log file will be an XML file
TXT logs will be smaller and their content can be displayed while the Tool is executing.
The display of XML logs can be customized by providing custom XSL templates. However, XML logs are larger and can only be displayed after the Tool has finished executing.
Quiet Option
Select whether or not the Quiet Option must be activated for the new NANT Scripting Tool.
NANT will print less information than normal during the Build and Deploy actions, if this option is activated.
Verbose Option
Select whether or not the Verbose Option must be activated for the new NANT Scripting Tool.
NANT will print verbose debug information during the Build and Deploy actions, if this option is activated.
Debug Option
Select whether or not the Debug Option must be activated for the new NANT Scripting Tool.
NANT will print additional debug information during the Build and Deploy actions, if this option is activated.
Time-Out (Sec.)
In this field, enter a Time-Out value if required.
If a value is provided, a running NANT Build or Deploy process will be interrupted after this number of seconds. In this way, "hanging" Build or Deploy processes are interrupted.
If no value is provided, a running NANT Build or Deploy process will never be interrupted.
-
-
Once you filled out the fields as required, click Create.
The newly created NANT Scripting Tool is added to the NANT Scripting Tools Overview at the bottom of the screen.
The NANT Scripting Tools Overview Screen
-
In the Global Administration context, select Scripting Tools > Overview.
The overview of all defined Scripting Tools is displayed.
-
Specify NANT in the Type field on the search panel.
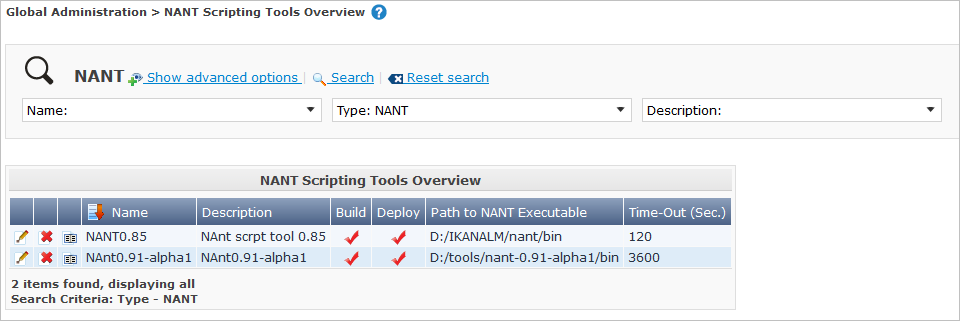
If required, use the other search criteria to refine the items displayed on the overview.
The following options are available:
-
click the Show/hide advanced options link to display or hide all available search criteria,
-
the Search link to refresh the list based on the current search criteria,
-
the Reset search link to clear the search fields.
-
-
Verify the information on the Scripting Tools Overview panel.
For a detailed description of the fields, refer to The NANT Scripting Tools Overview Screen.
-
Depending on your access rights, the following links may be available on the NANT Scripting Tools Overview panel:
Edit
This option is available to IKAN ALM Users with Global Administrator Access Rights. It allows editing a Scripting Tool definition.
Delete
This option is available to IKAN ALM Users with Global Administrator Access Rights. It allows deleting a Scripting Tool definition.
History
This option is available to all IKAN ALM Users. It allows displaying the History of all create, update and delete operations performed on a Scripting Tool
Editing a NANT Scripting Tool Definition
-
In the Global Administration context, select Scripting Tools > Overview.
The overview of all defined Scripting Tools is displayed.
Use the search criteria on the search panel to display the NANT Scripting Tools your are looking for.
-
Click the
Edit link to change the selected NANT Scripting Tool.The following screen is displayed:
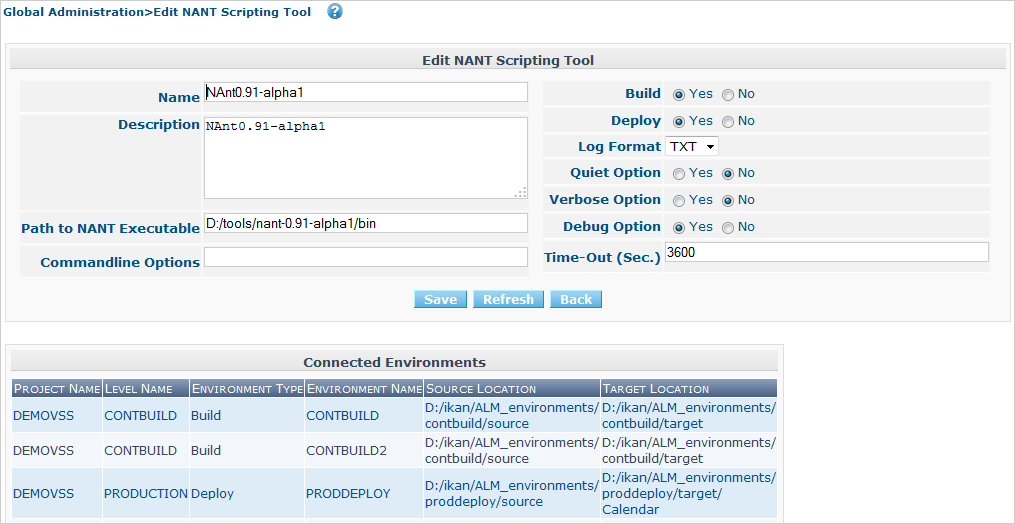
-
Edit the fields as required.
For a description of the fields, refer to Creating a NANT Scripting Tool.
The Connected Environments panel displays the Environments the Scripting Tool is linked to.
-
Click Save to save your changes.
You can also click:
-
Refresh to retrieve the settings from the database.
-
Back to return to the previous screen without saving the changes
-
Deleting a NANT Scripting Tool Definition
-
In the Global Administration context, select Scripting Tools > Overview.
The overview of all defined Scripting Tools is displayed.
Use the search criteria on the search panel to display the NANT Scripting Tools your are looking for.
-
Click the
Delete link to delete the selected NANT Scripting Tool.The following screen is displayed:
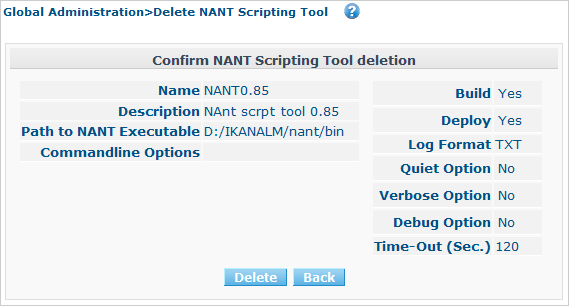
-
Click Delete to confirm the deletion.
You can also click Back to return to the previous screen without deleting the entry.
Note: If the NANT Scripting Tool is linked to one or more Build or Deploy Environments, the following screen is displayed:
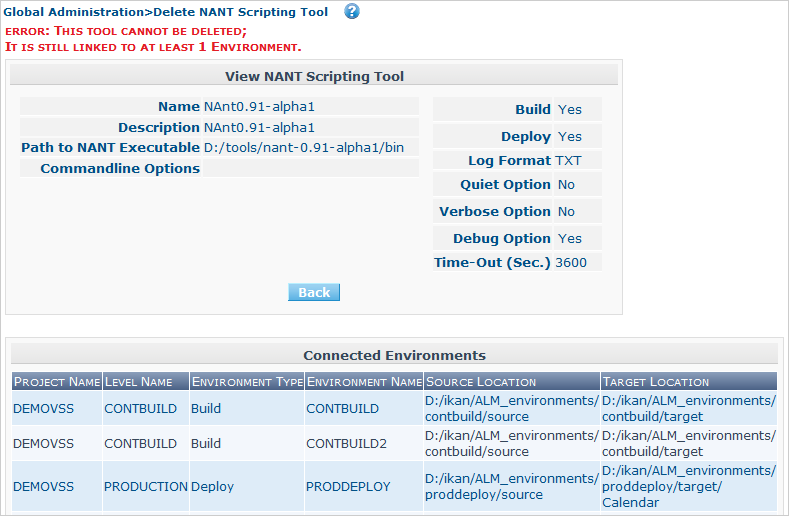
You need to assign another Scripting Tool to these Environments, before deleting this NANT Scripting Tool.
Viewing the NANT Scripting Tool History
-
In the Global Administration context, select Scripting Tools > Overview.
The overview of all defined Scripting Tools is displayed.
Use the search criteria on the search panel to display the NANT Scripting Tools your are looking for.
-
Click the
History link to display the NANT Scripting Tool History View.For more detailed information concerning this History View, refer to the section History and Event Logging.
-
Click Back to return to the Scripting Tools Overview screen.
Maven2 Scripting Tools
Maven2 is a scripting tool that can be used for building and managing any Java-based project. Its primary goal is to allow a developer to comprehend the complete state of a development effort in the shortest period of time. If Maven2 is installed on a machine connected to your Build/Deploy Environments, IKAN ALM will be able to interact with Maven2.
Therefore, you must define the Maven2 Scripting Tool in the IKAN ALM application and, when creating the Build or Deploy Environment, specify it as being the Build or Deploy Tool to be used.
Refer to the following sections for detailed information:
Creating a Maven2 Scripting Tool
|
This option is only available if you have Global Admin Access Rights in IKAN ALM. |
-
In the Global Administration context, select Scripting Tools > Create.
-
Select Maven2 from the drop-down list in the Type field in the search panel.
The following screen is displayed:
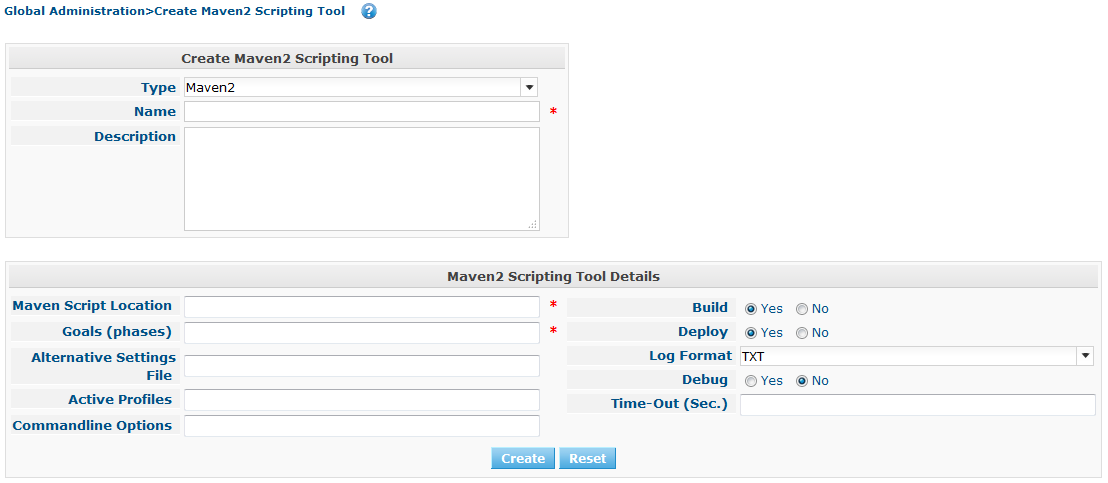
-
Fill out the fields in the Create Maven2 Scripting Tool panel at the top of the screen.
Fields marked with a red asterisk are mandatory.
Field Meaning Type
Select the type of Scripting Tool you want to define. This field is mandatory.
After you have selected the type, the appropriate Details panel will be displayed underneath.
Name
Enter the name of the new Maven2 Scripting Tool in this field. This field is mandatory.
Description
Enter a description for the new Maven2 Scripting Tool in this field. This field is optional.
-
Fill out the fields in the Maven2 Scripting Tool Details panel.
Fields marked with a red asterisk are mandatory.
Field Meaning Maven Script Location
Enter the path to the Maven2 start-up script on the target Machine linked to the Build/Deploy Environment (mvn shell script or mvn2.bat file). This field is mandatory.
Goals (phases)
Enter the Maven2 goals and/or phases to be executed by default. This field is mandatory.
The goals and/or phases should be separated by a space and use the following format:
[<goal(s)] [<Phase(s)].For example,
clean
dependency:copydependencies test
The goals and/or phases defined here will be used by default. If necessary, they can be overridden for the different build or deploy environments. In order to do so, add a build or deploy parameter “alm.mvn2.goals” with the desired value.
Please refer to Creating Environment Parameters.
Alternative Settings File
Enter the alternate path for the Maven2 User Settings File. It corresponds with the -s or --settings commandline option. This field is optional.
If not provided, the default Settings File under home-directory/.m2/settings.xml will be taken into account.
If necessary, this file can be overridden for the different build or deploy environments. In order to do so, add a build or deploy parameter “alm.mvn2.setting” with the desired value.
Please refer to Creating Environment Parameters.
Active Profiles
Enter the Activate Profiles. This is a comma-delimited list of profiles to activate. It corresponds with the -P or --activate-profiles Maven2 commandline option. This field is optional.
The Activate Profiles defined here will be used by default. If necessary, they can be overridden for the different build or deploy environments. In order to do so, add a build or deploy parameter “alm.mvn2.activate-profiles” with the desired value.
Please refer to Creating Environment Parameters.
Commandline Options
Enter the Commandline Options, separated by a space. For example: the option “-e” will give you more information about error messages. This field is optional.
Please note that you can NOT use the following options as they are already used by IKAN ALM: “-X” or “--debug” (Debug), “-s” or “--settings” (Settings File), “-P” or “--activate-profiles” (Activate Profiles) and “-B” or “--batch-mode”.
The Commandline Options defined here will be used by default. If necessary, they can be overridden for the different build or deploy environments. In order to do so, add a build or deploy parameter “alm.mvn2.options” with the desired value.
Please refer to Creating Environment Parameters.
Build
Indicate whether or not this Scripting Tool can be linked to a Build Environment and thus be used to build code.
Deploy
Indicate whether or not this Scripting Tool can be linked to a Deploy Environment and thus be used to deploy Builds.
Log Format
Select the format of the log file generated by this Maven2 Scripting Tool. The following options are available:
-
TXT: the log file will be a simple text file
-
XML: the log file will be an XML file
TXT logs will be smaller and their content can be displayed while the Tool is executing.
The display of XML logs can be customized by providing custom XSL templates. However, XML logs are larger and can only be displayed after the Tool has finished executing.
Debug
Select whether or not the Debug Option must be activated for the new Maven2 Scripting Tool. This corresponds with the -X or --debug Maven2 commandline option.
If this option is activated, Maven2 will print additional debug information during the Build and Deploy actions.
Time-Out (Sec.)
In this field, enter a Time-Out value if required.
If a value is provided, a running Maven2 Build or Deploy process will be interrupted after the defined number of seconds. In this way, "hanging" Build or Deploy processes are interrupted.
If no value is provided, a running Maven2 Build or Deploy process will never be interrupted.
-
-
Once you filled out the fields as required, click Create.
The newly created Maven2 Scripting Tool is added to the Maven2 Scripting Tools Overview at the bottom of the screen.
You can also click Reset to empty the fields and restore the initial values.
-
Overriding the default parameters set in the Maven2 Scripting Tool
You can override the default parameters set in the Maven2 Scripting Tool.
If an “alm.mvn2.goals” parameter for a chosen environment (either build or deploy) is specified, it will be used instead of the default goals that were initially set in the Maven2 Scripting Tool.
The same mechanism applies to the following parameters: Settings File (alm.mvn2.setting), Activate Profiles (alm.mvn2.activate-profiles) and Commandline Options (alm.mvn2.options).
When creating a build or deploy parameter, you can also set the option “Editable” to Yes. In that case you will be able to modify the value of the parameters at the moment of creating the level request. Editing Environment Parameters
The Maven2 Scripting Tools Overview Screen
-
In the Global Administration context, select Scripting Tools > Overview.
The overview of all defined Scripting Tools is displayed.
-
Specify Maven2 in the Type field on the search panel.
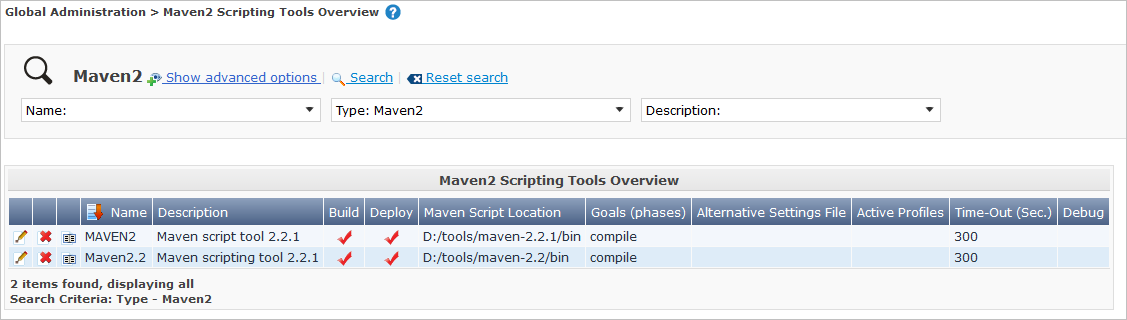
If required, use the other search criteria to refine the items displayed on the overview.
The following options are available: * click the Show/hide advanced options link to display or hide all available search criteria, * the Search link to refresh the list based on the current search criteria, * the Reset search link to clear the search fields.
-
Verify the information on the Scripting Tools Overview panel.
For a detailed description of the fields, refer to The Maven2 Scripting Tools Overview Screen.
-
Depending on your access rights, the following links may be available on the Maven2 Scripting Tools Overview panel:
Edit
This option is available to IKAN ALM Users with Global Administrator Access Rights. It allows editing a Scripting Tool definition.
Delete
This option is available to IKAN ALM Users with Global Administrator Access Rights. It allows deleting a Scripting Tool definition.
History
This option is available to all IKAN ALM Users. It allows displaying the History of all create, update and delete operations performed on a Scripting Tool
Editing a Maven2 Scripting Tool Definition
-
In the Global Administration context, select Scripting Tools > Overview.
The overview of all defined Scripting Tools is displayed.
Use the search criteria on the search panel to display the Maven2 Scripting Tools your are looking for.
-
Click the
Edit link to change the selected Maven2 Scripting Tool.The following screen is displayed.
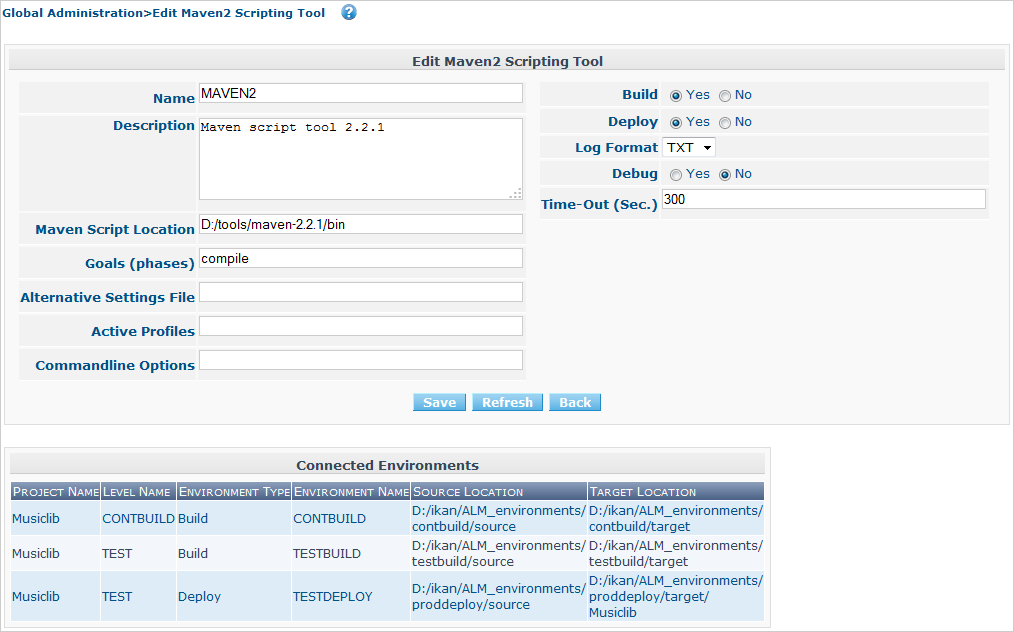
-
Edit the fields as required.
For a description of the fields, refer to Creating a Maven2 Scripting Tool.
The Connected Environments panel displays the Environments the Scripting Tool is linked to.
-
Click Save to save your changes.
You can also click:
-
Refresh to retrieve the settings from the database.
-
Back to return to the previous screen without saving the changes
-
Deleting a Maven2 Scripting Tool Definition
-
In the Global Administration context, select Scripting Tools > Overview.
The overview of all defined Scripting Tools is displayed.
Use the search criteria on the search panel to display the Maven2 Scripting Tools your are looking for.
-
Click the
Delete link to delete the selected Maven2 Scripting Tool.The following screen is displayed:
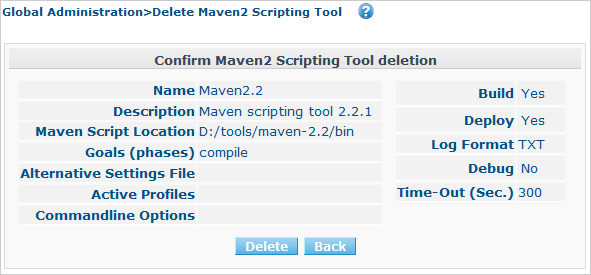
-
Click Delete to confirm the deletion.
You can also click Back to return to the previous screen without deleting the entry.
Note: If the Maven2 Scripting Tool is linked to one or more Build or Deploy Environments, the following screen is displayed:
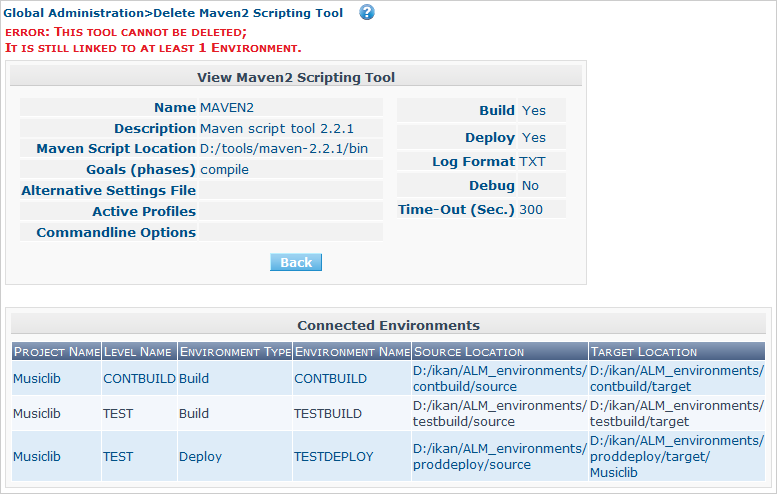
You need to assign another Scripting Tool to these Environments, before deleting this Maven2 Scripting Tool.
Viewing the Maven2 Scripting Tool History
-
In the Global Administration context, select Scripting Tools > Overview.
The overview of all defined Scripting Tools is displayed.
Use the search criteria on the search panel to display the Maven2 Scripting Tools your are looking for.
-
Click the
History link to display the Maven2 Scripting Tool History View.For more detailed information concerning this History View, refer to the section History and Event Logging.
-
Click Back to return to the Scripting Tools Overview screen.