Machines
All Machines hosting Build and/or Deploy Environments that are used by IKAN ALM Projects, must be defined in IKAN ALM. This is the task of the IKAN ALM Global Administrator. Other IKAN ALM Users can verify, if all Machines used for a new Project are available. If not, they can request the IKAN ALM Global Administrator to add the Machine definitions to IKAN ALM and install an IKAN ALM Agent on it. Build and Deploy Actions can only be handled on a Machine on which an IKAN ALM Agent is correctly installed and running.
Refer to the following sections for detailed information:
Creating a Machine Definition
|
This option is only available if you have Global Administrator Access Rights in IKAN ALM. |
-
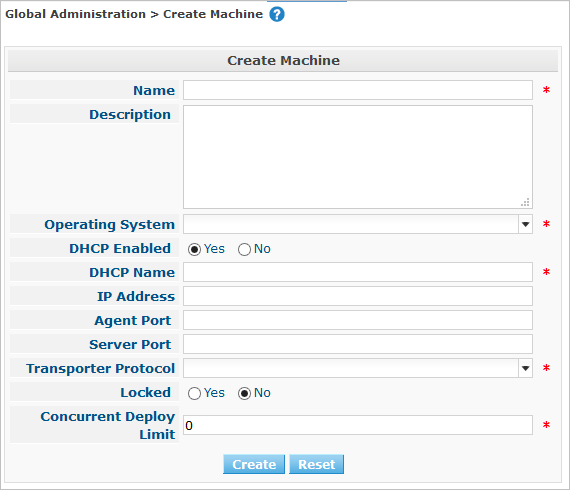
In the Global Administration context, select Machines > Create.
The following screen is displayed:
-
Fill out the fields in the Create Machine panel at the top of the screen. Fields marked with a red asterisk are mandatory:
Field Meaning Name
Enter the name of the new Machine in this field. This field is mandatory.
Description
Enter a description for the new Machine in this field. This field is optional.
Operating System
Select the required Operating System from the drop-down list. The Selection of an Operating System is mandatory.
DHCP Enabled
Indicate whether or not the Machine is DHCP-enabled.
DHCP Name
Enter the Machine’s DHCP Name. Required field when the DHCP Enabled status is set to Yes. The IKAN ALM Server will try to set up a connection with this DHCP Name (using web services).
IP Address
Enter the Machine’s IP Address. Required field when the DHCP Enabled status is set to No. The IKAN ALM Server will try to set up a connection with this IP Address (using web services).
Agent Port
In this field, you can enter the Port number (between 0 and 65536) on which the IKAN ALM Agent on this Machine will listen for communication with the IKAN ALM Server (using web services).
If you leave this field empty, the default value of 20020 will be used.
If you define a value different from the default value, be sure to define the same value when running the Agent install wizard on this Machine.
Server Port
In this field, enter the Port number (between 0 and 65536) on which the IKAN ALM Server will listen for communication with the IKAN ALM Agents (using web services). This port number was defined during the initial installation of the IKAN ALM Server.
If the IKAN ALM Server uses the default value of 20021, you can also leave this field empty.
Transporter Protocol
Select the required Transporter Protocol from the drop-down list. The list contains the names of all Transporters defined in IKAN ALM (FTP, FileCopy and SSH).
This Protocol defines how sources, scripts, build results and phases will be transported between the IKAN ALM Server locations (Build Archive, Work Copy, Script and Phase Catalog Location) and this Machine.
The Selection of a Transporter Protocol is mandatory.
For more information on configuring Transporters, refer to the section Transporters.
Locked
Select whether or not the Machine must be locked for future use.
Concurrent Deploy Limit
Enter the maximum number of Deploys that may be run at the same time.
-
If no number is set to 0 (the default), there is no limit for running Deploys concurrently.
-
If the number is set to
1, all deploys will run sequentially. -
If a specific number is specified, only that number of Deploys can be run concurrently on the agent connected with the machine. If a next one is requested, it will go in the waiting queue and it will only be started if one of the running Deploys is finished (following the FIFO-principle based on the Deploy OIDs).
-
-
Once you have filled out the fields, click Create.
The newly created Machine definition is added to the Machines Overview.
Your IKAN ALM User License may contain a limit on the number of Machines you can add. If this limit is exceeded, the new Machine definition is not added, and the following error message is displayed:
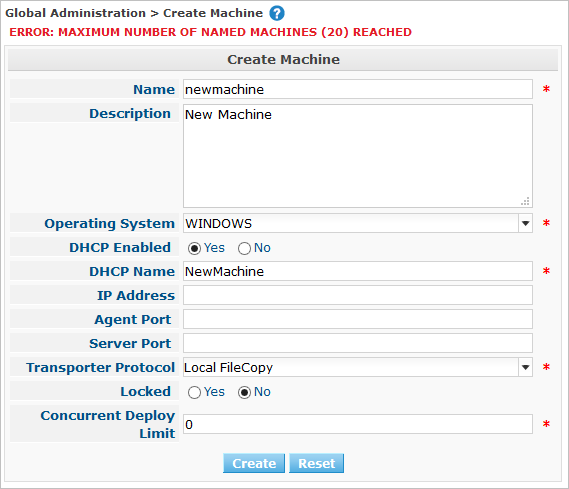
Contact your IKAN ALM Vendor if you need to purchase a license that allows for more Machine Definitions.
RELATED TOPICS |
The Machines Overview Screen
-
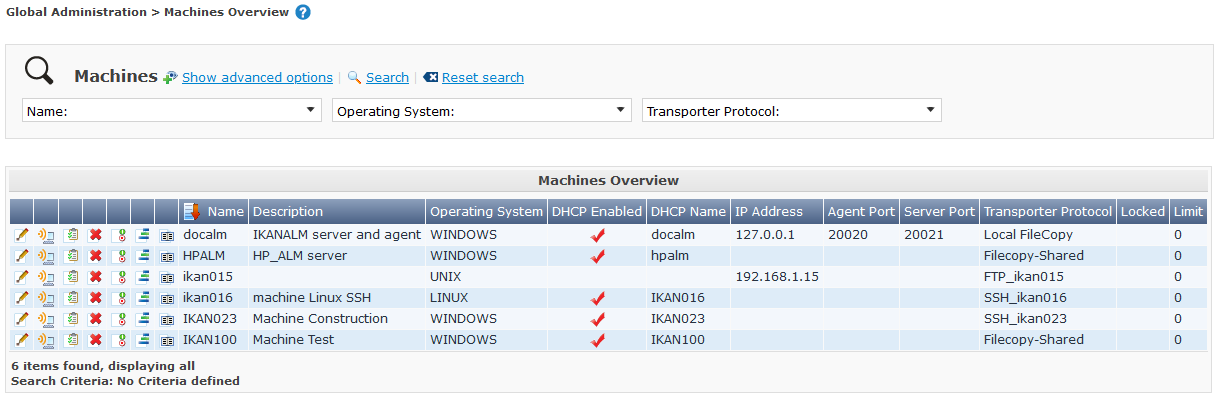
In the Global Administration context, select Machines > Overview.
The following screen is displayed:
-
Define the required search criteria on the search panel.
The list of items on the overview will be automatically updated based on the selected criteria.
You can also:
-
click the Show/hide advanced options link to display or hide all available search criteria,
-
click the Search link to refresh the list based on the current search criteria,
-
click the Reset search link to clear the search fields.
-
-
Verify the information on the Machines Overview panel.
For a detailed description of the fields, refer to Creating a Machine Definition.
-
Depending on your access rights, the following links may be available on the Machines Overview panel:

Edit
This option is available to IKAN ALM Users with Global Administrator Access Rights. It allows editing a Machine definition.

Install
This option is available to IKAN ALM Users with Global Administrator Access Rights. It allows to configure and run a remote install of an IKAN ALM Agent on a machine.

View Parameters
This option is available to all IKAN ALM Users. It allows viewing and editing the Parameters of a Machine.

Delete
This option is available to IKAN ALM Users with Global Administrator Access Rights. It allows deleting a Machine definition.

Status
This option is available to all IKAN ALM Users. It allows checking the status of a Machine.

Installed Phases
This option is available to IKAN ALM Users with Global Administrator Access Rights. It allows viewing and uninstalling the phases that are currently installed on the Machine.

History
This option is available to all IKAN ALM Users. It allows displaying the History of all create, update and delete operations performed on a Machine.
Columns marked with the
 icon can be sorted alphabetically (ascending or descending).
Editing a Machine Definition
-
In the Global Administration context, select Machines > Overview.
-
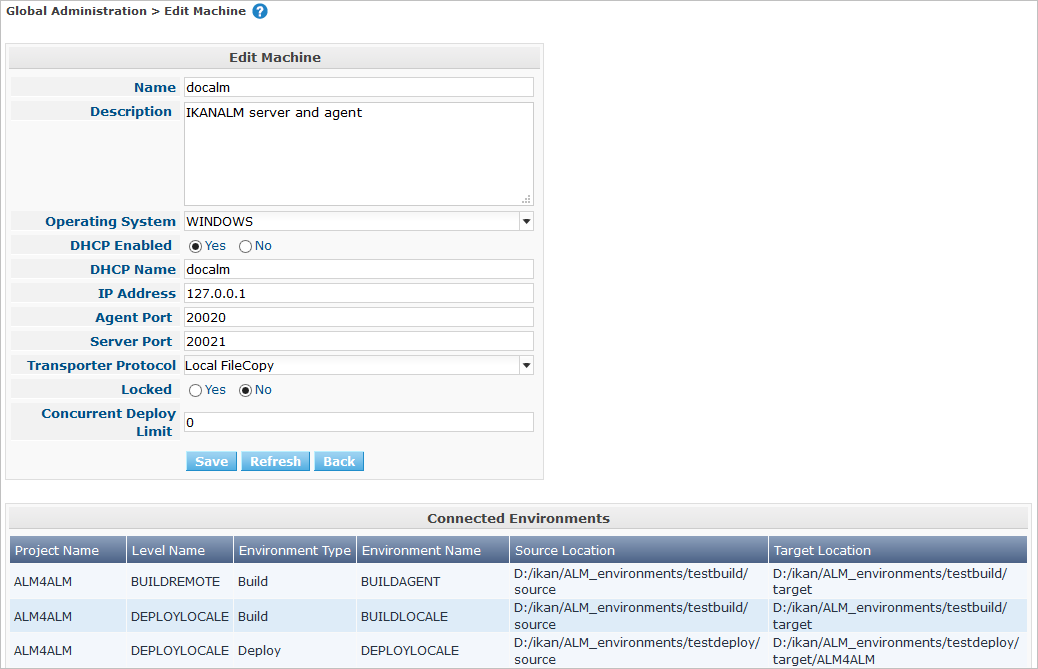
Click the
Edit link on the Machines Overview panel.The following screen is displayed:
-
Edit the fields as required.
For a description of the fields, refer to Creating a Machine Definition.
The Connected Environments panel displays the Environments the Machine is linked to.
-
Click Save to save your changes.
You can also click:
-
Refresh to retrieve the settings from the database.
-
Back to return to the previous screen without saving the changes
-
Remote installing an IKAN ALM Agent
-
In the Global Administration context, select Machines > Overview.
-
Click the
Install link on the Machines Overview panel.The following screen is displayed:
For more in depth information of the Remote Agent installation, refer to the Agent UI Installation How-to document.
-
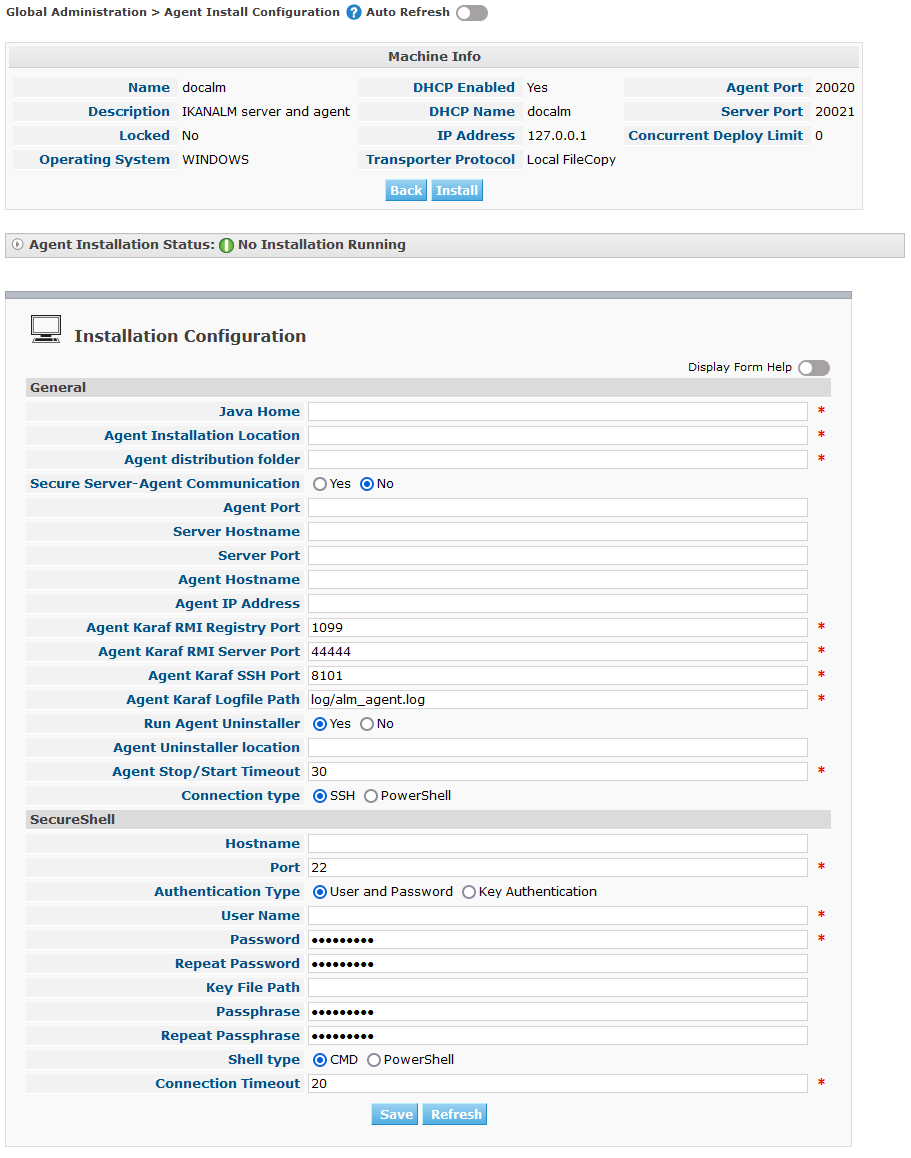
The Agent Install Configuration screen displays the status of the Agent Installation process. It also displays the Installation Configuration pane which contains the necessary values in order to run an Agent Installation.
At the top of the screen, the Machine Info panel is displayed. For a detailed description of the fields, refer to Creating a Machine Definition.
This panel contains two buttons:
-
Back : to return to the Machines Overview page.
-
Install : to start the Agent Installation process.
Make sure that all necessary values in the Installation Configuration pane are filled in correctly before starting the installation process, or it will fail.
-
-
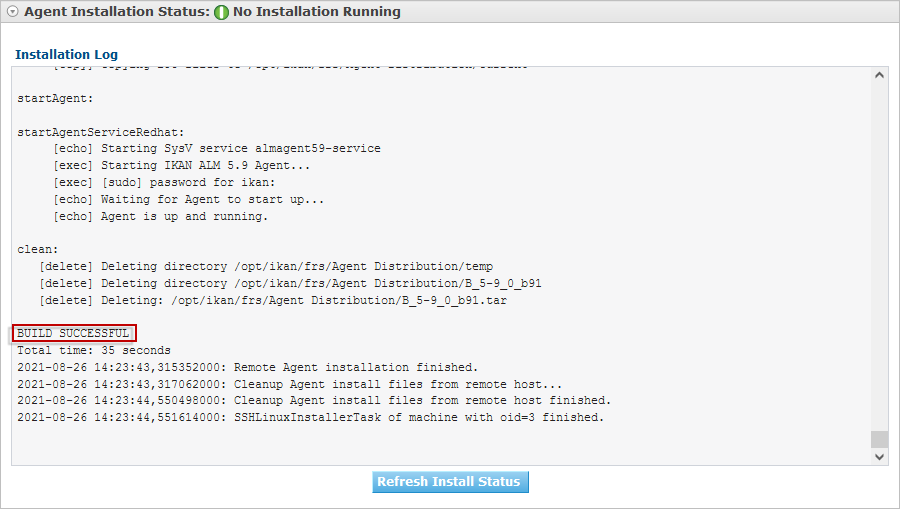
Verify the status of the installation process. Open the Agent Installation Status panel, by clicking it. The Installation Log shows the information about the latest installation attempt, when the log reads: “Agent Installation Log Not Found” it means that no installation has occurred yet, or that the log is unavailable.
The possible statuses are:
-
No installation running: The process is not running. This status is also set when the installation process has just finished running, either with success or failure.
-
Installation in progress: The installation process is currently running.
-
Could not connect to server: The IKAN ALM Server (which runs the installation process) is not available.

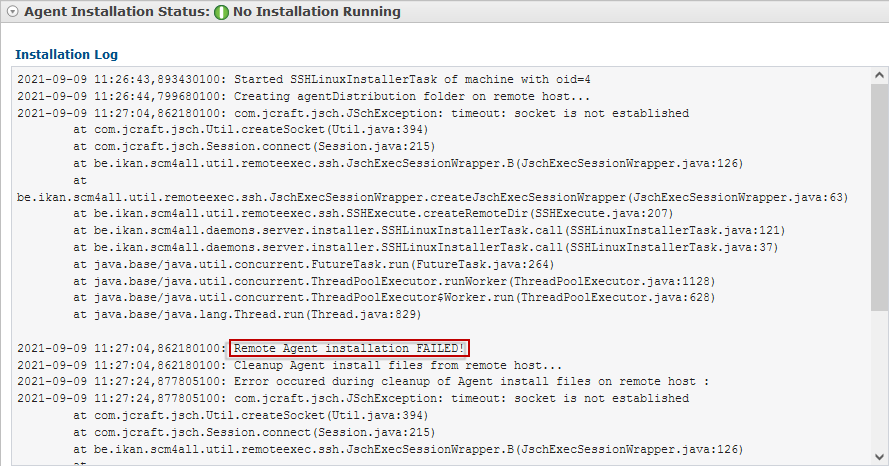


During installation click the Refresh Install Status Button to update the status manually, or use the Auto Refresh function at the top of the page.
-
-
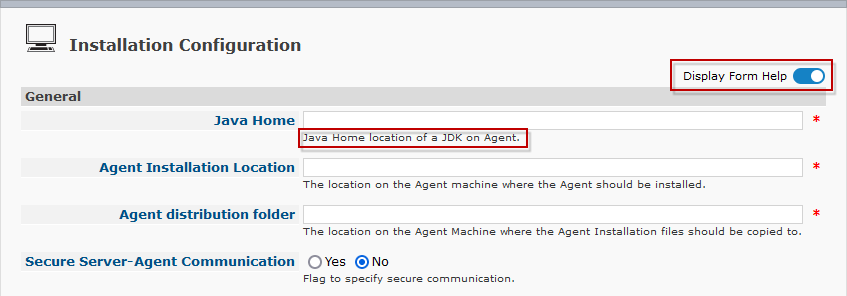
Before starting the installation, fill out the fields in the Installation Configuration panel. For some basic information about the form fields, click the Display Form Help toggle switch. Fields marked with a red asterisk are mandatory:
The following subpanels are available
-
SecureShell This subpanel is available when the SSH Connection type is selected.
-
PowerShell This subpanel is available when the PowerShell Connection type is selected.
General
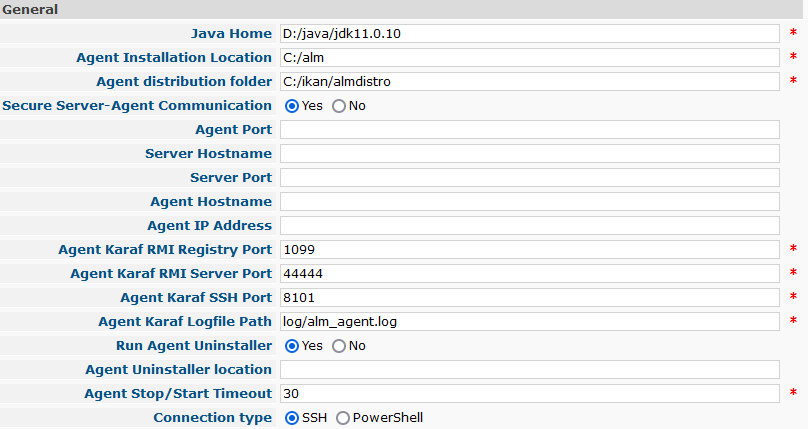
The following fields are available on the General subpanel. Fields marked with a red asterisk are mandatory:
| Field | Description |
|---|---|
Java Home |
The location of the Java Virtual Machine used to launch the Agent. This should be a Java 11 JDK. Example:
Note: On Unix or Linux systems, specify the path of the real Java installation (and not to a symlink), as the installation will verify the existence of specific jars under the provided path. |
Agent Installation Location |
Enter the location where the Agent will be installed. Example:
|
Agent Distribution Folder |
Enter the location on the Agent Machine where the Agent Installation files should be copied to.
e.g., |
Secure Server-Agent Communication |
Indicate whether or not the communication between the ALM Server and Agent is done through a secure channel. |
Agent Port |
Enter the port the Agent will be listening on. This field is optional, when leaving empty it is defaulted to the value of the Machine definition (which is defaulted to 20020). If you change this value, you will also have to change the Agent Port property of the Machine definition. |
Server Hostname |
Enter the hostname (or IP address) of the IKAN ALM Server machine. This field is optional, when leaving empty it is defaulted to the value of the Machine definition. The Agent will try to connect to the Server by using this name or IP address. |
Server Port |
In this field, enter the Port number (between 0 and 65536) the Agent will try to connect to the Server. This field is optional, when leaving empty it is defaulted to the value of the Machine defintion. The setting can be verified in the IKAN ALM Global administration: see System Settings, Panel Local Environment : the value of IKAN ALM Server represents the IKAN ALM Server Machine. Go to Global Administration > Machines > Overview Check the Server Port property of the IKAN ALM Server Machine. If no Server Port is defined on the ALM Server Machine, port 20021 will be used. |
Agent Hostname |
This field is Optional. Leave this field empty unless you want to override the automatically detected hostname of the Agent. For example, to use a fully qualified domain name like almAgent.your.domain for communicating with the IKAN ALM server. It is important that the hostname entered here matches the DHCP Name of the Agent Machine definition. |
Agent IP Address |
This field is Optional. Leave this field empty unless you want to override the automatically detected IP address of the Agent. For example, to use an IP Address which differs from the internal IP address for communicating with the IKAN ALM server. It is important that the IP address entered here matches the IP address of the Agent Machine definition. |
The following first three fields are the port numbers specific to the Karaf container hosting the IKAN ALM Agent daemon. Normally, there is no need to change those port numbers unless you have port conflicts. For more information, refer to the Karaf Container 4.0 documentation: https://karaf.apache.org/manual/latest/#_instances .
| Field | Description |
|---|---|
Agent Karaf RMI Registry Port |
Enter the Port number (between 0 and 65536) for the Karaf RMI registry port. The default value is 1099. |
Agent Karaf RMI Server Port |
Enter the Port number (between 0 and 65536) for the Karaf RMI server port. The default value is 44444. |
Agent Karaf SSH Port |
Enter the Port number (between 0 and 65536) for the Karaf SSH port. The default value is 8101. |
Agent Karaf Logfile Path |
Enter the Relative path to the Karaf log of the IKAN ALM Agent log. This setting is used by the IKAN ALM Server when displaying the Machine Log of an Agent on the Machine Detailed Status screen. The default value is log/alm_agent.log |
Run Agent Uninstaller |
Select whether or not the uninstallation process should run first to uninstall the previously installed IKAN ALM agent. The default value is Yes. |
Agent Uninstaller location |
This field is Optional. Enter the location of the Uninstaller for manually installed Agents. There is no need to set this field for Agents that have been installed using this page. You need to set this if you want the installation procedure to automatically uninstall an Agent that was previously installed manually. For example, if an ALM 5.8 Agent was installed using the console installer, you need to set this field to the location of that console installer, like C:/ikan/install/IKAN_ALM_5.8_console. The installation procedure will detect the version of the Agent and stop and remove the old Agent service. Note that this will only work if the Agent service was installed using its default service name. |
Agent Stop/Start Timeout |
Enter the timeout in seconds to wait for the Agent service to stop or start. The default value is 30 seconds. |
Connection type |
Select the Connection Type between the IKAN ALM Server and the target Agent Machine. Possible options are SSH (SecureShell) or PowerShell. After you have selected the Connection type, the appropriate SecureShell or PowerShell panel will be displayed underneath. |
SecureShell
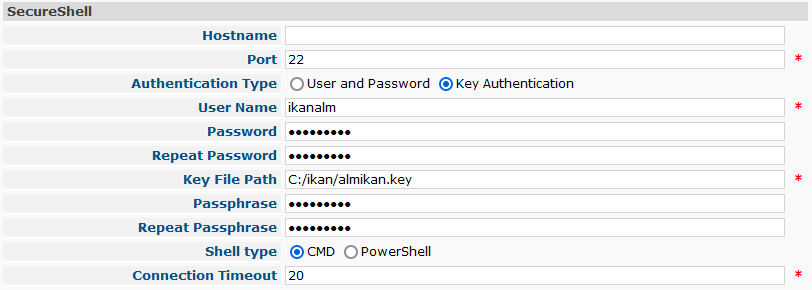
If you have selected the SSH Connection Type fill out the fields on the SecureShell subpanel:
| Field | Description |
|---|---|
Hostname |
This field is optional. Enter the hostname used when establishing an SSH connection with the Agent Machine. Leave this field empty unless you want to override the hostname or the ip address of the Agent Machine definition. |
Port |
Fill in the SSH Port number (between 0 and 65536) to connect to the Agent Machine. The default value is 22. |
Authentication Type |
Select the required Authentication type. Available options:
|
User Name |
Enter the User Name to connect to the SSH Agent Machine. Note that this User will also be used to register the Agent daemon on Linux and Unix Machines. |
Password |
Enter the Password required for User and Password Authentication. |
Repeat Password |
In this field, re-enter the Password for User and Password Authentication. |
Key File Path |
Enter the Path to the Key File required for Key Authentication. |
Passphrase |
This field is Optional. Enter the Passphrase for Key Authentication. |
Repeat Passphrase |
In this field, re-enter the Passphrase for Key Authentication. |
Shell type |
Enter the SSH Shell Type of the Agent Machine, Different processes will be executed depending on the Shell type. Available options:
|
Connection Timeout |
In this field, enter the timeout in seconds for establishing an SSH connection. The default value is 20 seconds. |
PowerShell
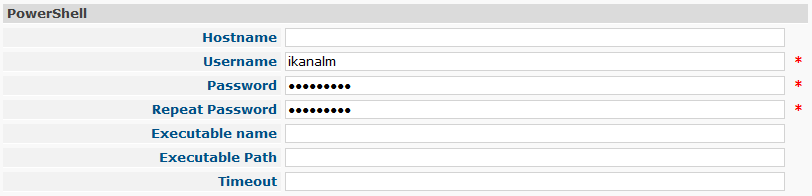
If you have selected the PowerShell Connection Type fill out the fields on the PowerShell subpanel:
| Field | Description |
|---|---|
Hostname |
This field is optional. Enter the hostname used when invoking remote PowerShell commands on the Agent Machine. Leave this field empty unless you want to override the hostname or the ip address of the Agent Machine definition. |
User Name |
Fill in the User Name used when invoking remote PowerShell commands on the Agent Machine. |
Password |
Enter the Password used when invoking remote PowerShell commands on the Agent Machine. |
Repeat Password |
Re-enter the Password used when invoking remote PowerShell commands on the Agent Machine |
Executable name |
This field is optional. Enter the PowerShell executable. When left empty, powershell.exe will be used. |
Executable Path |
This field is optional.
Enter the path to the PowerShell executable. When left empty, it is assumed the PowerShell executable is present in the PATH.
For Example |
Timeout |
This field is optional. Enter the timeout in seconds after which the PowerShell process will be forcibly terminated. |
-
Make the necessary changes on the different panels.
-
Click Save to save your changes, or Refresh to retrieve the settings from the database.
-
Start the Installation by clicking the Install button in the Machine Info panel.
Viewing the Machine Parameters
-
In the Global Administration context, select Machines > Overview.
-
Click the
View Parameters link on the Machines Overview panel.The following screen is displayed:
You can also access the Machine Parameters Overview via the Main Menu by selecting
 (Global
Administration) > Machines > Machine Parameters.
(Global
Administration) > Machines > Machine Parameters. -
The Machine Parameters Overview screen lets you create, edit, delete and copy Machine Parameters and allows checking their history.
For detailed information, refer to the following sections:
Deleting a Machine Definition
-
In the Global Administration context, select Machines > Overview.
-
Click the
Delete link on the Machines Overview panel.The following screen is displayed:
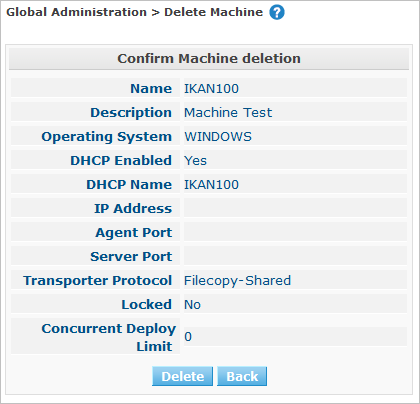
-
Click Delete to confirm the deletion.
You can also click Back to return to the previous screen without deleting the entry.
Note: If you try to delete a Machine connected to a Build or Deploy Environment, the following message is displayed:
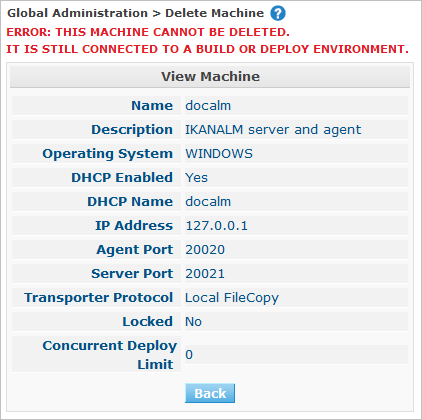
You must link the Environments to a different Machine, or delete them from IKAN ALM, before you can delete the Machine definition.
Viewing the Machine Status
-
In the Global Administration context, select Machines > Overview.
-
Click the
Status link on the Machines Overview panel.The following screen is displayed:
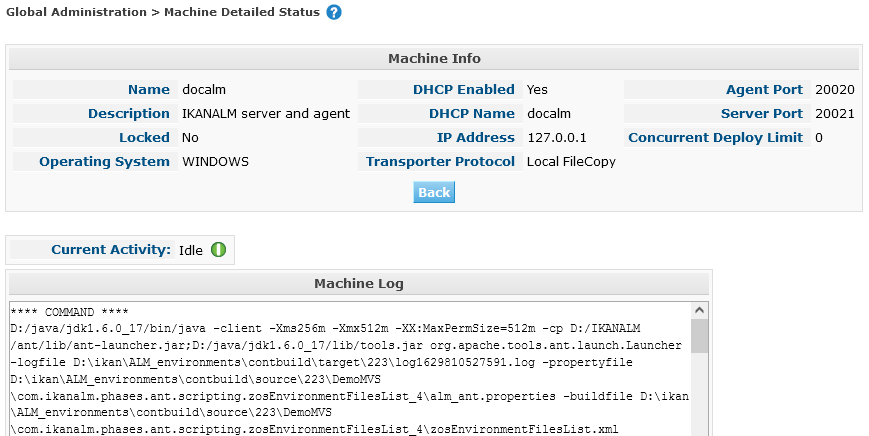
The Machine Detailed Status screen displays the status of the Agent Daemon running on the Machine.
At the top of the screen, the Machine Info panel is displayed. For a detailed description of the fields, refer to Creating a Machine Definition.
-
Verify the Status of the Machine.
The possible statuses are:
Status Description  Idle
IdleCould successfully connect to the Agent/Server Daemon. The Agent/Server is currently not executing any Level Requests, Builds or Deploys.
Running
BuildsCould successfully connect to the Agent Daemon. The Agent is currently executing Builds.
Running
DeploysCould successfully connect to the Agent Daemon. The Agent is currently executing Deploys.
Running
Builds and DeploysCould successfully connect to the Agent Daemon. The Agent is currently executing Builds and Deploys.
Running
Level RequestsCould successfully connect to the Server Daemon. The Server is currently executing Level Requests.
Shutting
DownCould successfully connect to the Agent/Server Daemon. The Agent/Server is shutting down.
 Could
not connect to Agent
Could
not connect to AgentThe connection to the Agent Daemon failed, either because the Agent Daemon is currently not running on the Machine, or due to networking issues that prevent connecting to the Agent Daemon. Contact your IKAN ALM Administrator.
Could
not connect to ServerThe connection to the Server Daemon failed, either because the Server Daemon is currently not running on the Machine, or due to networking issues that prevent connecting to the Server Daemon. Contact your IKAN ALM Administrator.
-
Verify the Machine Log.
The Machine Log panel displays the last 150 lines of output of the Agent Daemon process running on this Machine.
-
Click Back to return to the Machines Overview screen.
The Installed Phases Overview Screen
-
In the Global Administration context, select Machines > Overview.
-
Click the
Installed Phases link on the Machines Overview panel.The following screen is displayed.
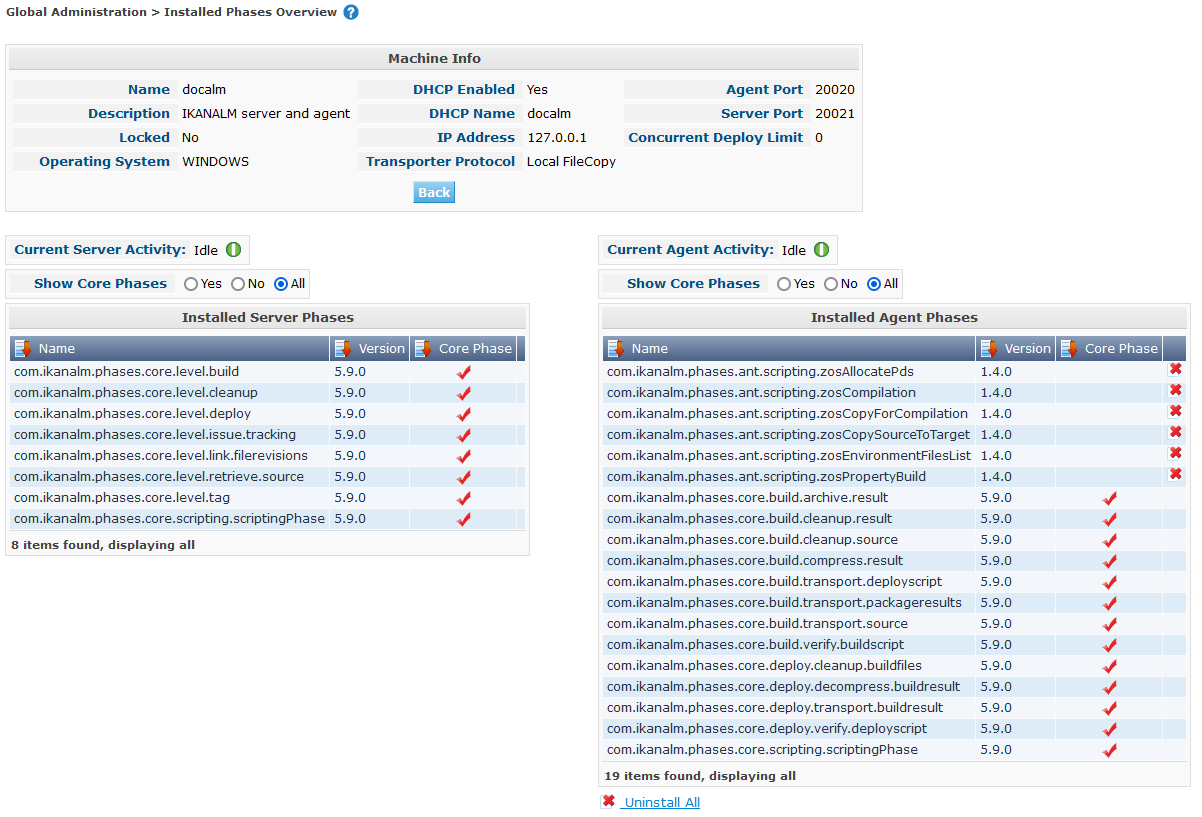
The Installed Phases Overview screen displays the status of the Server and/or Agent daemons running on the Machine. It also shows the phases that are installed on the Server and Agent, and provides controls to search, sort and uninstall those phases.
At the top of the screen, the Machine Info panel is displayed. For a detailed description of the fields, refer to Creating a Machine Definition.
The Activity and the installed phases on the Server daemon are only displayed if the Machine has been set as the "IKAN ALM Server" machine in the System Settings. System System Settings
-
Verify the Current Server and/or Agent Activity on the Machine.
For more information on the possible statuses, refer to Viewing the Machine Status.
-
Select whether to show the Core Phases or not.
The possible options are:
-
Yes: show only the Core Phases
-
No: show only non-Core Phases
-
All: show Core and non-Core Phases
-
-
Verify the information on the Installed Server Phases and Install Agent Phases panels.
-
The Installed Server Phases panel shows all phases that are installed on the Server daemon of the Machine. This panel is only shown if the Machine has been set as the "IKAN ALM Server" machine in the System Settings. See: System Settings
-
The Installed Agent Phases panel shows all phases that are installed on the Agent daemon of the Machine.
For each of the installed phases, the following information is available:
Information Description Name
The name of the Phase.
Version
The version of the Phase.
Core Phase
Core Phase or not?
-
-
Uninstalling Phases from the Server or Agent Daemons.
To uninstall a Phase, click the
Delete icon at the right of the Phase or Select the Uninstall All link to uninstall ALL non-Core phases of the Server or Agent daemon.Note: When a Phase is uninstalled, it is removed from the Server or Agent daemon. This does not mean that the Phase is removed from the Phase Catalog or from any connected Environments in Projects. When a Phase of a Level Request is executed on a certain Agent or Server and that Phase is not installed on that Agent or Server Daemon, IKAN ALM will automatically try to install the Phase on the Agent or Server daemon before executing it.
-
Click Back to return to the Machines Overview screen.
Viewing the Machine History
-
In the Global Administration context, select Machines > Overview.
-
Click the
History link on the Machines Overview panel.The Machine History View is displayed.
For more detailed information concerning this History View, refer to the section History and Event Logging.
-
Click Back to return to the Machines Overview screen.
Machine Parameters
Unlike Build and Deploy Parameters, Machine Parameters are (obviously) defined for a Machine and not for a specific Environment. Parameters defined for a specific Machine, will automatically be available for all Environments using that Machine. This avoids having to (re)define Build and/or Deploy Parameters for each Environment linked to the Machine.
|
If an Environment Parameter and a Machine Parameter have the same name, the Environment Parameter takes precedence. |
Depending on the Scripting Tool linked to the environment, the defined parameters will be:
-
added to the command which executes the Script (in the case of NAnt and Maven2)
-
written to a specific file named alm_ant.properties (in the case of Ant) or gradle.properties (in the case of Gradle) which is automatic loaded with the
–propertyfileANT option. This property file is created on the fly in the source location of the Environment in the directory containing the Script (this may be a subdirectory of the source location of the Environment in case the location of the Script was defined using a relative path). Once the Build/Deploy process has terminated, this file is automatically deleted, unless the Debug option for the Environment linked to the Level has been activated.
The Machine Parameters Overview screen lets you create, edit, delete and copy Machine Parameters and allows checking their history. The following actions are possible:
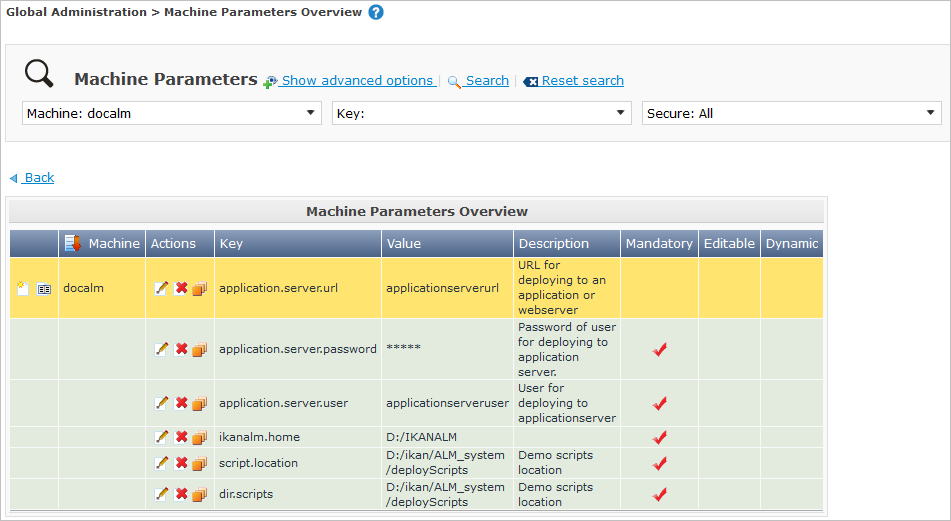
The Machine Parameters Overview Screen
-
In the Global Administration context, select Machines > Machine Parameters.
The following screen is displayed:
You can also access the Machine Parameters Overview via the Machines Overview by selecting
(Global
Administration) > Machines > Overview and, next, clicking the View
Parameters link for the required Machine. -
Define the required search criteria on the search panel.
The list of items on the overview will be automatically updated based on the selected criteria.
You can also:
-
click the Show/hide advanced options link to display or hide all available search criteria,
-
click the Search link to refresh the list based on the current search criteria,
-
click the Reset search link to clear the search fields,
-
-
Verify the information on the Machine Parameters Overview panel.
The Machine Parameters Overview panel displays the defined Machine Parameters for each Machine.
For a description of the fields, see Creating Machine Parameters.
Columns marked with the
icon can be sorted alphabetically (ascending or descending). -
Depending on your access rights, the following links may be available on the Machine Parameters Overview panel:
Link Description 
Create
This option is available to all Users with Global Administrator Access Rights. It allows creating a Machine Parameter.
History
This option is available to all Users with Global Administrator Access Rights. It allows displaying the History of the selected Machine Parameter definition.
Edit
This option is available to all Users with Global Administrator Access Rights. It allows editing the selected Machine Parameter definition.
Delete
This option is available to all Users with Global Administrator Access Rights. It allows deleting the selected Machine Parameter definition and (optionally) deleting Machine Parameters with the same key linked to other Machines.

Copy Parameter
This option is available to all Users with Global Administrator Access Rights. It allows copying the selected Machine Parameter definition.
Creating Machine Parameters
-
In the Global Administration context, select Machines > Machine Parameters Overview.
-
Click the
Create Parameter link next to the Machine to display the Create Machine Parameter window.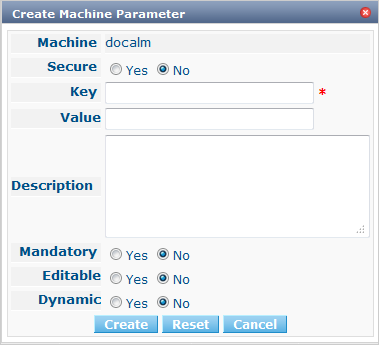
-
Fill out the fields for the new Machine Parameter.
The following fields are available. The Key field is mandatory:
Field Meaning Machine
This field displays the current Machine.
Secure
This field indicates whether the Parameter is secured or not.
Key
In this field, enter the Key (Name) for the Machine Parameter.
Value
In this field, enter the value(s) for the new Machine Parameter.
The following possibilities apply:
-
Enter the fixed value, if you are creating a non-editable Machine Parameter.
-
Enter the default value, if you are creating an editable Machine Parameter.
-
Enter the list of possible preset values, separated by a semicolon (;), if you are creating a dynamic Machine Parameter (for example:
yes;no). Subsequently, these values can be selected from a drop-down list when creating a Level Request
Repeat Value
Required field for secured Machine Parameters: repeat the secured value.
Description
In this field, enter a description for the Parameter.
Mandatory
Select the Yes option button, if the new Machine Parameter must be defined as mandatory. This is the default value. When you create a Level Request, mandatory Parameters will always be provided to the Build/Deploy Script.
Select the No option button, if the new Machine Parameter should not be defined as mandatory. When you create a Level Request, you can decide whether you want to provide the non-mandatory Parameter to the Build/Deploy Script.
Editable
Select the Yes option button, if the new Machine Parameter must be defined as editable. When you create a Level Request, you can accept the default value (the one you enter in the Value field during creation) or specify the value of your choice for the Parameter.
Select the No option button, if the new Machine Parameter should not be defined as editable. When you create a Level Request, only the preset value (the one you entered in the Value field during creation) for this Parameter can be offered to the Build/Deploy Script.
This field is not provided for secured Machine Parameters.
Dynamic
Select the Yes option button, if the new Machine Parameter must be defined as dynamic. When you create a Level Request, you can Select one of the predefined values from the drop-down list. These are the values you enter in the Value field during creation and which you separate by a semicolon (;). The selected value will be offered to the Build/Deploy Script.
Select the No option button, if the new Machine Parameter should not be defined as dynamic.
This field is not provided for secured Machine Parameters.
-
-
Click Create to confirm the creation of the Machine Parameter.
You can also click:
-
Reset to clear the fields and restore the initial values.
-
Cancel to return to the previous screen without saving the changes.
-
Editing Machine Parameters
-
In the Global Administration context, select Machines > Parameters Overview.
-
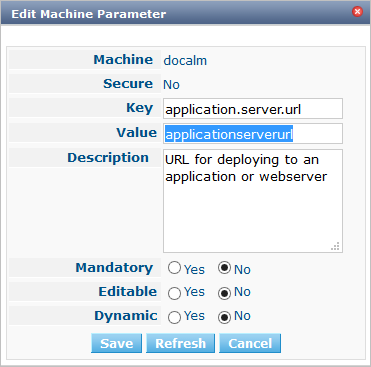
In the Actions column, click the
Edit link in front of the Machine Parameter to be edited.The following window is displayed:
-
Edit the fields as required.
For a description of the fields, refer to Creating Machine Parameters.
-
Click Save to save your changes.
You can also click:
-
Refresh to retrieve the settings from the database.
-
Cancel to return to the previous screen without saving the changes
-
Deleting Machine Parameters
-
In the Global Administration context, select Machines > Parameters Overview.
-
In the Actions column, click the
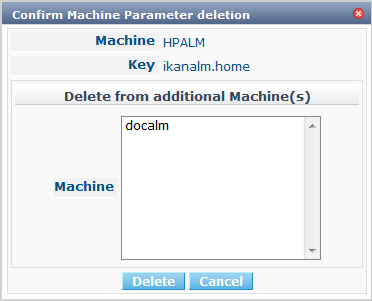
Delete link in front of the Machine Parameter to be deleted.The following confirmation window is displayed:
-
Optionally, Select additional Machines. This allows for deleting parameters with the same key name on the selected Machines.
-
Click Delete to delete the Machine Parameter.
You can also click Cancel to return to the previous screen without deleting the Parameter.
Copying Machine Parameters
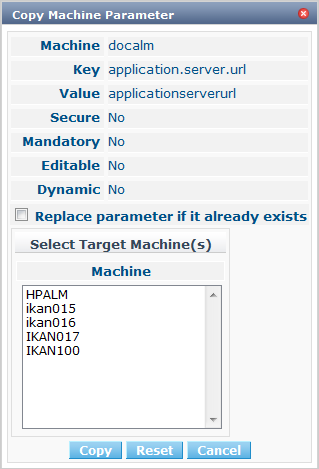
This functionality allows copying a complete Machine Parameter definition from one source Machine to one or more target Machines.
-
In the Global Administration context, select Machines > Parameters Overview.
-
In the Actions column, click the
Copy link in front of the Machine Parameter to be copied.The following window displays the values of the parameter you are about to copy.
-
Indicate whether you want to replace the parameter in case it already exists in the target Machine definition(s).
-
Select the Target Machine(s)
-
Click Copy to confirm copying the Machine Parameter.
You can also click:
-
Reset to clear the fields and restore the initial values.
-
Cancel to return to the previous screen without saving the changes.
-
Viewing the Machine Parameter History
-
In the Global Administration context, select Machines > Parameters Overview.
-
Click the
History link on the Parameters Overview panel to display the Machine History View.For more detailed information concerning this History View, refer to the section History and Event Logging.
Click Back to return to the previous screen.