Schedules
A Schedule definition enables to automate the creation of Level Request for a particular Build Level.
When a Schedule is linked to a Build Level, the IKAN ALM Scheduler Daemon will verify if there are changes in the Version Control Repository of the Project Stream the Level is linked to each time the Schedule interval expires.
If changes are found, a Level Request will automatically be created for the Build Level.
In other words, Schedules enable features like Build Automation or Continuous Integration.
Refer to the following sections for detailed information:
Creating a Schedule
|
This option is only available if you have Global Administrator Access Rights in IKAN ALM. |
-
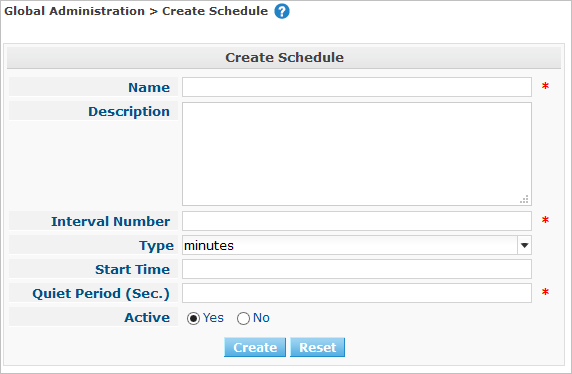
In the Global Administration context, select Schedules > Create.
The following screen is displayed:
-
Fill out the fields in the Create Schedule panel at the top of the screen. Fields marked with a red asterisk are mandatory:
Field Meaning Name
Enter the name of the new Schedule in this field. This field is mandatory.
Description
Enter a description for the new Schedule in this field. This field is optional.
Interval Number
Enter the number of interval units by which the Schedule must verify outstanding tasks.
For instance, if the Interval Unit is set to MINUTES and the Interval Number to 10, the Schedule will check for changes in the Version Control Repository every 10 minutes.
Interval Unit
Select the required Interval Unit from the drop-down list. The following options are available:
-
minutes
-
hours
-
days
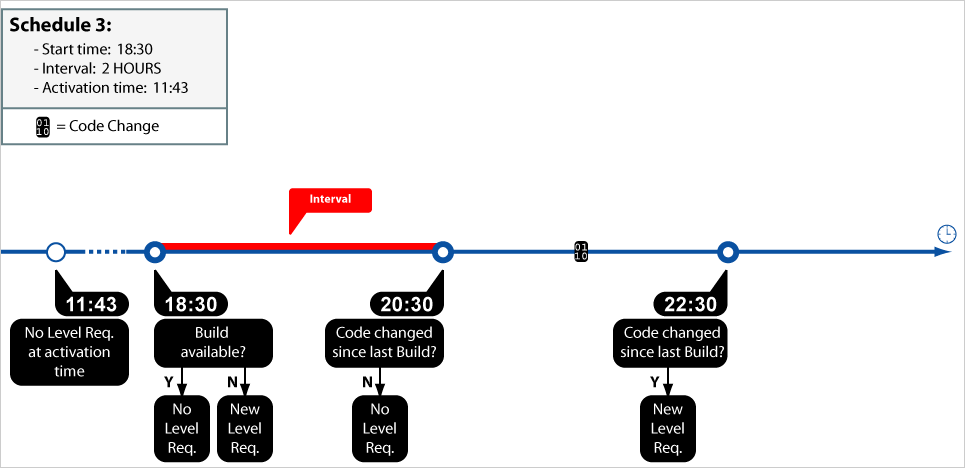
Start Time
Enter the time when the Schedule must start.
This field is used once each time the Scheduler is restarted and when the Schedule is set to Active.
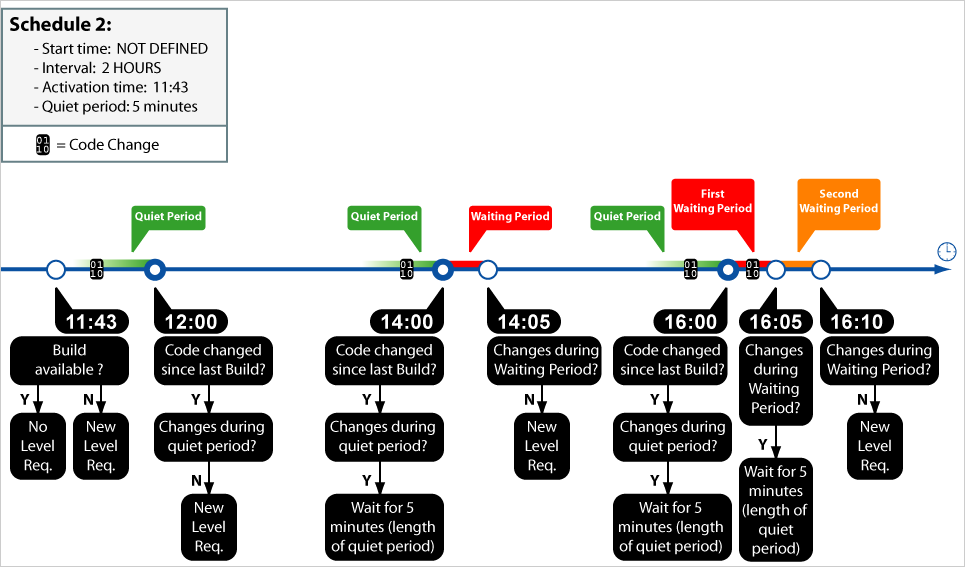
Quiet Period (Sec.)
Enter a Quiet Period value (between 0 and 3600 seconds) for the new Schedule.
The Quiet Period avoids that a Build is performed while people are checking in files. When a Level Request is due to be started by the Scheduler, the system will check first if any source code activity took place during the defined number of seconds.
Only if there was no source code activity, it will be assumed safe to update from the source control system and execute the Level Request.
Active
Select whether the Schedule is active or not.
Avoid using a too "aggressive" Schedule that, for instance, will check for changes every 1 minute. This might stress the VCR, particularly when the schedule is attached to multiple Build Levels. Instead, use a "hook script" in the VCR that launches an IKAN ALM Level Request from the IKAN ALM Commandline Interface when a source has been committed. Please consult the documentation of your VCR for more information concerning hook scripts.
A schedule that is attached to a Level of a tag-based Project Stream will not check for changes in the VCR and, hence, will have no effect, since it has no way of checking what has changed in the VCR since the last Level Request. Continuous Integration on a tag-based Project Stream is only possible by setting up VCR hook scripts that launch an IKAN ALM Level Request from the IKAN ALM Commandline Interface when a new tag has been created. Please consult the documentation of your VCR for more information concerning hook scripts.
-
-
Once you filled out the fields as required, click Create.
The newly created Schedule is added to the Schedules Overview at the bottom of the screen.
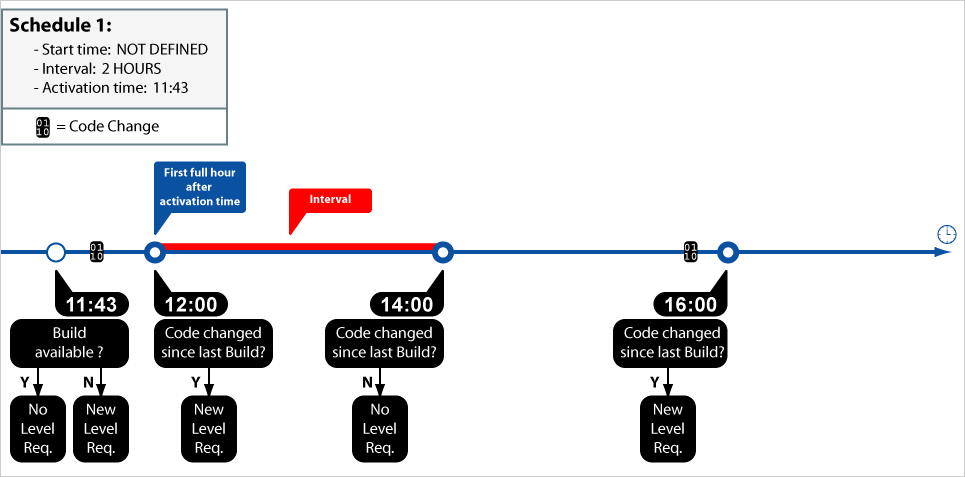
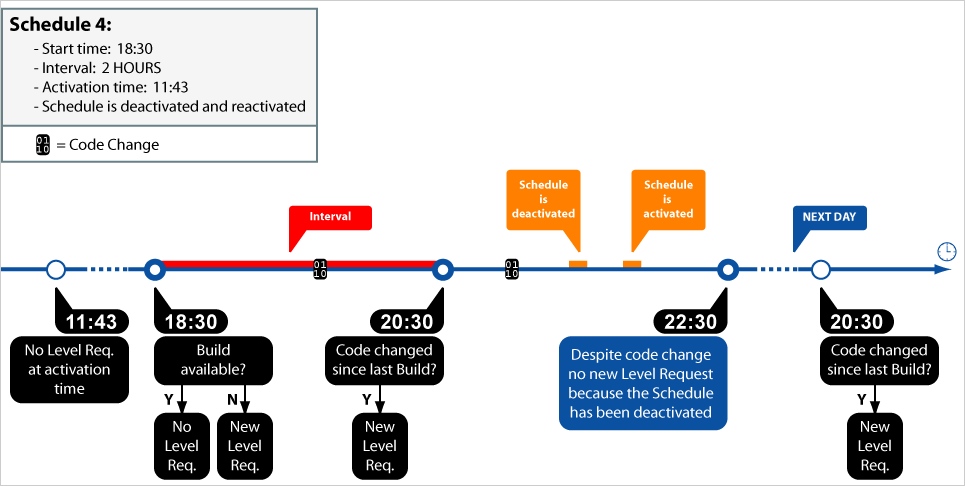
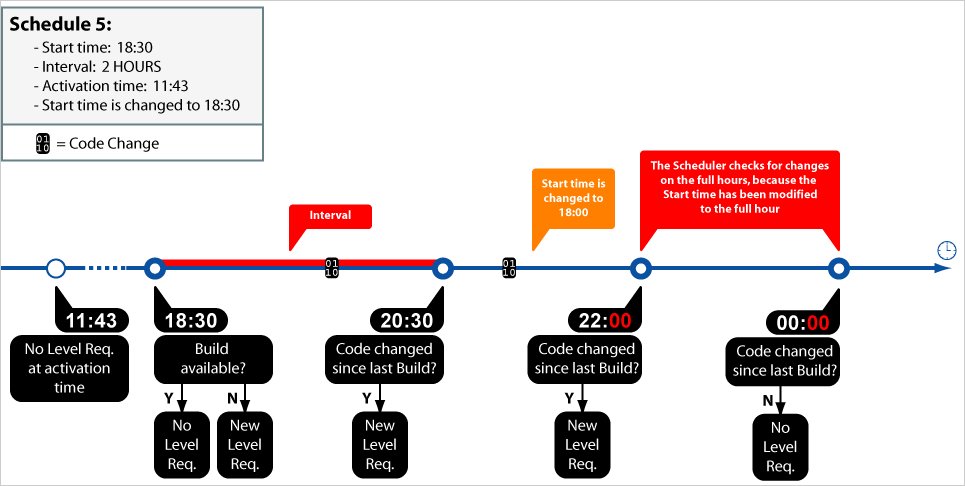
Samples:
In the samples the question "`Build Available?`" means: "`Is there a Build Level Request for the Level linked to the Schedule?`"
The question "`Code changed since last build?`" means: "`Have the resources in the VCR been changed since the last Build Level Request for the Level linked to the Schedule?
RELATED TOPICS |
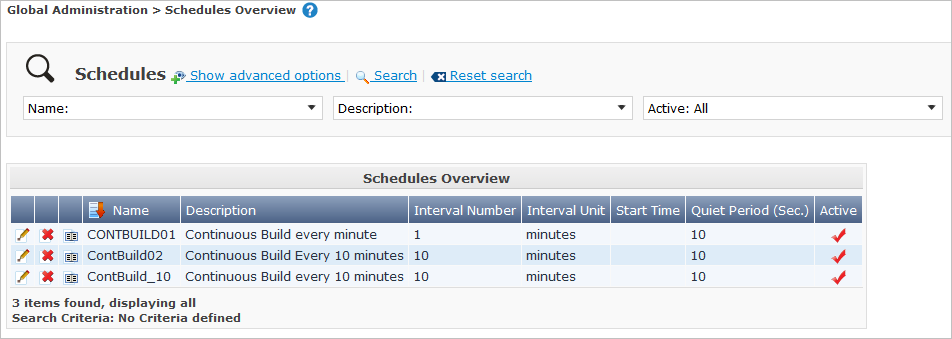
The Schedules Overview Screen
-
In the Global Administration context, select Schedules > Overview.
The following screen is displayed:
-
Define the required search criteria on the search panel.
The list of items on the overview will be automatically updated based on the selected criteria.
You can also: * click the Show/hide advanced options link to display or hide all available search criteria, * click the Search link to refresh the list based on the current search criteria, * click the Reset search link to clear the search fields.
-
Verify the information on the Schedules Overview panel.
For a detailed description of the fields, refer to Creating a Schedule.
-
Depending on your access rights, the following links may be available on the Schedules Overview panel:

Edit
This option is available to IKAN ALM Users with Global Administrator Access Rights. It allows editing a Schedule definition.

Delete
This option is available to IKAN ALM Users with Global Administrator Access Rights. It allows deleting a Schedule definition.

History
This option is available to all IKAN ALM Users. It allows displaying the History of all create, update and delete operations performed on a Schedule
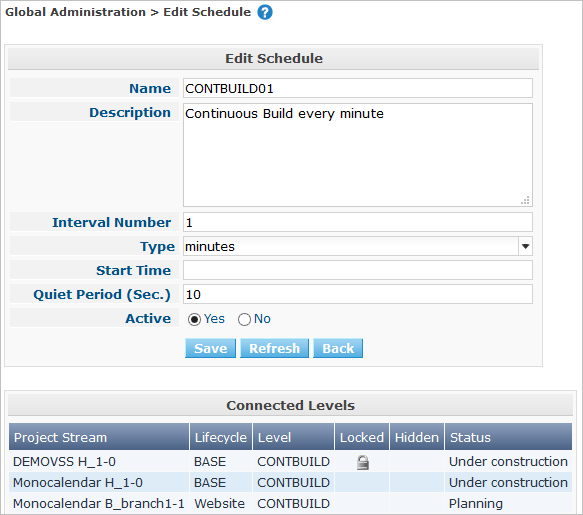
Editing a Schedule Definition
-
In the Global Administration context, select Schedules > Overview.
-
Click the
Edit link to change the selected Schedule.The following screen is displayed:
-
Edit the fields as required.
For a description of the fields, refer to Creating a Schedule.
The Connected Levels panel displays the Levels the Schedule is linked to.
-
Click Save to save your changes.
You can also click:
-
Refresh to retrieve the settings from the database.
-
Back to return to the previous screen without saving the changes
-
Deleting a Schedule Definition
-
In the Global Administration context, select Schedules > Overview.
-
Click the
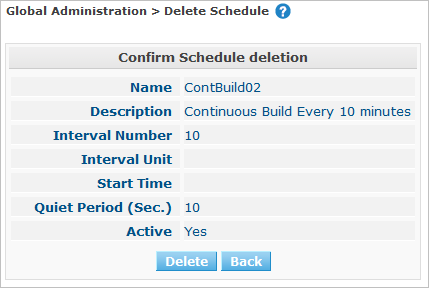
Delete link to delete the selected Schedule.If the Schedule is not linked to any Level, the following screen is displayed:
-
Click Delete to confirm the deletion.
You can also click Back to return to the previous screen without deleting the entry.
Note: If the Schedule is linked to one or more Levels, the following screen is displayed:
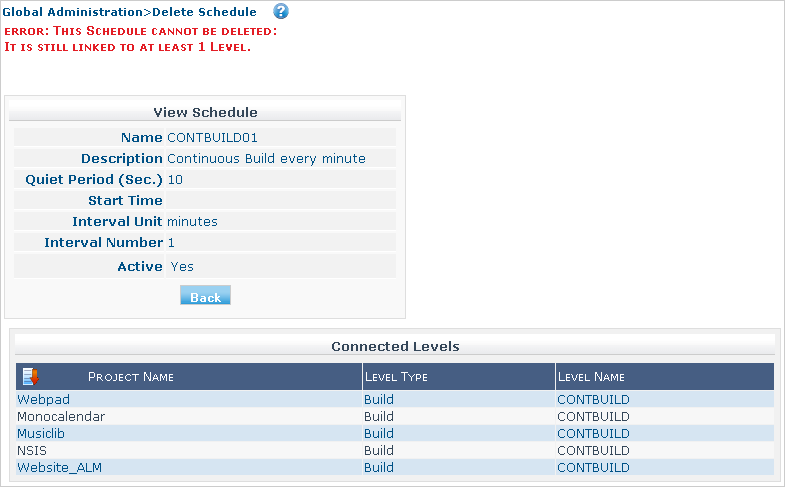
You must remove the Schedule from the listed Levels before you can delete it.
Viewing the Schedule History
-
In the Global Administration context, select Schedules > Overview.
-
Click the
History link to display the Schedule History View.For more detailed information concerning this History View, refer to the section History and Event Logging.
-
Click Back to return to the Schedules Overview screen.
RELATED TOPICS |