System
The System menu provides an entry to view or edit the IKAN ALM Server configuration settings and to perform Housekeeping Actions in the IKAN ALM Build Archive.
Users that have Global Admin Access rights will have access to the following Submenus:
Users who do not have Global Admin Access rights will only have access to the following Submenus:
System Settings
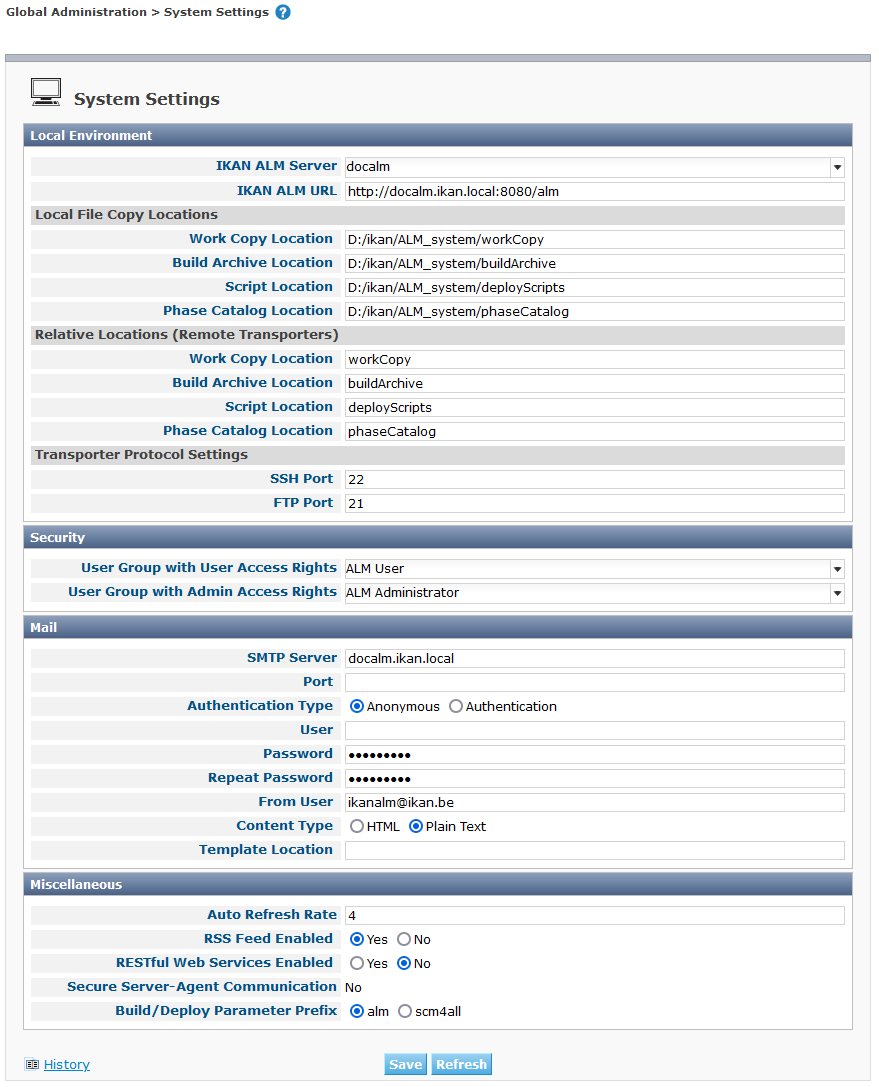
On the System Settings screen, the global IKAN ALM Server settings are defined, such as the different locations (build archive, script, work copy and phase catalog) and the mail and security settings. Some of these fields are filled in automatically during the installation process.
|
Changing some of these settings requires preparatory actions on the IKAN ALM server. |
-
In the Global Administration context, select System > System Settings.
The following screen is displayed.
If you do not have Global Administrator access rights in IKAN ALM, you will not be able to edit the fields.
The following subpanels are available:
Underneath the Edit System Settings panel, you will find the
 History link.
Click this link to display the System Settings History
View screen.
For more detailed information concerning this History View, refer to the section History and Event Logging.
History link.
Click this link to display the System Settings History
View screen.
For more detailed information concerning this History View, refer to the section History and Event Logging.
Local Environment
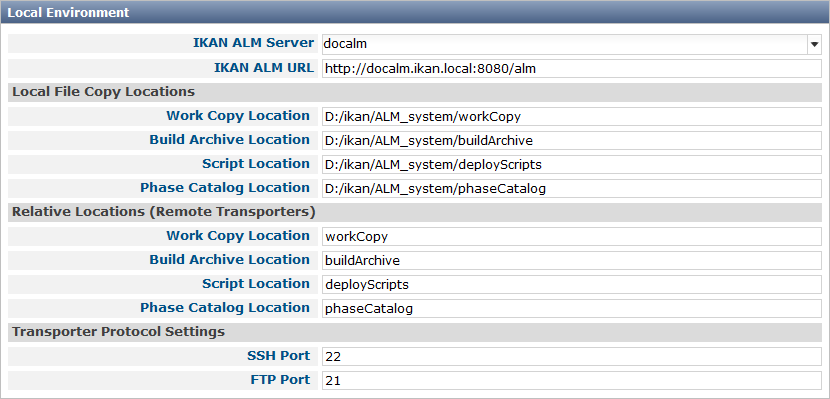
The following fields are available on the Local Environment subpanel:
| Field | Description |
|---|---|
IKAN ALM Server |
This field contains the name of the Machine currently hosting the IKAN ALM Server. Select another Machine Name from the drop-down list, if required. Changing this field requires preliminary actions, like installing the IKAN ALM Server on the new target Machine, migrating Local File Copy Locations and setting up the necessary VCR clients. |
IKAN ALM URL |
In this field, enter the base IKAN ALM URL. This URL is used for creating hyperlinks in mails sent by IKAN ALM (Approvals, Pre-Notifications, Post-Notifications, Level Request Success/Fail Notifications), for constructing the RSS feed link and for constructing the URIs for the IKAN ALM REST API. |
Local File Copy Locations |
These fields are used for Build and Deploy actions. These locations are automatically synchronized with the built-in Local FileCopy transporter. FileCopy Transporters |
Work Copy Location |
This field contains the path to the Work Copy Location. In preparation of the Build process, the IKAN ALM Monitor places the sources (checked out sources from a VCR and sometimes also dependent build results) in a subdirectory of this location. The tagging of the VCR after a successful Build is done from this location as well. You can edit the location if required. |
Build Archive Location |
This field contains the path to the location of the Build Archive on the IKAN ALM Server. Build Results will be stored in or retrieved from this location. They will be placed in a subdirectory per Project Stream and per Project. If required, you can edit the location. |
Script Location |
This location can be used to store build and deploy scripts. When the build or deploy script is not available in the sources or build result, it will be retrieved from this location. You can edit the location if required. This field allows that the Scripts are stored outside the Version Control Repository and managed on a (secured) central location. |
Phase Catalog Location |
This field contains the path to the location of the Phase Catalog on the IKAN ALM Server. Newly created Phases and Phases that have been imported will be stored in this location. |
Relative Locations (Remote Transporters) |
These locations are used for all remote transport actions (SSH, FTP and FileCopy). These locations are relative. The complete path will be assembled as follows: the prefix path (as specified in the SSH, FTP or FileCopy Transporter definition) concatenated with the relative location defined on this Local Environment tab. Remote Transporters are activated by defining them as the Transporter Protocol when specifying the settings for a Machine. For more information, refer to the sections Transporters and Machines. |
Work Copy Location |
This field contains the location of the Work Copy displayed as a remote location. This is the location where the VCR interface places the checked out sources or dependent build results on the IKAN ALM Server, so that they are accessible for a remote IKAN ALM Agent handling a build process. You can edit the location if required. |
Build Archive Location |
This field contains the location of the Build Archive displayed as remote location. This is the location where the Builds are stored in or retrieved from by a remote IKAN ALM Agent handling a build or deploy process. You can edit the location if required. |
Script Location |
This field contains the location of the Build or Deploy Script displayed as a remote location. Scripts will be retrieved from this location if they are not stored in the Version Control Repository. You can edit the location if required. This field allows that the Scripts are stored outside the Version Control Repository and managed on a (secured) central location. |
Phase Catalog Location |
This field contains the location of the Phase Catalog displayed as remote location. Newly created Phases and Phases that have been imported will be stored in this location. A remote IKAN ALM Agent that needs to install a Phase will use this location to retrieve it. |
Transporter Protocol Settings |
The Transporter Protocol defines how Sources and Build Results will be transported. |
SSH Port |
Specify the SSH Port Number. This is only necessary if the SSH Server on the IKAN ALM Server uses an SSH Port other than the default port number 22. An SSH Server daemon must be installed on the IKAN ALM server in order to use SSH as a Transporter Protocol. Note: This port number may be overwritten by the port number defined in the Transporter definition. Creating a Secure Shell Transporter |
FTP Port |
Specify the FTP Port Number. This is only necessary if the FTP Server on the IKAN ALM Server uses a TCP Port other than the default port number 21. An FTP server must be installed on the IKAN ALM Server in order to use FTP as a Transporter protocol. Note: This port number may be overwritten by the port number defined in the Transporter definition. Creating an FTP Transporter |
Security

The following fields are available on the Security subpanel.
| Field | Description |
|---|---|
User Group with User Access Rights |
This field contains the name of the User Group to which all Users requiring access to IKAN ALM must belong. Note that Users can also get access to IKAN ALM when they belong to a Nested User Group of the selected User Group. You may select another User Group from the drop-down list, if required. You may also leave this field empty. In this case, all authenticated users will have User access rights to IKAN ALM. |
User Group with Admin Access Rights |
This field contains the name of the User Group to which all Users requiring Administrator Rights must belong. Note that this must be an external User Group. Only users belonging to this or a Nested User Group may create, edit and delete Global Administration definitions in IKAN ALM. You may select another external User Group from the drop-down list, if required. You may also leave this field empty. In this case, all authenticated users will have Administrator access rights to IKAN ALM. |
IKAN ALM can send mails automatically or on demand to notify on failed or successful Builds and Deploys, to request an approval before delivering to a Test or Production Level, or just to notify connected users on changed settings.
Settings for connecting to an external mail system can also be defined on the Mail tab.
|
The Mail settings can be tested via the Notify IKAN ALM Users submenu option. Notifying IKAN ALM Users |
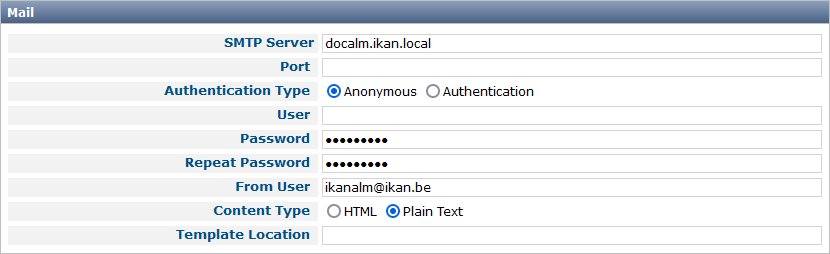
The following fields are available on the Mail subpanel.
| Option | Meaning |
|---|---|
SMTP Server |
Select the Machine name of the SMTP Mail Server. |
Port |
This field contains the SMTP Port number used by IKAN ALM to connect to the Mail Server. This field is optional, by default port 25 is used. |
Authentication Type |
Select which Authentication Type is required:
|
User |
This field contains the User name used to authenticate on the SMTP Server. This field is mandatory if Authentication was chosen as Authentication Type. |
Password |
This field contains the masked Password used to authenticate on the SMTP Server. This field is mandatory if Authentication was chosen as Authentication Type. The characters you enter are displayed as asterisks. |
Repeat Password |
In this field, re-enter the password used to authenticate on the SMTP Server. |
From User |
This field contains the From: E-Mail Address used in IKAN ALM notification e-mails. |
Content Type |
Indicates which templates will be used to compose notification and approval mail messages. There are two options: * HTML: the templates containing HTML tags will be used. * Plain Text: the templates without HTML tags will be used. |
Template Location |
By default, the mail templates are located in the following directory: TOMCAT_HOME/webapps/alm/WEB-INF/classes/templates If you want to customize these templates, we advise you to change this location to a local directory on the IKAN ALM Server. The locale directories match the language settings of the user:
If no match is found, the templates in the default directory will be used. For the HTML formatted templates, a html suffix is added before the _.vm extension. For plain text templates, there is no such suffix. |
Miscellaneous

The following fields are available on the Miscellanous subpanel:
| Field | Meaning |
|---|---|
Auto Refresh Rate |
In this field, you can enter the number of seconds for the automatic refresh function on the The Desktop Overview Screen, Level Requests Overview, Level Request Detail, Package Details and Build History Screen. As a result, these overview screens will be refreshed each time the interval expires (if the user has activated the Auto Refresh function on his or her Desktop submenu). If you do not want to allow the use of the Auto Refresh option, enter 0 (zero) in this field. |
RSS Feed Enabled |
In this field you can enable the RSS functionality. As a result an RSS button will become available on the user’s Level Requests Overview panel. By default the RSS Feeds are enabled. For more information, refer to the section The IKAN ALM RSS Functionality. |
RESTful Web Services Enabled |
The IKAN ALM REST API enables you to interact with IKAN ALM programmatically and integrate its functionality in scripts, other applications or stand-alone apps. Interaction is possible with:
By default, this feature is disabled for security reasons. The IKAN ALM REST API is fully documented and, when Restful Web services are enabled, accessible through the web interface: Help > REST API Documentation. |
Secure Server-Agent Communication |
This field indicates whether or not the web services communication between the IKAN ALM Web Application, IKAN ALM Server and IKAN ALM Agent is done through a secure channel. |
Build/Deploy Parameter Prefix |
This option determines the value of the IKAN ALM Build/Deploy parameters prefix (by default alm) and the name of the property file that is generated for Execute Script Build or Deploy phases (by default alm_ant.properties when you use an ANT Scripting Tool). In case you are upgrading from a version prior to IKAN ALM 5.0, this feature allows you to keep on working with the old scm4all parameter prefix and the old scm4all_ant.properties file, and not having to modify your Build and/or Deploy scripts. Note: This is a compatibility solution. At a certain point in time, you will have to modify your scripts and use the new alm prefix. |
-
Make the necessary changes on the different panels.
-
Click Save at the bottom of the screen.
You may also click Refresh to retrieve the settings from the database.
Housekeeping
The Housekeeping functionality allows you to manage the Build Archive. A search can be performed locating Build Files that may no longer be needed. These Build Files can be selected and marked for removal. The system will then physically remove them from the Build Archive and set the Archive Status of the related Builds to "deleted", hereby avoiding these Builds to be used in further Deploys.
The Housekeeping screen also shows information about the Build Archive, like the total number of build files in the Archive, the size of the Archive and the remaining free space on the hard drive where the Archive is located.
-
In the Global Administration context, select System > Housekeeping.
The Housekeeping screen is displayed:
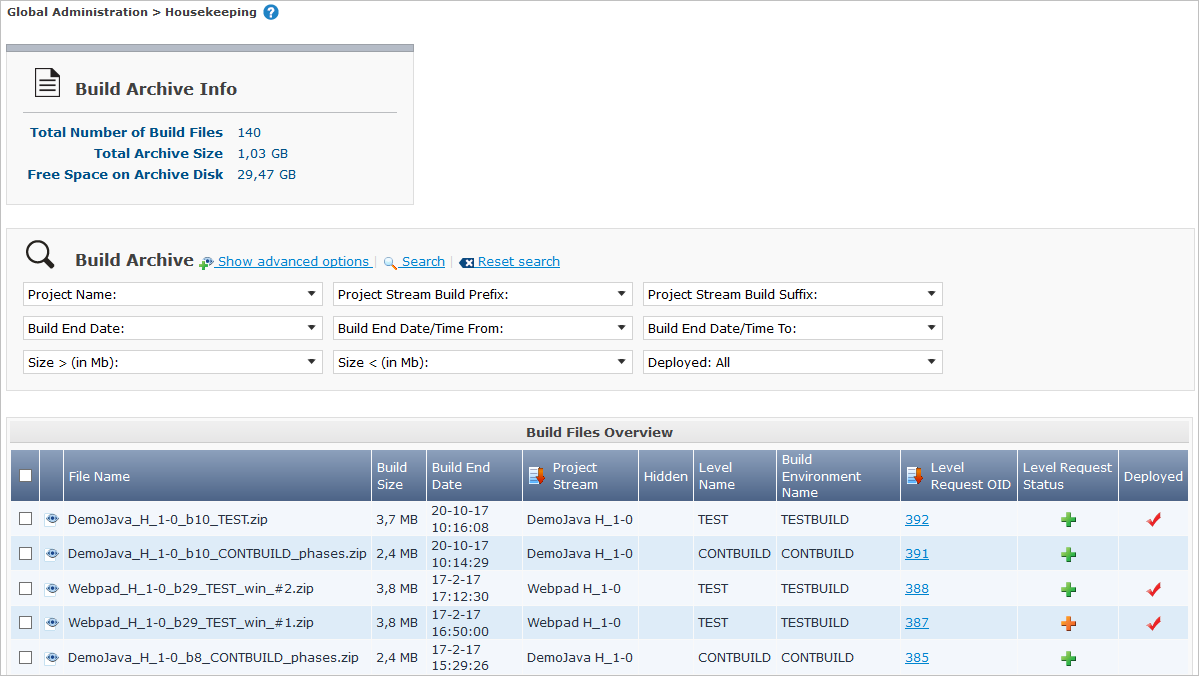
On top of the screen, the Build Archive Info panel displays the following information.
The Build Archive Info is based on hardware data obtained from the Build Archive location on the IKAN ALM Server. This Build Archive location is defined in the Local Environment tab of the System Settings. Local Environment
Field Description Total Number of Build Files
This field contains the total number of Build Files in the Build Archive.
Total Archive Size
This field indicates the total size (in a multiple of bytes) of the Build Archive.
Free Space on Archive Disk
This field indicates the remaining free space (in a multiple of bytes) on the hard drive where the Archive is located.
-
Define the required search criteria on the search panel.
The list of items on the overview will be automatically updated based on the selected criteria.
You can also:
-
click the Show/hide advanced options link to display or hide all available search criteria,
-
click the Search link to refresh the list based on the current search criteria,
-
click the Reset search link to clear the search fields.
You can enter or select several search criteria to narrow your search.
Criterion Description Project Name
Enter or select the name of the Project for which you want to display the Build Files.
Project Stream Build Prefix
Enter or select the Project Stream Build Prefix.
Project Stream Build Suffix
Enter or select the Project Stream Build Suffix.
Build End Date
Specify the minimum age of the Build Files.
The possible values are:
-
None Specified
No age specified, and the Build End Date/Time From and To fields will be ignored
-
Older than 3 years
Only Build files older than 3 years will be displayed
-
Older than 1 year
Only Build files older than 1 year will be displayed
-
Older than 3 months
Only Build files older than 3 months will be displayed
Build End Date/Time From
If you want to specify a range of dates, enter in this field the first Build End Date/Time of the range.
You can also click the
 icon to select the Build End Date/Time.
Click the required date to copy it into the field.
The time will be set to the current time. However you can still change the time manually.
This field will be ignored when a Build End Date field has been selected.
Build End Date/Time To
If you want to specify a range of dates, enter in this field the last Build End Date/Time of the range.
You can also click the
icon to select the Build End Date/Time.Click the required date to copy it into the field.
The time will be set to the current time. However you can still change the time manually.
This field will be ignored when a Build End Date field has been selected.
Size > (in Mb)
Use this field to specify the minimum size of the Build Files to be displayed on the Build Files Overview.
Size < (in Mb)
Use this field to specify the maximum size of the Build Files to be displayed on the Build Files Overview.
Deployed
Select Yes to display only the Build Files that have been deployed.
Select No to display only the Build Files that have not been deployed.
If the option All is selected, both the deployed and undeployed Build Files will be displayed.
Level Request Status
Specify the status of the Level Request that created the Build Files. Only Build Files that were created by a Level Request that currently has this status are displayed.
The possible values are:
-
Success
-
Warning
-
Fail
-
Run
-
Awaiting Post-approval
-
Rejected
-
Aborted
-
Aborting
Level Name
Enter or select the name of the Level for which you want to display the Build Files.
Level Type
Enter the Level Type (Build, Test or Production).
Build Environment Name
Enter or select the name of the Build Environment for which you want to display the Build Files.
Show Hidden Project Streams
Indicate whether you want to display the hidden Project Streams or not.
-
Yes
Hidden Project Streams will be displayed.
-
No
Hidden Project Streams will not be displayed.
-
All (= default)
All Project Streams, hidden and unhidden, will be displayed.
-
-
Verify the search result on the Build Files Overview.
The Build Files Overview panel lists the following information for each displayed Build File.
Field Description View Content
Click the
 View link to view the content of the Build File. Results
File Name
The name of the Build File.
Build Size
The size of the Build File.
Build End Date
The date and time at which the Build execution ended.
Project Stream
The name of the Project Stream.
Hidden
Indication whether the Project Stream is hidden or not.
Level Name
The name of the Level.
Build Environment Name
The name of the Build Environment.
Level Request OID
This field displays the Level Request OID of the Build. Click the link to display the details for this Level Request.
Level Request Status
This field contains the Level Request Status. See Level Requests Overview screen
Deployed
This field indicates whether or not the Build has been used by a Deploy.
-
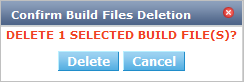
Select the Build Files to be deleted and click the Delete button underneath the overview.
Select the check box in the table heading in order to select all the displayed Build Files.
-
The Confirm Build Files Deletion popup window is displayed.
-
Click Delete to confirm the deletion or Back to return to the previous screen without deleting the Build Files.
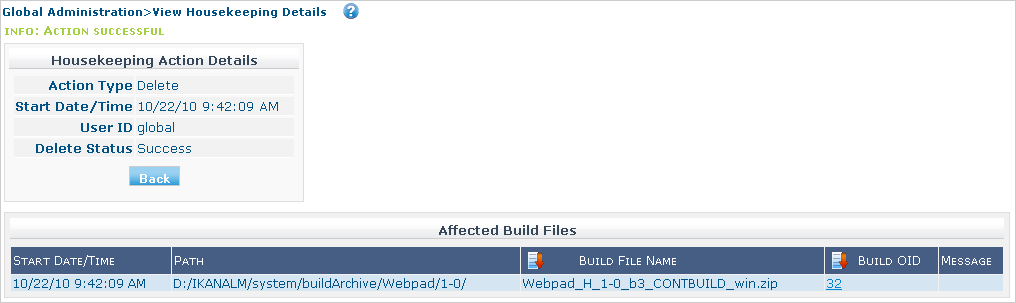
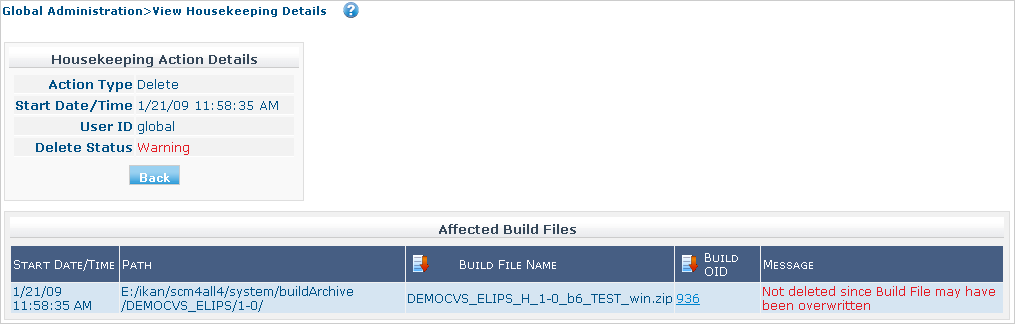
When the delete is confirmed, the removal is executed. The action is logged in the Housekeeping History and the User is redirected to the View Housekeeping Details screen where the result of the action is displayed.
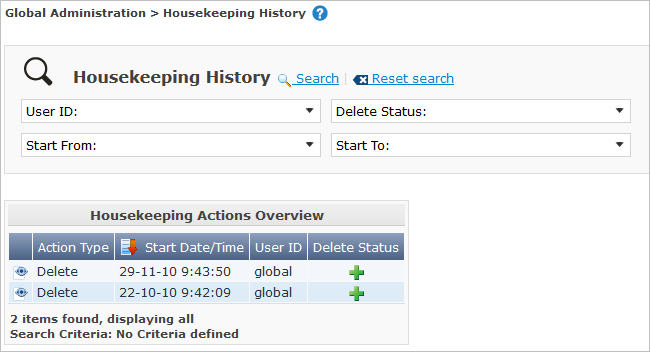
Housekeeping History
This functionality allows you to search for previously performed delete actions.
The Housekeeping History screen displays the history of Housekeeping Actions that have been performed.
It provides a Search panel where the User can enter search criteria to restrict the list of displayed History Actions.
-
In the Global Administration context, select System > Housekeeping History.
The Housekeeping History screen is displayed:
-
Define the required search criteria on the search panel.
The list of items on the overview will be automatically updated based on the selected criteria.
You can also:
-
click the Search link to refresh the list based on the current search criteria,
-
click the Reset search link to clear the search fields.
You can enter or select several search criteria to narrow your search.
Criterion Description User ID
Enter or select the ID of the User whose Housekeeping Actions you want to display.
Delete Status
This field indicates the Delete status
Start From
If you want to specify a range of dates, enter in this field the start Date/Time of the range.
You can also click the
icon to select the Date/Time.Click the required date to copy it into the field.
The time will be set to 0:0 (midnight). However you can still change the time manually.
Start To
If you want to specify a range of dates, enter in this field the end Date/Time of the range.
You can also click the
icon to select the Date/Time.Click the required date to copy it into the field.
The time will be set to 0:0 (midnight). However you can still change the execution time manually.
-
-
Verify the search result on the Housekeeping Actions Overview.
The Housekeeping Actions Overview panel lists the following information for each displayed Housekeeping Action.
Field Description Action Type
This field contains the type of the Housekeeping Action.
Start Date/Time
This field indicates the date and time when the Housekeeping Action started.
User ID
This field displays the ID of the User who performed the Housekeeping Action.
Delete Status
This field indicates the Delete status.
Possible statuses are:
-
Success
-
Warning
-
Error
-
-
You can click the
View link to display the View Housekeeping Details screen.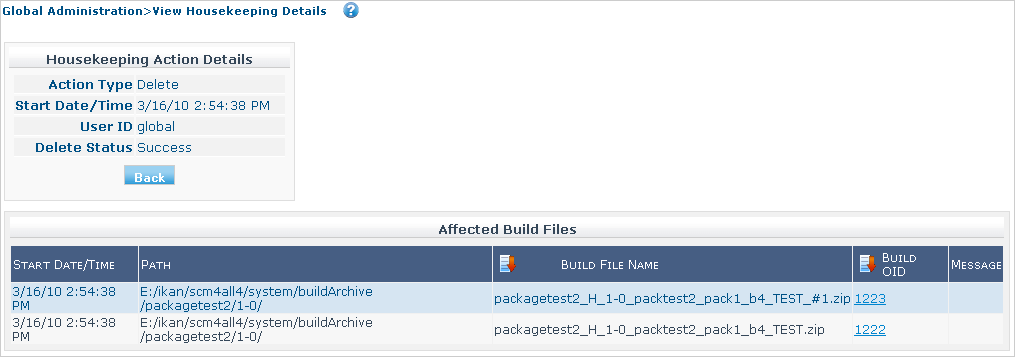
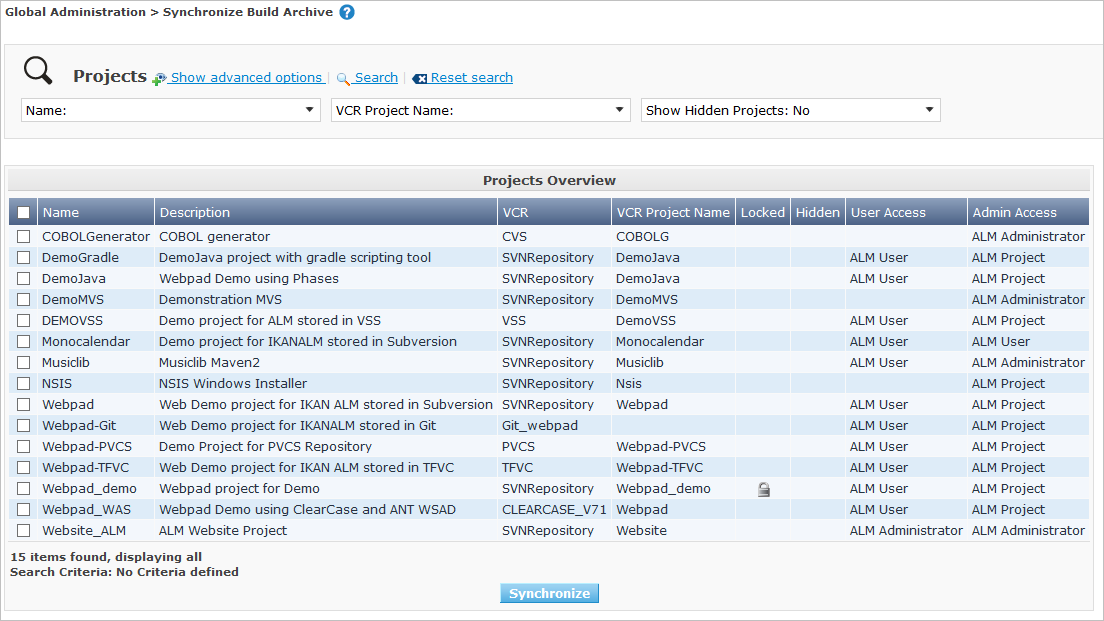
Synchronize Build Archive
The Synchronize Build Archive screen allows an IKAN ALM Administrator to synchronize the physical representation of the Build Archive on the file system with the logical representation of the Build Archive in the IKAN ALM database.
For example, a Build File that was manually deleted on the file system (using the OS delete command) will still have its Archive Status set to “Present” in the IKAN ALM database. During synchronization the status will be set to “Non existing”.
-
In the Global Administration context, select System > Synchronize Build Archive.
The Synchronize Build Archive screen is displayed:
-
Define the required search criteria on the search panel.
The list of items on the overview will be automatically updated based on the selected criteria.
You can also:
-
click the Show/hide advanced options link to display or hide all available search criteria,
-
click the Search link to refresh the list based on the current search criteria,
-
click the Reset search link to clear the search fields.
You can enter or select several search criteria to narrow your search.
Criterion Description Name
Specify the name of the Project.
VCR Project Name
Specify the VCR Project Name.
Show Hidden Projects
Indicate whether you want to display the hidden Projects or not.
-
Yes
Hidden Projects will be displayed.
-
No (= default)
Hidden Projects will not be displayed.
-
All
All Projects, hidden and unhidden, will be displayed.
Description
Specify the description of the Project.
VCR
Select the VCR from the drop-down list.
Locked
Specify whether the Project is locked or not.
-
-
Verify the search result on the Projects Overview.
The Projects Overview panel lists the following information for each displayed Build File.
Field Description Name
This field contains the Project Name.
Description
This field contains the Project Description.
VCR
This field contains the VCR used for the Project.
VCR Project Name
This field contains the VCR Project Name.
Locked
This field indicates whether or not the Project is locked:
-
If it is locked, this field contains the locked icon (
 ).
). -
If it is not locked, this field remains empty.
Hidden
This field indicates whether the Project is hidden or not.
User Access
This field contains the name of the User Group whose members have regular access rights to this Project.
Admin Access
This field contains the name of the User Group whose members have administrative access rights to this Project.
-
-
Select the Projects to be synchronized and click the Synchronize button underneath the overview.
Select the check box in the column header to select all Projects for synchronization.
In order to not overburden the IKAN ALM Server, it is best to limit the number of selected Projects and split up the Build Archive Synchronization in several steps.
-
The Synchronize Build Archive Log screen is displayed.
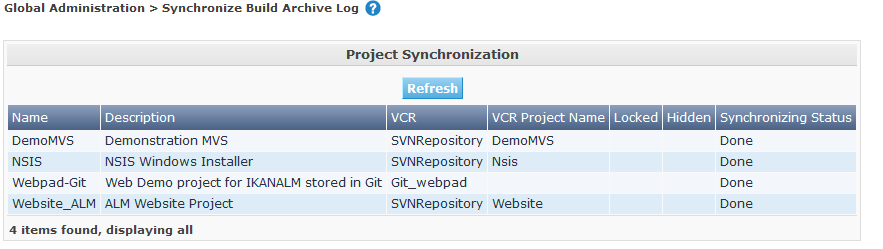
The extra field Synchronizing Status is displayed for each Project on the Project Synchronization panel.
It can have the following values:
-
Done: The Project has been synchronized successfully.
-
Synchronizing… : The Project is currently being synchronized.
-
Waiting: The synchronization of this Project has not yet started.
-
Error: There was a problem synchronizing the Project.
-
-
Click Refresh to update the Synchronization statuses.