Deploy Environments
Deploy Environments are locations where a Deploy Tool uses a Deploy script to unpack and deploy a Build Result. The Deploy Environment can be OS-specific and the Deploy process can be steered with Deploy Parameters.
Deploy Environments must be assigned to a Level in a Lifecycle in order to be active.
The Deploy Environments submenu option lets you start the following procedures:
-
The Deploy Environments Overview Screen
The Deploy Environments Overview screen lets you verify and change the information concerning Deploy Environments and related Phases. The following actions are possible:
-
Deploy Parameters
The Parameters Overview screen lets you create, edit, delete and copy Deploy Parameters and allows to check their history. For more information, refer to the chapter Environment Parameters.
Creating a Deploy Environment
-
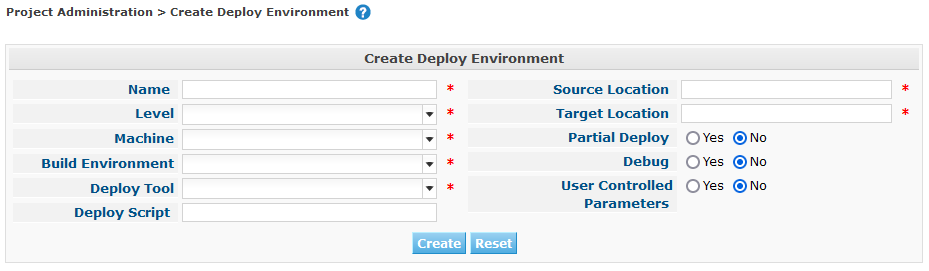
In the Project Administration context, select Deploy Environments > Create.
The following screen is displayed:
-
Fill out the fields for the new Deploy Environment.
The following fields are available. Fields marked with a red asterisk are mandatory
Field Meaning Name
In this field, enter the name for the new Deploy Environment.
Level
From the drop-down list, select the Level to which you want to assign this Deploy Environment.
Machine
From the drop-down list, select the Machine on which this Deploy Environment is physically available.
Build Environment
From the drop-down list, select the Build Environment this Deploy Environment is based on.
The Build Result of this Build Environment will be deployed.
Deploy Tool
From the drop-down list, select the Deploy Tool for this Deploy Environment.
Paths defined in the selected Deploy Tool must exist on the linked Machine.
Deploy Script
This field may contain the relative path to the Deploy Script that is selected specifically for this Deploy Environment.
If the field is empty, the default Deploy Script whose relative path is defined on the Project Settings screen will be used for this Deploy Environment.
Source Location
This field contains the path to the physical location where the unpacked build result is placed.
IKAN ALM adds the Deploy OID:
SourceLocation/DeployOID/ProjectName_VCR
This location is passed to the Deploy Script as a parameter named source.
Target Location
For a Deploy Environment, this field contains the path to the physical location where the Deploy Script will deploy the Build result.
This location is passed to the Deploy Script as a parameter named target.
Partial Deploy
Indicate whether the Partial Deploy option must be activated for this Deploy Environment.
If the option is activated, IKAN ALM will analyze the differences between the two build results on the IKAN ALM Server and only new and modified files will be transported to the Agent.
This is achieved as follows:
Both the newly compiled Build result and the base-line Build (the one the new Build results are compared with) are decompressed (unzipped).
The decompressed files are compared and the following actions are taken:
-
Identical files are deleted and not deployed.
-
Modified and new files (available in the new but not in the base-line Build results) are transported.
-
For deleted files (available in the base-line Build result, but not in the new one), dummy files with names in the format FileName.to_be_deleted are created. The Deploy Script must be written in such a way, that it deletes the matching files from the Deploy Environment’s Source Location.
Debug
Select whether or not the Debug option must be activated for this Deploy Environment.
If Debug is activated for a Deploy Environment, the Build Clean-up action (action 28 of the Build and Deploy Level Requests Overview) will not be performed, so that the user may use the available build results to run the deploy script manually for testing purposes.
User Controlled Parameters
Allow Users with a Project User role to create, read, update and delete Environment Parameters. Once enabled, the Parameters retain this state even if a Project Administrator disables this option afterwards.
-
-
Verify the information on the Deploy Environments Overview panel.
This Overview lists all Deploy Environments defined for all Levels belonging to the selected Project.
For more information on the available links, refer to The Deploy Environments Overview Screen.
-
Click Create to confirm the creation of the new Deploy Environment.
You can also click the Reset button to clear the fields and restore the initial values.
The Deploy Environments Overview Screen
-
In the Project Administration context, select Deploy Environments > Overview.
The following screen is displayed:
-
Define the required search criteria on the search panel.
The list of items on the overview will be automatically updated based on the selected criteria.
You can also:
-
click the Show/hide advanced options link to display or hide all available search criteria,
-
click the Search link to refresh the list based on the current search criteria,
-
click the Reset search link to clear the search fields,
-
-
Verify the Information available on the Deploy Environments Overview.
For a detailed description of the fields, see Creating a Deploy Environment.
Columns marked with the
 icon can be sorted alphabetically (ascending or descending).
 -
Depending on your access rights, the following links may be available on the Deploy Environments Overview panel:

Edit
This option allows editing a the Deploy Environment settings.

Delete
This option allows deleting a Deploy Environment.

clone
This option allows cloning a Deploy Environment.

Edit Phases
This option allows editing the Deploy Environment Phases.

View Parameters
This option allows viewing the Deploy Environment Parameters.

History
This option allows viewing the Deploy Environment History.
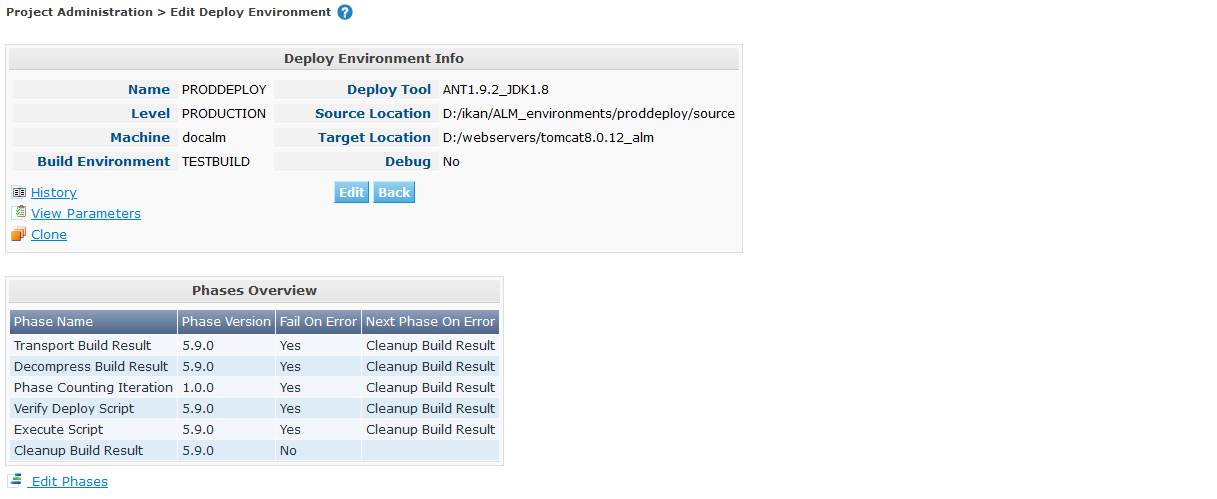
Editing a Deploy Environment
-
Switch to the Deploy Environments Overview screen.
-
Click
Edit to change the selected Deploy Environment definition.The following screen is displayed:
-
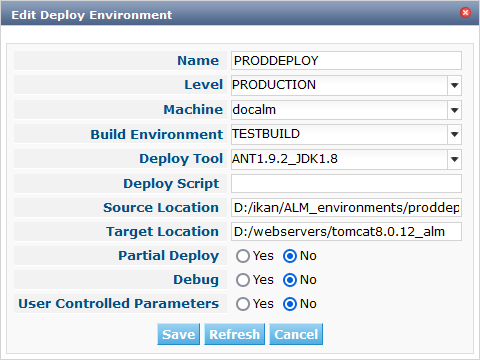
Click the Edit button on the Deploy Environment Info panel.
The Edit Deploy Environment window is displayed:
-
Edit the fields as required.
For a detailed description of the fields, refer to Creating a Deploy Environment.
-
Click Save, once you have finished your changes.
You can also click Refresh to retrieve the settings from the database or Cancel to return to the Edit Deploy Environment screen without saving your changes.
Deleting a Deploy Environment
-
Switch to the Deploy Environments Overview screen.
-
Click
Delete to delete the selected Deploy Environment definition.The following screen is displayed:
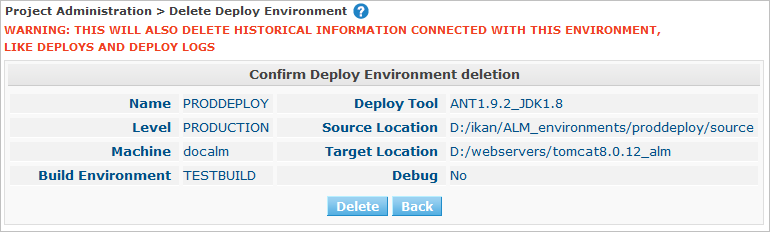
-
Click Delete to confirm the deletion.
You can also click Back to return to the previous screen without deleting the Environment.
Deleting a Deploy Environments may also delete Historical information linked to the Environment, like Deploys and Deploy Logs.
Cloning a Deploy Environment
When cloning an Environment, all settings, including the Phases and Parameters, will be cloned.
-
Switch to the Deploy Environments Overview screen.
-
Click
Clone to clone the selected Deploy Environment definition.The following screen is displayed:
-
On the clone Deploy Environment panel, specify the Name and Target Location, and specify a Level for the new Environment.
If required, you can also edit the other fields. For a detailed description of the fields, refer to Creating a Deploy Environment.
-
Click Clone to confirm the action.
You can also click Back to return to the previous screen without cloning the Environment.
Deploy Environment Phases
When creating a Deploy Environment, IKAN ALM will automatically link the default flow of Deploy Environment Phases to it.
The default Phases are:
-
Transport Build Result
-
Decompress Build Result
-
Verify Deploy Script
-
Execute Deploy Script
-
Cleanup Build Result
When executing a Deploy for this Environment, a log will be created for each of the Phases. The logs will be shown on the Level Request Details page. For more information, see : Level Request Detail.
Refer to the following procedures for more information:
The Deploy Environment Phases Overview Screen
-
Switch to the Deploy Environments Overview screen.
-
On the Deploy Environments Overview panel, click the
Edit Phases link.The Deploy Environment Phases Overview screen is displayed:
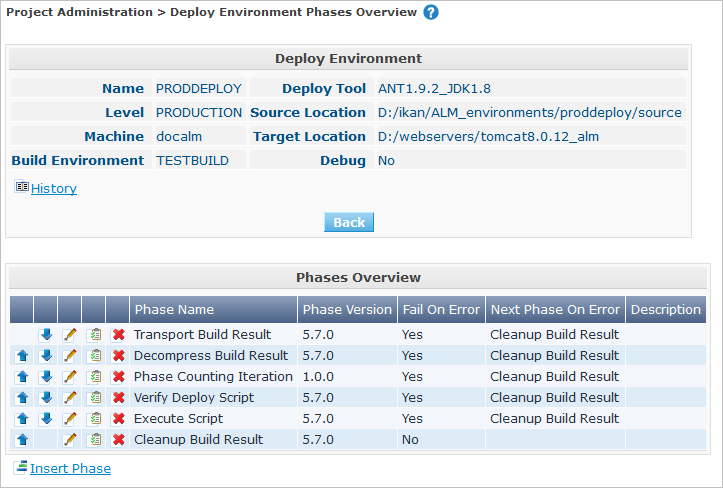
A link to this screen is also available on the Edit Deploy Environment screen.
-
Use the links on the Phases Overview panel, if required.
The following links are available:
-
The
 Up and
  Down links to change the order of the Phases.
 -
The
Edit link to edit the Phase’s settings. Editing a Deploy Environment Phase -
The
View Parameters link to manage the mandatory and optional Phase Parameters. Viewing the Deploy Environment Phase Parameters -
The
Delete link to delete a Phase. Deleting a Deploy Environment Phase
-
-
Insert a Phase, if required.
Select the Insert Phase link underneath the Phases Overview panel.
-
When done, click Back to return to the Deploy Environments Overview screen.
Inserting a Deploy Environment Phase
-
Switch to the Deploy Environments Overview screen.
-
On the Deploy Environments Overview panel, click the
Edit Phases link. -
On the Phases Overview panel, click the Insert Phase link.
The Insert Phase screen is displayed.
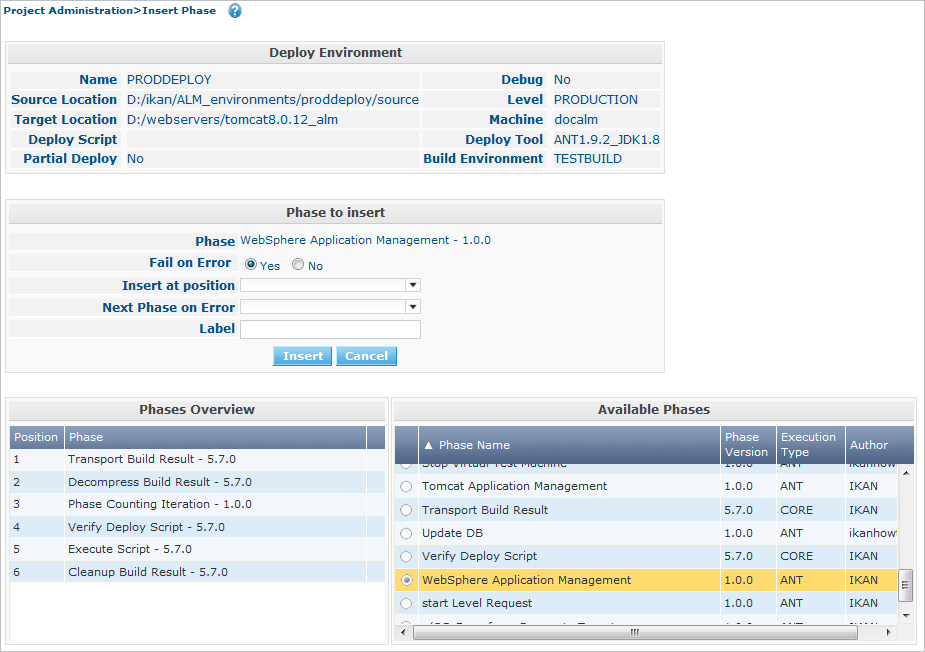
-
Select a Phase to insert from the Available Phases panel.
-
Fill out the fields for the new Phase.
The following fields are available:
Field Meaning Phase
from the Available Phases panel, select the Phase to add.
Fail on Error
In this field, indicate whether the Deploy is considered failed when this Phase goes into Error.
Insert at Position
This field indicates at which position the Phase will be inserted into the Deploy Environment workflow. The Phase Position is also indicated on the Phases Overview panel.
Next Phase On Error
In this field, indicate the next Phase to execute in case this Phase goes into Error.
Label
In this optional field you can add a Label for the Phase to be inserted.
In case you use the same Phase several times, adding a label is useful to provide additional information concerning the usage of the Phase.
-
Click Insert to confirm the creation of the new Phase.
You can also click Cancel to return to the previous screen without saving the changes.
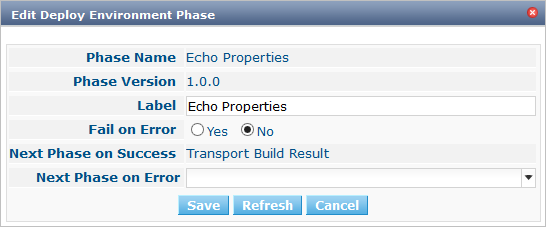
Editing a Deploy Environment Phase
-
Switch to the Deploy Environments Overview screen.
-
On the Deploy Environments Overview panel, click the
Edit Phases link. -
Click the
Edit link in front of the Phase you want to edit.The Edit Deploy Environment Phase window is displayed.
-
Edit the fields on the Edit Deploy Environment Phase panel.
For a description of the fields, refer to the section Inserting a Deploy Environment Phase.
-
Click Save to save your changes.
You can also click Refresh to retrieve the settings from the database or Cancel to return to the previous screen without saving your changes.
Changing the Order of the Deploy Environment Phases
-
Switch to the Deploy Environments Overview screen.
-
On the Deploy Environments Overview panel, click the
Edit Phases link. -
Use the
Up and Down links in front of a Deploy Environment Phase to change its position in the sequence. -
Click Back to return to the Deploy Environments Overview screen.
Avoid changing a Phase’s position in such a way that its Next Phase on Error is in an earlier position in the workflow: this could result in an infinite loop.
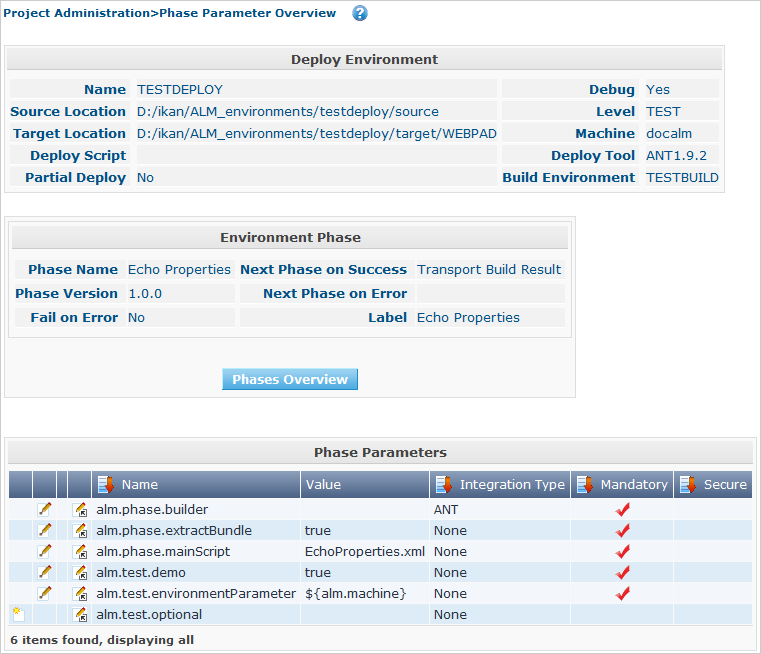
Viewing the Deploy Environment Phase Parameters
-
Switch to the Deploy Environments Overview screen.
-
On the Deploy Environments Overview panel, click the
Edit Phases link. -
Click the
View Parameters links in front of a Deploy Environment Phase you want to manage the Phase Parameters for.The Phase Parameter Overview screen is displayed.
-
Verify the Deploy Environment Phase Parameters.
The Phase Parameters panel displays all the defined Parameters of the Deploy Environment Phase and allows you to create non-mandatory Phase Parameters.
The following fields are available:
Field Meaning Name
The name of the Parameter.
This field may not be changed since it is defined in Global Administration.
Value
The Value of the Parameter.
Initially, when the Phase is inserted, the value will be copied from the Default Value in Global Administration (if provided).
This field may be changed by Editing the Phase Parameter.
Integration Type
This field indicates whether the value of the Parameter is a simple text value, or whether it represents a link (an integration) to an IKAN ALM Global Administration object type.
The possible values are:
-
None: the value is simple text
-
Transporter: link to a Transporter
-
VCR: link to a Version Control Repository
-
ITS: link to an Issue Tracking System
-
Scripting Tool: link to a Scripting Tool
-
ANT: link to an Ant Scripting Tool
-
GRADLE: link to a Gradle Scripting Tool
-
NANT: link to a NAnt Scripting Tool
-
MAVEN2: link to a Maven2 Scripting Tool
This field may not be changed since it is defined in Global Administration.
Mandatory
This field indicates whether the Parameter has been created automatically when the Phase is inserted in the Level. This is the case for Mandatory Parameters.
Non-mandatory Parameters must be created after the Phase has been inserted in the Level, using the Create Parameter link.
This field may not be changed since it is defined in Global Administration.
Secure
This field indicates whether the Parameter is secured or not.
This field may not be changed since it is defined in Global Administration.
-
-
Click the
Edit Parameter link next to a Phase Parameter.The following pop-up window will be displayed.
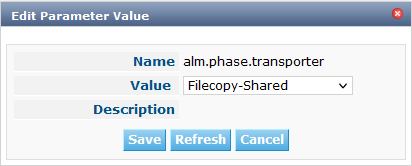
Set the value of the Deploy Environment Phase Parameter and click Save to save the value.
You can also click:
-
Refresh to retrieve the settings from the database.
-
Cancel to return to the Phase Parameter Overview screen without saving a value.
-
-
If you want to create a non-mandatory Phase Parameter, click the
 Create Parameter link next to a Phase Parameter.
The following pop-up window will be displayed.

If a default Parameter value has been set in Global Administration, that value will be suggested.
Set the value of the Deploy Environment Phase Parameter and click Create.
-
Reset to retrieve the settings from the database.
-
Cancel to return to the Phase Parameter Overview screen without saving a value.
-
-
If you want to delete a non-mandatory Phase Parameter, click the
Delete Parameter link next to a Phase Parameter.The following pop-up window will be displayed.
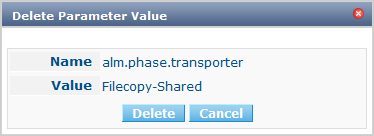
Click Delete to confirm the deletion of the mandatory Deploy Environment Phase Parameter.
You can also click Cancel to close the pop-up window without deleting the Parameter.
-
Click the
 Edit Global Phase Parameter link next to a Phase Parameter.
The User will be redirected to the Edit Phase screen (in the Global Administration context) and the Edit Phase Parameter Value pop-up window is opened.
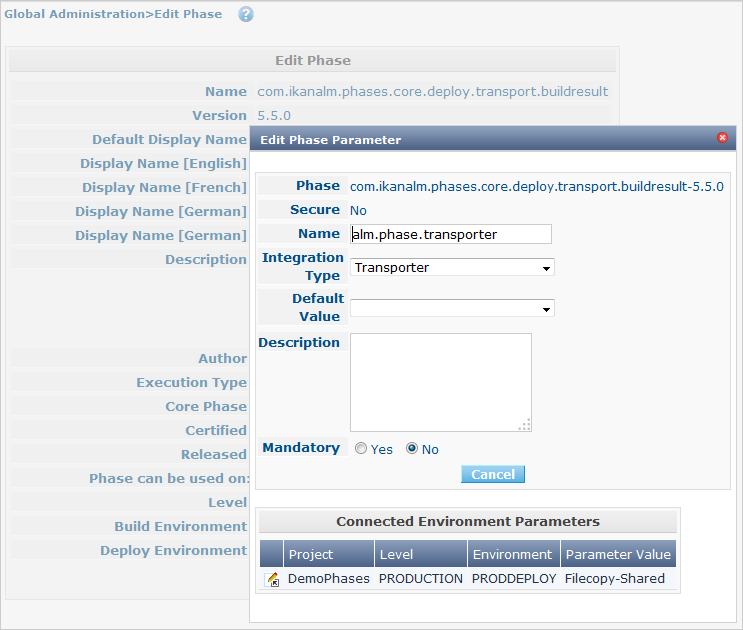
You can Edit the Global Phase Parameter as described in the section Editing Phase Parameters.
To go back to the Phase Parameter in the Project Administration context, click the appropriate
_ Edit Environment
Phase Parameter_ link in the Connected Environment
Parameters panel.
Deleting a Deploy Environment Phase
-
Switch to the Deploy Environments Overview screen.
-
On the Deploy Environments Overview panel, click the
Edit Phases link. -
On the Phases Overview panel, click the Delete link.
The Delete Deploy Environment Phase screen is displayed.

-
Click Yes to confirm the deletion of the Phase.
You can also click No to return to the previous screen without deleting the Deploy Environment Phase.
Viewing the Deploy Environment Parameters
-
Switch to the Deploy Environments Overview screen.
-
Click
View Parameters to view all parameters defined for the selected Deploy Environment.The following screen is displayed:
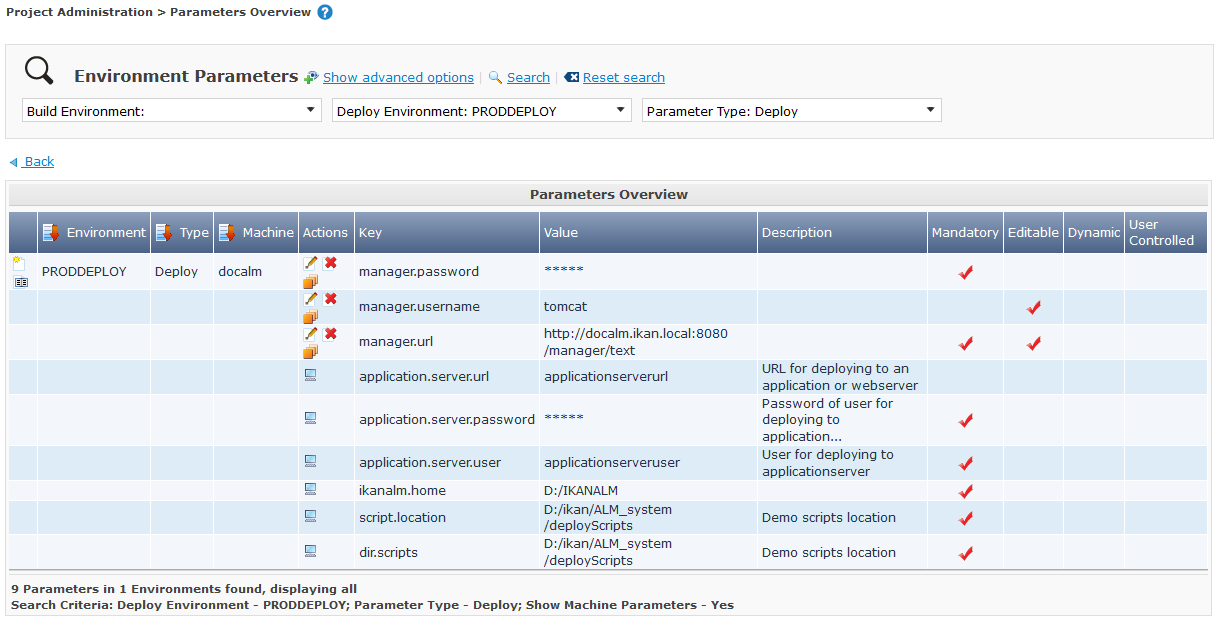
For a more detailed description of this screen, refer to the section Creating Environment Parameters.
Viewing the Deploy Environment History
-
Switch to the Deploy Environments Overview screen.
-
Click the
History link to display the Deploy Environment History View.For more detailed information concerning this History View, refer to the section History and Event Logging.
Click Back to return to the previous screen.