Transporters
Every Build or Deploy action handled by an IKAN ALM Agent involves sources, a script or a build result that must be transported between the IKAN ALM Agent and the IKAN ALM server.
The IKAN ALM Agent may reside locally or on a remote Machine (i.e., a server different from the IKAN ALM server.)
Custom Phases which have been created or imported into the Phase Catalog of the IKAN ALM Server need to be transported and installed in the execution environment of the IKAN ALM Server (Custom Level Phases) or Agent (Custom Build and Deploy Phases).
The Transporter is involved in the following Build and Deploy processes:
BUILD PROCESSES:
-
transporting the checked out sources from the IKAN ALM server to the source location on the Build Environment,
-
transporting the Build script from the script location on the IKAN ALM server to the source location on the Build Environment (only executed if the Build script is not included in the sources),
-
transporting the compressed Build result from the target location on the Build Environment to the Build Archive on the IKAN ALM server.
DEPLOY PROCESSES:
-
transporting the Build result from the Build Archive on the IKAN ALM server to the source location on the Deploy Environment,
-
transporting the Deploy script from the script location on the IKAN ALM server to the source location on the Deploy Environment (only if the Deploy script is not included in the sources).
Transport actions are always initiated by the IKAN ALM Agent. Therefore, the definition of a Transporter will always be a view of the IKAN ALM Agent on the locations of the IKAN ALM Server. These locations may be defined locally (Agent running on the same Machine as the IKAN ALM server) or remotely (Agent running on a different Machine as the IKAN ALM server) for the IKAN ALM Agent.
As a consequence, a Transporter must be defined for a specific Machine that is linked to the Build or Deploy Environment. The IKAN ALM Agent running on that Machine will execute the transport actions.
The Transporter is also involved in the distribution process of Custom Phases from the Phase Catalog to the execution environment of the IKAN ALM Server (Level Phases) or Agent (Build and Deploy Phases):
-
Level Phases:
Before the execution of the Level Phases for a Level Request, all non-released Custom Phases will be transported from the Phase Catalog to the execution environment on the IKAN ALM Server. This will be done using the Transporter that is linked to the IKAN ALM Server. Released Level Phases will only be transported if they are not yet installed on the IKAN ALM Server. You can check the installed Phases using the Installed Phases link next to the IKAN ALM Server Machine on the Machines Overview. See: The Machines Overview Screen
-
Build and Deploy Phases:
Before the execution of the Build/Deploy Phases for Build/Deploy, all non-released Custom Phases will be transported from the Phase Catalog on the IKAN ALM Server to the execution environment on the IKAN ALM Agent. This will be done using the Transporter that is linked to the IKAN ALM Agent. Released Build/Deploy Phases will only be transported if they are not yet installed on the IKAN ALM Agent. You can check the installed Phases using the Installed Phases link next to the IKAN ALM Agent Machine on the Machines Overview. See: The Machines Overview Screen
The relative locations for all remote transporters must be defined in the System Settings section. System System Settings
|
A Transporter will be activated by linking the Transporter to a Machine representing the IKAN ALM Agent (The Machines Overview Screen), and by linking that Machine to a Build or Deploy environment (Creating a Build Environment or Creating a Deploy Environment). |
This chapter describes three different Transporters, each of them enabling different protocols for transferring sources, scripts or build results.
Refer to the following sections for detailed information:
Creating a Transporter Protocol
|
This option is only available if you have Global Administrator Access Rights in IKAN ALM. |
-
In the Global Administration context, select Transporters > Create.
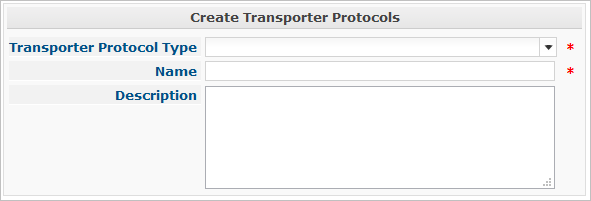
The following screen is displayed:
-
Select the Transporter Protocol Type you want to create.
The Details panel for the type of Transporter Protocol you selected is displayed underneath.
-
Enter the Name of the Transporter Protocol and add an optional Description.
-
Fill out the Transporter Protocol-specific Details.
For more information on those details, refer to the appropriate sections:
The Transporter Protocols Overview Screen
-
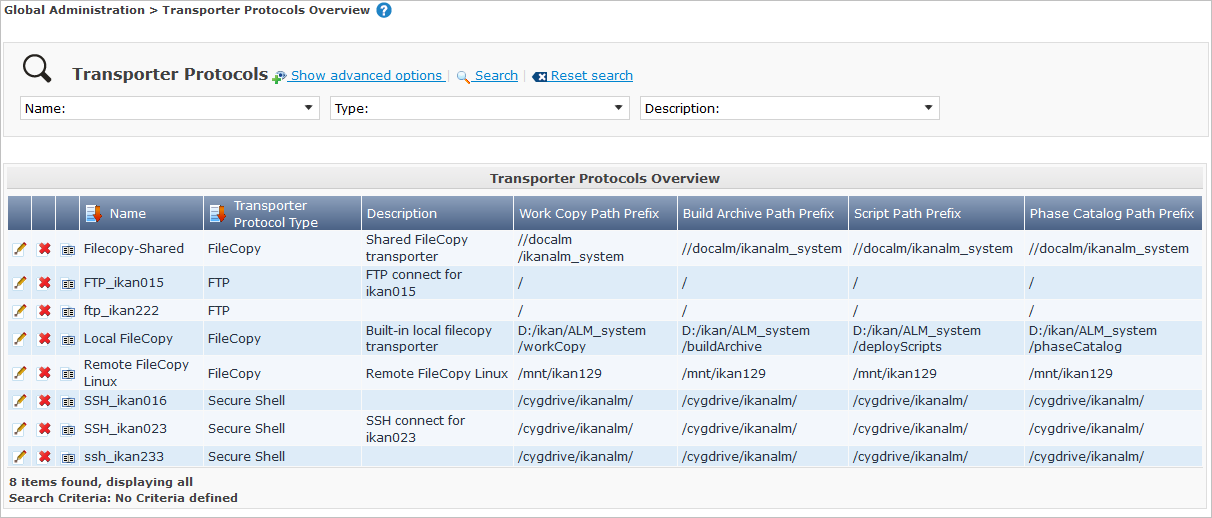
In the Global Administration context, select Transporters > Overview.
The following screen is displayed:
-
Define the required search criteria on the search panel.
The list of items on the overview will be automatically updated based on the selected criteria.
You can also:
-
click the Show/hide advanced options link to display or hide all available search criteria,
-
click the Search link to refresh the list based on the current search criteria,
-
click the Reset search link to clear the search fields.
-
-
Verify the information on the Transporter Protocols Overview panel.
-
Depending on your access rights, the following links may be available on the Transporter Protocols Overview panel:

Edit
This option is available to IKAN ALM Users with Global Administrator Access Rights. It allows editing a Transporter Protocol definition.

Delete
This option is available to IKAN ALM Users with Global Administrator Access Rights. It allows deleting a Transporter Protocol definition.

History
This option is available to all IKAN ALM Users. It allows displaying the History of all create, update and delete operations performed on a Transporter Protocol.
Refer to the following sections for detailed information:
FileCopy Transporters
A FileCopy Transporter makes it possible to use “file copy” for transporting Custom Phases, files and directories between the IKAN ALM server and a local or remote Agent handling the Build or Deploy processes (see the introduction on Transporters).
Since most transport actions are handled by the Agent (transport of Custom Level Phases is handled by the IKAN ALM Server), and the FileCopy Transporter enables the copying of resources between the Agent and the IKAN ALM server, different FileCopy Transporters must be defined for a local Agent (Machine) running on the IKAN ALM Server (Machine) and for a remote Agent (Machine) running on a server other than the IKAN ALM Server.
The "Local FileCopy" Transporter is created automatically during the IKAN ALM installation and will be automatically connected to the IKAN ALM Server Machine. This "Local FileCopy" Transporter is different in this aspect that it cannot be edited, updated nor deleted on the FileCopy Transporters Overview. Its definition is retrieved from the System Settings’ Local FileCopy Locations and can only be updated in the System Settings section. See: System Settings
If you want to use FileCopy for transferring resources to a Machine (Agent) other than the IKAN ALM server, a (Remote) FileCopy Transporter must be created. Keep in mind that the specified prefix locations are a view of the IKAN ALM Agent Machine on the IKAN ALM Server Machine. For Windows machines this means that the "Work Copy", "Build Archive", "Phase Catalog" and "Script" locations must be shared on the IKAN ALM Server. The prefixes in the FileCopy definition use the UNC notation containing the IKAN ALM Server Name and the share on the IKAN ALM Server. For Linux/Unix machines, this means that the "Work Copy", "Build Archive" and "Script" locations must be mounted on the IKAN ALM Agent Machine, and the mount name will be used in the different prefixes of the FileCopy Transporter definition.
|
Be aware of access rights problems during FileCopy transport actions to the locations on the remote IKAN ALM server when running a remote IKAN ALM Agent as a Windows service or a Linux/Unix daemon process. These may be tackled by running the service/daemon as a User having access rights to the share/mount to the IKAN ALM server, or by giving the IKAN ALM Agent machine rights on the locations on the IKAN ALM server. |
Refer to the following sections for detailed information:
Creating a FileCopy Transporter
|
This option is only available if you have Global Administrator Access Rights in IKAN ALM. |
-
In the Global Administration context, select Transporters > Create.
-
Select FileCopy from the drop-down list in the Type field on the search panel.
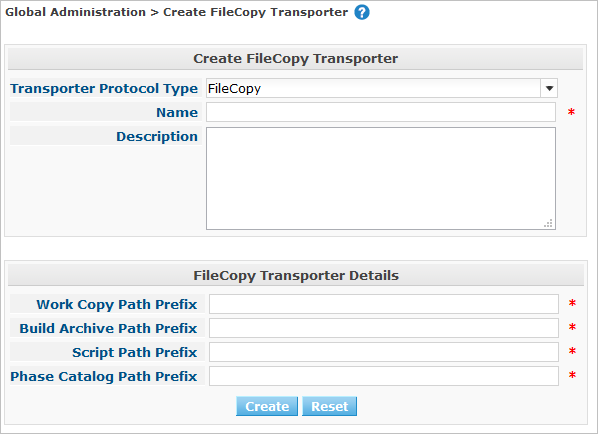
The following screen is displayed:
-
Fill out the fields in the Create FileCopy Transporter panel at the top of the screen. Fields marked with a red asterisk are mandatory:
Field Meaning Name
Enter the name of the new FileCopy Transporter in this field. This field is mandatory.
Description
Enter a description for the new FileCopy Transporter in this field. This field is optional.
-
Fill out the fields in the FileCopy Transporter Details panel.
Fields marked with a red asterisk are mandatory.
Field Meaning Work Copy Path Prefix
Enter the prefix for the Work Copy Location (the location where the VCR interface places the checked out sources on the IKAN ALM Server so that it is accessible from a remote IKAN ALM Agent handling a build process). The Server Location will be formed by concatenating this prefix together with the Relative Location defined in the System Settings. See: System Settings
Example:
-
For a Windows Transporter:
//IKAN110/almIn this sample "IKAN110" is the name of the IKAN ALM server, "alm" is the share name on that IKAN ALM server.
If in the System Settings the Relative Work Copy location is defined as "workCopy", the IKAN ALM Agent will try to retrieve the sources from a directory under
\\IKAN110/alm/workCopy. -
For a Linux/Unix Transporter:
/mnt/ikan110/almThis location is a mount of a directory on the IKAN ALM server (on the ikan110 machine) containing the Work Copy location.
If in the System Settings the Relative Work Copy location is defined as "workCopy", the IKAN ALM Agent will try to retrieve the sources from a directory under
/mnt/ikan110/alm/workCopy.
Build Archive Path Prefix
Enter the prefix for the Build Archive Location (the location where the Builds are stored or retrieved from by an IKAN ALM Agent handling a Build or Deploy process). The Server Location will be formed by concatenating this prefix together with the Relative Location defined in the System Settings. See: System Settings
For an example, refer to Work Copy Path Prefix.
Script Path Prefix
Enter the prefix for the Script Location (the location where the IKAN ALM Agent will retrieve the build or deploy script from, if it cannot be found in the sources).
The Server Location will be formed by concatenating this prefix together with the Relative Location defined in the System Settings. See: System Settings
For an example, refer to Work Copy Path Prefix.
Phase Catalog Path Prefix
Enter the prefix for the Phase Catalog Location (the location on the IKAN ALM Server where imported and newly created Phases are stored).
When an IKAN ALM Agent/Server needs to install a missing Phase, it uses this prefix and the Relative Phase Catalog Location defined in the System Settings to construct a path to copy the missing Phase from.
-
-
Once you have filled out the fields, click Create.
The newly created FileCopy Transporter Definition is added to the FileCopy Transporters Overview.
The FileCopy Transporters Overview Screen
-
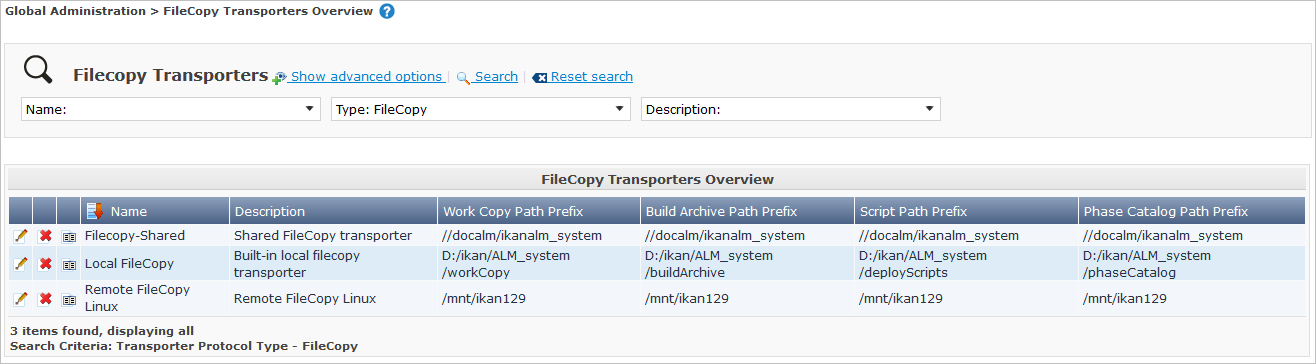
In the Global Administration context, select Transporters> Overview.
The overview of all defined Transporter Protocols is displayed.
-
Specify FileCopy in the Type field on the search panel.
The following screen is displayed:
If required, use the other search criteria to refine the items displayed on the overview.
The following options are available:
-
click the Show/hide advanced options link to display or hide all available search criteria,
-
the Search link to refresh the list based on the current search criteria,
-
the Reset search link to clear the search fields.
-
-
Verify the information on the FileCopy Transporters Overview panel.
For a detailed description of the fields, refer to Creating a FileCopy Transporter.
-
Depending on your access rights, the following links may be available on the Machines Overview panel:
Edit
This option is available to IKAN ALM Users with Global Administrator Access Rights. It allows editing a FileCopy Transporter definition.
Delete
This option is available to IKAN ALM Users with Global Administrator Access Rights. It allows deleting a FileCopy Transporter definition.
History
This option is available to all IKAN ALM Users. It allows displaying the History of all create, update and delete operations performed on a FileCopy Transporter.
Editing a File Copy Transporter Definition
-
In the Global Administration context, select Transporters > Overview.
The overview of all defined Transporter Protocols is displayed.
Use the search criteria on the search panel to display the FileCopy Transporter Protocols your are looking for.
-
Click the
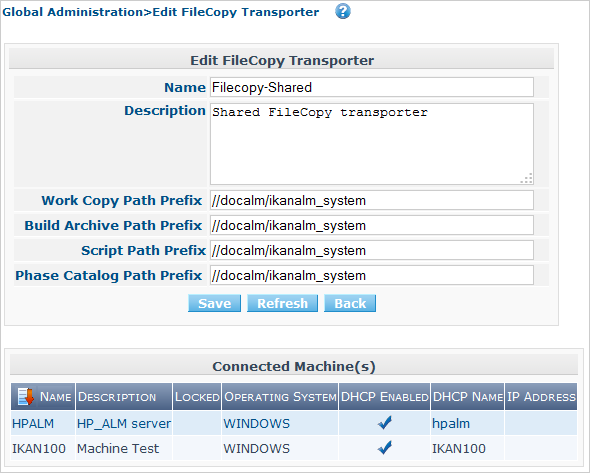
Edit link to change the selected FileCopy Transporter definition.The following screen is displayed:
-
Edit the fields as required.
For a description of the fields, refer to Creating a FileCopy Transporter.
The Connected Machine(s) panel displays the Machines the Transporter is linked to.
-
Click Save to save your changes.
You can also click:
-
Refresh to retrieve the settings from the database.
-
Back to return to the previous screen without saving the changes
-
Deleting a File Copy Transporter Definition
-
In the Global Administration context, select Transporters > Overview.
The overview of all defined Transporter Protocols is displayed.
Use the search criteria on the search panel to display the FileCopy Transporter Protocols your are looking for.
-
Click the
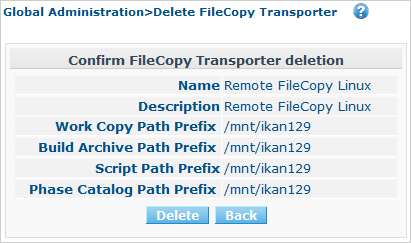
Delete link to delete the selected FileCopy Transporter definition.The following screen is displayed:
-
Click Delete to confirm the deletion.
You can also click Back to return to the previous screen without deleting the entry.
Note: If the FileCopy Transporter is linked to one or more Machines, the following screen is displayed:
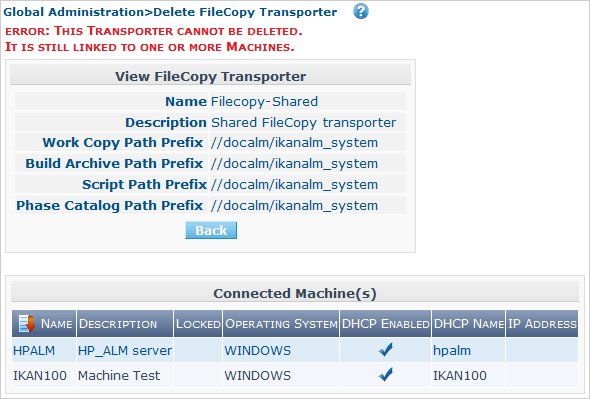
You must change the definition of the listed Machines, before you can delete the FileCopy Transporter.
Viewing the File Copy Transporter History
-
In the Global Administration context, select Transporters > Overview.
The overview of all defined Transporter Protocols is displayed.
Use the search criteria on the search panel to display the FileCopy Transporter Protocols your are looking for.
-
Click the
History link to display the FileCopy Transporter History View.For more detailed information concerning this History View, refer to the section History and Event Logging.
-
Click Back to return to the FileCopy Transporters Overview screen.
FTP Transporters
The built-in FTP Transporter Client makes it possible to use FTP as a protocol for transporting Custom Phases, build results, scripts or sources between the IKAN ALM Server and one or more Agents.
|
An FTP Server must be installed on the IKAN ALM Server machine and must be correctly configured so that it controls the different System Settings locations (Work Copy, Build Archive, Phase Catalog and Script Locations). |
In order to use the FTP Client for build and deploy actions, you must link the Transporter to a Machine representing an IKAN ALM Agent and link this Machine to the Build and Deploy Environments you want to “serve” via FTP.
Refer to the following sections for detailed information:
Creating an FTP Transporter
|
This option is only available if you have Global Administrator Access Rights in IKAN ALM. |
-
In the Global Administration context, select Transporters > Create.
-
Select FTP from the drop-down list in the Type field on the search panel.
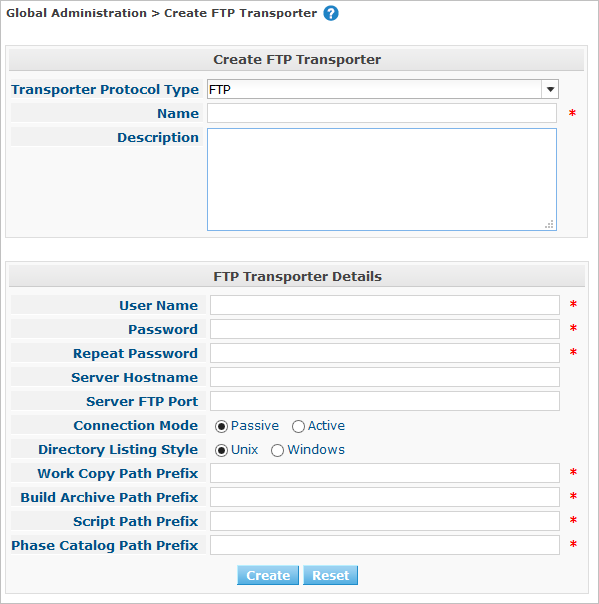
The following screen is displayed:
-
Fill out the fields in the Create FTP Transporter panel at the top of the screen. Fields marked with a red asterisk are mandatory:
Field Meaning Name
Enter the name of the new FTP Transporter in this field. This field is mandatory.
Description
Enter a description for the new FTP Transporter in this field. This field is optional.
-
Fill out the fields in the FTP Transporter Details panel.
Fields marked with a red asterisk are mandatory.
Field Meaning User Name
Enter the User Name in this field.
Password
Enter the Password in this field.
The characters you enter are displayed as asterisks.
Repeat Password
Re-enter the Password in this field.
Server Hostname
This field is optional.
It allows you to define a connection name that is different from the IKAN ALM Server Machine DHCP name or IP address.
Example:
FTP Server mapped to a hostname:
ftp.ikan.be.Server FTP Port
Enter the Port Number of the FTP Server running on the IKAN ALM Server.
Note: The value entered in this field will override the value specified in the System Settings. See : System System Settings. If not specified in the System Settings nor on this screen, the default FTP Port Number
21will be used.Connection Mode
Select the connection mode: Passive or Active.
Directory Listing Style
Choose the Directory Listing Style: Unix or Windows.
Work Copy Path Prefix
Enter the prefix for the Work Copy Location (the location where the VCR interface places the checked out sources on the IKAN ALM Server so that it is accessible from a remote IKAN ALM Agent handling a build process). The Server Location will be formed by concatenating this prefix together with the Relative Location defined in the System Settings. See: System Settings
Example:
If the FTP Server is configured to control the
E:/Ikan/alm/system(Windows) or/ikan/alm/system(Linux/Unix) directory, a/will suffice as prefix.In that case, the sources will be copied to the Agent by a GET command from a subdirectory under
/workCopyfrom the FTP Server.Build Archive Path Prefix
Enter the prefix for the Build Archive Location (the location where the Builds are stored or retrieved from). The Server Location will be formed by concatenating this prefix together with the Relative Location defined in the System Settings. See: System Settings
Example:
If the FTP Server is configured to control the
E:/Ikan/alm/system(Windows) or/ikan/alm/system(Linux/Unix) directory, a/will suffice as prefix.In that case, the build result will be copied from the Agent to the Build Archive by a PUT command into the subdirectory
/buildArchiveon the FTP Server.Script Path Prefix
Enter the prefix for the Script Location (the location where the IKAN ALM Agent will retrieve the build or deploy script from if it cannot be found in the sources). The Server Location will be formed by concatenating this prefix together with the Relative Location defined in the System Settings. See: System Settings
Example:
If the FTP Server is configured to control the
E:/Ikan/alm/system(Windows) or/ikan/alm/system(Linux/Unix) directory, a/will suffice as prefix.Phase Catalog Path Prefix
Enter the prefix for the Phase Catalog Location (the location on the IKAN ALM Server where imported and newly created Phases are stored).
When an IKAN ALM Agent/Server needs to install a missing Phase, it uses this prefix and the Relative Phase Catalog Location defined in the System Settings to construct a path to copy the missing Phase from.
-
Once you have filled out the fields, click Create.
The newly created FTP Transporter Definition is added to the FTP Transporters Overview.
The FTP Transporters Overview Screen
-
In the Global Administration context, select Transporters> Overview.
The overview of all defined Transporter Protocols is displayed.
-
Specify FTP in the Type field on the search panel.
The following screen is displayed:
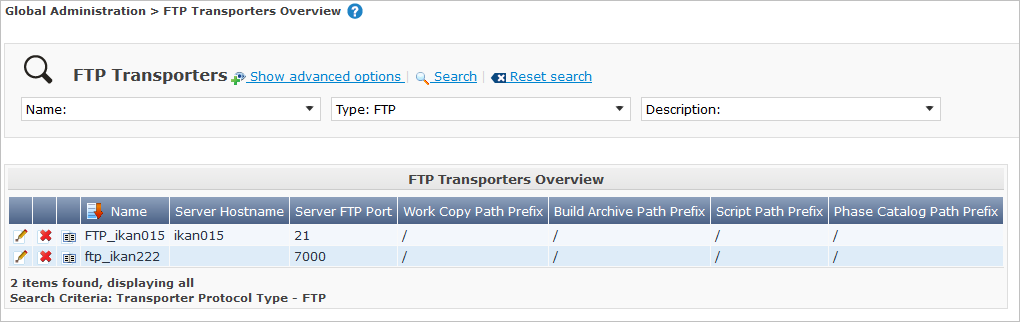
If required, use the other search criteria to refine the items displayed on the overview.
The following options are available:
-
the Show/hide advanced options link to display or hide all available search criteria,
-
the Search link to refresh the list based on the current search criteria,
-
the Reset search link to clear the search fields.
-
-
Verify the information on the FTP Transporters Overview panel.
For a detailed description of the fields, refer to Creating an FTP Transporter.
-
Depending on your access rights, the following links may be available on the Machines Overview panel:
Edit
This option is available to IKAN ALM Users with Global Administrator Access Rights. It allows editing a FTP Transporter definition.
Delete
This option is available to IKAN ALM Users with Global Administrator Access Rights. It allows deleting a FTP Transporter definition.
History
This option is available to all IKAN ALM Users. It allows displaying the History of all create, update and delete operations performed on a FTP Transporter.
Editing an FTP Transporter Definition
-
In the Global Administration context, select Transporters > Overview.
The overview of all defined Transporter Protocols is displayed.
Use the search criteria on the search panel to display the FTP Transporter Protocols your are looking for.
-
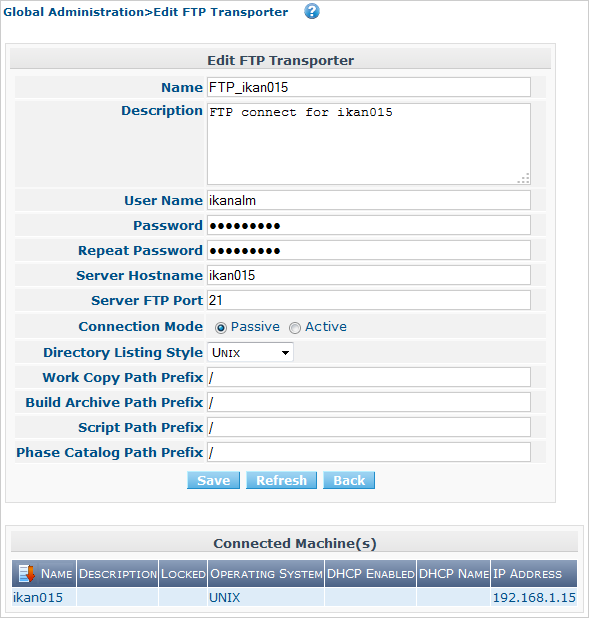
Click the
Edit link to change the selected FTP Transporter definition.The following screen is displayed:
-
Edit the fields as required.
For a description of the fields, refer to Creating an FTP Transporter.
The Connected Machine(s) panel displays the Machines the Transporter is linked to.
-
Click Save to save your changes.
You can also click:
-
Refresh to retrieve the settings from the database.
-
Back to return to the previous screen without saving the changes
-
Deleting an FTP Transporter Definition
-
In the Global Administration context, select Transporters > Overview.
The overview of all defined Transporter Protocols is displayed.
Use the search criteria on the search panel to display the FTP Transporter Protocols your are looking for.
-
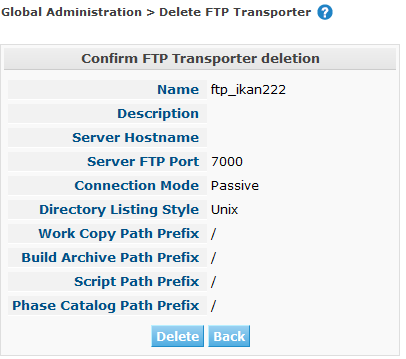
Click the
Delete link to delete the selected FTP Transporter definition.The following screen is displayed:
-
Click Delete to confirm the deletion.
You can also click Back to return to the previous screen without deleting the entry.
Note: If the FTP Transporter is linked to one or more Machines, the following screen is displayed:
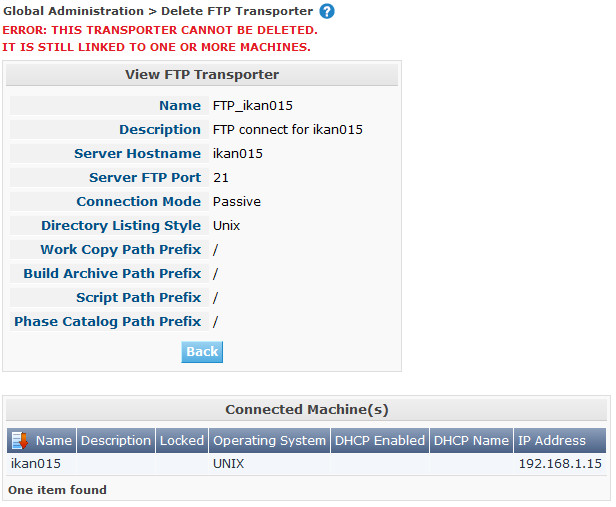
You must change the definition of the listed Machines, before you can delete the FTP Transporter.
Viewing the FTP Transporter History
-
In the Global Administration context, select Transporters > Overview.
The overview of all defined Transporter Protocols is displayed.
Use the search criteria on the search panel to display the FTP Transporter Protocols your are looking for.
-
Click the
History link to display the FTP Transporter History View.For more detailed information concerning this History View, refer to the section History and Event Logging.
-
Click Back to return to the FTP Transporters Overview screen.
Secure Shell Transporters
Secure Shell Transporters allow you to securely transport Custom Phases, sources, scripts and build results between the IKAN ALM Server and an IKAN ALM Agent. The Secure Shell Transporter is part of the IKAN ALM Agent installation. Its configuration is explained in this section.
|
An SSH Server must be installed on the IKAN ALM Server machine and must be correctly configured so that it controls the different System Settings locations (Work Copy, Build Archive, Phase Catalog and Script Locations). |
In order to ensure a secure transport for build and deploy actions, you must link the Transporter to a Machine representing an IKAN ALM Agent and link that Machine to the Build and Deploy Environments you want to “serve” via a Secure Shell.
Refer to the following sections for detailed information:
Creating a Secure Shell Transporter
|
This option is only available if you have Global Administrator Access Rights in IKAN ALM. |
-
In the Global Administration context, select Transporters > Create.
-
Select Secure Shell from the drop-down list in the Type field on the search panel.
The following screen is displayed:
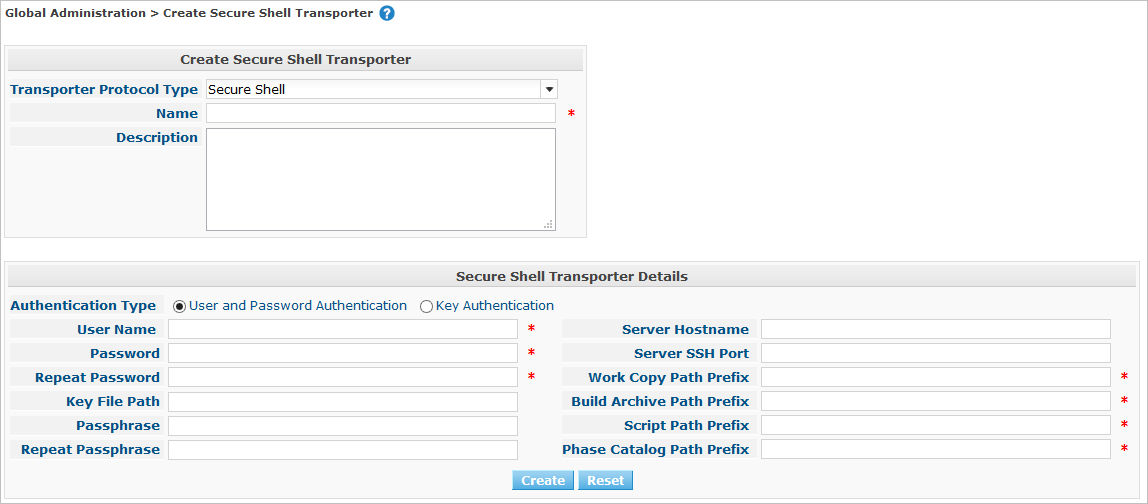
-
Fill out the fields in the Create Secure Shell Transporter panel at the top of the screen. Fields marked with a red asterisk are mandatory:
Field Meaning Name
Enter the name of the new Secure Shell Transporter in this field. This field is mandatory.
Description
Enter a description for the new Secure Shell Transporter in this field. This field is optional.
-
Fill out the fields in the Secure Shell Transporter Details panel.
Fields marked with a red asterisk are mandatory.
Field Meaning Authentication type
Select the required Authentication type from the drop-down list.
The following types are available:
-
User and Password Authentication
-
Key Authentication
User Name
Enter the User Name in this field, if User and Password Authentication is selected.
Password
Enter the Password in this field, if User and Password Authentication is selected.
The characters you enter are displayed as asterisks.
Repeat Password
Re-enter the Password in this field.
Key File Path
Enter the path to the Key File in this field, if Key Authentication is selected.
Passphrase
Enter the Passphrase in this field if you use a Passphrase to protect your Key Authentication.
The characters you enter are displayed as asterisks.
Repeat Passphrase
Re-enter the Passphrase in this field.
Server Hostname
This field is optional.
It allows you to define the hostname of the IKAN ALM Server Machine in case it is different from the IKAN ALM Server Machine DHCP name or IP address.
Server SSH Port
Enter the Port Number of the SSH Server running on the IKAN ALM Server.
Note: The value entered in this field will override the value specified in the System Settings. See: System Settings. If not specified in the System Settings nor on this screen, the default SSH Port Number
22will be used.Work Copy Path Prefix
Enter the prefix for the Work Copy Location (the location where the VCR interface places the checked out sources on the IKAN ALM Server so that it is accessible from a remote IKAN ALM Agent handling a build process). The Server Location will be formed by concatenating this prefix together with the Relative Location defined in the System Settings. See: System Settings
Example 1:
An IKAN ALM Server on a Windows machine with an SSH Server supporting the "cygdrive" notation.
System Settings: the Relative Work Copy Location being defined as "workCopy" and the Local FileCopy Work Copy Location as
e:/ikan/alm/workCopyresults in/cygdrive/e/ikan/almas the Work Copy Path Prefix.The IKAN ALM Agent will try to Secure Copy the sources from a location under
/cygdrive/e/ikan/alm/workCopy.Example 2:
An IKAN ALM Server on a Linux machine.
System Settings: the Local FileCopy Work Copy location being defined as
/opt/ikan/alm/workCopyand the Relative Work Copy Location as "workCopy" results in/opt/ikan/almas Work Copy Path Prefix.The IKAN ALM Agent will try to Secure Copy the sources from a location under
/opt/ikan/alm/workCopy.Build Archive Path Prefix
Enter the prefix for the Build Archive Location (the location where the Builds are stored or retrieved from). The Server Location will be formed by concatenating this prefix together with the Relative Location defined in the System Settings. See: System Settings
For an example, refer to Work Copy Path Prefix.
Script Path Prefix
Enter the prefix for the Script Location. The Server Location will be formed by concatenating this prefix together with the Relative Location defined in the System Settings. See: System Settings
For an example, refer to Work Copy Path Prefix.
Phase Catalog Path Prefix
Enter the prefix for the Phase Catalog Location (the location on the IKAN ALM Server where imported and newly created Phases are stored).
When an IKAN ALM Agent/Server needs to install a missing Phase, it uses this prefix and the Relative Phase Catalog Location defined in the System Settings to construct a path to copy the missing Phase from.
-
-
Once you filled out the fields as required, click Create.
The newly created Secure Shell Transporter is added to the Secure Shell Transporter Overview.
The Secure Shell Transporters Overview Screen
-
In the Global Administration context, select Transporters> Overview.
The overview of all defined Transporter Protocols is displayed.
-
Specify Secure Shell in the Type field on the search panel.
The following screen is displayed:
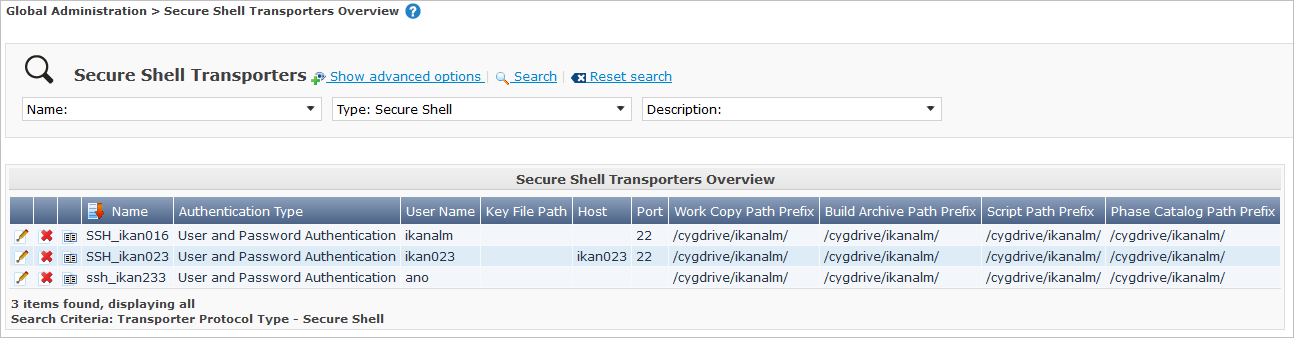
If required, use the other search criteria to refine the items displayed on the overview.
The following options are available:
-
click the Show/hide advanced options link to display or hide all available search criteria,
-
the Search link to refresh the list based on the current search criteria,
-
the Reset search link to clear the search fields.
-
-
Verify the information on the Secure Shell Transporters Overview panel
For a detailed description of the fields, refer to Creating a Secure Shell Transporter.
-
Depending on your access rights, the following links may be available on the Machines Overview panel:
Edit
This option is available to IKAN ALM Users with Global Administrator Access Rights. It allows editing a Secure Shell Transporter definition.
Delete
This option is available to IKAN ALM Users with Global Administrator Access Rights. It allows deleting a Secure Shell Transporter definition.
History
This option is available to all IKAN ALM Users. It allows displaying the History of all create, update and delete operations performed on a Secure Shell Transporter.
Editing a Secure Shell Transporter Definition
-
In the Global Administration context, select Transporters > Overview.
The overview of all defined Transporter Protocols is displayed.
Use the search criteria on the search panel to display the Secure Shell Transporter Protocols your are looking for.
-
Click the
Edit link to change the selected Secure Shell Transporter.The following screen is displayed:
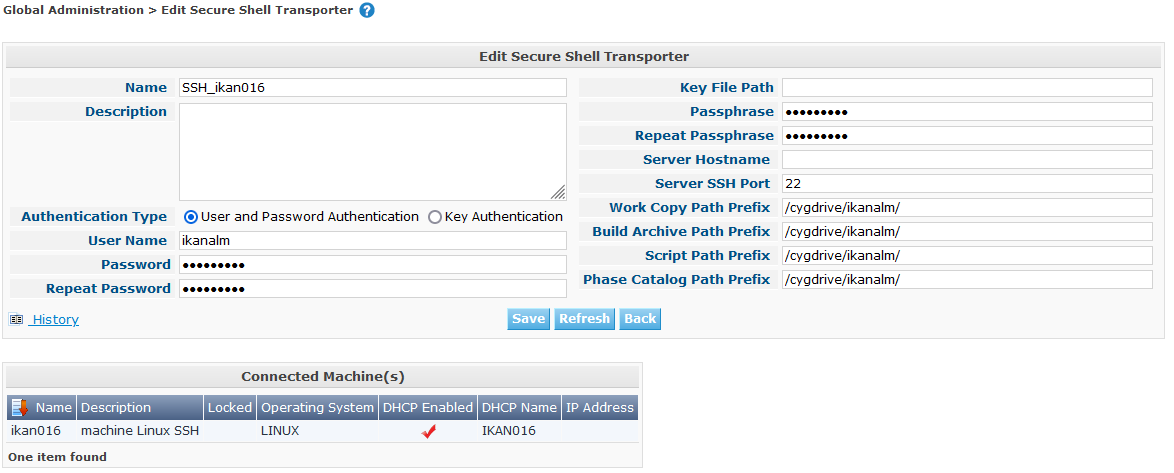
-
Edit the fields as required.
For a description of the fields, refer to Creating a Secure Shell Transporter.
The Connected Machine(s) panel displays the Machines the Transporter is linked to.
-
Click Save to save your changes.
You can also click:
-
Refresh to retrieve the settings from the database.
-
Back to return to the previous screen without saving the changes
-
Deleting a Secure Shell Transporter Definition
-
In the Global Administration context, select Transporters > Overview.
The overview of all defined Transporter Protocols is displayed.
Use the search criteria on the search panel to display the Secure Shell Transporter Protocols your are looking for.
-
Click the
Delete link to delete the selected Secure Shell Transporter.If the Secure Shell Transporter is not linked to any Machine, the following screen is displayed:
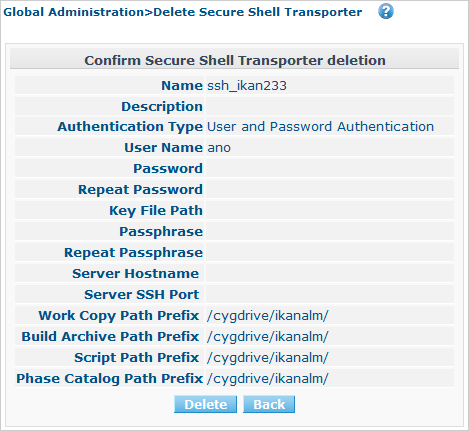
-
Click Delete to confirm the deletion.
You can also click Back to return to the previous screen without deleting the entry.
Note: If the Secure Shell Transporter is linked to one or more Machines, the following screen is displayed:
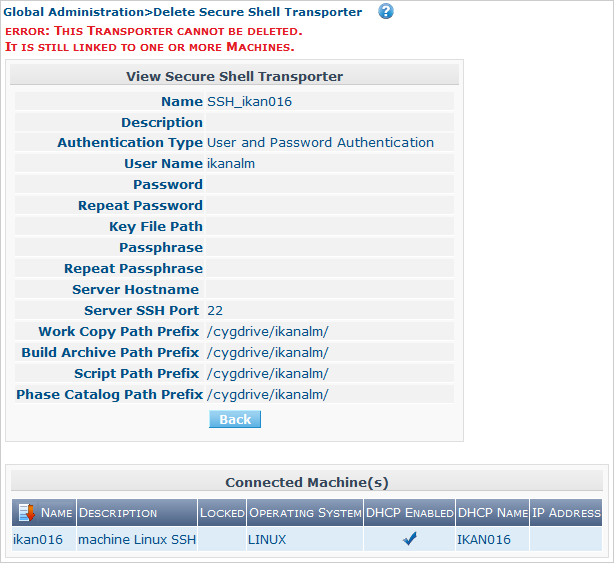
You must change the definition of the listed Machines, before you can delete the Secure Shell Transporter.
Viewing the Secure Shell Transporter History
-
In the Global Administration context, select Transporters > Overview.
The overview of all defined Transporter Protocols is displayed.
Use the search criteria on the search panel to display the Secure Shell Transporter Protocols your are looking for.
-
Click the
History link to display the Secure Shell Transporter History View.For more detailed information concerning this History View, refer to the section History and Event Logging.
-
Click Back to return to the Secure Shell Transporters Overview screen.