Phases
When IKAN ALM is running Level Requests, Builds and Deploys, all actions are performed by executing a sequence of Phases. Those Phases are defined in the IKAN ALM database and can be consulted and manipulated in the Phases section of the Global Administration interface. Once they have been defined in Global Administration, Phases may be linked to Levels, Build or Deploy Environments in the Project Administration context.
The IKAN ALM core functionality is performed by so-called "Core" Phases. Those Core Phases can only be viewed, and cannot be altered nor deleted. Consider them an integral part of IKAN ALM.
You can extend this core functionality by creating your own Phases. There are two options:
-
Create a Phase from scratch using the "Create Phase" functionality. In that case, you first specify the name and the version of the Phase, and, next, you choose the script or scripts to be executed by the Phase.
-
Import a Phase that has already been created via the "Import Phase" functionality.
Refer to the following sections for detailed information:
For a complete explanation of the concept of Phases, refer to Phases - General Information.
Creating a Phase Definition
|
This option is only available if you have Global Administrator Access Rights in IKAN ALM. |
-
In the Global Administration context, select Phases > Create.
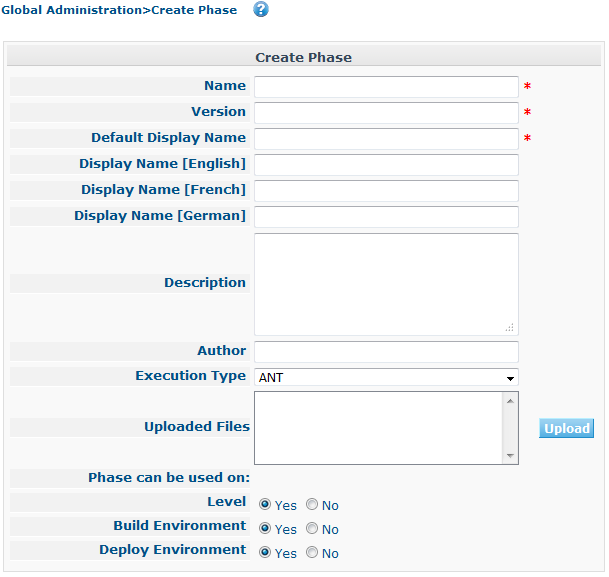
The following screen is displayed.
-
Fill out the fields in the Create Phase panel at the top of the screen. Fields marked with a red asterisk are mandatory:
Field Meaning Name
The name of the Phase.
This must be a unique name so choose it carefully. A good practice is to use a "reverse DNS" notation, like for example: "com.mycompany.phases.ant.deployToTomcat".
The name may contain the following characters:
-
letters
-
numbers
-
._-
All other characters (including whitespaces) are illegal and will result in a validation error.
This field is mandatory and cannot be changed after the creation of the Phase.
Version
The version of the Phase.
Together with the Phase name, this field forms the unique identifier of the Phase. As a result, there can only be one Phase defined with a certain name and version.
The version needs to conform to the following format:
[0-9]+(\.[0-9]+(\.[0-9]+(\.[0-9A-Za-z_-]+)?)?)?For example, the following versions are legal:
-
1.0
-
1.0.0
-
1.0.0.0
-
1.0.0.0-beta2
The following versions are NOT legal:
-
1.
-
beta2
-
1.0.0-beta2
Default Display Name
The name of the Phase as it will be displayed in the IKAN ALM user interface, e.g., on the Level Request Detail screen or on the Build Environment Phases Overview screen.
This default name will be used when no language-specific display name is provided.This field is mandatory.
Display Name [English]
The English name of the Phase as it will be displayed in the IKAN ALM user interface for a User whose language is set to English in his or her Personal Settings. See: Personal Settings
This field is optional.
Display Name [French]
The French name of the Phase as it will be displayed in the IKAN ALM user interface for a User whose language is set to French in his or her Personal Settings. See: Personal Settings
This field is optional.
Display Name [German]
The German name of the Phase as it will be displayed in the IKAN ALM interface for a User whose language is set to German in his or her Personal Settings. See: Personal Settings
This field is optional.
Description
The description for the new Phase.
This field is optional.
Author
The author of the Phase.
For example, the name of the User creating the Phase or the company he is working for.
This field can be useful when searching for Phases.
This field is optional.
Execution Type
Select the Scripting Tool type that will be used to execute the scripts that are contained in this Phase.
The possible values are:
-
ANT
-
GRADLE
-
NANT
-
MAVEN2
This field is mandatory and cannot be changed after the creation of the Phase.
-
-
Once you have filled out the above mentioned fields, you need to upload the script file(s).
Click the Upload button.
A file selection window will open.
-
Select the scripts that will be used to execute the Phase.
Note: You can select only one file.
-
If there is only one script file to be uploaded, you simply select that script file.
-
If the Phase needs multiple files for its execution, you must first archive those files into a .zip or a .tar.gz file, and then select that file. IKAN ALM will extract the archive file, and show its contents in the Uploaded Files field.
When the upload has succeeded, the following message is displayed:

-
-
Select the “main” script.
As the message suggests, you must now select the "main" script in the list of uploaded files. This is the script that will actually be called when the Phase is executed.
When the upload has succeeded and the main script is selected, the Create and Reset buttons will become available.
-
Indicate where the Phase can be used.
Select the appropriate option(s).
There are three possibilities:
-
On Levels
-
On Build Environments
-
On Deploy Environments
-
-
Click Create to create the Phase.
When clicking the Create button, the Phase is created in the Phase Catalog and added to the Phases Overview panel.
The location of the Phase Catalog is specified in the System Settings. System Settings
You can also click Reset to clear the fields and restore its initial values.
RELATED TOPICS
|
The Phases Overview Screen
-
In the Global Administration context, select Phases > Overview.
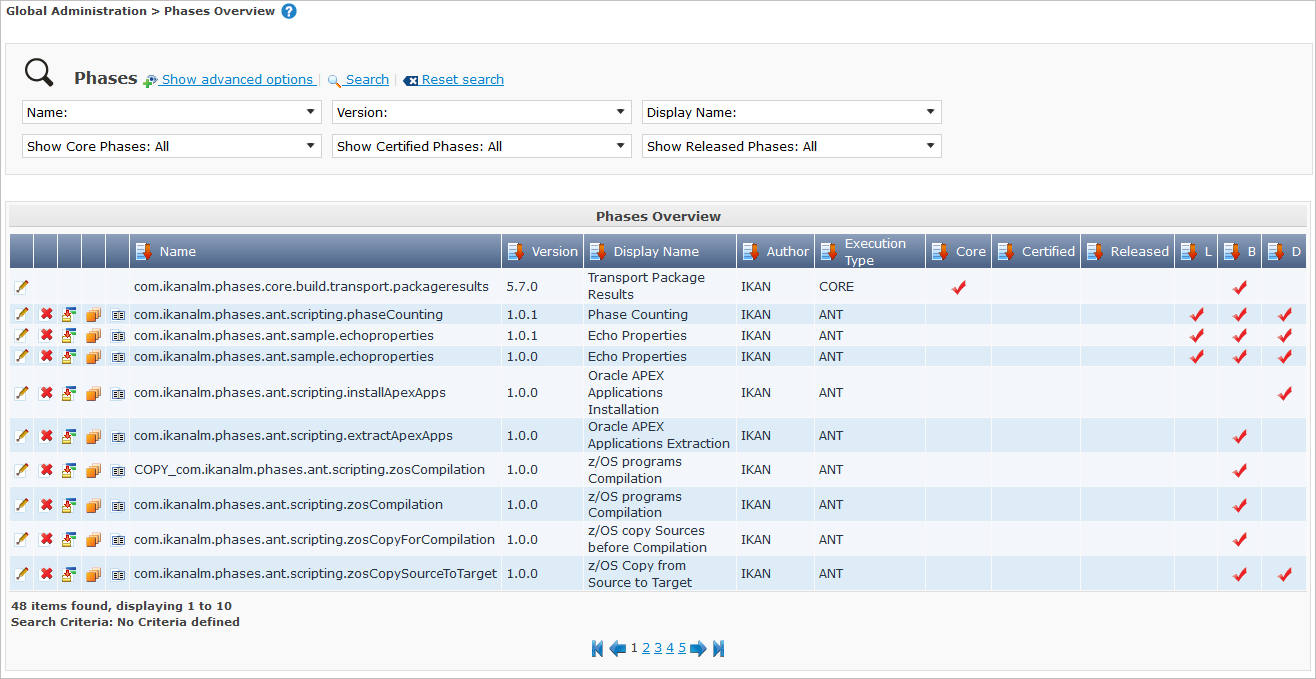
The following screen is displayed:
-
Define the required search criteria on the search panel.
The list of items on the overview will be automatically updated based on the selected criteria.
You can also:
-
click the Show/hide advanced options link to display or hide all available search criteria,
-
click the Search link to refresh the list based on the current search criteria,
-
click the Reset search link to clear the search fields.
-
-
Verify the information on the Phases Overview panel.
For a detailed description of the fields, refer to Creating a Phase Definitionand Editing a Phase Definition.
-
Depending on your access rights, the following links may be available on the Phases Overview panel:
 __
__Edit
This option is available to IKAN ALM Users with Global Administrator Access Rights. It allows editing a Phase.

Delete
This option is available to IKAN ALM Users with Global Administrator Access Rights. It allows deleting a Phase.

Export
This option is available to IKAN ALM Users with Global Administrator Access Rights. It allows exporting a Phase.

Copy
This option is available to IKAN ALM Users with Global Administrator Access Rights. It allows copying a Phase.

History
This option is available to all IKAN ALM Users. It allows displaying the History of all create, update and delete operations performed on a Phase.
Columns marked with the
 icon can be sorted alphabetically (ascending or descending).
Editing a Phase Definition
The Phase Info panel lets you edit the definition of a Phase.
Underneath this panel, the Phase Parameters panel is displayed allowing you to create, edit, delete and mass edit Phase Parameters.
For more detailed information on Phase Parameters, refer to the following sections:
-
In the Global Administration context, select Phases > Overview.
-
On the Phases Overview panel, click the
Edit link in front of the Phase you want to edit.
The following screen is displayed: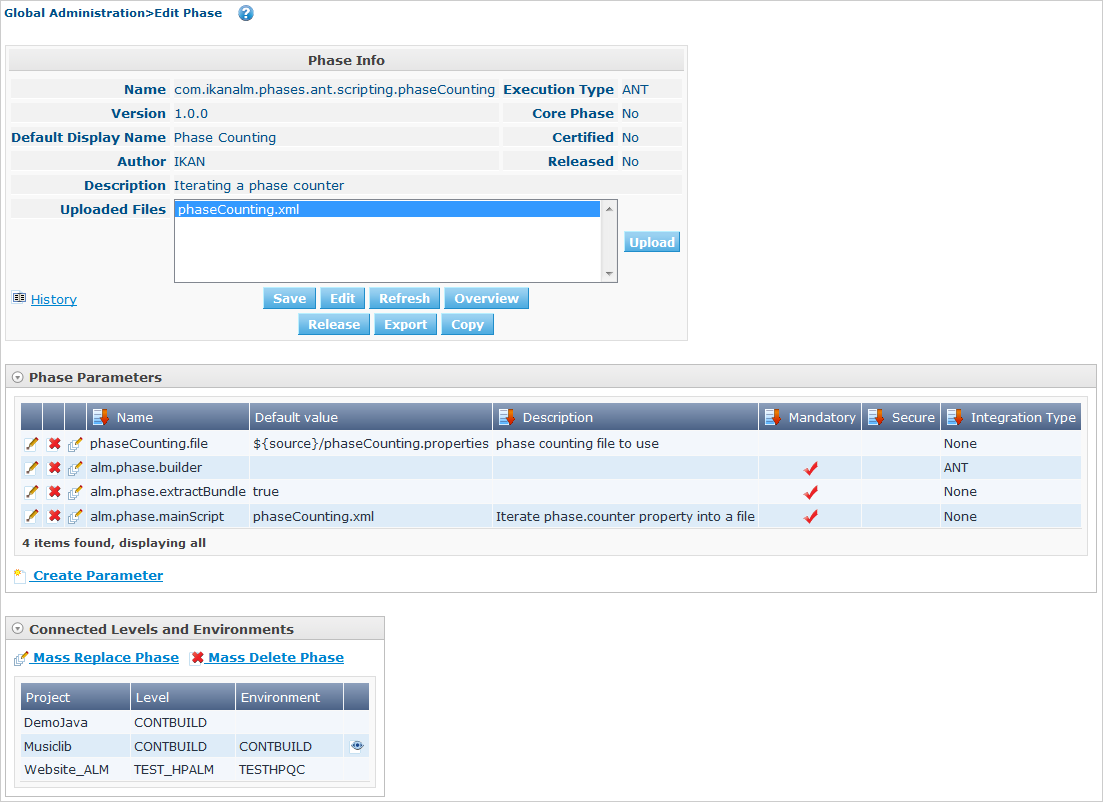
-
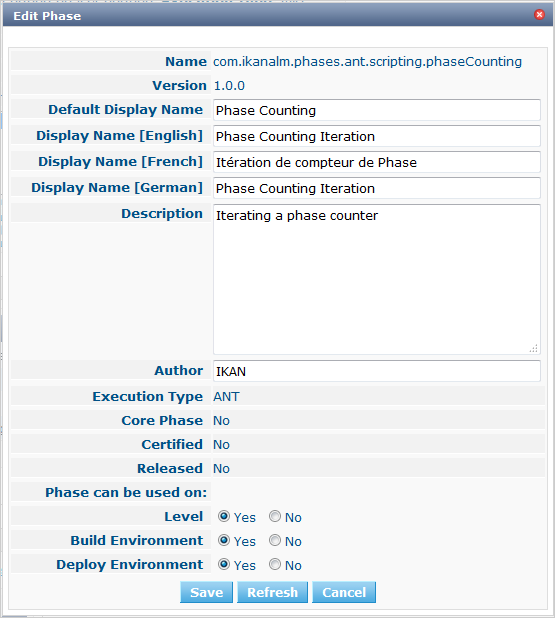
Click the Edit button to modify the Phase. The Edit Phase pop-up window is displayed.
For a description of the fields, refer to Creating a Phase Definition.
The following additional fields are displayed on this screen:
Field Meaning Core Phase
This field indicates whether a Phase is a Core Phase or not.
A Core Phase is an internal IKAN ALM Phase that performs some core functionality (e.g., the Retrieve Code Phase).
It cannot be edited nor deleted.
For more information, refer to Phases - General Information.
Certified
This field indicates whether a Phase is Certified or not.
A Certified Phase is a Phase that has been tested and approved by IKAN.
It cannot be modified and its parameters cannot be deleted.
For more information, refer to Phases - General Information.
Released
This field indicates whether a Phase has been Released or not.
A Phase that has not been released is regarded as being in development, i.e., its script(s) and other containing files may be changed.
To facilitate Phase development, IKAN ALM will automatically re-install a non-released Phase just before it is executed. Once a Phase has been released, its contents (scripts) cannot change anymore, so the Upload button will not be available.
For more information, refer to Phases - General Information.
The Name and Version fields are not editable. If you want to rename a Phase or change its version, you must first copy it, and then delete the original Phase.
For more information, refer to the section Copying a Phase Definition.
-
Verify the uploaded files
The Uploaded Files field lists the current contents of the Phase.
If you want to alter the contents, click the Upload button and choose a script file or an archive file. The new uploaded files will be shown in the Uploaded Files list.
The new uploaded files will REPLACE the old files; they are not added to the current contents of the Phase!
The new uploaded files will only be persisted when you click the Save button. To redisplay the originally uploaded files, click the Refresh button.
For more information on uploading files, refer to the section Creating a Phase Definition.
-
Verify the Phase parameters.
The Phase Parameters panel displays all the defined Parameters of the Phase.
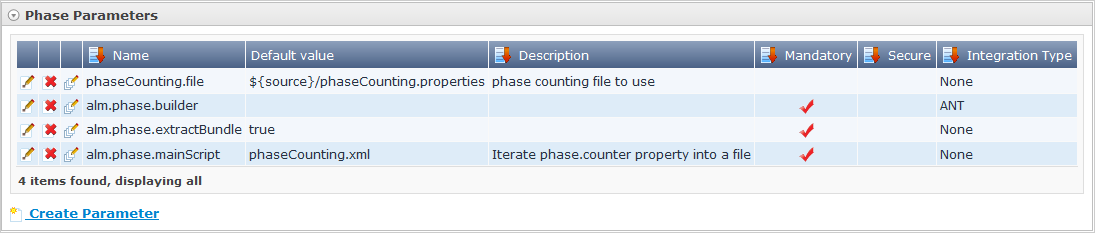
For a detailed description of the fields, refer to the section Creating Phase Parameters.
The following links are available on the Phase Parameters panel:
Edit
This option allows editing a Phase Parameter.
Delete
This option allows deleting a Phase Parameter.

Mass Edit
This option allows editing the values of a Parameter in its connected Environments.
You can also add a new parameter, by clicking the Create Parameter link underneath the Phase Parameters panel. For more information, refer to the section Creating Phase Parameters.
-
Verify the connected Environments.
The Connected Levels and Environments panel shows the Levels and Build or Deploy Environments where this Phase has been added.
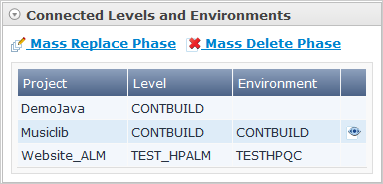
When the Environment field is empty, this means that the Phase has been added to the Level.
For more information on mass replacing and mass deleting Phases, refer also to the sections Mass Replacing Phases and Mass Deleting Phases.
-
On the Edit Phase panel, click Save to save your changes.
When clicking the Save button, the Phase’s data are persisted and you will be redirected to the Phases Overview screen.
Meanwhile, IKAN ALM re-packages the uploaded files in a .jar file and replaces the existing .jar file in the Phase Catalog location (as defined in the System Settings) with the new .jar file. There, it is ready to be picked up by an IKAN ALM Server or Agent Daemon process when the Phase needs to be (re-)installed on an IKAN ALM Server or Agent.
You can also click:
-
Refresh to retrieve the settings from the database.
-
Overview to return to the previous screen without saving the changes.
-
Release to release the Phase.
When clicking the Release button, a confirmation pop-up window is displayed.
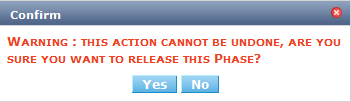
Click Yes to confirm the release of the Phase.
As a result, the “Released” flag of the Phase will be set. Once a Phase has been released, its contents cannot be changed anymore, so the Upload button will no longer be available. The idea is that the behavior of the Phase is "frozen". Phase Parameters of a released Phase, however, can still be created, edited and deleted.
If you need to upload new scripts for a Phase after it has been released, you must first copy the Phase and give the copy a different name and/or version, and then upload the new scripts for that new Phase. For more information, refer to the section Copying a Phase Definition.
-
Export to export the Phase. Exporting a Phase Definition
-
Copy to copy the Phase. Copying a Phase Definition
-
History to display the History of all create, update and delete operations performed on a Phase. Viewing the Phase History
-
The Phase Parameters Overview Screen
-
In the Global Administration context, select Phases > Overview.
The following screen is displayed.
-
Click the
Edit link in front of the required Phase on the Phases Overview panel.The Edit Phase screen is displayed.
Underneath the Phase Info panel, the Phase Parameters panel displays all defined parameters.
-
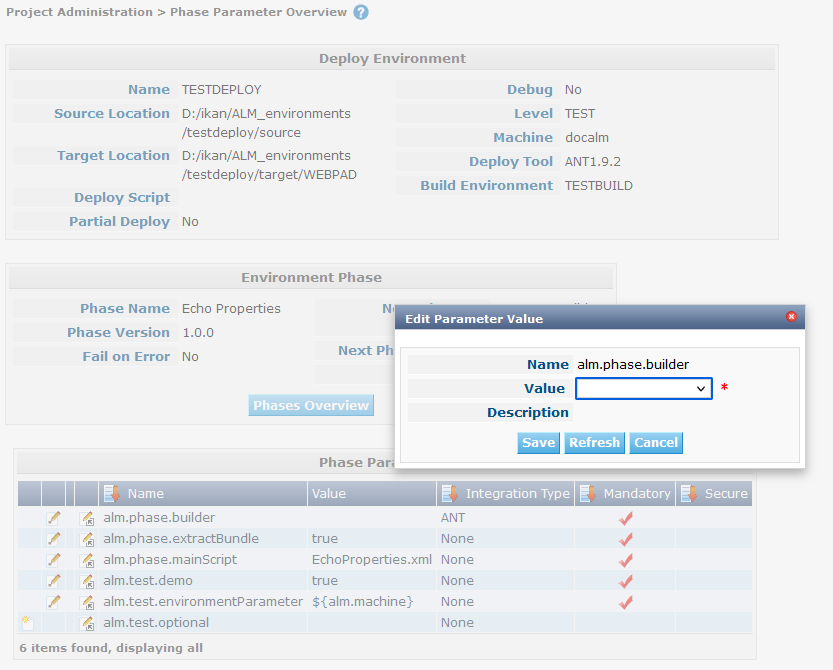
Verify the information on the Phase Parameters panel.
For a description of the fields, see Creating Phase Parameters.
The following links are available:
Link Description Edit
This option is available to all Users with Global Administrator Access Rights. It allows editing the selected Phase Parameter definition.
Delete
This option is available to all Users with Global Administrator Access Rights. It allows deleting the selected Phase Parameter definition.
Mass Edit
This option is available to all Users with Global Administrator Access Rights. It allows mass editing the selected Phase Parameter.
Columns marked with the
icon can be sorted alphabetically (ascending or descending).
Creating Phase Parameters
-
In the Global Administration context, select Phases > Overview.
-
Click the
Edit link in front of the required Phase on the Phases Overview panel.The Edit Phase screen is displayed.
-
Click the
 Create Parameter link at the bottom of the Phase Parameters panel.
The following pop-up window will be displayed:
-
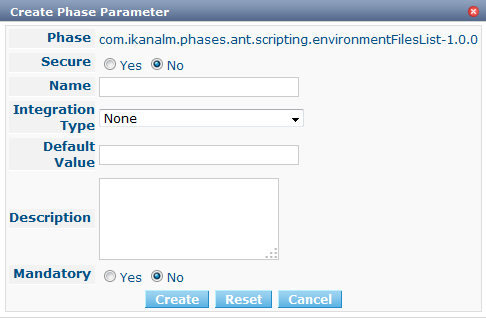
Fill out the fields in the Create Phase panel at the top of the screen. Fields marked with a red asterisk are mandatory:
Field Meaning Phase
Name + version of the Phase the Parameter is being created for.
This is a read-only field, displayed for informational purposes.
Secure
This field indicates whether the Parameter is secured or not.
This field is mandatory and cannot be changed after the creation of the Parameter.
Name
The name of the Parameter.
This field is mandatory.
Integration Type
This field indicates whether the value of the Parameter is a simple text value, or whether it represents a link (an integration) to an IKAN ALM object type.
The possible values are:
-
None: the value is simple text
-
Transporter: link to a Transporter
-
VCR: link to a Version Control Repository
-
ITS: link to an Issue Tracking System
-
Scripting Tool: link to a Scripting Tool
-
ANT: link to an Ant Scripting Tool
-
GRADLE: link to a Gradle Scripting Tool
-
NANT: link to a NAnt Scripting Tool
-
MAVEN2: link to a Maven2 Scripting Tool
When you select a type other than None, the Default Value field switches to a drop-down list where you can select a specific IKAN ALM object of that type. For example, if ANT is selected as Integration Type, the Default Value drop-down list will contain ANT Scripting Tools.
This field is only relevant for non-secured Parameters. If the Parameter is set to secured, this field is hidden and an Integration Type of None is assumed.
Default Value
This is the default value the Parameter will get when the Phase is added to an Environment and no value has been explicitly set.
This field is optional.
Repeat Default Value
Mandatory field for secured Parameters: repeat the secured default value.
Description
In this field, enter a description for the Parameter.
Mandatory
This field indicates whether the Parameter will always be created when adding the Phase to an Environment.
When a Mandatory Parameter is created, it will be automatically created in the Environments where this Phase has been added to.
When a non-Mandatory Parameter is set to Mandatory, it will also be automatically created in the Environments where this Phase has been added to.
-
-
Click Create to create the Phase Parameter.
When clicking the Create button, the Phase Parameter is created and the pop-up window closes. The new Parameter is added to the Phase Parameters panel.
You can also click:
-
Reset to clear the fields and restore its initial values.
-
Cancel to close the pop-up window without creating the Phase Parameter.
-
Editing Phase Parameters
-
In the Global Administration context, select Phases > Overview.
-
Click the
Edit link in front of the required Phase on the Phases Overview panel.The Edit Phase screen is displayed.
-
On the Phase Parameters panel, click the
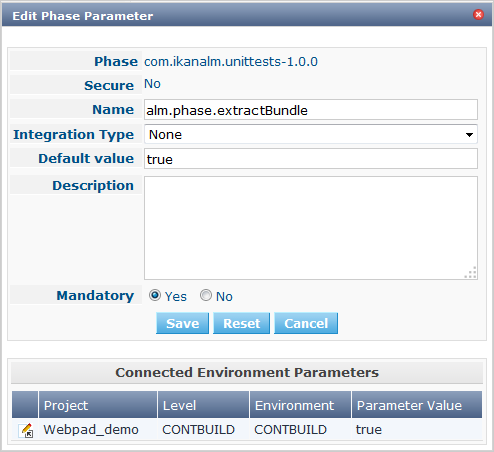
_Edit _link in front of the Parameter you want to edit.The following pop-up window will be displayed:
-
Edit the fields as required.
For a description of the fields, refer to Creating Phase Parameters.
-
Verify the connected Environment Parameters.
The Connected Environment Parameters panel shows the Environments where this Phase Parameter has been added to, and the values of the Parameter in those Environments.
An Environment is identified by its Project, Level, and, optionally, its Environment name. When the Environment field is empty, this means that the Phase has been added to the Level.
-
Click the
 Edit Environment Phase Parameter link next to an Environment Parameter.
The user will be redirected to the Phase Parameter Overview screen (in the Project Administration context) and the Edit Parameter Value pop-up window is opened.
-
Set the value of the Environment Parameter and click Save to save the value.
You can also click:
-
Reset to retrieve the settings from the database.
-
Cancel to return to the Phase Parameter Overview screen without saving a value. The Phase Parameters Overview Screen
To go back to the Edit Phase Parameter window (in the Global Administration context), click one of the
Edit Global Phase Parameter links.
-
Deleting Phase Parameters
-
In the Global Administration context, select Phases > Overview.
-
Click the
Edit link in front of the required Phase on the Phases Overview panel.The Edit Phase screen is displayed.
-
On the Phase Parameter panel, click the
_Delete _link in front of the Parameter you want to delete.The following pop-up window will be displayed:
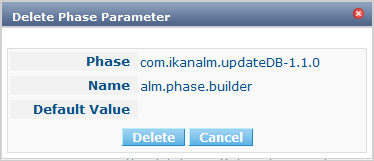
If the Parameter has been created in 1 or more Environments, the following Warning message is shown:

-
Click Delete to confirm the deletion.
The parameter will be removed from all connected Environments and from the Phase.
You can also click Cancel to close the pop-up window without deleting the Parameter.
Mass Editing Phase Parameters
-
In the Global Administration context, select Phases > Overview.
-
Click the
Edit link in front of the required Phase on the Phases Overview panel.The Edit Phase screen is displayed.
-
On the Phase Parameters panel, click the
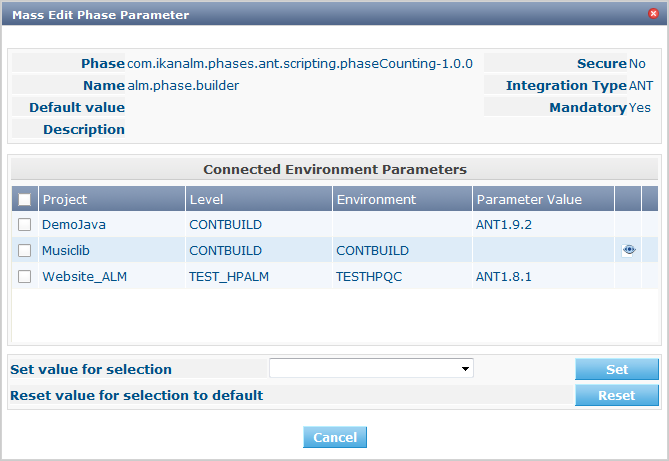
Mass Edit link in front of the Parameter you want to edit.The following pop-up window will be displayed, showing the different connected Environment Phase Parameters with the Project and Level or Build/Deploy Environment and the Parameter value.
If a label has been specified for a specific phase, you can display it by hovering the
 icon in the outer right column.
For more information on the usage of labels, refer to the section Inserting a Level Phase.
-
Select one or more items on the Connected Environment Parameters list.
-
Select or type a new value for the selected Parameters in the Set value for selection field, and click Set.
After confirming, the values of the selected Environment Phase Parameters will be set to the specified value.
If the Parameter is secured, the value has to be repeated in the Repeat Value field.
-
Click Reset.
After confirming, the values of the selected Environment Phase Parameters will be set to the default value of the Phase Parameter.
-
Click Delete.
After confirming, the selected Environment Phase Parameters will be removed from their Environments.
The Delete action is only available for non-mandatory Parameters.
-
Click Cancel to close the pop-up window.
Mass Replacing Phases
The Mass Replace Phase option allows you to replace a Phase in several Environments of different Projects at once, which can be useful when installing a new version of a Phase in multiple Projects. That is a much easier process than having to remove the Phase and insert the Replacement Phase in each Level, Build/Deploy Environment Phases Overview.
|
You need Global Administration Security Rights in order to execute a Mass Replace Phase. |
-
In the Global Administration context, select Phases > Overview.
-
Click the
Edit link in front of the required Phase on the Phases Overview panel.The Edit Phase screen is displayed.
-
On the Connected Levels and Environments panel, click the
 Mass Replace Phase link.
The Mass Replace Phase wizard is displayed. This wizard will guide you through the four steps of the Mass Replace Phase process.
-
STEP 1 - Select a Replacement Phase
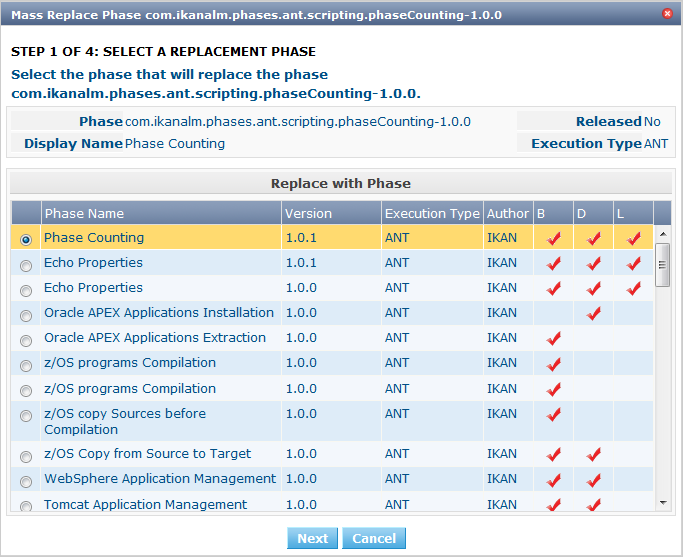
Select the Phase that will replace the original Phase from the Replace With Phase table and click the Next button.
-
STEP 2 - Select the Connected Levels and Environments

From the table of Connected Levels and Environments, select the Levels and Environments for which the original phase will be replaced by the phase you selected in step 1.
If you select the checkbox in the header, all Levels and Environments will be selected.
If a Phase has a Label for a specific Environment, you can check its contents by hovering the
icon. -
STEP 3 - Match Parameters
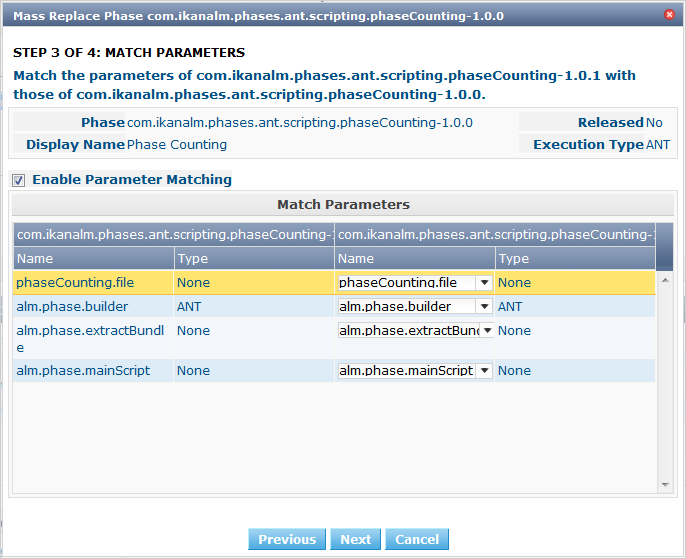
In this step you have to match the parameters of the original Phase with those of the Replacement Phase.
IKAN ALM will try to match parameters with an identical name and type. If needed, you can always correct those automatic matches, or match unlinked parameters by selecting the appropriate parameter from the drop-down list.
Matched parameters will get the value from the original Environment Parameter.
Unmatched parameters for which a default parameter has been specified, will be initialized using that parameter. If no default parameter has been specified, you can always specify it later. Mass Editing Phase Parameters
If you do not activate the Enable Parameter Matching option, the Environment Parameters will get the default value (if it has been set), or will stay empty.
Select Next if the parameter matching is OK.
-
STEP 4 - Confirmation Screen
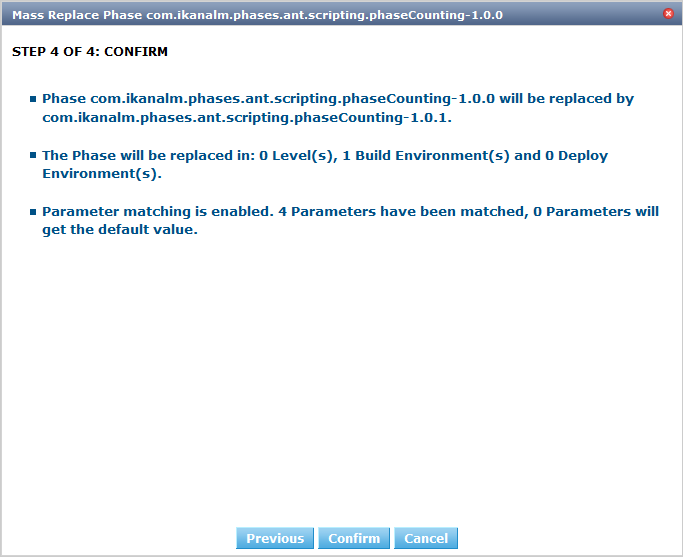
On the confirmation screen you can verify all the choices before actually replacing the phase:
-
the Phase that will replace the original Phase (selected in Step 1)
-
in how many Levels, Build and Deploy Environments it will be replaced (selected in Step 2)
-
how the Parameters will be matched (selected in Step 3)
Click the Confirm button to replace the Phase. Next, the Phase will be replaced in the different Environments.
-
-
Mass Deleting Phases
The Mass Delete Phase option allows you to delete a Phase in several Environments of different Projects at once. This is a much easier process than having to remove the Phase in each Level, Build/Deploy Environment Phases Overview.
|
You need Global Administration Security Rights in order to execute a Mass Delete Phase. |
-
In the Global Administration context, select Phases > Overview.
-
On the Phases Overview panel, click the
Edit link in front of the required Phase.The Edit Phase screen is displayed.
-
On the Connected Levels and Environments panel, click the
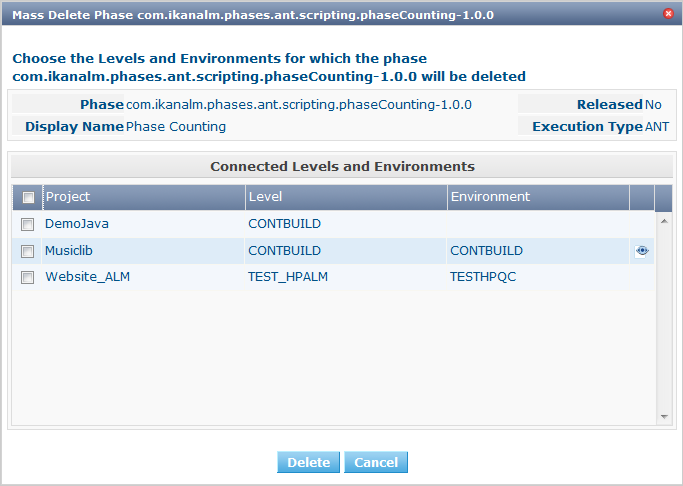
 Mass Delete Phase link.
The following pop-up window is displayed.
-
Select the Levels and/or Environments you want to delete the Phase from.
If you select the checkbox in the header, all Levels and Environments will be selected.
If a Phase has a Label for a specific Environment, you can check its contents by hovering the
icon. -
Click Delete.
After confirming, the selected Phase(s) will be removed from their Levels and/or Environments.
You can also click Cancel to return to the Edit Phase screen.
RELATED TOPICS
Deleting a Phase Definition
-
In the Global Administration context, select Phases > Overview.
-
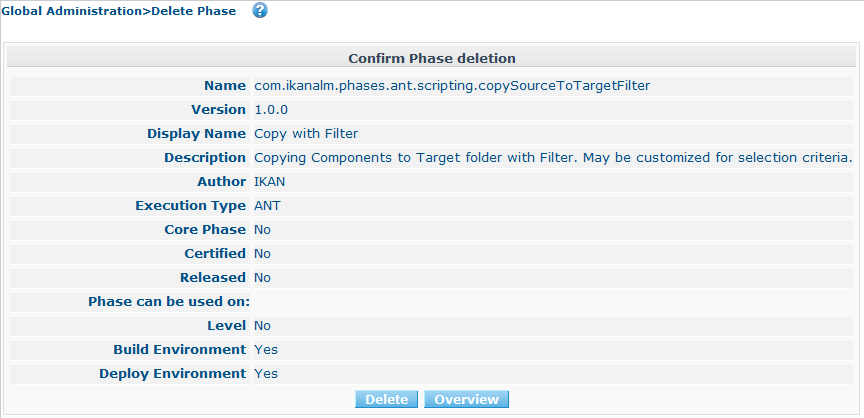
On the Phases Overview panel, click the
Delete link in front of the Phase you want to delete.The Confirm Phase deletion screen is displayed.
-
Click Delete to confirm the deletion.
You can also click Overview to return to the previous screen without deleting the Phase.
Note: If you try to delete a Phase connected to at least one Environment, the following message is displayed:

Before you can delete it, you must remove the Phase from all Environments it is connected to.
Deleting a Phase definition will also delete the corresponding .jar file from the Phase Catalog location.
Exporting a Phase Definition
-
In the Global Administration context, select Phases > Overview.
-
On the Phases Overview panel, click the
Export link in front of the Phase you want to export.IKAN ALM packages the Phase metadata and all the script files in a .jar file. A file dialog screen will be displayed, asking you where you want to save this .jar file.The exported .jar file can be used to import the Phase again in the future, possibly in another IKAN ALM installation. Importing a Phase Definition
Copying a Phase Definition
-
In the Global Administration context, select Phases > Overview.
-
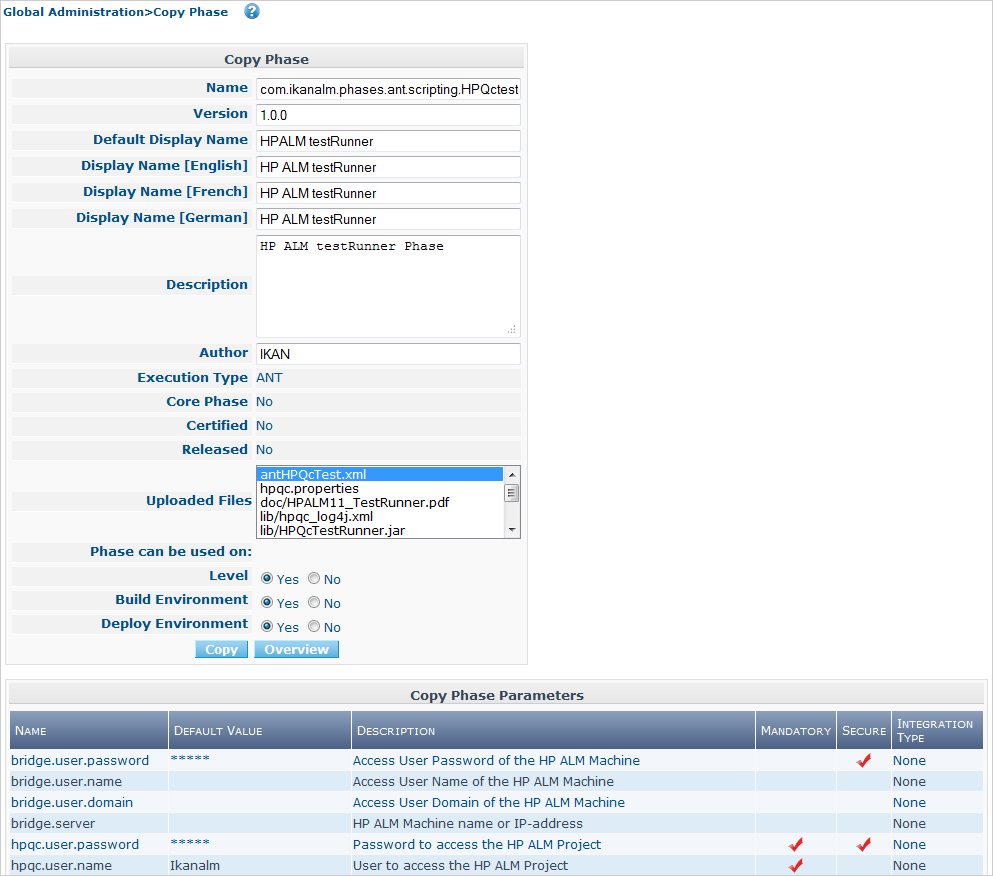
On the Phases Overview panel, click the
Copy link in front of the Phase you want to copy.The Copy Phase screen is displayed.
-
Modify the fields as required.
For a description of the fields, refer to the section Creating a Phase Definition.
The combination Name - Version must be unique, so at least one of those fields must be modified to be able to save the copy of the Phase. If you are upgrading the Phase, you (most likely) increment the Version value.
-
Verify the uploaded files.
The Uploaded Files field lists the current contents of the Phase. You cannot upload new files on this screen, you must first complete the copy, and then edit the Phase. Editing a Phase Definition
-
Verify the Phase Parameters.
The Copy Phase Parameters panel displays all the Parameters of the Phase that will be copied. All Parameters will be copied to the new Phase.
-
Click Copy to copy the Phase.
When you click Copy, a new Phase will be created with the specified properties: all the displayed Phase Parameters will be created, and the user is redirected to the Phases Overview screen.
You can also click Overview to return to the Phases Overview screen without saving the changes.
Viewing the Phase History
-
In the Global Administration context, select Phases > Overview.
-
On the Phases Overview panel, click the
History link in front of the Phase you want to display the history for.The Phase History View screen is displayed.
For more detailed information concerning this History View, refer to the section History and Event Logging.
-
Click Back to return to the Phases Overview screen.
Importing a Phase Definition
-
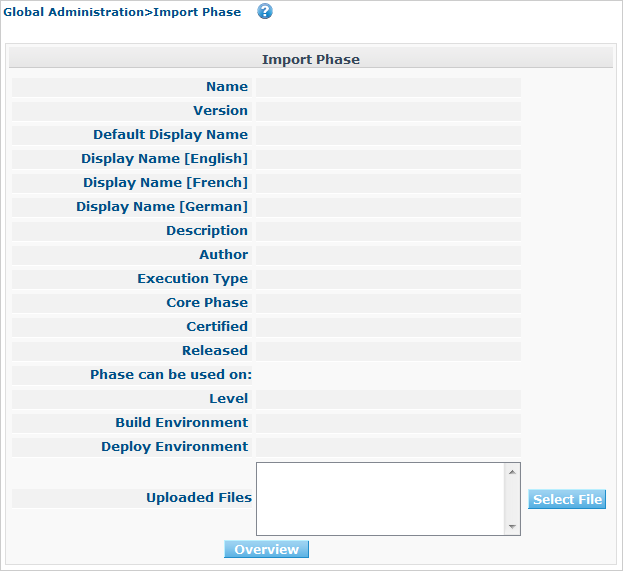
In the Global Administration context, select Phases > Import.
The Import Phase screen is displayed.
-
Click the Select File button to choose the Phase to be imported.
A file dialog window opens, where you can choose a .jar file that contains a previously exported Phase.
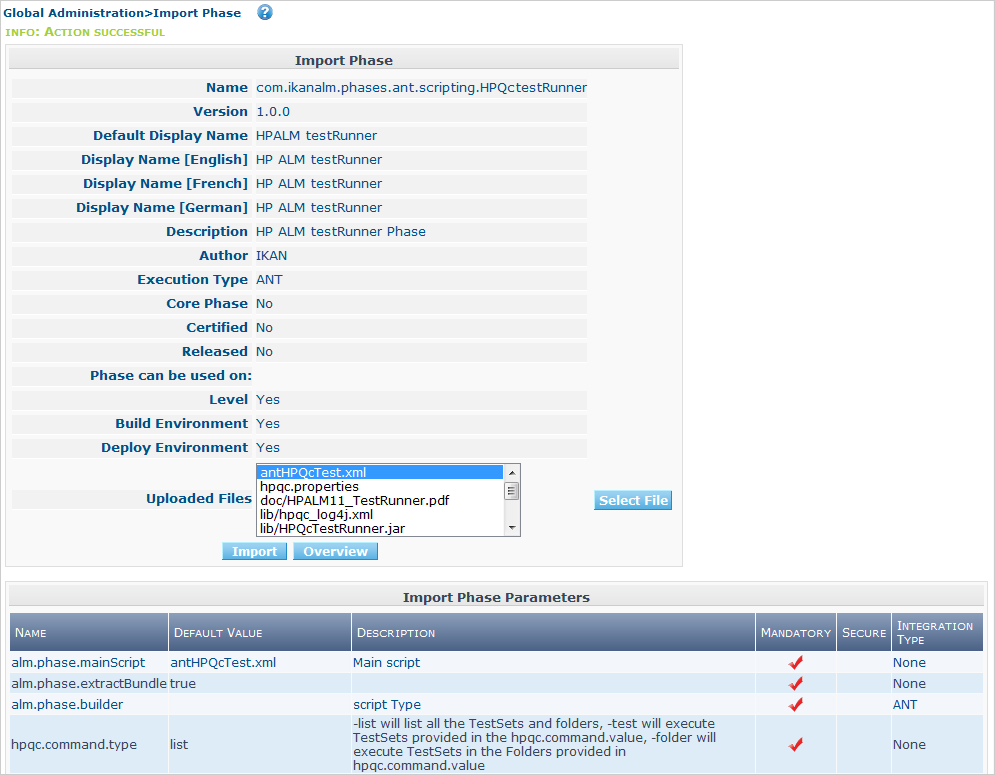
Once you have selected a file, it will be uploaded and the Phase information contained in it will be read and then be displayed:
-
Verify the properties of the Phase to be imported.
All the properties of the Phase will be shown in the fields. For a description of the fields, refer to the sections Creating a Phase Definitionand Editing a Phase Definition.
The scripts and other files contained within the Phase are shown in the Uploaded Files field.
The Import Phase Parameters panel shows the defined Parameters of the Phase that will be imported.
-
Click Import to import the Phase.
When clicking Import, the Phase and its Parameters are created in the IKAN ALM database. The scripts and other files contained within the Phase are packaged into a .jar file and copied to the Phase Catalog location (as defined in the System Settings).
You can also click Overview to return to the Phases Overview screen without importing the Phase.