Level Requests
Level Requests are action requests in relation to a Level.
From a logical point of view, they are requests to create a Build on a Build Level, to deliver a Build to the next Level (Test or Production) or to rollback a Build on a Level (Test or Production) defined in the applicable Lifecycle.
From a physical point of view, Level Requests can match a Build with or without a Deploy, a Rebuild with or without a Deploy or just a Deploy.
The following sections describe these Level Request types in detail:
The following sections deal with the procedures involved when creating new Level Requests:
The following sections deal with the procedures involved when using the Level Requests Overview:
The following section deals with the Build History:
Level Request Action Flows
The following sections describe how Level Requests are handled once they have been created, with the default behavior as starting point. When adapting the Level Phase, the Build Environment Phase or the Deploy Environment Phase, this will result in an action flow differing from this default flow.
The following different action flows are possible, depending on the composition of the Level (the Level Type and the related Build and/or Deploy Environment(s)):
(Re)Build Level Requests
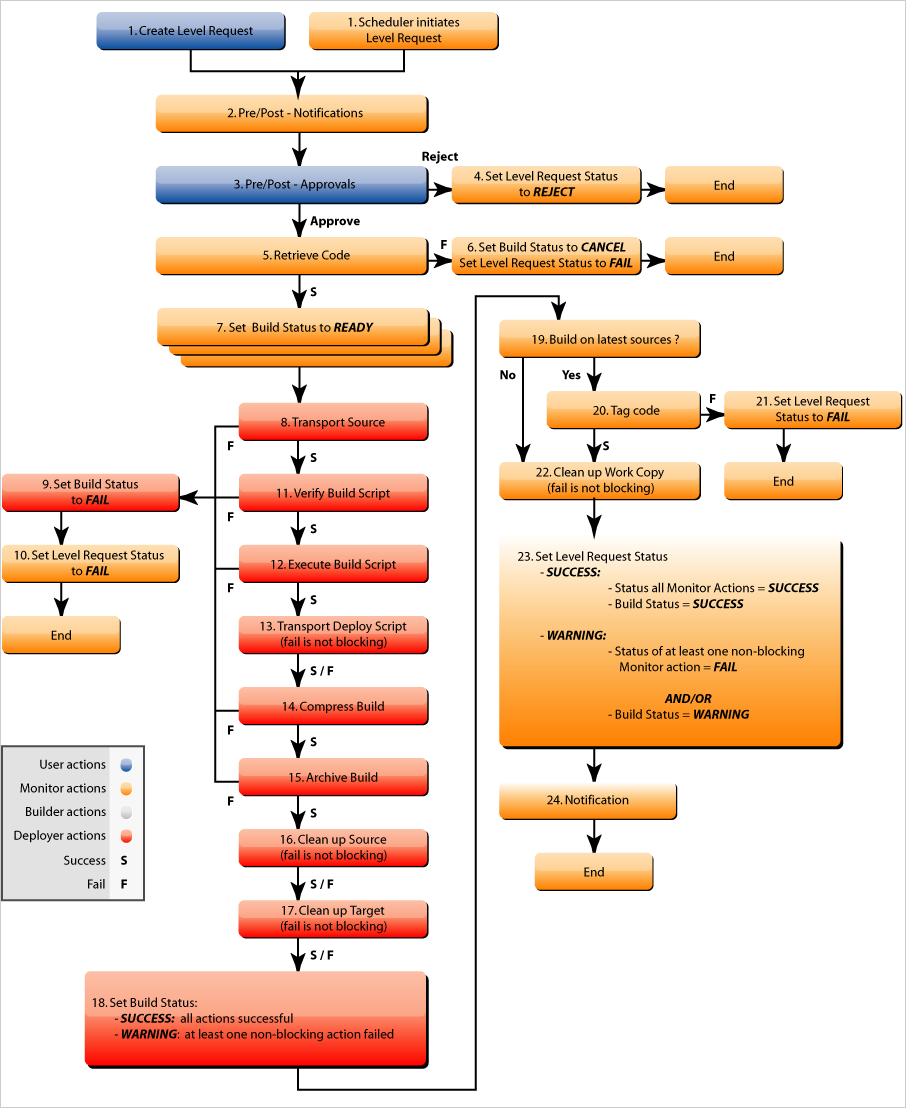
The following graphic displays the action flow of a Build Level Request or a Rebuild Level Request. If the Level Phase or the Build Environment Phase have been modified, the sequence of actions may be different.
The Build Level Request is generated for the first Level in a Lifecycle, e.g., a Level on which a Nightly Build (or even a Continuous Build) is executed to verify the stability of the latest sources in the VCR. Usually, such a Level has one Build Environment.
The Rebuild Level Request on a Level later on in the Lifecycle will not be executed on the latest sources, but on code that has already been tagged during the Build Level Request on a previous Level.
|
The main difference between a Build and a Rebuild is step 19. If the answer is No, the Build was not done with the latest sources, but with previous tagged sources and the Level Request is a Rebuild. If the answer is Yes, the build was done with the latest sources from the VCR and the Level Request is a Build. Other differences between Build and Rebuild are indicated in the table describing the action flow. |
| Step | Description |
|---|---|
1. |
A Level Request is created manually by the User (via the Web Interface or the Command Line) or automatically by the Scheduler. A Build Level Request directly goes on to step 5; a Rebuild Level Request may pass steps 2, 3 and/or 4. |
2. |
The Monitor Process on the IKAN ALM Server picks up the created Level Request and sends the required Pre- and Post-Notifications. This is an optional step in case of a Rebuild, since there are no Pre- or Post Notifications on a Build Level. If required, the Pre- and Post-Approval groups are defined on the Level Settings screen. |
3. |
The Monitor generates the required Pre- and Post-Approvals. This is an optional step in case of a Rebuild, since there are no Pre- or Post Notifications on a Build Level. If required, the Pre- and Post-Approval groups are defined on the Level Settings screen. |
4. |
As soon as one of the Approvals is rejected, the Monitor sets the Level Request status to Reject and the action flow is terminated. This step is optional in case of a Rebuild. |
5. |
If all Approvals of a Rebuild with Pre- or Post-Approval(s) are granted, and if the requested Date/Time is reached, the Monitor sets the Level Request status to Run and retrieves the Source Code from the VCR to a subdirectory of the Work Copy location on the IKAN ALM Server. This location is defined in the System Settings. If the Project Stream in which this Build is done, is Parent for one or more Child Project Streams, the Sources or the Build Result (depending on the Dependency Type) of these Child Project Streams will also be retrieved from the VCR, respectively from the Build Archive, to the Work Copy location. |
6. |
If the Retrieval process fails, the Monitor sets the Build Status of all Builds related to the Level Request to Cancel, the Level Request Status to Fail and the action flow is terminated. |
7. |
If the Retrieval process succeeds, the Monitor sets the Build Status of all Builds related to the Level Request to Ready. Since a (Re)Build Level Request may have more than one Build, steps 8 till 18 will be performed for each Build related to the Level Request. |
8. |
As the Build Status is set to Ready, the Builder Agent on the Machine(s) where a Build must be executed, picks up this Ready status and transports the Source Code from the Work Copy Location on the IKAN ALM Server to the Build Environment Source Location, defined on this Machine and for this Build Level. Which transport action (local FileCopy, remote FileCopy, SecureCopy or FTP) will be used depends on the type of Transporter that is linked to the Machine containing the Build Environment. Refer to the section Build Environments. If this process fails, steps 9 and 10 are performed. If this process succeeds, step 11 is performed. |
9. |
The Builder sets the Build Status to Fail. |
10. |
If the Monitor picks up the Fail Build Status, it sets the Level Request status to Fail as well and the action flow is terminated. |
11. |
If the Source Transport process succeeds, the Builder Agent verifies the Build Script. This process comprises two phases. In the first phase, the Builder Agent determines which Build Script must be used. If a specific Build Script was defined for the Build Environments, the Builder assumes it must locate and use this Build Script. If no specific Build Script was defined for the Build Environment, the Builder assumes it must locate and use the Build Script defined in the Project Settings. In the second phase, the Builder tries to locate the Build Script it has determined it must use during the first phase. First the Builder searches checked-out source code available in the Source Location of the Build Environment. If the Build Script is found, the Verify Build Script process succeeds and step 12 will be performed. If the Build Script is not found in the checked-out source code, the Builder searches the default IKAN ALM Script Location as defined in the System Settings. If the Build Script is found, it will be transported to the Build Environment Source Location defined on this Machine and for this Build Level. The same transport mechanism will be used as for the Source Code. The Verify Build Script process succeeds and step 12 will be performed. If the Build Script is not found here either, or if the transport process from the IKAN ALM Script Location does not succeed, the Verify Build Script action fails and steps 9 and 10 are performed. |
12. |
If the Build Script Verification process succeeds, the Builder Agent executes the Build Script. First, the Build Script is provided with the following parameters: Build Script Location, Source Location, Target Location, standard IKAN ALM parameters and user-defined Build Parameters. Then, the defined Build Tool for the Build Environment (Ant, Gradle, NAnt or Maven2) generates the Build artifacts (e.g., executables, libraries, …). The Build Script should include a copy mechanism that transfers minimum one Build artifact to the Target Location of the Build Environment. Only the Build artifacts in the Target Location will be available if the Build Result must be deployed later on. If this operation fails, steps 9 and 10 are performed. If this operation succeeds, step 13 is performed. |
13. |
If the Build Script is executed successfully, the Builder Agent checks if the Build result will be deployed on Levels higher up in the Lifecycle. This is the case when a Deploy Environment of such a Level is linked to the Build Environment on which this Build is executed. If that is the case, the Builder Agent will try to add the Deploy Script to the Build result. If a Deploy Script is available on the Build Source Location (as retrieved together with the Source Code from the VCR), this Deploy Script is copied to the Build Target Location. As the failure of this step is not blocking, step 14 is performed next, whether the operation was successful or not. |
14. |
The Builder Agent compresses the Build artifacts on the Build Environment Target Location. Depending on the Operating System of the IKAN ALM server holding the Build Archive, a *.zip or *.tar.tgz will be created. If this operation fails, steps 9 and 10 are performed. If this operation succeeds, step 15 is performed. |
15. |
The Builder Agent archives the Compressed Build to the Build Archive on the IKAN ALM Server. The Build Archive Location on the IKAN ALM Server is defined in the System Settings. Which transport action (local FileCopy, remote FileCopy, SecureCopy or FTP) will be used depends on the type of Transporter that is linked to the Machine containing the Build Environment. If this operation fails, steps 9 and 10 are performed. If this operation succeeds, step 16 is performed. |
16. |
The Builder Agent cleans up the Source Location on the Build Environment. This means that all files used to create the Build Result (Source files, Build Script and possibly Deploy Script) are deleted. If the Debug option is activated for a Build Environment, the Source Cleanup action will not be performed, so that the User may use the available sources to run the Build Script manually for testing purposes As the failure of this step is not blocking, step 17 is performed next, whether the operation was successful or not. |
17. |
The Builder Agent cleans up the Target Location on the Build Environment. This means that all available files (the uncompressed and compressed Build Result as well as the Deploy Script) are deleted. If Debug is activated for a Build Environment, the Target Cleanup action will not be performed, so that the user may inspect the Build Result on the Build Environment. As the failure of this step is not blocking, step 18 is performed next, whether the operation was successful or not. |
18. |
The Build Agent sets the Build Status. If all Builder actions (steps 8, 11, 12, 13, 14, 15, 16 and 17) were executed successfully, the Build Status will be set to Success. If Builder actions 13, 16 and/or 17 failed, the Build will be set to Warning. (If another action failed, the Build Status will be set to Fail as indicated by steps 9 and 10) |
19. |
The Monitor checks if the status of all Builds related to the Level Request have been set to Success or Warning. Then it verifies if the Build has been executed on the latest sources from the VCR, which is typical for the first Build Level in the Lifecycle of a Project Stream. In this case step 20 will be performed next. Otherwise, the Build has been executed on Code that was tagged before, and the Build is most likely a Rebuild based on tagged code, generated on the Build Environment belonging to a Test or Production Level. An exception is the Build on a Build Level in a Tag-based Project Stream: although it is not a Rebuild, this Build will always be executed on sources that have been tagged by the user before. In this case step 20 will also be skipped and the next step will be step 22. |
20. |
The Monitor tags the code in the VCR if the Build was executed on the latest sources. |
21. |
If the Tagging Process fails, the Monitor will set the Level Request status to Fail and the action flow is terminated. |
22. |
If the Tagging Process is successful or if it was skipped because the Code was already tagged, the Monitor cleans up the used subdirectories in the Work Copy Location on the IKAN ALM Server. This means that all files retrieved from the VCR or from the Build Archive are deleted. As the failure of this step is not blocking, step 23 is performed next, whether the operation was successful or not. |
23. |
The Monitor Process on the IKAN ALM Server determines the final Level Request status. The final Level Request Status is set to Success, if all Monitor actions (in yellow) were executed successfully and the Build Status has been set to Success. The final Level Request Status is set to Warning, if at least one non-blocking Monitor Action failed and/or the Build Status has been set to Warning. |
24. |
The required Notifications are sent. All Users belonging to the User Group with User Access Rights or the User Group with Admin Access Rights (both defined on the Project screen) receive the required notifications, as well as the Users having Request Rights on the Level. The Notification type (mail or none) and the Notification criteria (if Level Request Status is SUCCESS, FAIL, WARNING or ALWAYS) are defined in the sections Creating a Build Level, Creating a Test or Production Level or Editing a Level. |
(Re)Build and Deploy Level Requests
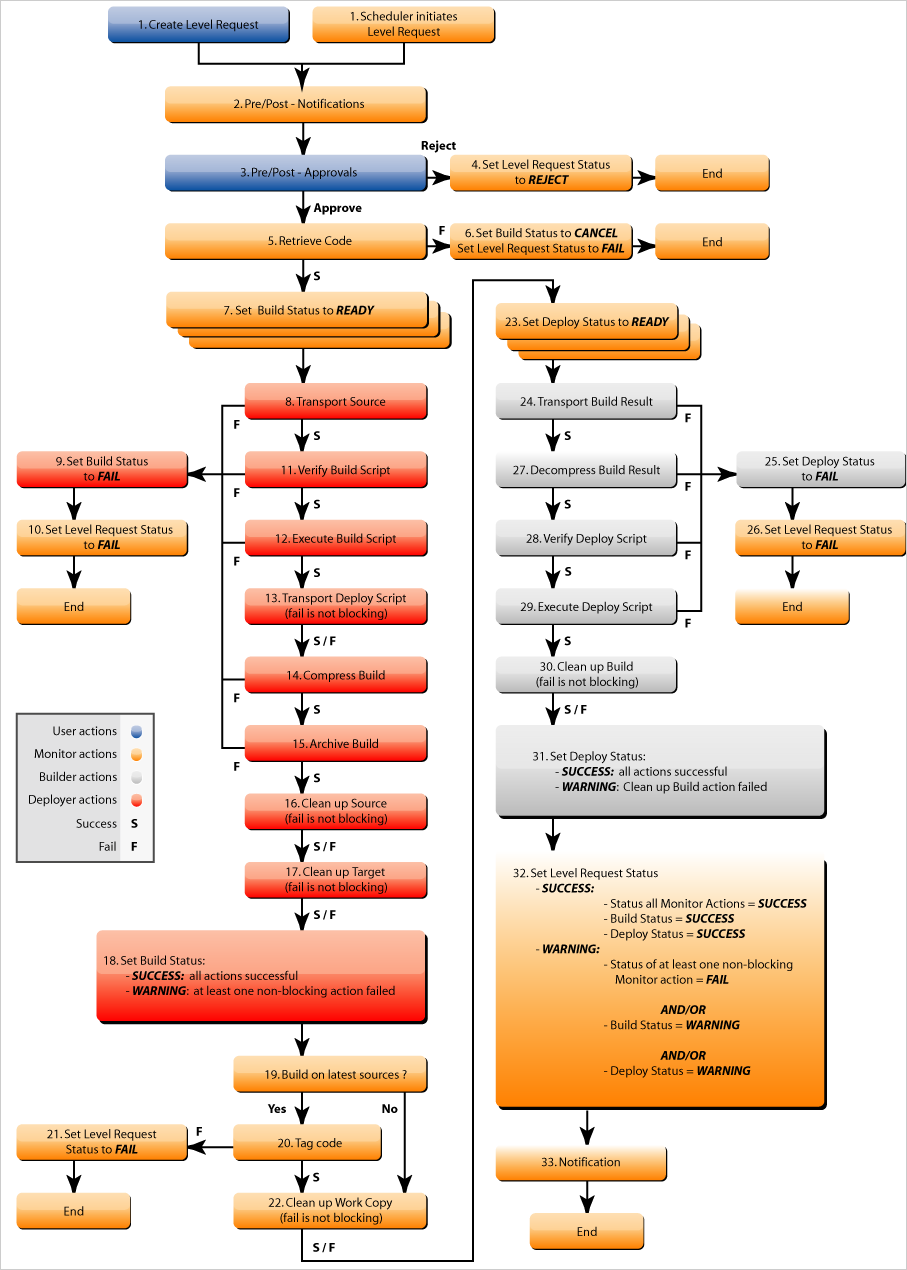
The following graphic displays the action flow of a Build and Deploy Level Request or a Rebuild and Deploy Level Request.
The (Re)Build and Deploy Level Request may be created on any Level in the Lifecycle, e.g., as a Build and Deploy Level Request on the (first) Build Level that has a Deploy Environment to directly deploy the Build Result of the latest sources for integration testing, or on a QA Test Level which is very similar to the Production Level, and where a Rebuild is done so that the Build Result may be deployed later on to a Production Level.
The following section describes the default Action Flow. If the Level Phases, the Build Environment Phase or the Deploy Environment Phase have been modified, the sequence of actions may be different.
|
The main difference between a Build and a Rebuild is step 19. If the answer is No, the build was not done with the latest sources, but with previous tagged sources and the Level Request is a Rebuild. If the answer is Yes, the build was done with the latest sources from the VCR and the Level Request is a Build. Other differences between Build and Rebuild are indicated in the table describing the action flow. |
| Step | Description |
|---|---|
1. |
A Level Request is created manually by the User (via the Web Interface or the Command Line) or automatically by the Scheduler. A Build Level Request directly goes on to step 5, a Rebuild Level Request may pass steps 2,3 and/or 4. |
2. |
The Monitor Process on the IKAN ALM Server picks up the created Level Request and sends the required Pre- and Post-Notifications. This is an optional step in case of a Rebuild, since there are no Pre- or Post Notifications on a Build Level. If required, the Pre- and Post-Notification groups are defined on the Level Settings screen. |
3. |
The Monitor generates the required Pre- and Post-Approvals. This is an optional step in case of a Rebuild, since there are no Pre- or Post Notifications on a Build Level. If required, the Pre- and Post-Approval groups are defined on the Level Settings screen). |
4. |
As soon as one of the Approvals is rejected, the Monitor sets the Level Request status to Reject and the action flow is terminated. This step is optional in case of a Rebuild |
5. |
If all Approvals of a Rebuild with Pre- or Post-Approval(s) are granted, and if the requested Date/Time is reached, the Monitor sets the Level Request status to Run and retrieves the Source Code from the VCR to a subdirectory of the Work Copy location on the IKAN ALM Server. This location is defined in the System Settings. If the Project Stream in which this Build is done, is Parent for one or more Child Project Streams, the Sources or the Build Result (depending on the Dependency Type) of these Child Project Streams will also be retrieved from the VCR, respectively from the Build Archive, to the Work Copy location. |
6. |
If the Retrieval process fails, the Monitor sets the Build and Deploy Status of all Builds and Deploys related to the Level Request to Cancel, the Level Request Status to Fail and the action flow is terminated. |
7. |
If the Retrieval process succeeds, the Monitor sets the Build Status of all Builds related to the Level Request to Ready. Since a (Re)Build and Deploy Level Request may have more than one Build, steps 8 till 18 will be performed for each Build related to the Level Request. |
8. |
As the Build Status is set to Ready, the Builder Agent on the Machine(s) where a Build must be executed, picks up this Ready status and transports the Source code from the Work Copy Location on the IKAN ALM Server to the Build Environment Source Location, defined on this Machine and for this Build Level. Which transport action (local FileCopy, remote FileCopy, SecureCopy or FTP) will be used depends on the type of Transporter that is linked to the Machine containing the Build Environment. Refer to the section Build Environments. If this process fails, steps 9 and 10 are performed. If this process succeeds, step 11 is performed. |
9. |
The Builder sets the Build Status to Fail. |
10. |
If the Monitor picks up the Fail Build Status, it sets the Level Request status to Fail as well, and the action flow is terminated. |
11. |
If the Source Transport process succeeds, the Builder Agent verifies the Build Script. This process comprises two phases. In the first phase, the Builder Agent determines which Build Script must be used. If a specific Build Script was defined for the Build Environments. The Builder assumes it must locate and use this Build Script. If no specific Build Script was defined for the Build Environment, the Builder assumes it must locate and use the Build Script defined on the Project Settings screen. In the second phase, the Builder tries to locate the Build Script it has determined it must use in the first phase. First it searches in the checked out source code available in the Source Location of the Build Environment. If the Build Script is found, the Verify Build Script process succeeds and step 12 will be performed. If the Build Script is not found in the checked out source code, the Builder searches the default IKAN ALM Script Location as defined in the System Settings. If the Build Script is found, it will be transported to the Build Environment Source Location defined on this Machine and for this Build Level. The same transport mechanism will be used as for the Source Code. The Verify Build Script process succeeds and step 12 will be performed. If the Build Script is not found here either, or if the transport process from the IKAN ALM Script Location does not succeed, the Verify Build Script action fails and steps 9 and 10 are performed. |
12. |
If the Build Script Verification process succeeds, the Builder Agent executes the Build Script. First, the Build Script is provided with the following parameters: Build Script Location, Source Location, Target Location, standard IKAN ALM parameters and user-defined Build Parameters. Then the defined Build Tool for the Build Environment (Ant, Gradle, NAnt or Maven2) generates the Build (e.g., executables, libraries,…). The Build Script should include a copy mechanism that transfers minimum one Build artifact to the Target Location of the Build Environment. Only the Build artifacts in the Target Location will be available if the Build Result must be deployed later on. If this operation fails, steps 9 and 10 are performed. If this operation succeeds, step 13 is performed. |
13. |
If the Build Script execution is successful, the Builder Agent checks if the Build result will be deployed in this Level (most likely, since it is a (Re)Build and Deploy Level Request), or on Levels higher up in the Lifecycle. This is the case when a Deploy Environment of this Level or of a higher Level is linked to the Build Environment on which this Build is executed. If that is the case, the Builder Agent will try to add the Deploy Script to the Build result. If a Deploy Script is available on the Build Source Location (as retrieved together with the Source Code from the VCR), this Deploy Script is copied to the Build Target Location. As the failure of this step is not blocking, step 14 is performed next, whether the operation was successful or not |
14. |
The Builder Agent compresses the Build artifacts on the Build Environment Target Location. Depending on the Operating System of the IKAN ALM Server holding the Build Archive, a *.zip or *.tar.tgz file will be created. If this operation fails, steps 9 and 10 are performed. If this operation succeeds, step 15 is performed. |
15. |
The Builder Agent archives the compressed Build to the Build Archive on the IKAN ALM Server. The Build Archive Location on the IKAN ALM Server is defined in the System Settings. Which transport action (local FileCopy, remote FileCopy, SecureCopy or FTP) will be used depends on the type of Transporter that is linked to the Machine containing the Build Environment. If this operation fails, steps 9 and 10 are performed. If this operation succeeds, step 16 is performed. |
16. |
The Builder Agent cleans up the Source Location on the Build Environment. This means that all files used to create the Build result (Source files, Build Script and possibly Deploy Script) are deleted. If the Debug option is activated for a Build Environment, the Source Cleanup action will not be performed, so that the User may use the available sources to run the Build Script manually for testing purposes. As the failure of this step is not blocking, step 17 is performed next, whether the operation was successful or not. |
17. |
The Builder Agent cleans up the Target Location on the Build Environment. This means that all available files (uncompressed and compressed Build Result as well as the Deploy Script) are deleted. If Debug is activated for a Build Environment, the Target Cleanup action will not be performed, so that the user may inspect the Build Result on the Build Environment. As the failure of this step is not blocking, step 18 is performed next, whether the operation was successful or not. |
18. |
The Build Agent sets the Build Status. If all Builder actions (steps 8, 11, 12, 13, 14, 15, 16 and 17) were executed successfully, the Build Status will be set to Success. If Builder actions 13, 16 and/or 17 failed, the Build Status will be set to Warning.(If another action failed, the Build Status will be set to Fail as indicated by steps 9 and 10). |
19. |
The Monitor checks if the status of all Builds related to the Level Request have been set to Success or Warning. Then it verifies if the Build has been executed on the latest sources from the VCR, which is typical for the first Build Level in the Lifecycle of a Project Stream. In this case, step 20 will be performed next. If the Build has been executed on Code that was ALREADY tagged, the Build is most likely a Rebuild based on tagged code, generated on the Build Environment belonging to a Test or Production Level. An exception is the Build on a Build Level in a Tag-based Project Stream: although it is not a Rebuild, this Build will always be executed on sources that have been tagged by the user before. In this case step 20 will also be skipped and the next step will be step 22. |
20. |
If the Build was executed on the latest sources, the Monitor tags the code in the VCR. |
21. |
If the Tagging Process fails, the Monitor will set the Level Request status to Fail and the action flow is terminated. |
22. |
If the Tagging Process is successful or if it was skipped because the Code was already tagged, the Monitor cleans up the used subdirectories of the Work Copy on the IKAN ALM Server. This means that all files retrieved from the VCR are deleted. As failure of this step is not blocking, step 23 is performed next, whether the operation was successful or not. |
23. |
The Monitor sets the Deploy Status of all Deploy actions to Ready. |
24. |
As the Deploy Status is set to Ready, the Deploy Agent on the Machine(s) where a Build must be deployed, picks up this Ready status. It then transports the compressed Build Result from the Build Archive to the Deploy Environment Source Location for this Level. Which transport action (local FileCopy, remote FileCopy, SecureCopy or FTP) will be used depends on the type of Transporter that is linked to the Machine containing the Deploy Environment. Refer to the section Deploy Environments. If this process fails, steps 25 and 26 are performed. If this process succeeds, step 27 is performed. |
25. |
The Deployer sets the Deploy Status to Fail. |
26. |
If the Monitor picks up one Deploy with Fail Status, it sets the Level Request status to Fail as well and the action flow is terminated. |
27. |
If the Transport Build Result process succeeds, the Deployer Agent decompresses the Build file (containing the result from a preceding Build action and the Deploy script) into the Deploy Environment Source Location. (This is the same location as to which the compressed Build was transported.) If this process fails, steps 25 and 26 are performed. If this process succeeds, step 28 is performed. |
28. |
If the Decompress process succeeds, the Deployer Agent verifies the Deploy Script. This process comprises two phases. In the first phase, the Deployer Agent determines which Deploy Script it must use. First, it verifies if a specific Deploy Script was defined for the Deploy Environment (Deploy Environments). If this is the case, the Deployer assumes it must locate and use this Deploy Script. If no specific Deploy Script was defined for the Deploy Environment, the Deployer assumes it must locate and use the Deploy Script defined on the Project Settings screen. If no Deploy Script was defined there either, the Verify Deploy Script process fails and steps 25 and 26 are performed. In the second phase, the Deployer tries to locate the Deploy Script it has determined it must use in the first step. First it searches the decompressed Build Result in the Source location of the Deploy Environment (Deploy Environments). If the Deploy Script is found, the Verify Deploy Script process succeeds and step 29 will be performed. If the Deploy Script is not found in the decompressed Build result, the Deployer searches the default IKAN ALM Script Location as defined in the System Settings. If the Deploy Script is found, it will be transported to the Deploy Environment Source Location, defined on this Machine and for this Level. The same transport mechanism will be used as for the Build Result. The Verify Deploy Script process succeeds and step 29 will be performed. If the Build Script is not found here either or the transport from the IKAN ALM Script Location does not succeed, the Verify Deploy Script action fails and steps 25 and 26 are performed. |
29. |
If the Verify Deploy Script process succeeds, the Deployer Agent executes the Deploy Script. The Deploy Script is provided with the following parameters: Source Location, Target Location, standard IKAN ALM Parameters and user-defined Deploy Parameters. The defined Deploy Tool (Ant, Gradle, NAnt or Maven2) for the Deploy Environment deploys the Build to the Target Location. If this operation fails, steps 25 and 26 are performed. If this operation succeeds, step 30 is performed. |
30. |
If the Deploy is successful, the Deploy Agent cleans up the Build Result on the Deploy Environment Source Location for this Level. If the Debug option is activated for a Deploy Environment, the Clean-up Build Result action will not be performed, so that the user may use the available Build Result to run the deploy script manually for testing purposes. As failure of this step is not blocking, step 31 is performed next, whether the operation was successful or not. |
31. |
The Deploy Agent sets the Deploy Status. If all Deployer actions (steps 24, 27, 28, 29 and 30) were executed successfully, the Deploy Status will be set to Success. If Deployer action 30 (Clean up Build) failed, the Deploy Status will be set to Warning. (If another action failed, the Deploy Status will be set to Fail as indicated by steps 25 and 26). |
32. |
As soon as the Monitor Process on the IKAN ALM Server finds that all Deploy actions connected to a Level Request have the Success or Warning Status, it determines the final Level Request status. The final Level Request Status is set to Success, if all Monitor actions (in yellow) were executed successfully and both the Build Statuses and the Deploy Statuses have been set to Success. The final Level Request Status is set to Warning, if at least one non-blocking Monitor action failed and/or the Build Statuses and/or the Deploy Statuses have been set to Warning. |
33. |
The required Notifications are sent. All Users belonging to the User Group with User Access Rights or the User Group with Admin Access Rights (both defined on the Project screen) receive the required notifications, together with the users that have Request Rights on the Level. The Notification type (mail or none) and the Notification criteria (if Level Request Status is SUCCESS, FAIL, WARNING or ALWAYS) are defined in the sections Creating a Build Level, Creating a Test or Production Level or Editing a Level. |
Deploy Level Requests
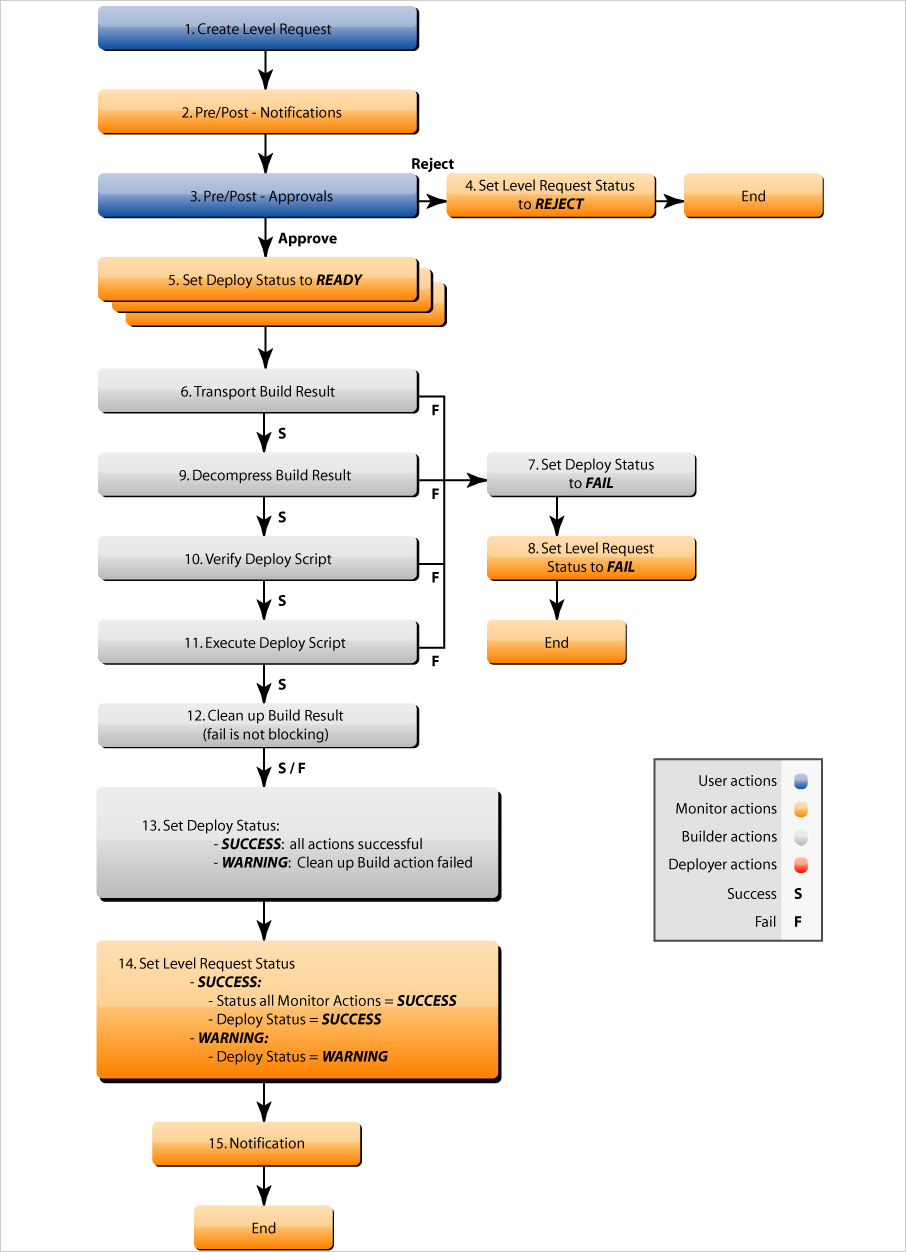
The following graphic displays the action flow of a Deploy Level Request.
The Deploy Level Request is always executed for a Level after the Build Level in a Lifecycle, e.g., a QA Test Level which is very similar to the Production Level, or the Production Level itself. Most often, such a Level has one or more Deploy Environments, and will reuse the Build Result that has been created on Levels with a Build Environment earlier in the Lifecycle.
|
The following section describes the default Action Flow. If the Level Phases or the Deploy Environment Phase have been modified, the sequence of actions may be different. |
| Step | Description |
|---|---|
1. |
A Level Request is created manually by the User (via the Web Interface or the Command Line) or automatically by the Scheduler. |
2. |
The Monitor Process on the IKAN ALM Server picks up the Level Request and optionally sends the required Pre- and Post-Notifications. The Pre- and Post-Notification groups are optionally defined on the Level Settings screen. |
3. |
The Monitor optionally generates the required Pre- and Post-Approvals. The Pre- and Post-Approval groups are optionally defined on the Level Settings screen. |
4. |
As soon as one of the Approvals is rejected, the Monitor sets the Level Request status to Reject and the action flow is terminated. |
5. |
When the Level Request is approved, and the requested Date/Time is reached, the Monitor sets the Level Request status to Run. Then the Monitor sets the Deploy Status of all Deploys related to the Level Request to Ready. Since a Deploy Level Request may have more than one Deploy, steps 6 till 10 will be performed for each Deploy related to the Level Request. |
6. |
As the Deploy Status is set to Ready, the Deploy Agent on the Machine(s) where a Build must be deployed, picks up this Ready status. It then transports the compressed Build Result from the Work Copy Location to the Deploy Environment Source Location defined on this Machine and for this Level. Which transport action (local FileCopy, remote FileCopy, SecureCopy or FTP) will be used depends on the type of Transporter that is linked to the Machine containing the Deploy Environment. Refer to the section Deploy Environments. If this process fails, steps 7 and 8 are performed. If this process succeeds, step 9 is performed. |
7. |
The Deployer sets the Deploy Status to Fail. |
8. |
If the Monitor picks up the Fail Deploy Status, it sets the Level Request status to Fail as well and the action flow is terminated. |
9. |
If the Transport Build Result succeeds, the Deployer Agent decompresses the Build File into the Deploy Environment Source Location. (This is the same location as the location to which the compressed Build was transported.) If this process fails, steps 7 and 8 are performed. If this process succeeds, step 10 is performed. |
10. |
If the Decompress process succeeds, the Deployer Agent verifies the Deploy Script. This process comprises two phases. In the first phase, the Deployer Agent determines which Deploy Script it must use. First, it verifies if a specific Deploy Script was defined for the Deploy Environments. If this is the case, the Deployer assumes it must locate and use this Deploy Script. If no specific Deploy Script was defined for the Deploy Environment, the Deployer assumes it must locate and use the Deploy Script defined on the projects Settings screen. In the second phase, the Deployer tries to locate the Deploy Script it has determined it must use during the first phase. First it searches the decompressed Build Result in the Source location of the Deploy Environment. If the Deploy Script is found, the Verify Deploy Script process succeeds and step 11 will be performed. If the Deploy Script is not found in the decompressed Build result, the Deployer searches the default IKAN ALM Script Location as defined in the System Settings. If the Deploy Script is found it will be transported to the Deploy Environment Source Location, defined on this Machine and for this Level. The same transport mechanism will be used as for the Build Result. The Verify Deploy Script process succeeds and step 11 will be performed. If the Deploy Script is not found here either or the transport from the IKAN ALM Script Location does not succeed, the Verify Deploy Script action fails and steps 7 and 8 are performed |
11. |
If the Verify Deploy Script process succeeds, the Deployer Agent executes the Deploy Script. First the Deploy Script is provided with the following parameters: Source Location, Target Location, standard IKAN ALM Parameters and user-defined Deploy Parameters. The defined Deploy Tool for the Deploy Environment (Ant, Gradle, NAnt or Maven2) deploys the Build to the Target Location. If this operation fails, steps 7 and 8 are performed. If this operation succeeds, step 12 is performed. |
12. |
If the Deploy is successful, the Deploy Agent cleans up the Build Result on the Deploy Environment Source Location for this Level. If the Debug option is activated for a Deploy Environment, the Clean-up Build Result action will not be performed, so that the user may use the available Build Result to run the deploy script manually for testing purposes. As the failure of this step is not blocking, step 13 is performed next, whether the operation was successful or not. |
13. |
The Deploy Agent sets the Deploy Status. If all Deployer actions (steps 6, 9, 10, 11 and 12) were executed successfully, the Deploy Status is set to Success. If Deployer action 12 (Clean up Build) failed, the Deploy Status will be set to Warning. (If another action failed, the Deploy Status will be set to Fail as indicated by steps 7 and 8). |
14. |
As soon as the Monitor Process on the IKAN ALM Server detects a Deploy with Deploy Status Success or Warning, it determines the final Level Request status. The final Level Request Status is set to Success, if all Monitor actions (in yellow) were executed successfully and the Deploy Status has been set to Success. The final Level Request Status is set to Warning, if the Deploy Status has been set to Warning. |
15. |
The required Notifications are sent. All Users belonging to the User Group with User Access Rights or the User Group with Admin Access Rights (both defined on the Project screen) receive the required notifications, together with the users that have Request Rights on the Level. The Notification type (mail or none) and the Notification criteria (if Level Request Status is SUCCESS, FAIL, WARNING or ALWAYS) are defined in the sections Creating a Build Level, Creating a Test or Production Level or Editing a Level. |
Creating Level Requests
The following sections deal with the procedures involved when creating new Level Requests:
|
If you often need to create Level Requests for specific Levels, you can assign them to one of your Desktop Tab Pages. Adding Elements to a Desktop Tab Page This way, you will be able to easily create Level Requests by simply clicking an icon. |
The Create Level Request: Select Level Screen
-
Select Level Requests > Create Level Request on the Main Menu.
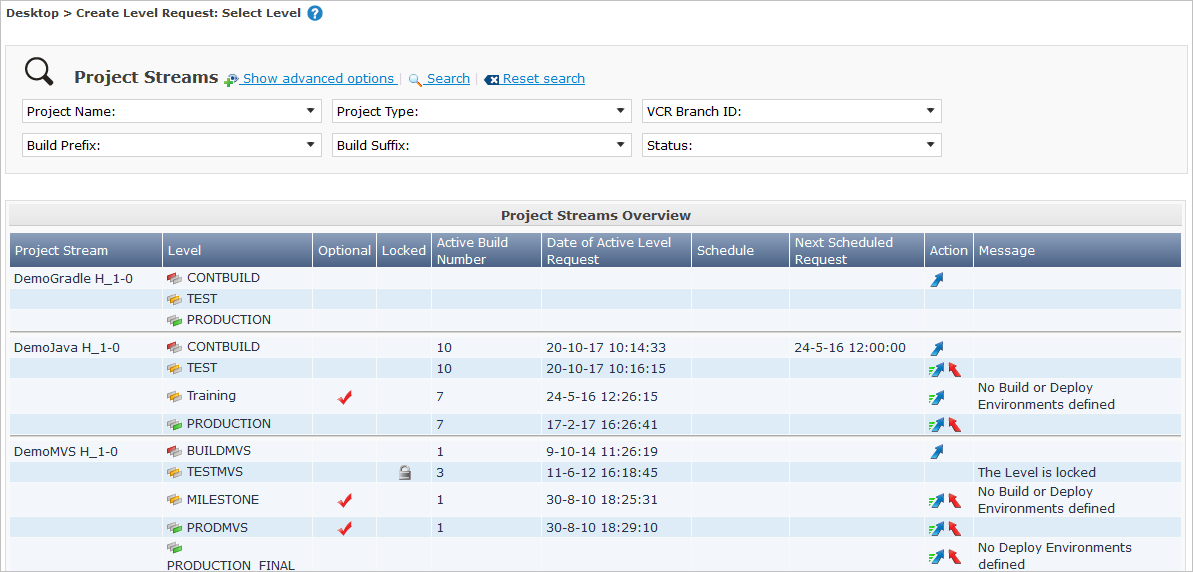
The Create Level Request: Select Level screen is displayed:
-
Define search criteria on the Search Project Stream panel.
Level Requests are always defined for a Project Stream.
If you do not immediately find the required Project Stream on the Overview, define search criteria for Projects and/or Project Streams in the Search Project Stream panel.
-
Verify the information on the Project Streams Overview screen.
The Project Streams and Levels matching the search criteria, are displayed below the Search Project Stream panel. If no search criteria were defined, all available Levels and Project Streams will be displayed.
The following information is available for each displayed Level.
Field Description Project Stream
This field contains the identification of the Project Stream.
This name is composed of:
-
Project Name
-
Project Stream Type: H (Head) or B (Branch)
-
Project Stream Prefix, optionally followed by the Suffix in case of a Branch Project Stream
Example:
Webpad H_1-0Level
This field contains the name and type of the Level.
There are three Level Types:
-
Build
-
Test
-
Production
See the sections Creating a Build Level and Creating a Test or Production Level.
Optional
This field indicates whether or not the Level is optional in the Lifecycle attached to the Project Stream.
-
If the Level is optional, the field is marked by a red cross.
-
If the Level is not optional, this field is empty.
Locked
This field indicates whether or not the Level is locked:
-
If the Level is locked, the field contains a red check mark.
-
If the Level is not locked, the field is empty.
It is not possible to execute Level Requests on locked Levels. Levels can be unlocked by auditing the Project.
Active Build Number
This field contains the number of the Active Build on this Level.
Date of Active Level Request
This field indicates the date and time at which the latest successful Level Request was executed on this Level.
Schedule
This field is only applicable on a Build Level.
It contains the name of the Schedule associated with this Level. The Schedule defines the frequency of the Continuous Build process as a number of seconds, minutes or days. Schedules
If no Schedule was assigned to a particular Level, the field remains empty.
Next Scheduled Request
If a Schedule was assigned to the Level, this field contains the execution date and time of the next scheduled Level Request, under the condition that there are changes in the connected VCR.
-
-
In the Action column, click the required Level Request Creation icon.
The following icons may be available:
Icon Level Request Type Description  /
/ 
Request/Force
Click this icon to create a Build Level Request.
If no schedule is attached to the Build Level, a build will be requested.
If a schedule is attached to it, and if the Force Build Option is activated for the Project Stream, a build can be forced.

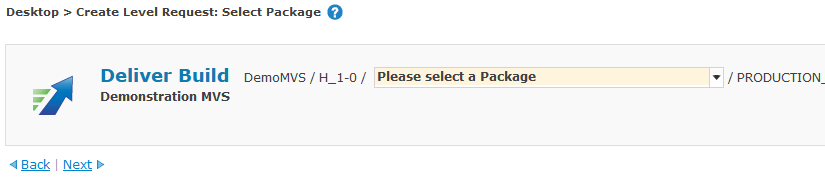
Deliver
Click this icon to create a Level Request that will deliver a Build to the selected Test or Production Level.

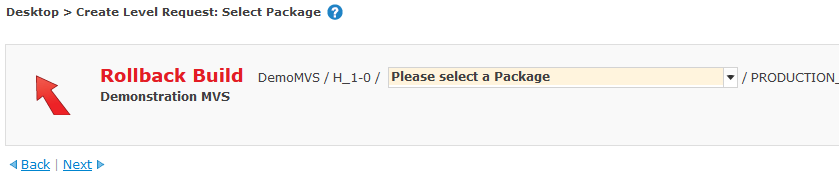
Rollback
Click this icon to create a Level Request that will restore a previous version of the application on the selected Test or Production Level.
The following messages can replace or complete the Level Request Creation Links.
Message Description A Level Request is pending for this Level of this Project Stream
This message is displayed, if a Level Request is being executed or waiting for approval.
You will need to wait until the current Level Request is completed, before you can define a new Level Request for this Level.
The Level is locked
It is not possible to define Level Requests for Locked Levels.
You (or the Project Manager) must audit the Project to unlock the Level, before you can define Level Requests for this Level.
No Request Rights
It is not possible to define Level Requests, if your User ID does not have the required access rights. This is because your User ID is not a member of the Requester User Group that is protecting the creation of Level Requests on the Level.
You must connect with a User ID having the right to run Requests or ask the Global or Project Administrator to give this right to your User ID.
The Project is locked
It is not possible to define Level Requests for locked Projects.
A User with Project Admin Access Rights can unlock the Project first by clicking the Unlock button on the Projects Overview. Editing Project Settings
The Project Stream is locked
It is not possible to define Level Requests for locked Project Streams.
A User with Project Admin Access Rights can unlock the Project Stream first by clicking the Unlock button on the Edit Project Stream screen. Editing Project Stream Settings
The Project Stream is frozen
It is not possible to define Build Level Requests for frozen Project Streams. However, it is still possible to deliver Level Requests to Test and Production Levels.
A User with Project Admin Access Rights can unfreeze the Project Stream first by selecting another status from the Status drop-down menu on the Edit Project Stream screen. Editing Project Stream Settings
No Build Environments defined
It is not possible to define a Build Level Request for a Build Level without a Build Environment.
A User with Project Admin Access Rights can create a Build Environment for this Level
No Build or Deploy Environments defined
This field indicates that the Test Level is not associated to a Build or Deploy Environment.
This is a warning message, indicating that there will be no deploy Action when creating a Deliver or Rollback Level Request for this Level. However, such Levels have the same Approval and Notification management options as Levels that are linked to Environments.
No Deploy Environments defined
This field indicates that the Production Level is not associated to a Deploy Environment.
This is a warning message, indicating that there will be no deploy Action when creating a Deliver or Rollback Level Request for this Level. However, such Levels have the same Approval and Notification management options as Levels that are linked to Environments.
Forced Builds are not allowed
It is not possible to define manual Build Level Request on Project Streams in case the Accept Forced Build attribute is set to “No”. Creating a Build Level Request
No Levels defined in the Lifecycle of the Project Stream.
It is not possible to create a Level Request, since there is no Level linked to the Lifecycle of the Project Stream.
Creating a Build Level Request
Level Requests are created using the Request/Force Build (![]() /
/ ![]() ) icons.
) icons.
Whether it concerns a Requested or a Forced Build depends on the way the Build Level has been defined.
| Build Type | Description |
|---|---|
Requested Build ( |
If no schedule is attached to the Build Level, builds will only be generated when created manually. This is called a Requested Build. |
Forced Build ( |
If a Continuous Build Process has been defined for the Build Level by means of a Schedule, and if the Force Build option is activated for the Project Stream concerned, a Build can still be generated manually. This is called a Forced Build. |
-
Select Level Requests > Create Level Request on the Main Menu.
-
If the Level belongs to a Package-based Project, you first need to select the required Package.
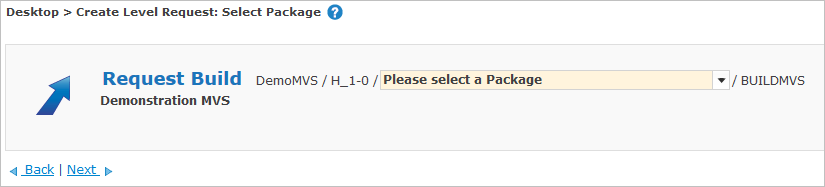
If you add the selected package to a Desktop Tab Page, this step is avoided when creating a Level Request. Adding Elements to a Desktop Tab Page
-
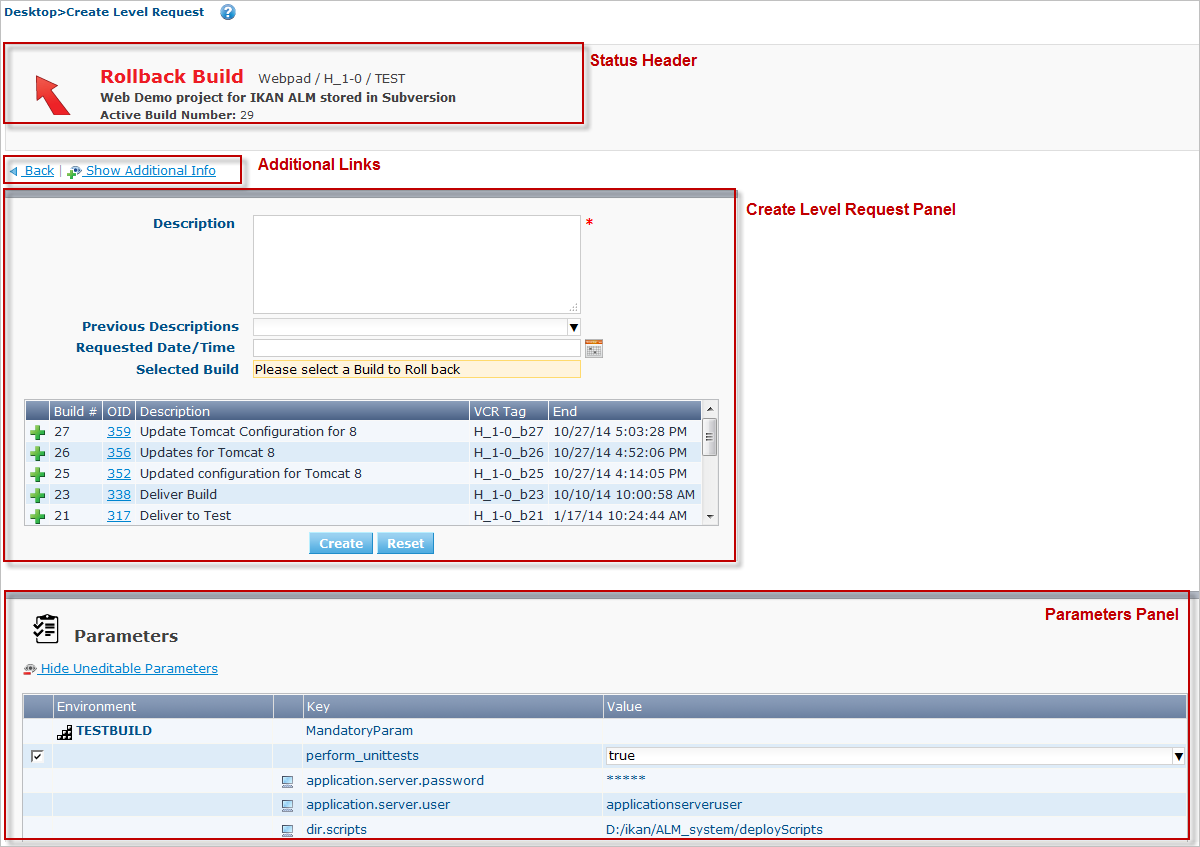
The Create Level Request screen is displayed.
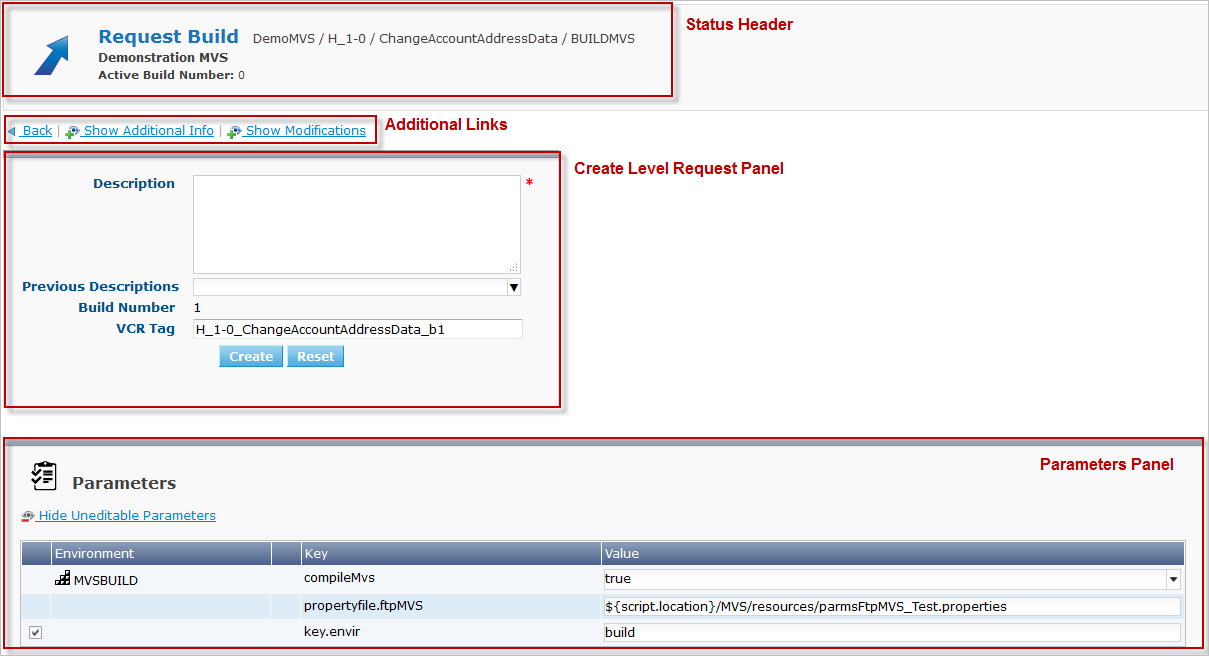
On this screen you will find the following sections:
-
The Status Header
-
Links for navigation and for showing/hiding panels with extra information
-
The Create Level Request panel
-
The optional Select Deploys to Execute panel becomes available in case several Deploy Environment have been defined for the Level and if the option Make Level Optional is activated for the Level. See also Enabling or Disabling Optional Deploys.
-
The Parameters panel (only available if Parameters are linked to the involved Environments or Machines)
-
-
Verify the information provided in the Status Header and via the additional links in the upper part of the screen.
-
The Status Header
The header displays the type of Build Level Request (Force or Request Build) and its corresponding symbol, followed by the context of the Level Request (Project Name/Project Stream Identification[/Package Name]/Level Name), the description of the Project and the active build number.
-
The Back link
Click this link to return to the Create Level Request: Select Level page, or the Desktop Page, depending on where you launched the Create Build Level Request.
-
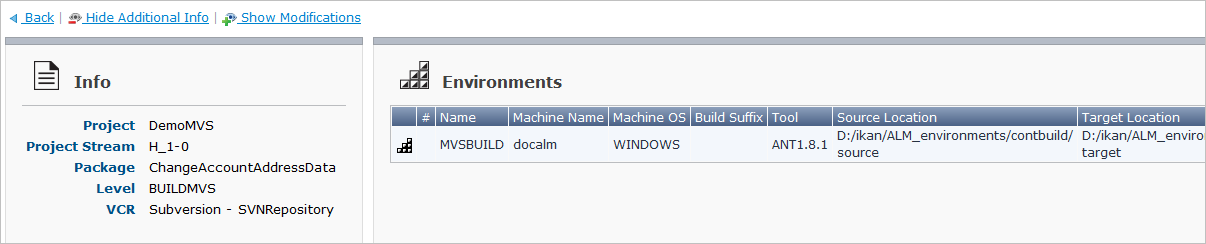
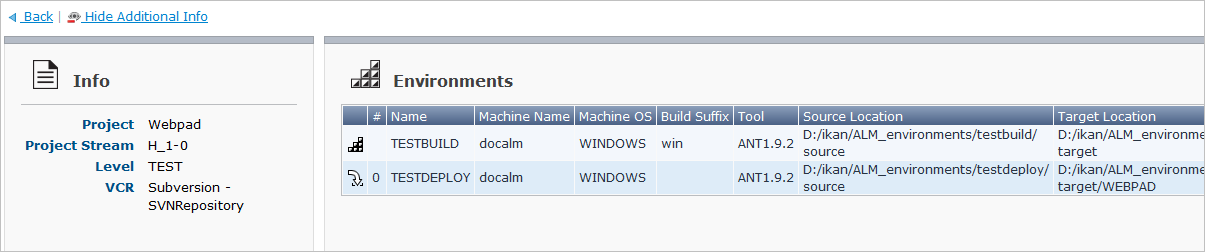
The Show/Hide Additional Info link
Click this link to display or hide information concerning the Project, Project Stream, [Package,] Level and Version Control Repository, as well as information about the Environments linked to the Build Level.
-
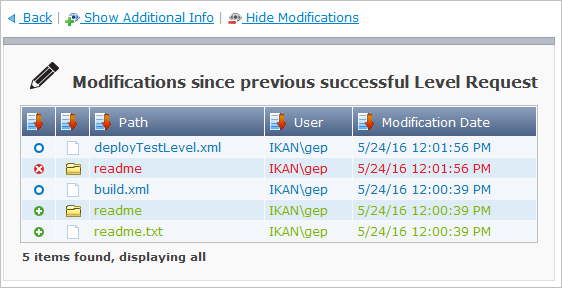
The Show/Hide Modifications link
Click this link to display or hide the Modifications since previous successful Level Request panel, containing the added, deleted and modified files in the VCR compared with the previous successful Level Request.
-
-
Complete the fields in the Create Level Request panel.
The following fields are available:
Field Description Description
In this field, enter a description for the Level Request or select one of the previously entered descriptions.
Previous Descriptions
From the drop-down list, select one of the descriptions you entered previously to automatically fill in the Description field.
Build Number
This field contains the next available sequential Build Number for this Level.
This number is only indicative, as another Level Request for this Level may be defined almost simultaneously, resulting in a higher Build Number for this Level Request.
VCR Tag
This field contains the VCR Tag that is likely to be assigned to the Build resulting from the Level Request, if it is executed successfully. The Tag matches the Tag Template defined for the Head or Branch Stream.
In the exceptional event that another Level Request is defined almost simultaneously for this Level, the actual VCR Tag will contain a higher Build Number.
The user can override or edit the suggested Tag in order to specially mark the Build. For instance, if the BUILD is a release candidate, he or she might change it to RC_1. Keep in mind that the VCR Tag must be unique in the Project Stream and that it may not contain special characters or spaces depending on the VCR type.
Note: In the case of Tag-based Builds, this field is left empty. The Tag must be provided by the User. The tag has to match the user-defined tag in the head or branch of the VCR. For more information, refer to the section Creating a Branch Project Stream.
-
If available, verify and/or edit the settings for the available Build or Deploy Parameters in the Parameters panel.
The Parameters will be grouped per Environment linked to the Level.
A Build/Deploy Parameter can have the following characteristics:
-
Mandatory Parameters will always be provided to the Build/Deploy Script, when the Level Request is executed. Mandatory Parameters lack the activation check box.
-
Non-Mandatory Parameters can be provided to the Build/Deploy Script, when the Level Request is executed. If you want to provide the Non-Mandatory Parameter, select the check box. If you do not want to provide the Non-Mandatory Parameter, clear the check box.
-
Editable Parameters have a default value, but you can change this value each time you create a Level Request.
-
Uneditable Parameters have a fixed value, which cannot be changed when you create a Level Request. Use the Show Uneditable Parameters link to display them.
-
Dynamic Parameters dispose of a list of allowed values. You can select one of these allowed values from the drop-down list, when you create a Level Request.
-
Secured Parameters are non-editable parameters whose value cannot be read by any IKAN ALM User.
By default, the uneditable parameters are hidden. Use the Show Uneditable Parameters option to display them.
A Machine Parameter can have all the same characteristics and applies for all the Environments related to the Machine.
-
-
Once you have defined and verified all settings, click Create.
The Level Requests Overview screen is displayed. It contains the information about the new Level Request (as well as about the older Level Requests).
For a detailed description of this screen refer to Level Requests Overview.
Creating a Deliver Build Level Request
-
Select Level Requests > Create Level Request on the Main Menu.
-
Click the Deliver icon (
) to deliver a Build to the selected Test or Production Level. -
If the Level belongs to a Package-based Project, you first need to select the required Package.
If you add the selected package to a Desktop Tab Page, this step is avoided when creating a Level Request. Adding Elements to a Desktop Tab Page
-
The Create Level Request screen is displayed.

On this screen you will find the following sections:
-
The Status Header
-
Links for navigation and for showing/hiding panels with extra information
-
The Create Level Request panel
-
The optional Select Deploys to Execute panel becomes available in case several Deploy Environment have been defined for the Level and if the option Make Level Optional is activated for the Level. See also Enabling or Disabling Optional Deploys.
-
The Parameters panel (only available if Parameters are linked to the involved Environments or Machines)
-
-
Verify the information provided in the Status Header and via the additional links in the upper part of the screen.
On this screen you will find the following sections:
-
The Status Header
The header displays the type of Level Request and its corresponding symbol, followed by the context of the Level Request (Project Name/Project Stream Identification[/Package Name]/Level Name), the description of the Project and the active build number.
-
The Back link
Click this link to return to the Create Level Request: Select Level page, or the Desktop Page, depending on where you launched the Create Build Level Request.
-
The Show/Hide Additional Info link
Click this link to display or hide information concerning the Project, Project Stream, [Package,] Level and Version Control Repository, as well as information about the Environments linked to the Build Level.
-
-
Complete the fields in the Create Level Request panel.
The following fields are available:
Field Description Description
In this field, enter a description for the Level Request or select one of the previously entered descriptions.
Previous Descriptions
From the drop-down list, select one of the descriptions you entered previously to automatically fill in the Description field.
Requested Date/Time
Leave this field blank to execute the Level Request as soon as possible.
If required, enter an execution Date and Time for the Level Request in the format set in the User’s local settings.
You can also click the
 icon to select the execution date.
The following screen is displayed:
icon to select the execution date.
The following screen is displayed:
Click the required date to copy it into the Requested Date/Time field.
The execution time will be set to the current time. However you can still change the execution time manually.
Selected Build
Select the Build to be delivered to the Test or Production Level. The list contains all Builds available on the previous Level that have not yet been delivered to this Level and that have the same (Redeliver) or a higher Build Number than the current active Build.
If the previous Level in the Lifecycle is marked as Optional (Making a Level optional or required) the list contains the available Builds from the previous Level AND from the Level before that one. The column Available on indicates on which Level the available Build resides.
The current active build on a Level can be redelivered. If such a Build exists, it will be marked in blue. In that case, the Level Request Action Type will be “Redeliver Build”.
-
If available, select the deploys to be executed in the Select Deploys to Execute panel.
-
If available, verify and/or edit the settings for the available Build and Deploy Parameters in the Parameters panel.
See Creating a Build Level Request for more information on the available parameters.
-
Once you have defined the required settings, click Create.
The Level Requests Overview screen is displayed. It contains the information about the new Level Request (as well as about the older Level Requests).
For a detailed description of this screen refer to Level Requests Overview.
Creating a Rollback Build Level Request
-
Select Level Requests > Create Level Request on the Main Menu.
-
Click the Rollback icon (
) to restore the previous Build onto the selected Test or Production Level. -
If the Level belongs to a Package-based Project, you first need to select the required Package.
If you add the selected package to a Desktop Tab Page, this step is avoided when creating a Level Request. Adding Elements to a Desktop Tab Page
-
The Create Level Request screen is displayed.
On this screen you will find the following sections:
-
The Status Header
-
Links for navigation and for showing/hiding panels with extra information
-
The Create Level Request panel
-
The optional Select Deploys to Execute panel becomes available in case several Deploy Environment have been defined for the Level and if the option Make Level Optional is activated for the Level. See also Enabling or Disabling Optional Deploys.
-
The Parameters panel (only available if Parameters are linked to the involved Environments or Machines)
-
-
Verify the information provided in the Status Header and via the additional links in the upper part of the screen.
On this screen you will find the following sections:
-
The Status Header
The header displays the type of Build Level Request (Force or Request Build) and its corresponding symbol, followed by the context of the Level Request (Project Name/Project Stream Identification[/Package Name]/Level Name), the description of the Project and the active build number.
-
The Back link
Click this link to return to the Create Level Request: Select Level page, or the Desktop Page, depending on where you launched the Create Build Level Request.
-
The Show/Hide Additional Info link
Click this link to display or hide information concerning the Project, Project Stream, [Package,] Level and Version Control Repository, as well as information about the Environments linked to the Build Level.

-
-
Complete the fields in the Create Level Request panel below.
The following fields are available:
Field Description Description
In this field, enter a description for the Level Request or select one of the previously entered descriptions.
Previous Descriptions
From the drop-down list, select one of the descriptions you entered previously to automatically fill in the Description field.
Requested Date/Time
Leave this field blank to execute the Level Request as soon as possible.
If required, enter an execution Date and Time for the Level Request in the format set in the User’s local settings.
You can also click the
icon to select the execution date.
The following screen is displayed:
Click the required date to copy it into the Requested Date/Time field.
The execution time will be set to the current time. However you can still change the execution time manually.
Selected Build
Select the Build to be restored on the selected Test or Production level. The list contains all Builds that have been delivered to this Level (except the current active Build on this Level).
-
If available, select the deploys to be executed in the Select Deploys to Execute panel.
-
If available, verify and/or edit the settings for the available Build and Deploy parameters in the Parameters panel.
Refer to the section Creating a Build Level Request for more information on the available parameters.
-
Once you have defined the required settings, click Create.
The Level Requests Overview screen is displayed. It contains the information about the new Level Request (as well as about the older Level Requests).
For a detailed description of this screen refer to Level Requests Overview.
Level Requests Overview
The following sections deal with the procedures involved when using the Level Requests Overview:
The Level Requests Overview Screen
-
Select Level Requests > Overview Level Requests on the Main Menu.
The Level Requests Overview screen is displayed:
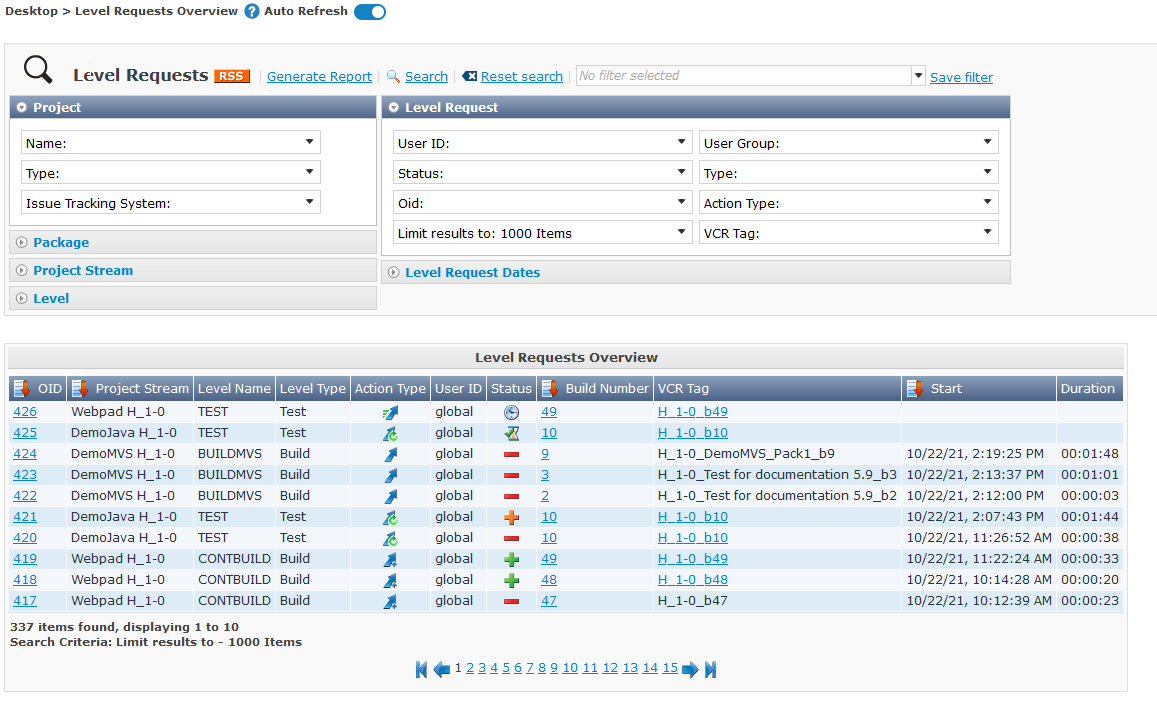
If the Auto Refresh option is activated, the Level Requests Overview screen will be refreshed each time the defined rate is expired. Auto Refresh
-
Use the search criteria on the Search panel to only display the Level Requests you are looking for.

The following options are available:
-
Search: in principle it is not necessary to click the Search option. The results on the overview will be automatically synchronized in function of the selected criteria.
-
Reset search: to clear all search criteria and display the full list of items.
-
Select an existing filter from the drop-down list.
-
Save filter: to save the current search criteria for future use.
For more information on the usage of search panels and filters, refer to the sections Search Panels and Defining Search Filters.
-
-
Click the Search button once again if you want to verify the changing status of existing and new Level Requests.
If the Auto Refresh option is activated, the Level Requests Overview will be refreshed following the interval specified by the Auto Refresh Rate specified in the System Settings. Auto Refresh
-
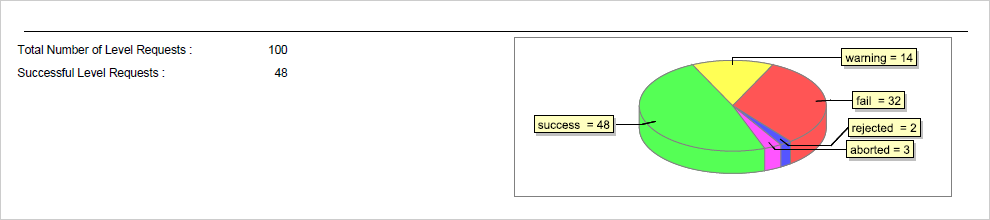
Use the Generate Report button to run the Level Requests Overview Report.
See Generating a Report for more information on Generating a Level Requests Overview Report.
-
On the Level Requests Overview, verify the Level Request Information fields for the required Level Request.
Columns marked with the
 icon can be sorted alphabetically (ascending or descending).
The following information fields are available:
Field Description OID
This field contains the OID (Object Identifier) of the Level Request. This is a unique sequential number assigned to each Level Request when it is created.
The Level Request OIDs are displayed as a link. Click this link to display the details for this Level Request.
For more information, refer to the section explaining the Summary tab page of the Level Request Detail screen.
Project Stream
This field contains the identification of the Project Stream.
This name is composed of: * Project Name * Project Stream Type: H (Head) or B (Branch) * Project Stream Prefix, optionally followed by the Suffix in case of a Branch Project Stream
Example:
Webpad H_1-0Level Name
This field contains the name of the Level concerned by the Level Request.
Level Type
This field contains the type of the Level concerned by the Level Request (Build, Test or Production).
Action Type
This field contains the type of the Level Request Action.
The following types are available:
-
 Build initiated by Scheduler
 -
Force Build
-
Request Build
-
Deliver Build
-
 Redeliver Build
 -
Rollback Build
For a description of the latter four Level Request Action Types, refer to Creating Level Requests. The Build initiated by the Scheduler is similar to the Request Build Level Request Action Type, but it is triggered automatically.
User ID
This field contains the User ID of the User who created the Level Request.
For Level Requests initiated by the Scheduler, this field remains empty.
Status
This field contains the Level Request Status. The following status indication icons are possible:
-
 (Success): the Level Request is executed successfully.
 -
 (Warning): the Level Request has been successfully executed, but at least one non-critical Level, Build or Deploy Phase failed, e.g., for debugging reasons.
 -
 (Fail): the execution of the Level Request as a whole failed. This is due to the failure of one or more critical Level, Build or Deploy Phases.
 -
 (Run): the Level Request is being executed at this moment.
 -
(Aborting): the Level Request is being aborted at this moment.
-
 (Awaiting requested Date/Time): the requested execution is in the future, or is waiting for the Monitor process to pick it up
 -
 (Awaiting Pre-Approval or Awaiting Post-Approval): the Level Request is awaiting a Pre- or Post-Approval.
 -
 (Rejected): An Approval associated with the Level Request was rejected. The Level Request will never be executed.
 -
 (Canceled): the Level Request has been canceled before it was run. It will never be executed.
 -
 (Aborted): the Level Request has been aborted during execution. The results (such as Build Results) that were already available at the time of the abort have been cleaned up and cannot be used.
Build Number
This field contains the Build Number of the Level Request. Use this link to access the Build History Detail screen. Build History Screen
VCR Tag
This field contains the VCR Tag of the Level Request. This Tag matches a Build with its source code in the VCR.
The format of the VCR Tag normally matches the Tag Template defined for the Stream. The Project Streams Overview Screen
However, the user can override the default VCR Tag while creating a Level Request (and is obliged to do so for a Build Level Request in a Tag Based Project Stream), so that the Tag Format can be completely different.
The Level Request VCR Tag is displayed as a link leading to the Sources tab page on the Level Request Detail screen. For more information, refer to the section Sources.
Start
This field indicates the date and time when the Level Request execution started.
Duration
This field indicates the total duration of the Level Request.
-
-
View the details of a specific Level Request.
Click the Level Request’s OID link in front of the required Level Request.
For more information, refer to the section Level Request Detail.
The IKAN ALM RSS Functionality
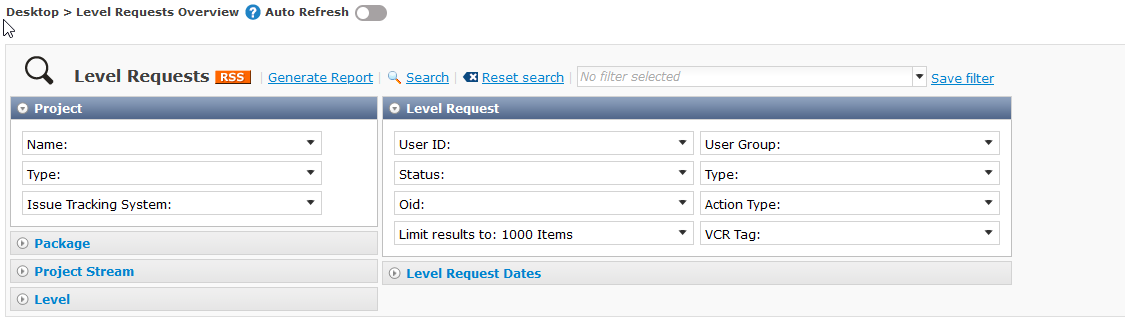
If your Global IKAN ALM Manager has activated RSS Feeds at System Settings level, the orange RSS button is available on the Search Level Request panel.
RSS is a web format used to publish frequently updated digital content, such as blogs, news feeds or podcasts. Consumers of RSS content use special browsers called aggregators to watch for new content in dozens or even hundreds of web feeds. Programs known as feed readers or aggregators can check a list of feeds on behalf of a user and display any updated articles that they can find.
RSS feeds can be shown by a plug-in in the user’s IDE or by other RSS Readers including the Mozilla Firefox browser.
IKAN ALM provides RSS Feeds for displaying data about the last 10 Level Requests that meet specified criteria.
-
Select Level Requests > Overview Level Requests on the Main Menu.
-
Specify for which Level Requests you want information to appear in the RSS feed.
Initially the URL for the RSS Feed does not contain any criteria, except for the current user’s language. To specify which Level Requests you want to appear in the RSS Feed, define the search criteria on the Search Level Request panel.
The list of Level Requests matching the set criteria will appear in the Level Requests Overview panel.
Most of the criteria will be added to the URL. See the RSS URL Details to see which criteria might be used.
-
Display the RSS Feed
Click the RSS button. A browser window will open, displaying the RSS Feed for the Level Requests you selected.
Note: If your browser does not have an integrated RSS Reader, you must manually add the URL for the RSS Feed. To do so, select and copy the URL from the Location Bar of your browser window, and paste it in the Properties Settings of your RSS plug-in or reader.
The RSSOwl plug-in can be found on the Eclipse update site: http://www.rssowl.org/.
You find a detailed explanation of the structure of the IKAN ALM URL in the section RSS URL Details.
Generating a Report
This functionality allows you to generate a report for specified Level Requests. This report can be exported to PDF, CSV, RTF or XLS format.
-
Switch to the Level Requests Overview screen and specify for which Level Requests you want to generate a report.
To specify which Level Requests you want to appear in the Report, define the search criteria and click the Search button.
The list of Level Requests matching the set criteria will appear in the Level Requests Overview panel. These criteria will be used by the Report Generation.
-
Click the Generate Report button.
The following dialog is displayed:
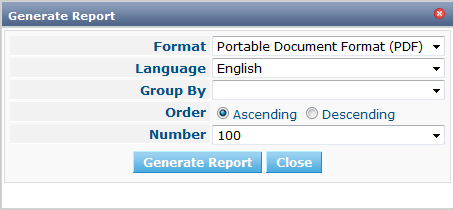
The following selection fields are available:
Field Description Format
Select the required export format from the drop-down menu.
The following formats are available: * Portable Document Format (PDF) * Comma Separated Values (CSV) * Rich Text Format (RTF) * MS Excel Worksheet (XLS)
Language
Select the required language for the report from the drop-down menu.
The following languages are available: * English * French * German
Group By
Optional field which enables to group the reported Level Requests by
-
Project Name
-
Level Name
Order
Select whether the reported Level Requests are to be ordered ascending or descending.
Number
Select the maximum number of results that may appear in the report. The choices are:
-
20
-
50
-
100 (= default)
-
200
-
500
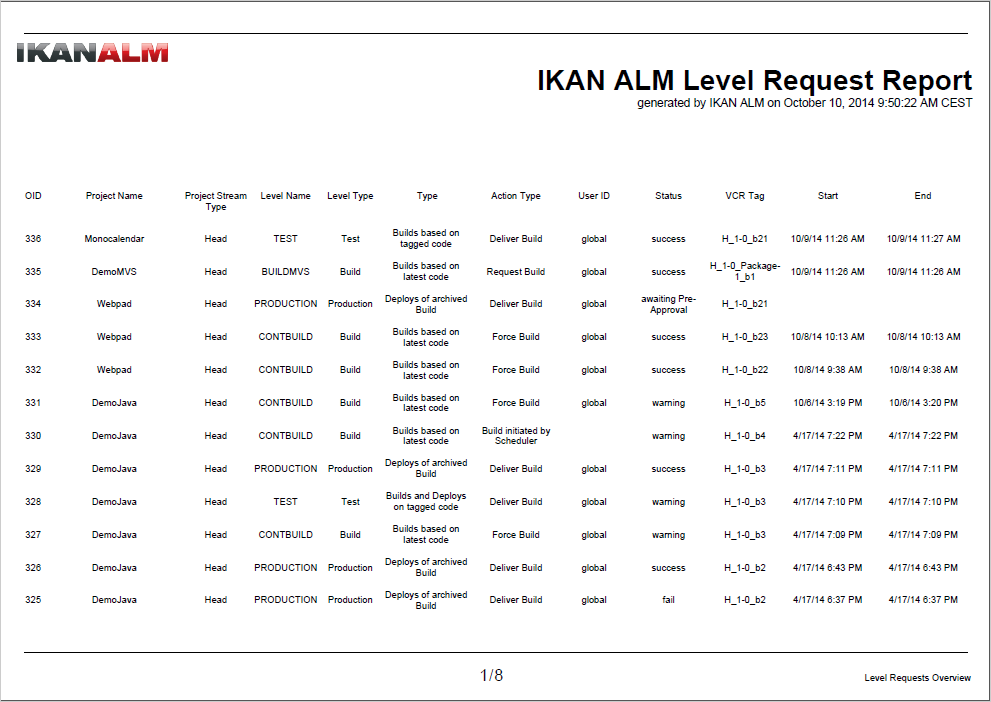
Make the required selections and click Generate Report.
The report is generated. The following is an example of a report saved in PDF format:
More options are available when Generating a Report with the IKAN ALM Command Line. For more information, refer to the section Command Line Interface (Optional).
-
-
Use the Close button to return to the Level Requests Overview screen.
Level Request Detail
The Level Request Detail screen contains the detailed information concerning the selected Level Request.
The screen is structured as follows:
-
Status Header
The header displays the status and corresponding symbol of the selected Level Request, as well as the Level Request OID and description, the requester (User or Schedule) and the date and time at which the Level Request has been requested.
-
Tab Pages with detailed information
Underneath the status indication, several tabs are available, each of them displaying additional information concerning the Level Request. By default the Summary tab page is displayed.
Refer to one of the following sections for more information.
-
Back, Refresh and Build History links
-
Use the Back link to return to the previous screen.
-
Use the Refresh link to update the displayed information. This link reloads the currently selected tab page, as well as the header information.
-
Use the Build History link to get information about the Build’s Lifecycle.
For more detailed information, refer to the section Build History Screen.
-
-
Auto Refresh option
In some cases it might be useful to activate the Auto Refresh option.
On the Phase Logs tab page, for example, it allows you to follow the execution steps of a Level Request. Auto Refresh is also available on the Summary, Approvals, Issues and Dependencies tab pages.
Once the Level Request has reached a final status (Success, Rejected, Canceled, Aborted, Fail or Warning), the Auto Refresh function will be stopped automatically.
For more information on the Auto Refresh settings, refer to the section Auto Refresh.
Summary
The Summary page displays the status of the Level Request and, underneath, several panels providing detailed information. The panels displayed depend on the status of the Level Request.
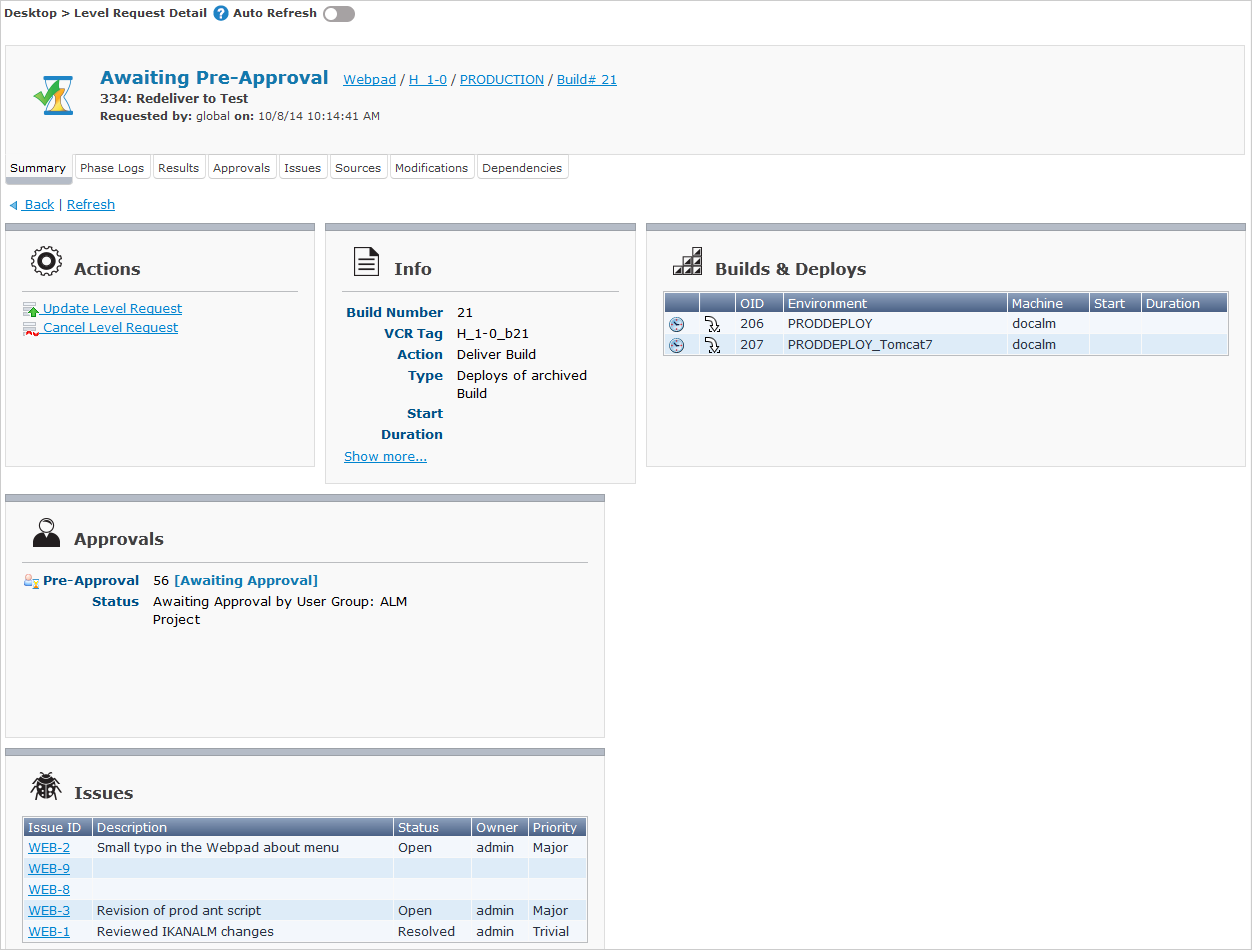
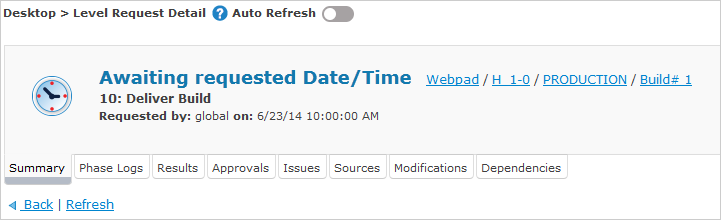
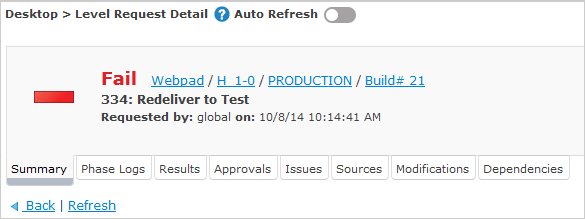
Status Header
Some examples of Level Requests for release-based Projects:
Example of a Level Request for a package-based Project:
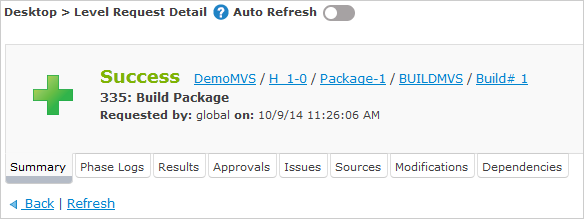
The header of the Level Request Detail screen displays the status and the corresponding symbol of the selected Level Request, as well as the Level Request OID and description, the requester (User or Schedule) and the date and time at which the Level Request has been requested.
|
The links next to the status indication lead to the Level Request Overview screen. Depending on the link element you select, more information will already be filled in on the Search Level Request panel to limit the Level Requests displayed on the overview. |
| Link Element | Preselected Search Details |
|---|---|
Project |
Project Name |
Project Stream |
Project Name and Build Prefix (and, optionally, the Build Suffix in case of a Level Request for a Branch Project Stream). |
Package (only for Package-based Projects) |
Project Name, Build Prefix (and, optionally, the Build Suffix) and Package Name. |
Level |
Project Name, Build Prefix, Package Name and Level Name. |
Build Number |
Project Name and VCR Tag. |
|
When selecting another Tab Page, this header is not being refreshed. |
Depending on the status of the Level Request, the Summary page may contain the following panels:
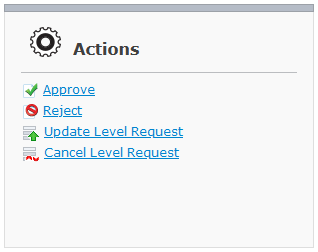
Actions Panel
The actions available in this panel depend on the status of the Level Request.
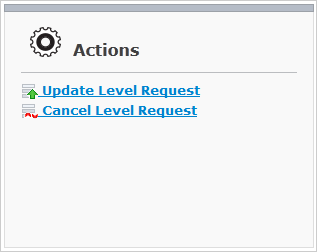
Actions are available when the Level Request execution time is set to a moment in the future, if an Approval is pending for the Level Request, if the Level Request is still being executed, or if the Level Request is successful and can be delivered to the next level.
-
The Level Request execution time is set to a moment in the future:
The following action links will be available:
Link Meaning  Update Level Request
Click this link to update the Level Request Description and/or Execution Time.
Note: This action is not available for a Build level.
 Cancel Level Request
Click this link to cancel the Level Request.
Once you have confirmed the cancellation, the Level Request Status will be set to Canceled.
It is no longer possible to cancel a Level Request, once an assigned Approval has been granted.
Clicking the Update Level Request link shows the Update Level Request screen.
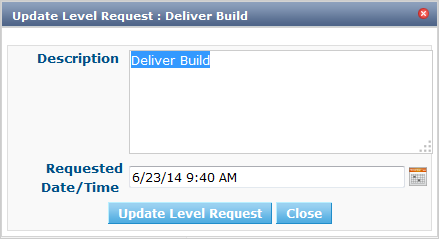
The following fields may be edited:
Field Meaning Description
This field contains the description entered by the user, when he or she created the Level Request.
Requested Date/Time
This field indicates when the execution of the Level Request should start. This date and time cannot be in the past. If left blank, the current system time will be taken as value for this field.
Click Update Level Request to save the changes and return to the Level Request Detail screen.
You can also click Close to cancel the update and return to the Level Request Detail screen.
-
The Level Request is currently being executed:
If the Level Request is currently being executed, the following button is available:
Button Meaning Abort Level RequestClick this button to abort the Level Request execution.
Once you have confirmed the abort, the Level Request Status will be set to Aborting. Once the current Monitor, Build or Deploy Agent action is completed, the Level Request execution will be halted and the Level Request status will be set to Aborted.
Clicking the Abort Level Request action button displays the following screen.
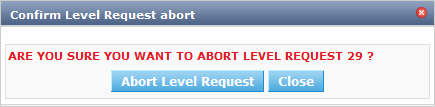
Click Abort Level Request to confirm the action and return to the Level Request Detail screen.
You can also click Close to cancel the abort process and return to the Level Request Detail screen.
-
The Level Request is waiting for an Approval:
If the Level Request is waiting for an Approval, in addition to the available options above, there are two additional options:
Button Meaning  Approve
Click this button to open the Approve Level Request pop-up.
RejectClick this button to open the Approve Level Request pop-up.
For more info on the dialogs opened by these actions, refer to the section Approving Outstanding Approvals.
-
The Level Request is successful and can be delivered to a next Level:
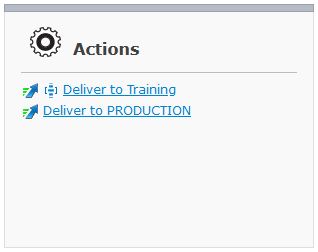
If the Level Request is in status Success or Warning, the following buttons are available:
Button Meaning  Deliver to Optional Level
Click this button to deliver to the indicated Optional level.
Deliver to LevelClick this button to deliver to the indicated non-Optional Level.
Info Panel
This panel contains detailed information concerning the Level Request.
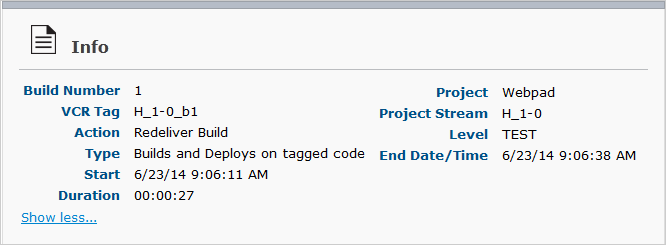
|
The Show more… and Show less… links respectively show or hide more data about the Level Request. |
The following information is available.
| Field | Meaning |
|---|---|
Build Number |
This field contains the Build number of the Level Request. |
VCR Tag |
This field contains the VCR Tag of the Level Request. This Tag matches a Build with its source code in the VCR. The format of the VCR Tag normally matches the Tag Template defined for the Stream. Project Streams However, the user can override the default VCR Tag while creating a Level Request, so that the Tag Format can be completely different. |
Action |
This field contains the Level Request Action Type. The following types exist:
|
Type |
The Level Request Type. The following types exist:
|
Start |
This field contains the date and time when the Level Request execution started. |
Duration |
This field contains the total execution time of the Level Request. |
Project |
This field contains the Project name. |
Project Stream |
This field contains the Project Stream, the Build Prefix and, optionally, the Build Suffix (in case of a Branch Project Stream). |
Package |
This field contains the Package name in case of Package-based Project Streams. |
Level |
This field contains the Level name. |
End Date/Time |
This field contains the date and time when the Level Request execution ended. |
Partial Build Tag |
In case of a Partial Build type Project Stream (see Creating a Branch Project Stream), this field contains the Partial Build Tag. Only the sources that differ from this Tag have been retrieved and made available for the Build during the Retrieve Code Phase. |
Builds and Deploys Panel
This panel contains the different Builds and/or Deploys that are related to the Level Request.
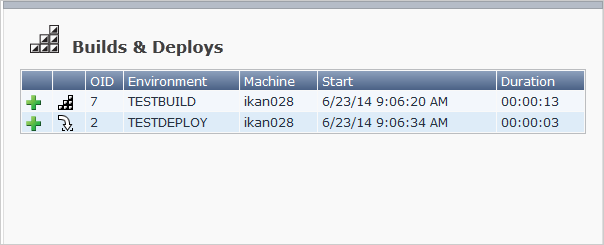
The following information is available:
| Field | Meaning |
|---|---|
Status icon |
This field contains the Build/Deploy Status indication. This Status indication is derived from the status of the different Build/Deploy Phases. Possible status indications are:
|
Type icon |
This field indicates the type: Build ( |
OID |
This field contains the OID (Object Identifier) of the Build/Deploy. This is a unique sequential number assigned to each Build/Deploy Action when it is created. Note: The OID is not equal to the Build/Deploy Number! |
Environment |
This field contains the name of the Build/Deploy Environment where this Build/Deploy was executed. |
Machine |
This field contains the name of the Machine hosting the Build/Deploy Environment where this Build/Deploy was executed. |
Start |
This field indicates the date and time when the Build/Deploy execution started. |
Duration |
This field indicates the total execution time of the Build/Deploy. |
Approvals Panel
This panel is only displayed if the Level Request has been rejected or if the status of the Level Request is Awaiting a Pre- or Post-approval.
It displays the type and OID of the Awaiting or Rejected Approval for the Level Request, its status and to which User Group the User has to belong to for approving or rejecting the Approval. If the Level Request has been Rejected, the Reason will also be displayed.
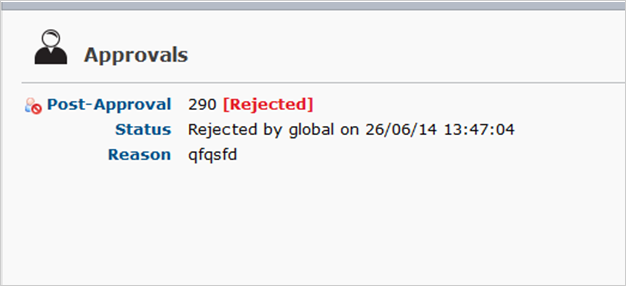
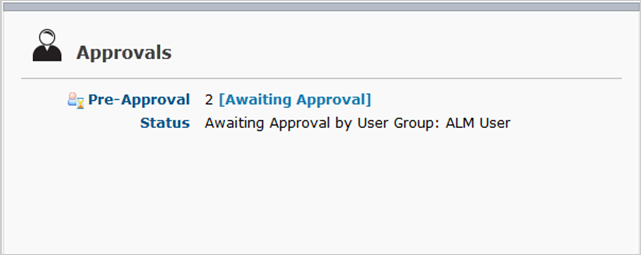
|
For a complete list of all Approvals defined for the Level Request, select the Approvals tab underneath the Status header. Approvals |
Issues Panel
This panel is only shown if there are Issues related to the Level Request.
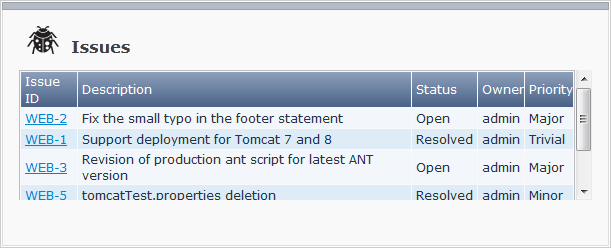
Issues can get linked to a Level Request in two ways: automatically by IKAN ALM during the execution of the Level Request or manually by a User after the Level Request has ended. Refer to the section Issue Tracking for more information on defining an external Issue Tracking System, and to the section Phases - General Information for more information on the Issue Tracking Phase.
For each issue the following information is displayed:
| Field | Meaning |
|---|---|
Issue ID |
This field displays the ID by which the Issue is defined in the external Issue Tracking System. If the URL field in the definition of the Issue Tracking System is not empty, this field will be displayed as a link. Click the link to view the Issue in the external Issue Tracking System’s Web interface. For more information on the URL field, refer to the section Issue Tracking Creating an Issue Tracking System. |
Description |
This field contains the description of the Issue. |
Status |
This field contains the status of the Issue. |
Owner |
This field contains the owner of the Issue. |
Priority |
This field contains the Issue priority. |
|
On this panel you cannot modify any of the Issues. If you want to edit, delete or synchronize them, select the Issues tab underneath the Status header. Issues |
Error/Warning Log Panel
This panel is only shown if the Level Request status is set to Fail or Warning. It only shows the log of the first Phase with status Fail or Warning. This is not necessarily the cause of the error status of the Level Request. For a complete overview of the status of all the Phases, refer to the Phase Logs tab page (Phase Logs).
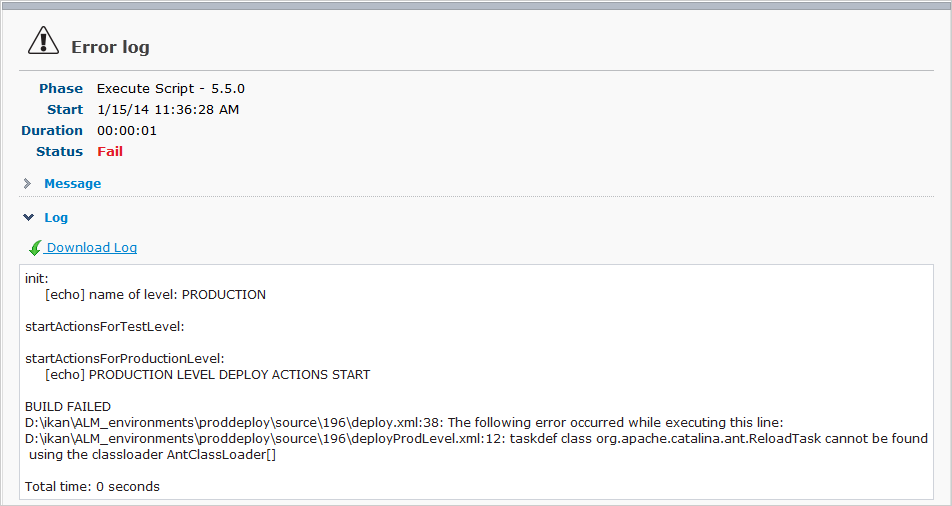
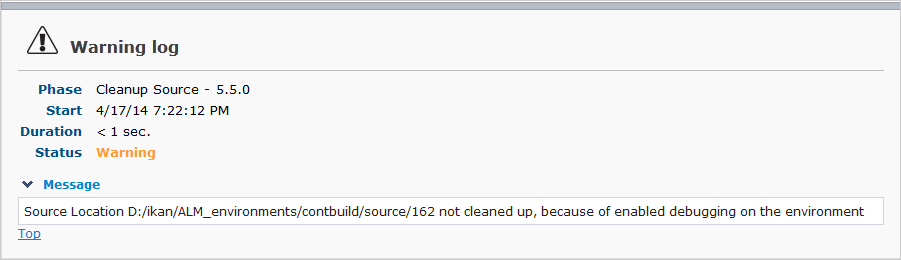
The following information is displayed.
| Field | Meaning |
|---|---|
Phase |
This field contains the Display Name of the Phase, combined with the Phase Version. |
Start |
This field displays the date/time when the Phase started. |
Duration |
This field displays the total execution time of the Phase. |
Status |
This field displays the status of the Phase. Possible status indications are:
|
Message |
Clicking this link displays the message. If no log is available, the message will be displayed immediately. Note: if you hover over the word Message, the first 256 characters of the message text are shown as tooltip. |
Stack Trace |
If available, this fields displays the Stack Trace. Note: if you hover over the word Stack Trace, the first 256 characters of the stack trace text are shown as tooltip. |
Log |
This field displays the log of the Phase. The log is only available for Phases executed by a Scripting Tool (Ant, NAnt or Maven2). If the Log Format is set to TXT, you can download the error/warning log on the Phase Logs tab page. For more information on specifying the format of the log, refer to the section Scripting Tools. |
Use the Top link to quickly return to the top of the page.
RELATED TOPICS |
Phase Logs
This page displays the logs of the Level Phases, the Build and Deploy actions and their Build and Deploy Phases executed during the handling of a Level Request. It also provides more detailed information regarding the used Parameters.
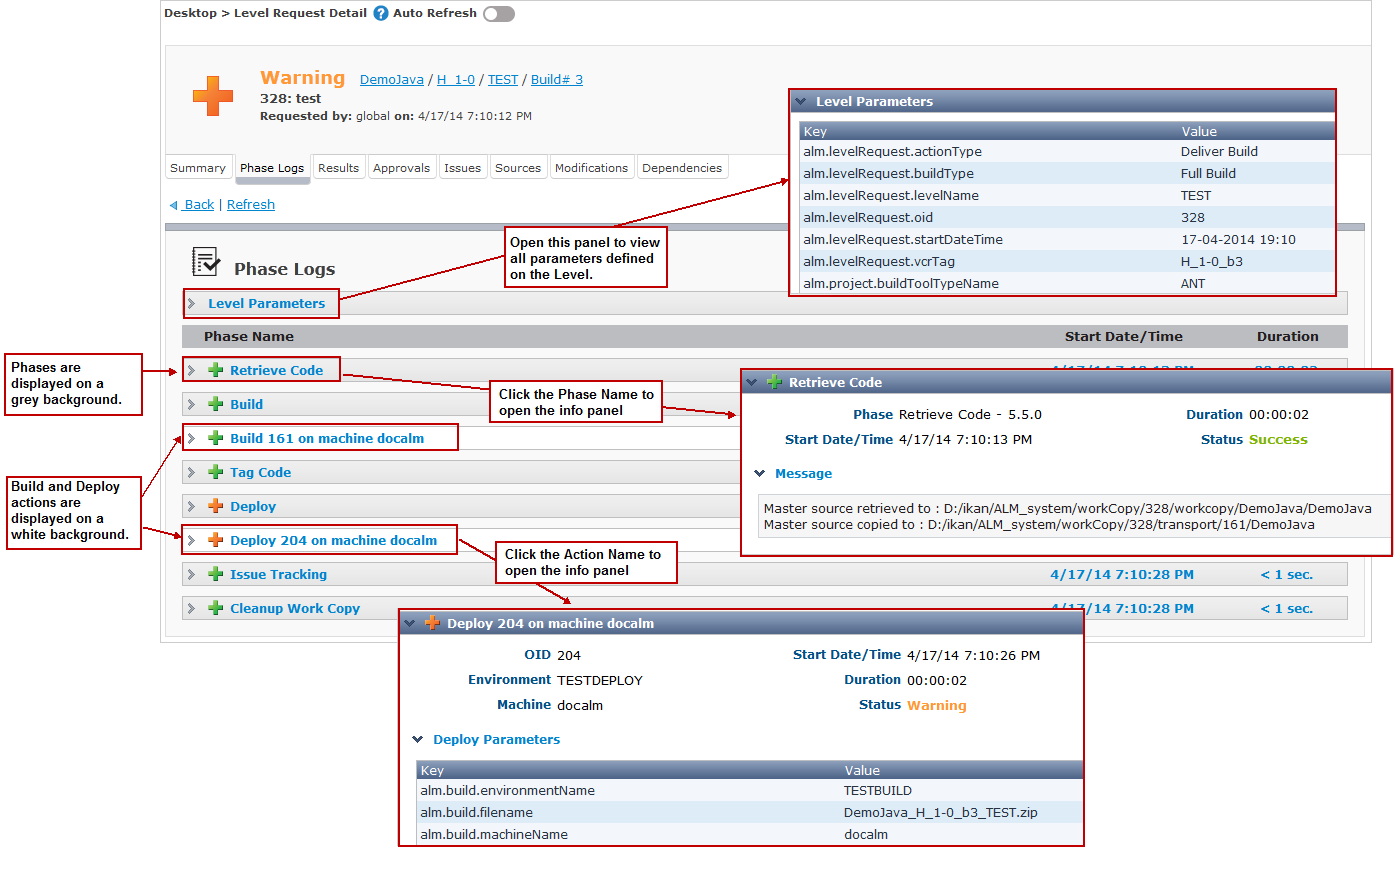
The following panels can be available:
-
Possible subpanels:
-
Phase Parameters
-
Message
-
Stack Trace
-
Logs
-
-
Possible subpanels:
-
Used Build Parameters
-
Build Phases
Just as the Level Phases panel, the Build Phases panel may contain the following subpanels:
-
Phase Parameters
-
Message
-
Stack Trace
-
Logs
-
-
-
Possible subpanels:
-
Used Deploy Parameters
-
Deploy Phases
Just as the Level Phases panel, the Deploy Phases panel may contain the following subpanels:
-
Phase Parameters
-
Message
-
Stack Trace
-
Logs
-
-
If a Phase is still running or if one of the Phases failed, the log of that Phase will be automatically opened. The parameters (for Custom Phases), the message, the log and/or the stack trace will be displayed.
Items on a gray background represent the different Phases, items on a white background represent the Build or Deploy actions.
Click a Phase/Action Name to expand its information panel.
|
If the Level Request status is set to Awaiting requested Date/Time, Awaiting Pre-Approval, Canceled or Rejected due to a Pre-approval that has been rejected, no Phase logs are available. 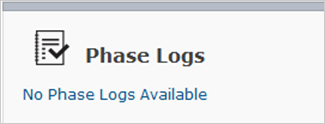
If you activate the Auto Refresh option, you can easily follow the execution of the different Phases. |
Example of a running Phase
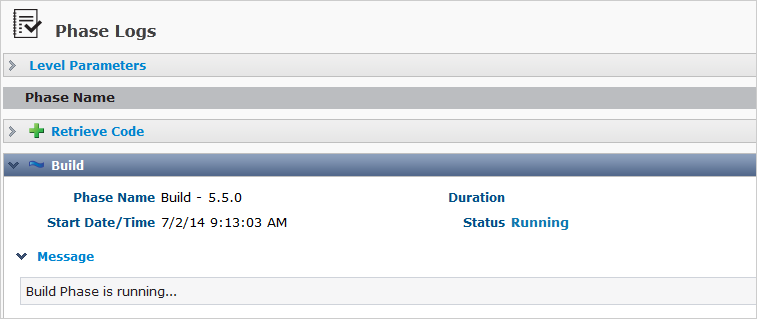
Example of a Phase with status Success
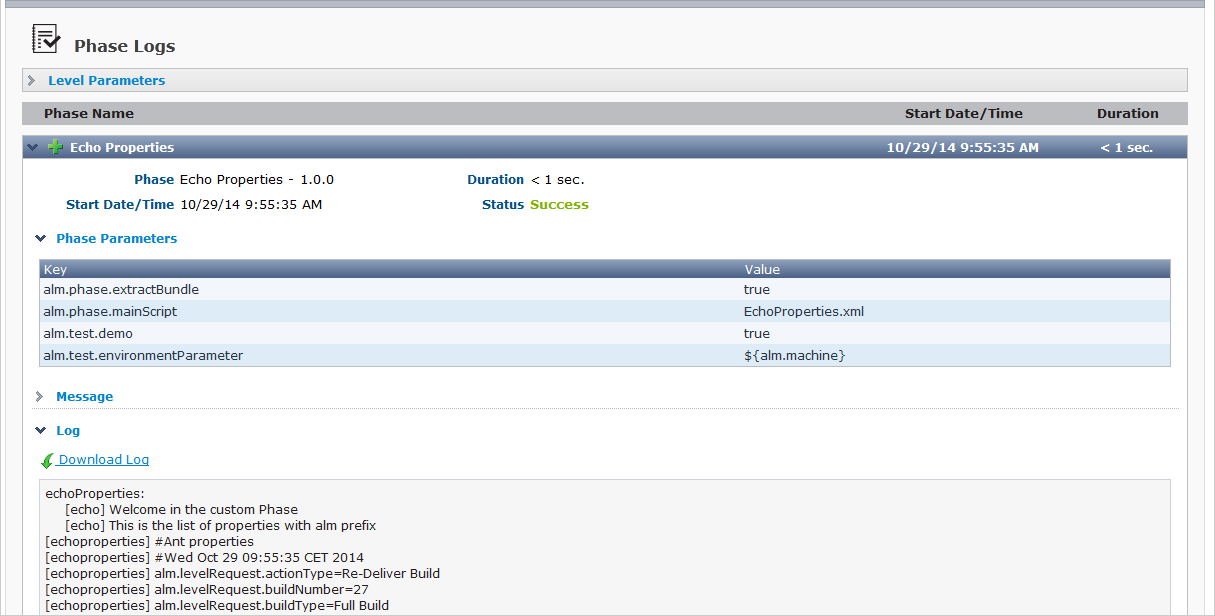
Example of a skipped Deploy Phase
In case of optional Deploys, (a) specific Deploy(s) can be skipped when creating the Level Request. The Level Request will always end with status Warning due to the skipped Deploy, even if the execution of the Level Request was successful.
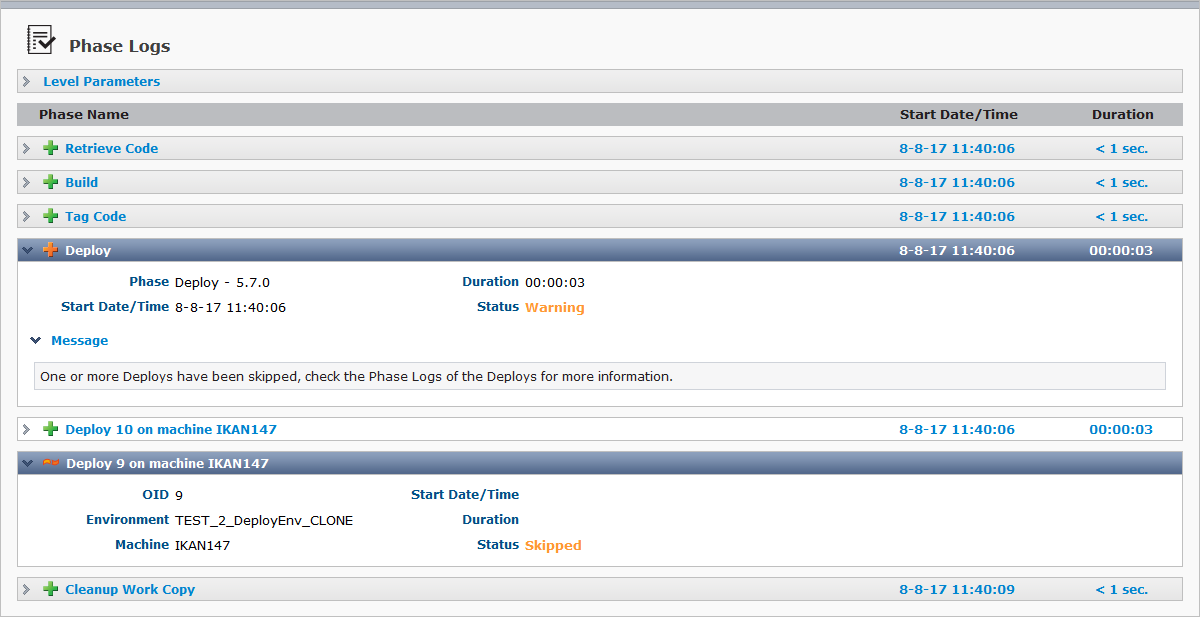
Level Parameters
To view the Level Parameters used to execute the Level Request, click the Level Parameters heading to expand the panel.
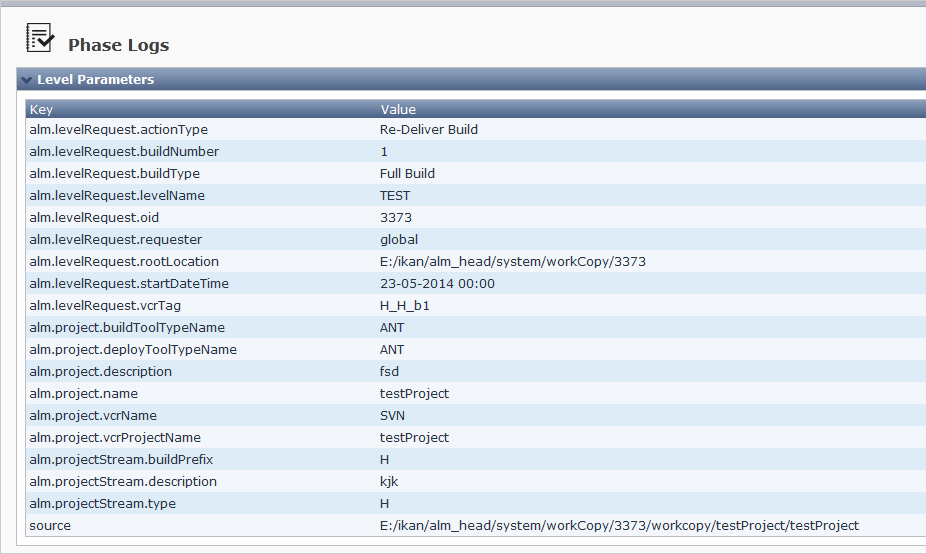
For each of the parameters, the table displays its key and value.
For more information on Level Parameters, refer to the section Predefined Level Parameters.
Level Phases
Example of a Core Phase
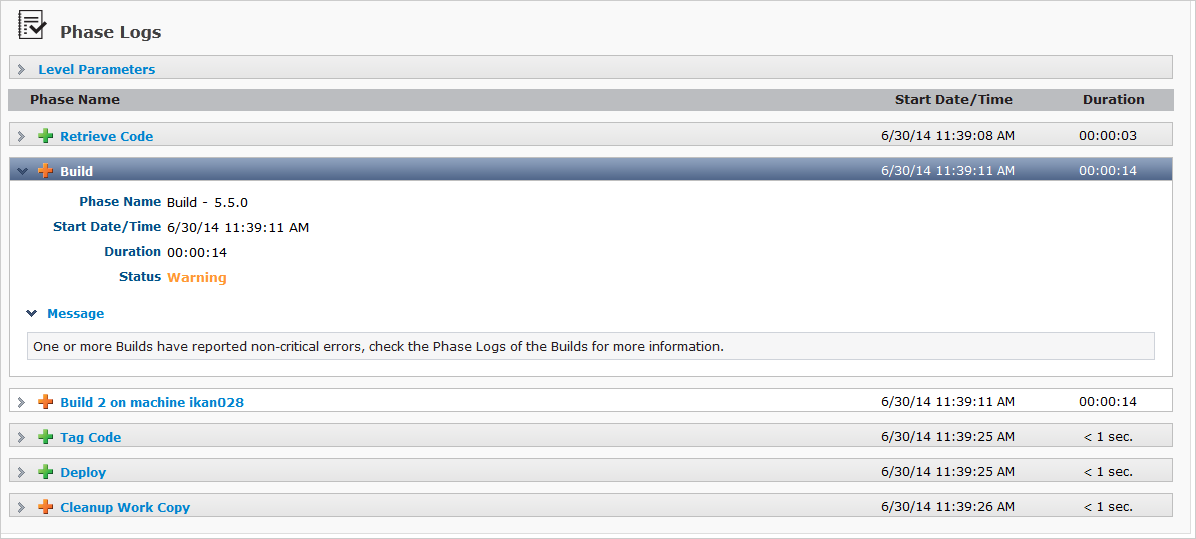
Example of a Custom Phase using Phase Parameters
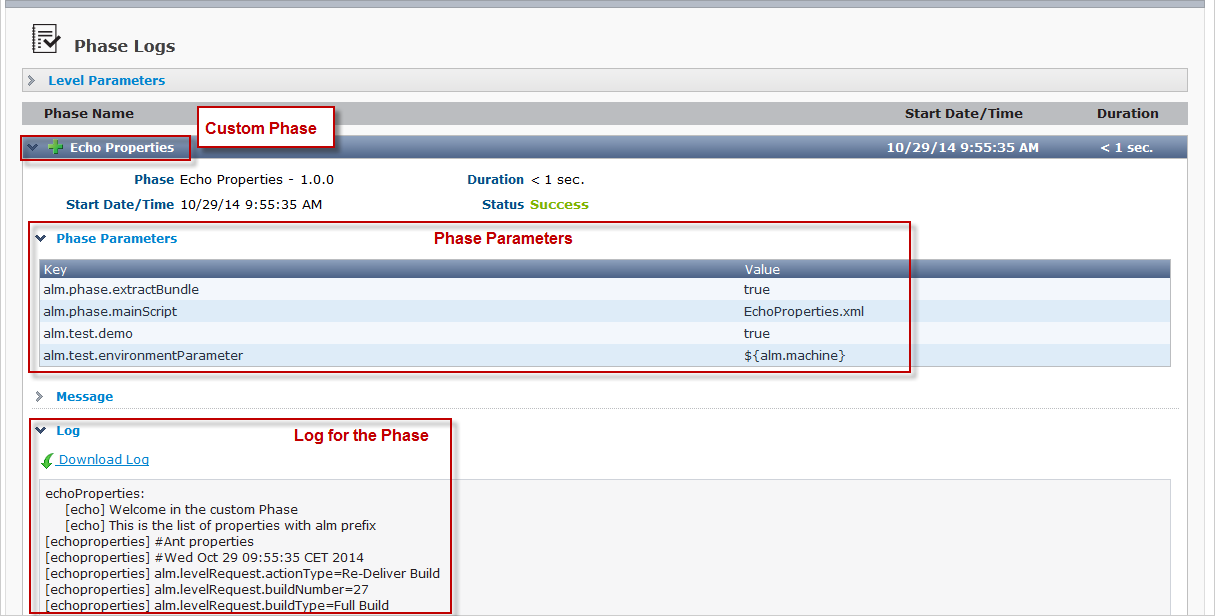
Underneath the Level Parameters, the list of all different Level Phases and their status (Success, Warning, Fail, Running, Not executed or Aborted), Start Date/Time and Duration is displayed.
For more information, refer to Phases - General Information.
|
An error status does not always mean that the Level Request has failed. That depends on the Fail on Error setting of the Level Phase which is defined on the Edit Level Phase screen. Inserting a Level Phase |
Click the name of a Phase to expand its information panel. The logs of Phases in error and running status are automatically opened.
The following information is displayed for each of the Phases:
| Field | Description |
|---|---|
Phase |
This field displays the name and the version of the Phase. |
Start Date/Time |
This field displays the date/time when the Phase execution started. |
Duration |
This field displays the total execution time of the Phase. |
Status |
This field displays the status of the Phase. The possible statuses are: Success, Warning, Fail, Running, Not executed and Aborted. |
Each Phase may contain the following subpanels:
-
Phase Parameters (only for Custom Phases)
-
Message
-
Stack Trace (only in case of a Fail)
-
Log (only for Phases executed by a Scripting Tool)
The Log can be downloaded if the Log Format type of the Scripting Tool is set to TXT.
Level Phases are handled by the IKAN ALM Server. By default, the Level Phases listed in the following table may be available. However, since the defined Level workflow can be altered (The Level Phases Overview Screen), not all Phases may be present in the Phases Log.
|
The description in this table is very concise. For a more detailed description, refer to the section Level Phases. |
| Field | Description |
|---|---|
Retrieve Code |
The IKAN ALM Server retrieves the source code from the VCR (and sometimes, in the case of certain dependencies, also the build results from the Build Archive) and stores it in a sub folder of the Work Copy Location so that the Agent can use it to perform a build. |
Build |
This Phase monitors the status of the Builds linked to the Level Request. The IKAN ALM Server notifies and does the follow-up of the IKAN ALM Agents that execute the Builds linked to the Level Request. |
Tag Code |
The IKAN ALM Server tags the source code after a successful Build on a Build Level. The tagging will not be performed for a Build Level in a Tag-based Project Stream, nor for Deliver or Rollback Level Requests. |
Deploy |
This Phase monitors the status of the Deploys linked to the Level Request. The IKAN ALM Server notifies and does the follow-up of the IKAN ALM Agents that execute the Deploys linked to the Level Request. |
Link File Revisions |
This is a specific Phase for Levels in Package-based Projects, which is absent for Release-based Projects. Based on the contents of the Package at the moment of the Level Request execution, the IKAN ALM Server registers the checked-out versions extracted from the VCR for the Level. This information allows verifying the contents (i.e., the linked File Revisions) of the Package at the moment of Level Request execution, given the fact that this contents may vary in time. |
Issue Tracking |
This is a specific Phase for Projects linked with an Issue Tracking System. Depending on the settings in the Issue Tracking system (Issue Tracking), on the VCR type and on the level type, different actions may be logged. For Build Level Requests, the log will contain Issue matching information from commit comments in the VCR. For Deliver Level Requests, it will contain the enumeration of Issues since the previous Deliver to the Level. |
Cleanup Work Copy |
The IKAN ALM Server cleans up the Work Copy folder where the source files (and other stored artifacts) have been checked out from the VCR in the Retrieve Code Phase. |
Build Actions
Build Actions are displayed on a white background in the Phase Logs list. Their description contains the Build OID and the name of the Machine on which they are executed. Their Start Date/Time and duration are also indicated.
Example of a successful Build Action
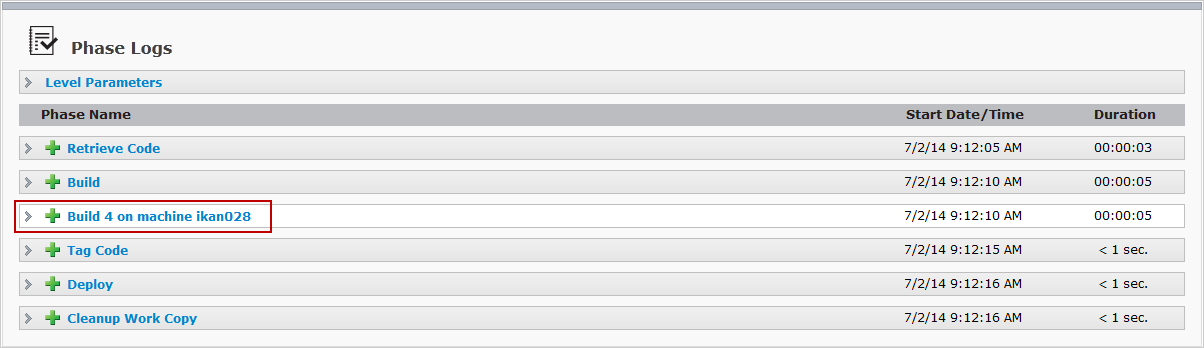
Example showing the list of Build Parameters used during the Build Action
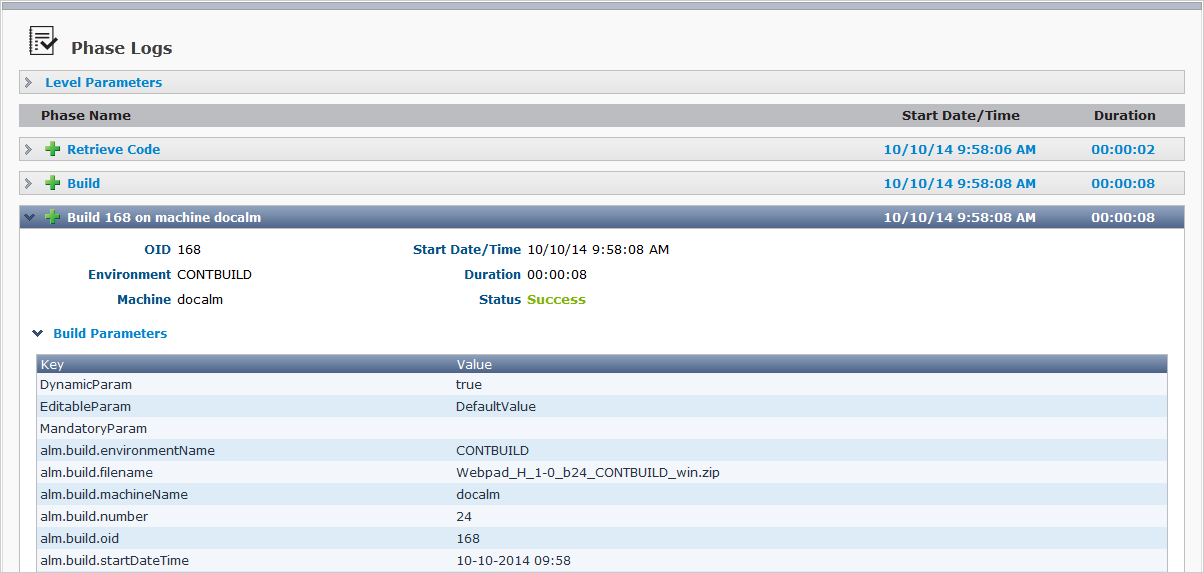
If you open the information panel of a Build Action, the following information is displayed.
| Field | Description |
|---|---|
OID |
The OID of the Build. |
Environment |
The name of the Build Environment linked to the Level Request. |
Machine |
The name of the Machine. |
Start Date/Time |
This field displays the date/time when the Build started. |
Duration |
This field displays the total execution time of the Build. |
Status |
The status of the Build. Possible status indications are:
|
Used Build Parameters |
Click this link to display all the Build parameters used during the execution of the Level Request. For each of the parameters, the table displays its key and value. For more information, refer to the section Predefined Level Parameters.
|
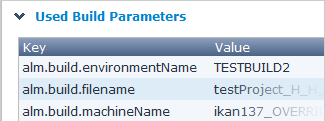
Build Phases
Build Phases are executed by the IKAN ALM Agent while handling a Build.
Each of these Phases have a status indication. An Error status does not always mean that the Build as a whole has failed. That depends on the Fail on Error setting of the Build Environment Phase, defined on the Edit Build Environment Phase screen. Editing a Build Environment Phase
The Phases listed in the following table may be available. However, since the defined Build Environment workflow can be altered (The Build Environment Phases Overview Screen), not all Phases may be present in the Phase Log.
The description in this table is very concise. For a complete description of the Build Phases, refer to Phases - General Information.
| Phase | Description |
|---|---|
Transport Source |
The Transport Source Phase transports the required Source code from the Work Copy Location on the IKAN ALM Server to the Build Environment Source Location. It logs what was transferred and which Transporter was used in the Message field. |
Verify Build Script |
The Verify Build Script Phase tries to locate the defined build script in the checked-out source code or in the IKAN ALM Script Location. It fails when it can’t find a build script. It logs where it found the Build Script in the Message field. |
Execute Script |
The Execute Script Phase will execute the Build Script using the defined Scripting Tool and Build Parameters. It logs the target folder that contains the Build results in the Message field. It also logs the full output as generated by the Build Script in a separate Log panel under the Message field. |
Transport Deploy Script |
If a Deploy Script is available on the Source Location of the Build Environment, this Deploy Script is copied to the Target Location. It logs where it found the deploy script in the Message field. |
Compress Build |
The Compress Build Phase compresses the Build result files in the Target Location. It logs the full path of the compressed file in the Message field. |
Archive Result |
The Archive Result Phase copies the compressed Build file to the Build Archive Location on the IKAN ALM Server. It logs what was transferred and which Transporter was used in the Message field. |
Cleanup Source |
Cleaning up means that all files in the Build Environment Source location (Source files, Build Script and possibly Deploy Script) are deleted. It logs the result of the cleanup in the Message field. |
Cleanup Result |
Cleaning up means that all files in the Build Environment Target location (uncompressed and compressed Build files as well as the Deploy Script) are deleted. It logs the result of the cleanup in the Message field. |
Deploy Actions
Deploy Actions are displayed on a white background in the Phase Logs list. Their description contains the Deploy OID and the name of the Machine on which they are executed. Their Start Date/Time and duration are also indicated.
Example of a Deploy with status Success
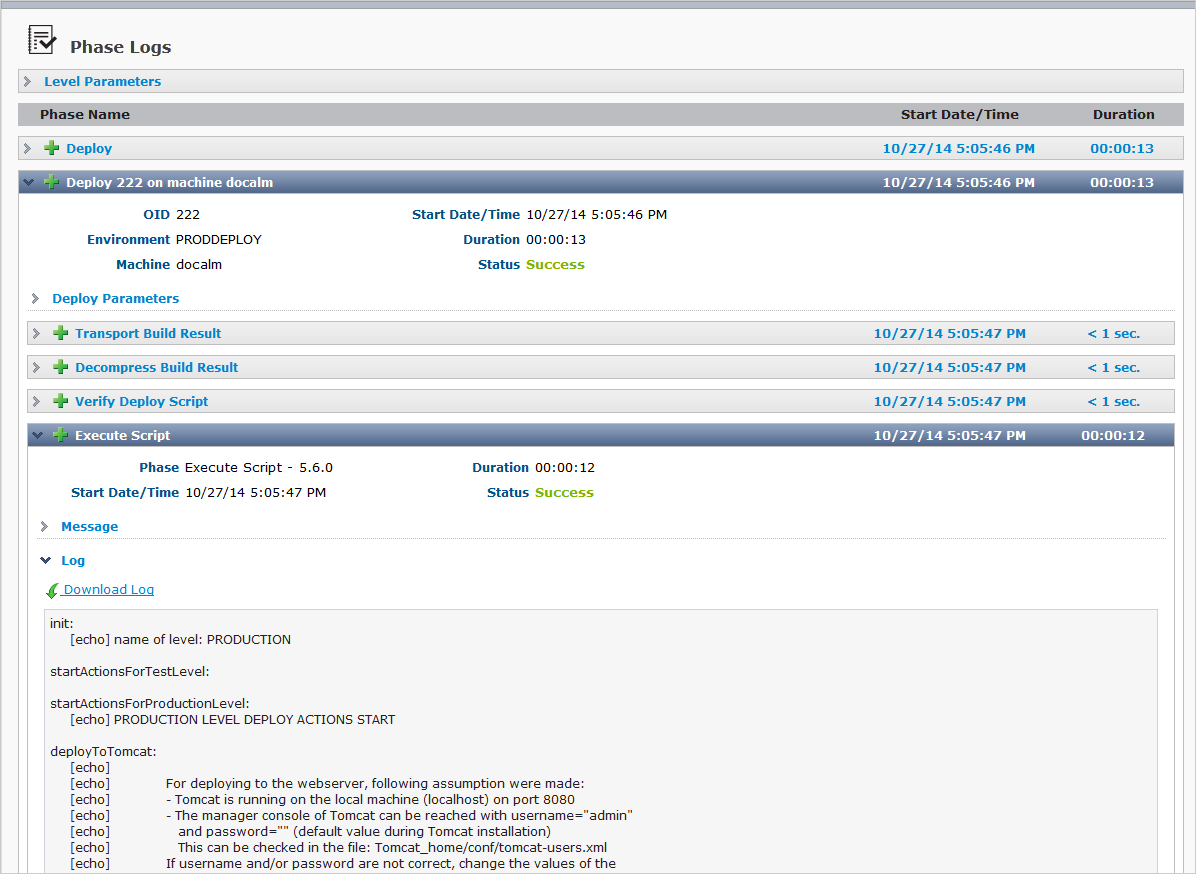
Example of a Deploy with status Warning
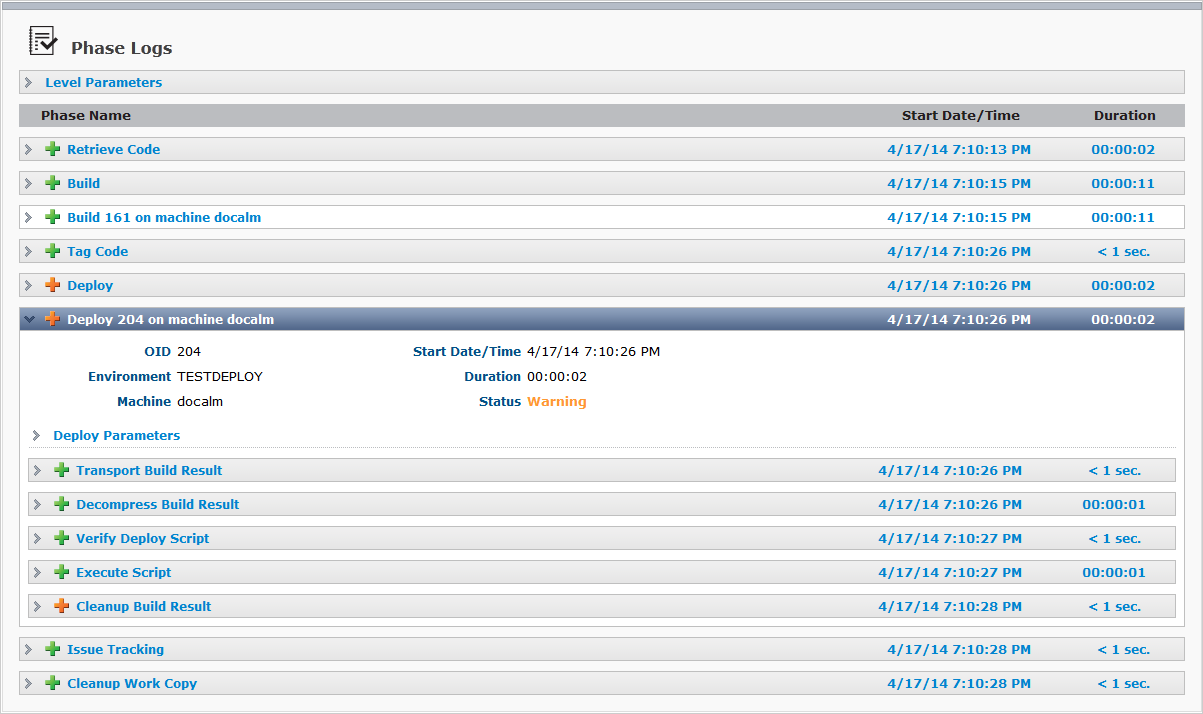
If you open the information panel of a Deploy Action, the following information is displayed.
| Field | Description |
|---|---|
OID |
The OID of the Deploy. |
Environment |
The name of the Deploy Environment linked to the Level Request. |
Machine |
The name of the Machine. |
Start Date/Time |
This field displays the date/time when the Deploy started. |
Duration |
This field displays the total execution time of the Deploy. |
Status |
The status of the Deploy. Possible status indications are:
|
Used Deploy Parameters |
Click this link to display all the Deploy parameters used during the execution of the Level Request. For each of the parameters, the table displays its key and value. For more information, refer to the section Predefined Deploy Parameters.
|
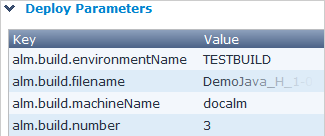
Deploy Phases
Each of these Phases have a status indication. An Error status does not always mean that the Deploy as a whole has failed, this depends on the Fail on Error setting of the Deploy Environment Phase, defined on the Edit Deploy Environment Phase screen. Editing a Deploy Environment Phase
The Phases listed in the following table may be available. However, since the defined Deploy Environment workflow can be altered (The Deploy Environment Phases Overview Screen), not all Phases may be present in the Phase Log.
The description in this table is very concise. For a complete description of the Deploy Phases, refer to Phases - General Information.
| Phase | Description |
|---|---|
Transport Build Result |
The Transport Build Phase transports the Build from the Build Archive on the IKAN ALM Server to the Deploy Environment Source Location. It logs what was transferred and which Transporter was used in the Message field. |
Decompress Build Result |
The Decompress Build Result Phase decompresses the Build file into the Deploy Environment Source Location. It logs where the Build results were decompressed in the Message field. |
Verify Deploy Script |
The Verify Deploy Script Phase tries to locate the defined deploy script in the decompressed Build result or in the IKAN ALM Script Location. It fails when it can’t find a deploy script. It logs where it found the deploy script in the Message field. |
Execute Script |
The Execute Script Phase will execute the Deploy Script using the defined Scripting Tool and Deploy Parameters. It logs the target folder of the Deploy in the Message field. It also logs the full output as generated by the Deploy Script in a separate Log panel under the Message field. |
Cleanup Build Result |
The Cleanup Build Result Phase cleans up the Build files on the Source Location for this Deploy Environment. It logs the result of the cleanup in the Message field. |
RELATED TOPICS |
Results
On the Results page you can (for each Build related to the Level Request) display the content of the compressed Build Result File, i.e., the files that were present in the Target Location at the moment the Build script ended and which are now stored in the Build Archive.

If the option Downloadable Build is activated for the Environment, you can also download the Build File or view its composition using a File Explorer.
The following information is displayed.
|
If there are no Builds, the following information will be displayed: 
|
| Field | Description |
|---|---|
Build File Name |
The name of the Build File that holds the compressed Build results. This file is stored in the IKAN ALM Build Archive Location. If the option Downloadable Build is activated for this Build Environment, this name is displayed as a hyperlink. Click the hyperlink to save a local copy of the Build file on your system. This name may have the following format: WEBPAD_H_1-0_b9_CONTBUILD_win.zip where:
If the Build failed, this field is empty |
File Size |
The size of the Build File (in bytes, kB, MB, GB or TB). |
Archive Status |
The status of the Archive. To be able to download the Build file, the archive must be Present in the IKAN ALM database. Possible values are:
|
Environment |
The name of the Build Environment where this Build was executed. |
Machine |
The name of the Machine hosting the Build Environment where this Build was executed. |
Status |
The status of the Build that produced the result. |
|
This link allows you to download the Build Result or to open it using a File Explorer. Note that this is only possible if the option Downloadable Build has been activated on the Build Environment. For more information, refer to the section Editing a Build Environment. If not, you can always visualize the tree by clicking the plus sign in front of the zip file, or use the Expand All or Collapse All links to show or hide the entire tree structure at once.
|
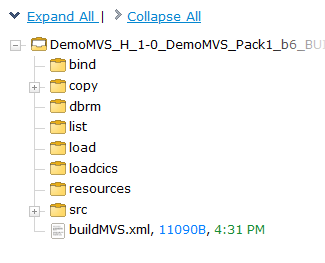
RELATED TOPICS |
Approvals
The Approvals page displays the status of the Approvals that are defined for the Level Request. The Approvals are ordered according to the sequence in which they should be approved.
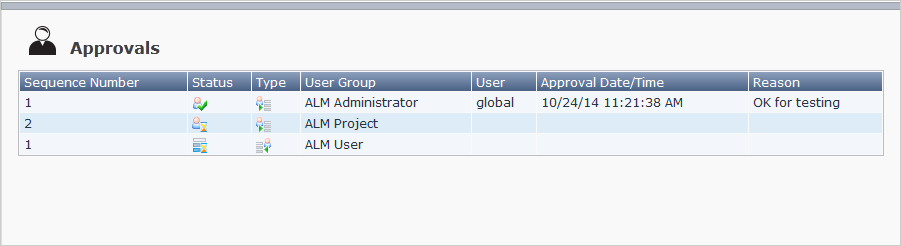
Before the Level Request can start, all Pre-Approvals need to be approved. Post-approvals need to be given at the end of the Level Request and enable to approve or reject the results or actions of the Level Request. Approvals can be approved or rejected by the Users belonging to the User Group of the Approval.
For more information on defining Approvals on Levels, refer to Level Approvals.
|
A user can check whether he/she still has to approve/reject an Approval by using the Outstanding Approvals menu option. Approvals |
The following information is displayed:
|
If there are no Approvals, the following information will be displayed: 
|
| Field | Meaning |
|---|---|
Sequence Number |
This field contains the Sequence Number of the Approval. The Approvals are ordered per type. |
Status |
This field indicates the Approval Status. Possible status indications are:
|
Type |
This field indicates the Approval Type. Possible Approval Types are: * Pre-Approval * Post-Approval |
User Group |
This field contains the name of the User Group whose members can grant or reject the Approval. This matches the settings on the Level Approvals Overview screen (Level Approvals). |
User |
This field contains the User ID of the User who granted or rejected the Approval. This field is empty for waiting Approvals. |
Approval Date/Time |
This field contains the Approve or Reject Timestamp. This field is empty for waiting Approvals. |
Reason |
This field contains the comment the User entered in the Reason field when he or she granted or rejected the Approval. For some special events, like Level Request cancellations, abortions or failures, this reason is automatically provided by IKAN ALM. |
RELATED TOPICS |
Issues
The Issues page displays the list of Issues that have been linked to a Level Request. Issues can get linked to a Level Request automatically by IKAN ALM during the execution of the Level Request, or manually by a User after the Level Request has ended.

Refer to the section Issue Tracking for more information on defining on external Issue Tracking System, and to Phases - General Information for more information on the Issue Tracking Phase.
|
Issue information is only visible when the Project of the Level Request is linked to an Issue Tracking System. See: Editing Project Settings If the project is connected to an Atlassian JIRA, MicroFocus ALM, GitHub or Microsoft Team Foundation Issue Tracking System, the description, status, owner and priority information will automatically be filled in based on the Issue information in the Issue Tracking System concerned. For other Issue Tracking Systems, you can add the information manually. |
The following information is available:
| Field | Meaning |
|---|---|
Issue ID |
This field displays the ID by which the Issue is defined in the external Issue Tracking System. If the URL field of the Issue Tracking System definition is not empty, this field will be displayed as a link. Click the link to directly view the Issue in the external Issue Tracking System’s Web interface. Refer to Creating an Issue Tracking System for more information on the URL field. |
Description |
This field displays the Description of the Issue. |
Status |
This field displays the Status of the Issue |
Owner |
This field displays the owner of the Issue. |
Priority |
This field displays the Priority of the Issue. |
|
If there are no Issues, the following information will be displayed: 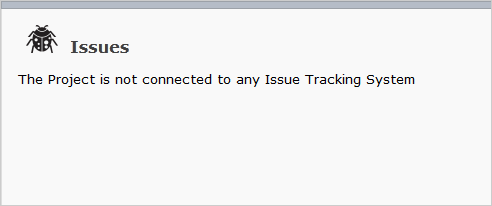
|
|
Apart from the Issue ID, the information in the fields may not be automatically filled in when IKAN ALM synchronizes the Issues with the Issue Tracking System. In that case, the values need to be provided manually by editing the Issue. |
Use the appropriate link for editing, deleting or adding an Issue.
|
These links are only available for Build Levels.
|
Editing an Issue
This option is provided to manually update the fields of an Issue linked to this Level Request.
-
Click the
 Edit link.
The Edit Issue screen is displayed:
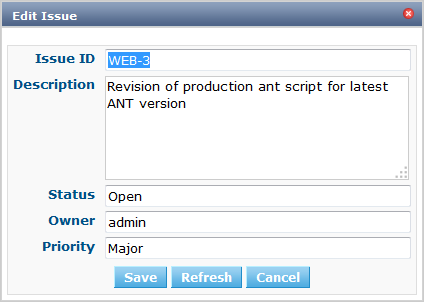
-
Change the fields as required.
For a detailed description of the fields, refer to Adding an Issue.
-
Click Save to save your changes.
You can also click:
-
Refresh to retrieve the settings from the database.
-
Cancel to return to the previous screen without saving your changes.
-
Deleting an Issue
This option is provided to manually update the fields of an Issue linked to this Level Request.
-
Click the
 Delete link.
The Confirm Issue Deletion screen is displayed:
-
Click Delete to confirm the Issue Deletion.
You can also click Cancel to return to the Issues page without deleting the Issue.
Synchronizing an Issue
|
This option is only available for Atlassian JIRA, MicroFocus ALM, GitHub and Microsoft Team Foundation. |
MF ALM Defects, JIRA Issues, GitHub Issues and Team Foundation Artifacts may be linked to an IKAN ALM Level Request, based on the comments provided by the developers when they commit their code to the VCR. IKAN ALM retrieves information from the corresponding Issue, such as a short description, the owner and the priority. This information is synchronized during the Issue Tracking Phase each time the Level Request is delivered to the next Level in the IKAN ALM Lifecycle.
The Synchronize option is provided to manually synchronize the Status, Owner and Priority fields of an Issue linked to this Level Request. This may be useful when Issues are manually added to the Level Request, e.g., when they were omitted by the developers in the commit comments.
-
Click the
 Synchronize link.
 -
If the synchronization succeeds, the Status, Owner and Priority fields will be updated and a message confirming the successful synchronization is displayed at the top of the screen.
If the synchronization fails, an error message indicating the problem will be displayed.
Adding an Issue
This option is provided to manually link Issues to a Level Request.
This may be necessary when the automatic process did not detect some Issues, or when Issues need to be linked with Level Requests that were executed at a time when an external Issue Tracking System was not yet properly configured in IKAN ALM.
-
Click the Add Issue link.
The Add Issue screen is displayed:
The following fields are available. Fields marked with an asterisk are mandatory.
Field Description Issue ID
Enter the number by which the Issue is defined in the external Issue Tracking System.
This value is used in the Related Issues panel on the Level Request Detail screen to provide the direct link to the Issue in the external Issue Tracking System’s Web interface.
This field is mandatory
Description
Enter text describing the Issue.
This field is optional.
Status
Enter the Status of the Issue (e.g.: open, closed, in progress, …)
This field is optional.
Owner
Enter the Owner (or reporter) of the Issue.
This field is optional
Priority
Enter the Priority of the Issue (e.g.: high, medium, low,…)
This field is optional.
For JIRA Issues, MicroFocus ALM Defects, GitHub Issues and Team Foundation Artifacts, it’s sufficient to enter the Issue ID. After having created the Issue, synchronize the issue (Synchronizing an Issue) to automatically retrieve the additional fields from the Issue Tracking System.
-
Fill out the fields as required and click Create.
You can also click:
-
Reset to retrieve the settings from the database.
-
Cancel to return to the previous screen without saving your changes.
-
RELATED TOPICS |
Sources
The Sources page displays the list of all the sources (and their revision numbers) in the VCR used by this Level Request.
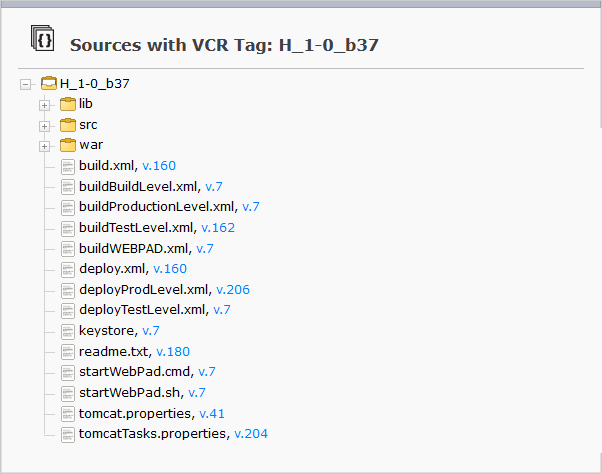
For Builds based on latest code, these files were tagged by IKAN ALM in the Tag Code Phase of this Level Request.
For Builds based on tagged code, these files were already tagged by either a previous Level Request on the Build Level of this Lifecycle or, in the case of a Tag-Based build, by an external system.
|
This information is only visible if the Level Request has ended with status Success or Warning. |
RELATED TOPICS |
Modifications
The Modifications page allows you to verify the differences between the sources used to create the current Build and the ones used for the Build generated by the previous Level Request. Although there is no Build on Levels with only Deploy Environments, this information will still be visible for Level Requests on such Levels, since in this case there is always a Build that is deployed to that Level.
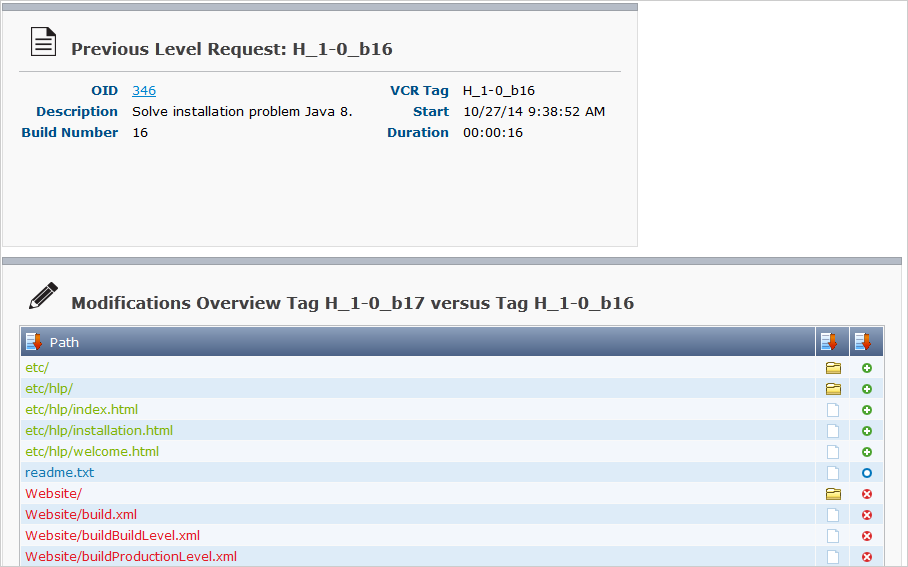
The list of modifications shows additions in green, modifications in blue and deletions in red. The Type (File or Directory) and Modification Type are displayed in separate columns.
The following information is displayed for the previous Level Request:
| Field | Meaning |
|---|---|
OID |
This field displays the OID of the previous Level Request. When clicking this OID link, the detail of the previous successful build will be displayed. |
Description |
This field displays the description of the previous Level Request. |
Build Number |
This field displays the Build number of the previous Level Request. |
VCR Tag |
This field contains the VCR Tag of the previous Level Request. This Tag matches a Build with its source code in the VCR. The format of the VCR Tag normally matches the Tag Template defined for the Stream. Project Streams However, the user can override the default VCR Tag while creating a Level Request, so that the Tag Format can be completely different. |
Start |
This field displays the date/time when the previous Level Request started. |
Duration |
This field displays the total execution time of the previous Level Request. |
|
Modifications cannot be shown if there is no previous successful Level Request to compare with. On the Build Level, modifications are only shown for the statuses Warning or Success. |
RELATED TOPICS |
Dependencies
The Project Dependency functionality makes it possible to reuse common libraries or sources from Child Projects.
Projects can be reused in two ways:
-
as a Build result retrieved from the Build Archive, or
-
as sources retrieved from the Versioning System.
In the case of reuse of a Build result, there will be a link between the parent Build object and the child Build object.
In the case of reuse of sources, there will be a link between the parent Build object and the child Level Request object.
|
Project Stream dependencies are defined on the Edit Project Stream Dependency Detail screen using the Code Retrieval field. See: Editing a Project Stream Dependency |
The Dependencies page is the starting point to find all the information concerning:
Build Dependencies
The Dependencies page displays the specific Builds and/or Sources of the Child Projects where this Build depends on. Note that the transitive dependencies of a Child whose sources are used will also be displayed, since they were also collected in the Retrieve Code Phase.
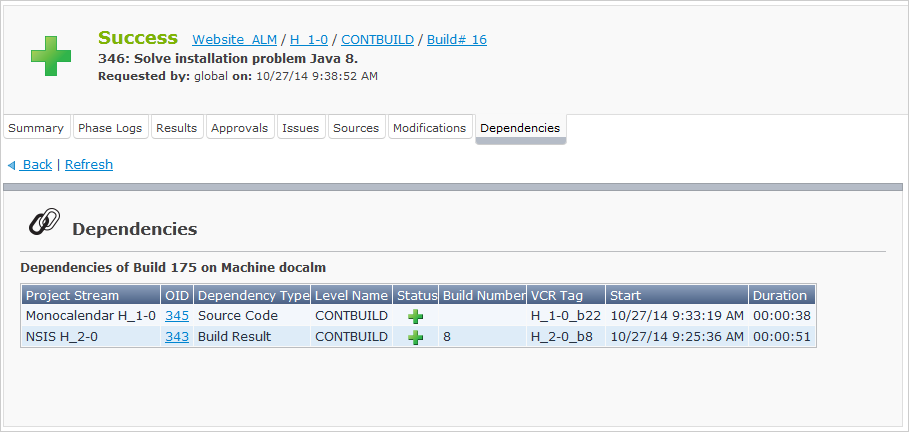
|
If there are no Dependencies, the following information will be displayed: 
|
Per Build, a Dependency table will be displayed.
-
Verify the information on the Dependencies table.
The following information fields are available:
Field Meaning Project Stream
This field displays the Name followed by the Build Prefix of the Child Project Stream.
OID
This field displays the Level Request OID of the Child Build.
Click the link to display the details for this Level Request.
Dependency Type
This field displays the Dependency Type of the Build Dependency.
Possible types are:
-
Source Code: the sources of the Child Build are used
-
Build Result: the Build result of the Child Build is used
See the description of the Code Retrieval field in the section Editing a Project Stream Dependency.
Level Name
This field displays the name of the Level.
Status
This field displays the status of the Level Request of the Child Build.
Build Number
This field displays the Build Number of the Child Build.
This field is empty if the Dependency Type is Source Code.
VCR Tag
This field displays the VCR Tag of the Level Request of the Child Build.
Start
This field displays the date/time when the Level Request of the Child Build started.
Duration
This field displays the total execution time of the Level Request of the Child Build.
-
-
You click through on one of the OID links to display its Level Request Details.
Build Usage
In the case of reuse of a Build result, there will be a link between the parent Build object and the child Build object.
In that case, the Build Usage panel provides information concerning the Level Requests using the Build Result of a specific Build.
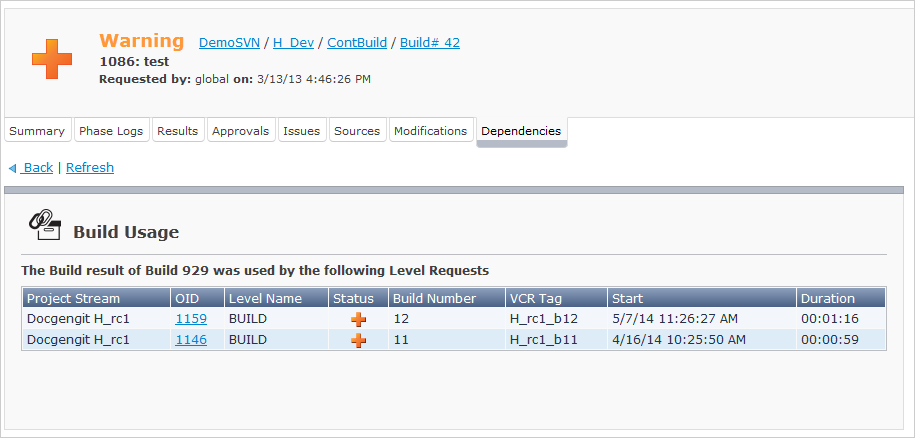
This information is useful in case there is a problem with a child library, or with the sources of a Project which is used by another Project. It allows you to find out whether other Projects use this child library, or these child sources.
|
This information is only visible if a parent (dependent) project has used this Level Request’s Build result in a Build of its own. |
-
Verify the information on the Dependencies table.
The following information fields are available:
Field Meaning Project Stream
This field displays the Name followed by the Build Prefix of the Parent Project Stream.
OID
This field displays the Level Request OID of the Parent Build.
Click the link to display the details for this Level Request.
Level Name
This field displays the name of the Level.
Status
This field displays the status of the Level Request of the Parent Build.
Build Number
This field displays the Build Number of the Parent Build.
VCR Tag
This field displays the VCR Tag of the Level Request of the Parent Build.
Start
This field displays the date/time when the Level Request of the Parent Build started.
Duration
This field displays the total execution time of the Level Request of the Parent Build.
-
You can click through on one of the OID links to display its Level Request Details.
Level Request Usage
In the case of reuse of sources, there will be a link between the parent Build object and the child Level Request object. In that case, the Level Request Usage table displays the Level Requests of parent projects that use this Level Request’s sources.
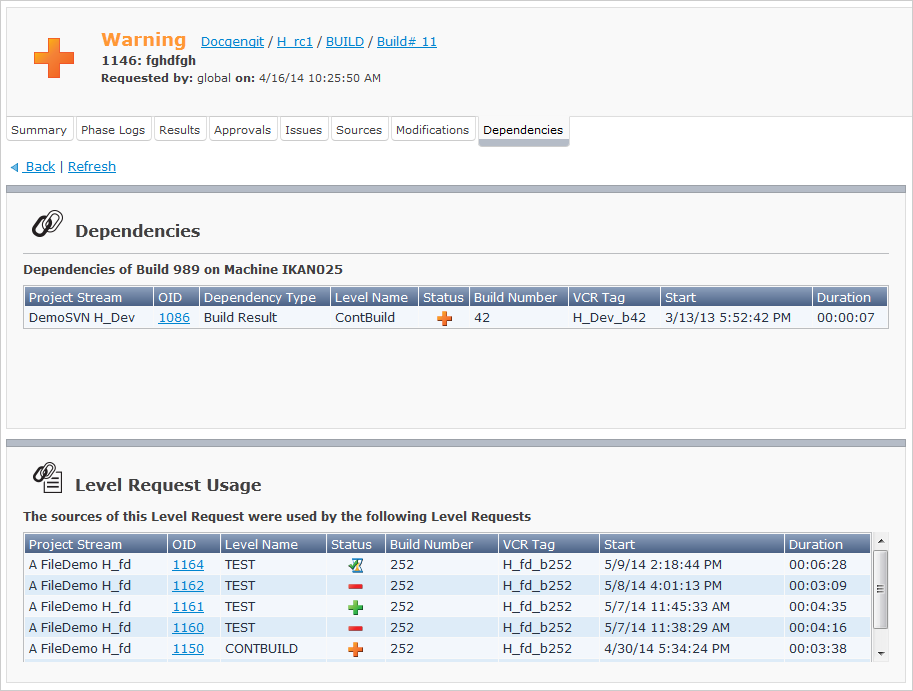
|
This information is only visible if a parent (dependent) project has used this Level Request’s sources in a Build of its own. |
-
Verify the information on the Level Request Usage table.
The following information fields are available:
Field Meaning Project Stream
This field displays the Name followed by the Build Prefix of the Parent Project Stream.
OID
This field displays the Level Request OID of the Parent Build.
Click the link to display the details for this Level Request.
Level Name
This field displays the name of the Level.
Status
This field displays the status of the Level Request of the Parent Build.
Build Number
This field displays the Build Number of the Parent Build.
VCR Tag
This field displays the VCR Tag of the Level Request of the Parent Build.
Start
This field displays the date/time when the Level Request of the Parent Build started.
Duration
This field displays the total execution time of the Level Request of the Parent Build.
-
You can click through on one of the OID links to display its Level Request Details.
RELATED TOPICS |
Build History Screen
The Build History option allows to quickly verify the Lifecycle of a specific Build (identified by its number).
-
Select Level Requests > Overview Level Requests on the Main Menu.
-
Click the Build Number link you want to see the history for.
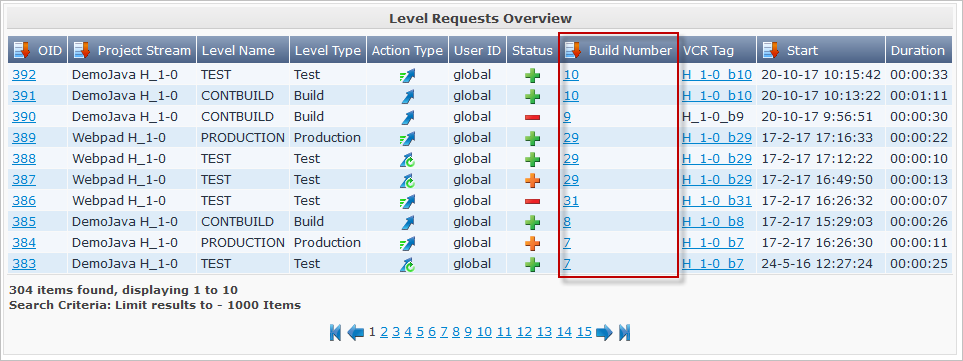
The Build History screen is displayed:
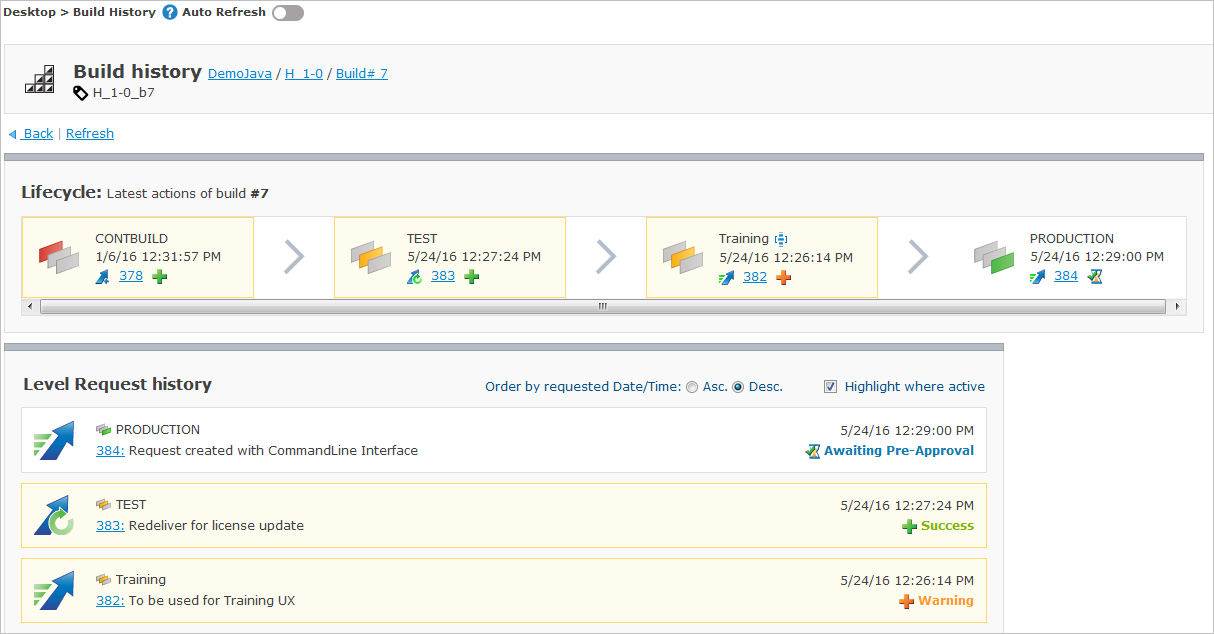
If the Auto Refresh option is activated, the Build History screen will be refreshed each time the defined rate is expired. Auto Refresh
The Build History can also be accessed from the Builds and Deploys Overview, and from the Level Request Detail screen.
The screen is structured as follows:
-
Status Header
The header displays the Project Name, Project Stream Identification and Build number of the Level Request, and the VCR tag.
Those links lead to the Level Request Overview screen. Depending on the link element you select, more information will already be filled in on the Search Level Request panel to limit the Level Requests displayed on the overview.
-
Lifecycle Panel
This panel shows an ordered view of the latest Build actions for all Levels of the Lifecycle connected to the Project Stream.
For each Level, the latest Level Request of the Build is shown, with the Requested Date/Time, the Type, a link to the Level Request Detail screen and the Status. If this Level Request is also the latest for a Level, it will be highlighted. If the Build was never executed/delivered to the Level, only the Level Name will be visible.
The Level type is indicated as follows:
Icon Description 
Build Level

Test Level

Production Level
If a Level is optional, it is preceded by the
icon. -
Level Request History
The Level Request History provides information about all Level Requests related to the selected Build. The Level Requests are ordered so that the most recent Level Request (i.e., the Level Request indicating the current situation) is displayed at the top of the list.
The following information is displayed for each of the Level Requests:
-
The Action Type of the Level Request (Requested or Forced Build, Deliver or Rollback)
-
The Level Type (Build, Test or Production)
-
The Level Request OID
The OID is displayed as a link. Clicking this link will display the Level Request Detail screen).
-
The Requested Date/Time
-
The Level Request status
-
The Level Requests can be sorted in ascending or descending order.
+ By default, the “active” Level Requests are high-lighted in a different color. A Level Request is active if it is the last successful (status is set to Success or Warning) Level Request on the Level. You can deactivate this, by deselecting the Highlight where active option.
-
Builds and Deploys Overview
-
Select Level Requests > Overview Builds and Deploys Level Request on the Main Menu.
The Builds and Deploys Overview screen is displayed:
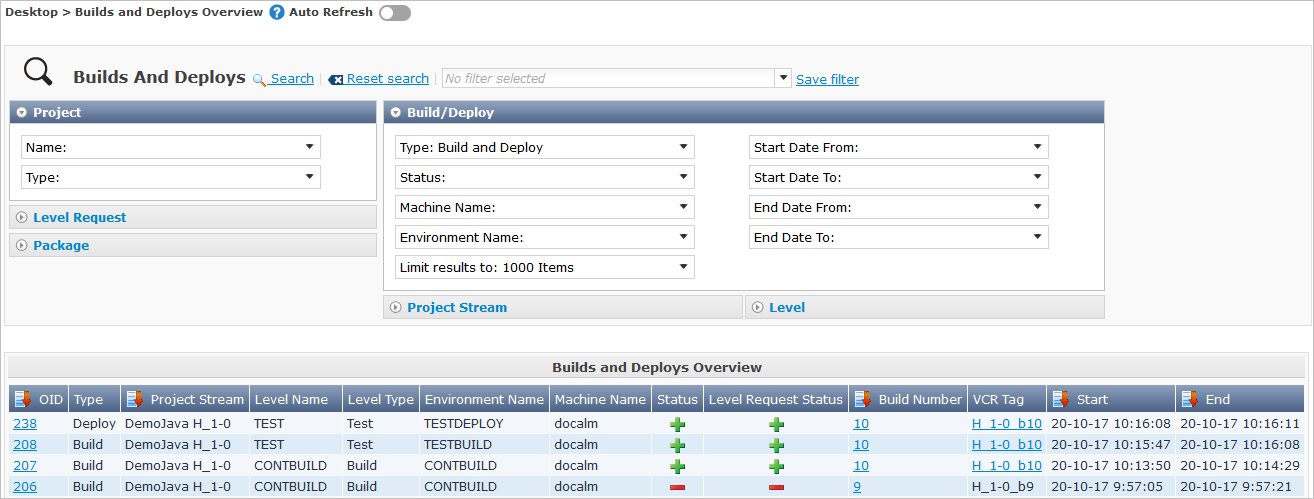
If the Auto Refresh option is activated, the Build and Deploys Overview screen will be refreshed each time the defined rate is expired. Auto Refresh
-
Use the search criteria on the Search Builds and Deploys panel to only display the Builds and/or Deploys you are looking for.
You can select multiple statuses and/or action types on the select boxes using the SHIFT or CTRL key.
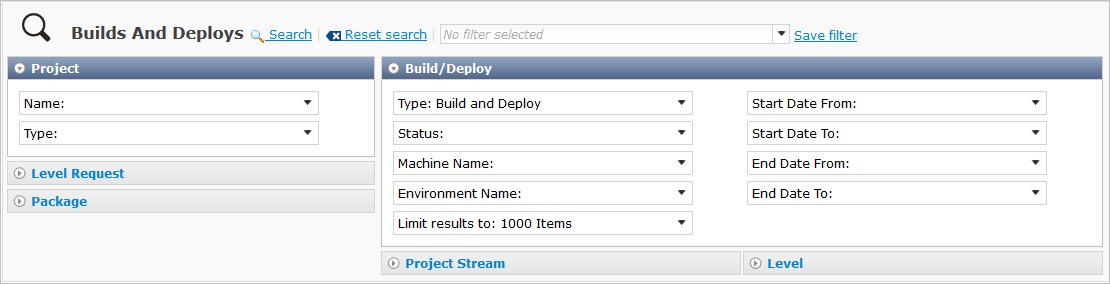
The following options are available:
-
Show advanced options: to display all available search criteria.
-
Search: in principle it is not necessary to click the Search option. The results on the overview will be automatically synchronized in function of the selected criteria.
-
Reset search: to clear all search criteria and display the full list of items.
-
Select an existing filter from the drop-down list.
-
Save filter: to save the current search criteria for future use.
For more information on the usage of search panels and filters, refer to the sections Search Panels and Defining Search Filters.
-
-
Verify the information on the Builds and Deploys Overview panel.
Columns marked with the
icon can be sorted alphabetically (ascending or descending).The following information fields are available:
Field Description OID
This field contains the OID (Object Identifier) of the Build or Deploy action.
Click this link to display the details for this Level Request which created the Build or Deploy.
For more information, refer to the section explaining the Summary tab page of the Level Request Detail screen.
Type
This field contains the object type: Build or Deploy.
Project Stream
This field contains the identification of the Project Stream.
This name is composed of:
-
Project Name
-
Project Stream Type: H (Head) or B (Branch)
-
Project Stream Prefix, optionally followed by the Suffix in case of a Branch Project Stream
Example:
Webpad H_1-0Project Name
This field contains the name of the Project concerned by the Level Request which created the Build or Deploy.
Level Name
This field contains the name of the Level concerned by the Level Request which created the Build or Deploy.
Level Type
This field contains the type of the Level concerned by the Level Request (Build, Test or Production) which created the Build or Deploy.
Environment Name
This field contains the name of the Build or Deploy Environment.
Machine Name
This field contains the name of the Machine.
Status
This field contains the status of the Build or the Deploy.
The following status indications are possible:
-
Success
-
Warning
-
Fail
-
Run
-
Wait
-
In progress
-
Rejected
-
Canceled
-
Aborted
For more information, refer to the section Summary.
Level Request Status
This field contains the Level Request status. The following status indications are possible:
-
Success
-
Warning
-
Fail
-
Run
-
Aborting
-
Awaiting requested Date/Time
-
Awaiting Pre-Approval
-
Awaiting Post-Approval
-
Rejected
-
Canceled
-
Aborted
For more information, refer to the section Level Requests Overview.
Build Number
This field contains the Build Number of the Level Request. Use this link to access the Build History Detail screen.
VCR Tag
This field contains the VCR Tag of the Level Request. This Tag matches a Build with its source code in the VCR.
The Level Request VCR Tag is displayed as a link leading to the Sources tab page on the Level Request Detail screen. For more information, refer to the section Sources.
Start
This field indicates the date and time when the Build or Deploy execution started.
End
This field indicates the date and time when the Build or Deploy execution ended.
-
-
View the details of a specific Build or Deploy
Click the Level Request’s OID link which created the Build or Deploy.
For more information, refer to the section explaining the Summary tab page of the Level Request Detail screen.