Environment Parameters
Environment Parameters are parameters that can be used during the Execute Script Phase which runs a Build/Deploy Script. They may also be used during the execution of a Custom Phase.
Depending on the Build/Deploy Tool (Execute Script Phase) or the Execution Type (Custom Phase), the defined parameters will be:
-
added to the command which executes the Script (in the case of NAnt and Maven2)
-
written to a file named alm_ant.properties (in the case of Ant) which is automatically loaded with the option
-propertyfile. This property file is created on the fly in the source location of the Environment in the directory containing the Script (this may be a subdirectory of the source location of the Environment in case the location of the Script was defined using a relative path).In case of a Custom Phase, this file is located in a subdirectory of the source location, together with the extracted script and other resources of the Custom Phase.
Once the Build/Deploy process has terminated, this file is automatically deleted, unless the Debug option for the Environment linked to the Level has been activated.
Environment Parameters can be divided into two categories:
-
Predefined Parameters: these are Environment Parameters that are always available. A list of these predefined parameters can be found in:
To override the predefined parameter value for a specific Environment, define a Parameter with the same name on that Environment.
-
User-defined Parameters: The option Build Environments > Build Parameters or Deploy Environments > Deploy Parameters allows you to define your own Environment Parameters.
|
On the Miscellaneous subpanel of the System Settings screen, you can specify the prefix for the predefined Parameters and properties file. See System Settings - Miscellaneous. There also exist Predefined Level Parameters. They are available during the execution of a Custom Phase on a Level, They may not be overridden, since it is not (yet) possible to define Level Parameters. For more information, refer to the appendix Predefined Level Parameters. |
The Parameters Overview screen lets you create, edit, delete and copy Environment Parameters and allows checking their history. The following actions are possible:
The Parameters Overview Screen
|
This option is only available if you have Project Administrator Access Rights. |
-
In the Project Administration context, select Build Environments > Build Parameters or Deploy Environments > Deploy Parameters.
The following screen is displayed:

-
Define the required search criteria on the search panel.
The list of items on the overview will be automatically updated based on the selected criteria.
You can also:
-
click the Show/hide advanced options link to display or hide all available search criteria,
-
click the Search link to refresh the list based on the current search criteria,
-
click the Reset search link to clear the search fields,
-
-
Verify the information on the Parameters Overview panel.
The Parameters Overview panel displays the defined Environment Parameters for each of the Environments.
For a description of the fields, see Creating Environment Parameters.
The icon
 indicates that the parameter is a Machine Parameter. See Machine Parameters. In order to show these Parameters, you should set the Show Machine Parameters criterion to Yes.
Columns marked with the
 icon can be sorted alphabetically (ascending or descending).
 -
Depending on your access rights, the following links may be available on the Parameters Overview panel:
Link Description 
Create
This option is available to all Users with Project Administrator Access Rights. It allows creating an Environment Parameter.

History
This option is available to all Users with Project Administrator Access Rights. It allows viewing the Parameter history of the selected Environment.

Edit
This option is available to all Users with Project Administrator Access Rights. It allows editing the selected Environment Parameter definition.

Delete
This option is available to all Users with Project Administrator Access Rights. It allows deleting the selected Environment Parameter definition and (optionally) deleting Environment Parameters with the same key linked to other Build or Deploy Environments.

Copy Parameter
This option is available to all Users with Project Administrator Access Rights. It allows copying the selected Environment Parameter definition to one or more Environments.
Creating Environment Parameters
-
Switch to the Parameters Overview screen for the required Project.
-
Click the
Create Parameter link to display the Parameter Action window.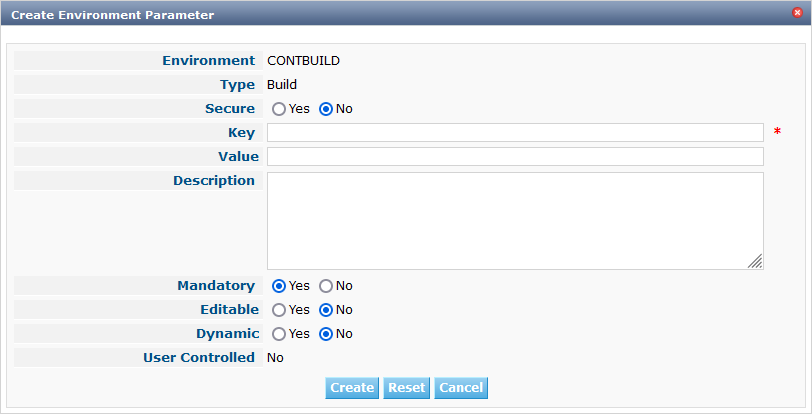
-
Fill out the fields for the new Environment Parameter.
The following fields are available. The Key field is mandatory:
Field Meaning Environment
This field displays the name of the current Environment.
Type
This field displays the type of Parameter being created: Build or Deploy.
Secure
This field indicates whether the Parameter is secured or not.
Key
In this field, enter the Key (Name) for the Environment Parameter.
Note: If an Environment Parameter and a Machine Parameter have the same Key, the Environment Parameter takes precedence.
Value
In this field, enter the value(s) for the new Environment Parameter.
The following possibilities apply:
-
Enter the fixed value, if you are creating a non-editable Environment Parameter.
-
Enter the default value, if you are creating an editable Environment Parameter.
-
Enter the list of possible preset values, separated by a semicolon (;), if you are creating a dynamic Environment Parameter.
Repeat Value
Required field for secured Environment Parameters: repeat the secured value.
Description
In this field, enter a description for the Parameter.
Mandatory
Select the Yes option button, if the new Environment Parameter must be defined as mandatory. When you create a Level Request for this Environment, the mandatory Environment Parameters will always be provided to the Script.
Select the No option button, if the new Environment Parameter should not be defined as mandatory. When you create a Level Request for this Environment, you can decide whether you want to provide the non-mandatory Environment Parameter to the Script.
Editable
Select the Yes option button, if the new Environment Parameter must be defined as editable. When you create a Level Request for this Environment, you can accept the default value (the one you enter in the Value field during creation) or define a value yourself for this Environment Parameter.
Select the No option button, if the new Environment Parameter should not be defined as editable. When you create a Level Request for this Environment, only the preset value (the one you enter in the Value field during creation) for this Environment Parameter can be offered to the Script.
This field is not provided for secured Environment Parameters.
Dynamic
Select the Yes option button, if the new Environment Parameter must be defined as dynamic. When you create a Level Request for this Environment, you can select one of the predefined values from the drop-down list. These are the values you enter in the Value field during creation and which you separate by a semicolon (;). The selected value will be offered to the Script.
Select the No option button, if the new Environment Parameter should not be defined as dynamic.
This field is not provided for secured Environment Parameters.
User Controlled
Allow Users with a Project User role to create, read, update and delete Environment Parameters. Once enabled, the Parameters retain this state even if a Project Administrator disables this option afterwards.
-
-
Click Create to confirm the creation of the Environment Parameter.
You can also click:
-
Reset to clear the fields and restore the initial values.
-
Cancel to return to the previous screen without saving the changes.
-
Viewing the Environment Parameters History
Switch to the Parameters Overview screen for the required Project.
The Parameters Overview Screen
. Click the ![]() History link on the Parameters Overview panel to display the Environment History View.
History link on the Parameters Overview panel to display the Environment History View.
For more detailed information concerning this History View, refer to the section History and Event Logging.
Click Back to return to the previous screen.
Editing Environment Parameters
-
Switch to the Parameters Overview screen for the required Project.
-
In the Actions column, click the
Edit link in front of the Environment Parameter to be edited.The following window is displayed:
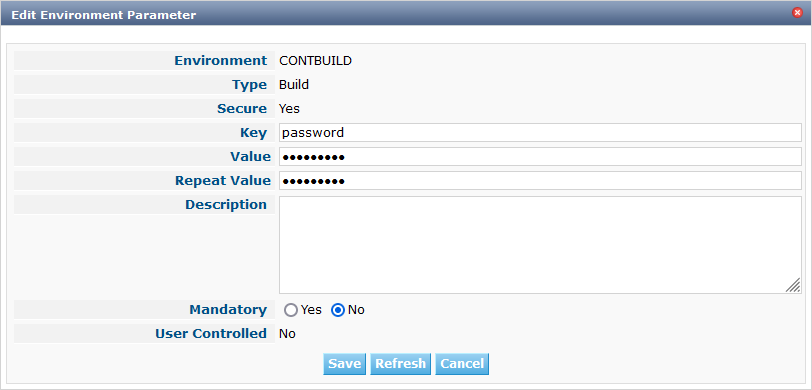
For a description of the fields, refer to Creating Environment Parameters.
-
Edit the fields as required, and click Save to save your changes.
You can also click:
-
Refresh to clear the fields and restore the initial values.
-
Cancel to return to the previous screen without saving your changes.
-
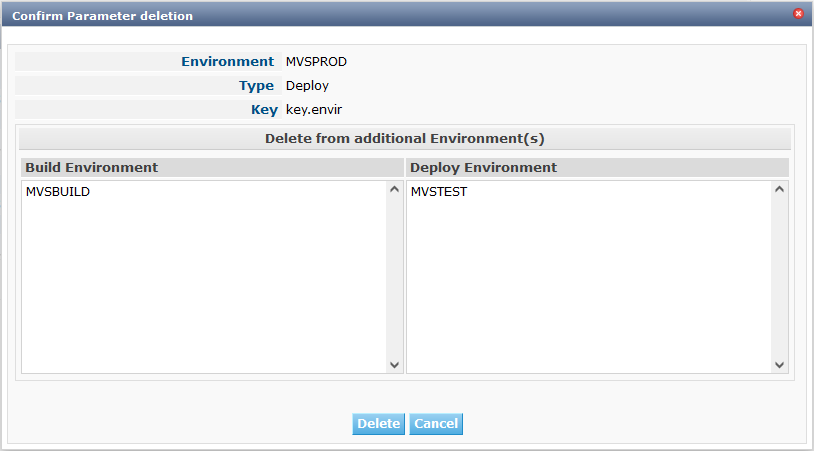
Deleting Environment Parameters
-
Switch to the Parameters Overview screen for the required Project.
-
In the Actions column, click the
Delete link in front of the Environment Parameter to be deleted.The following confirmation window is displayed:
-
Optionally, select additional Environments. This allows for deleting parameters with the same key name on the selected Build and Deploy Environments.
-
Click Delete to confirm the deletion of the Environment Parameter.
You can also click Cancel to return to the previous screen without saving your changes.
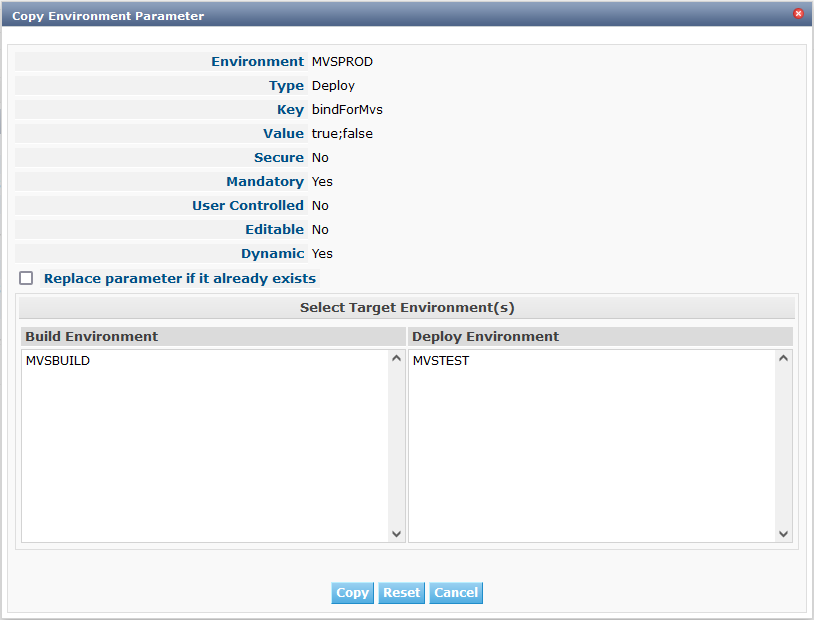
Copying Environment Parameters
To avoid having to redefine Environment Parameters which are identical for multiple Environments, you can copy the required Environment Parameter to other Build and/or Deploy Environments.
-
Switch to the Parameters Overview screen for the required Project.
-
In the Actions column, click the
Copy link in front of the Environment Parameter to be copied.The following window displays the values of the parameter you are about to copy.
-
Indicate whether you want to replace the parameter in case it already exists in the target Build or Deploy Environment(s).
-
Select the Target Environment(s)
-
Click Copy to confirm copying the Environment Parameter.
You can also click:
-
Reset to clear the fields and restore the initial values.
-
Cancel to return to the previous screen without saving the changes.
-