Users and Groups
Refer to the following sections for more information on:
Users
IKAN ALM uses the JAAS interface to base its User ID/Password authentication on existing Security Systems in your organization. This means that User IDs and external User Groups are maintained outside IKAN ALM.
As a result, Users may not be created in IKAN ALM via a menu entry: a User must first be created in the external security system. If a User has the appropriate rights, he or she may log on to IKAN ALM. Based on this first successful logon, the User will be automatically created in IKAN ALM.
A User ID can only be used to log on to IKAN ALM and to define Personal Settings, if it exists in this external Security System.
If your IKAN ALM license allows no floating users and is fully based on reserved users it will not be possible to log on with another User ID once the maximum number of reserved active users is reached. If additional users need to log on to IKAN ALM, there are two possibilities:
-
expand the IKAN ALM license (by adding reserved or floating users)
-
archive one or more active users that are no longer required
|
Archived users can no longer log on to IKAN ALM. They are maintained in the system solely for historical purposes, in other words to display what actions they have performed in the past. Re-activating an archived user is only possible if this action does not exceed the user limit imposed by your IKAN ALM license. |
If your IKAN ALM license allows floating users, new users can always log in, on condition that
-
not all floating licenses are occupied by other User IDs
-
the User is created in the external security system and has access rights to log on to IKAN ALM
Access Rights in IKAN ALM are based on the adherence of User IDs to User Groups. There are two types of User Groups: external and internal. External User Groups must exist in the external Security System, before they can be defined and used in IKAN ALM. There is no automatic mechanism for importing external User Groups from the external Security System into IKAN ALM, as a lot of these User Groups may not be required in IKAN ALM.
It is possible to add a User ID to an external User Group or to delete a User ID from such a User Group within IKAN ALM, but these actions have only a temporary effect. As soon as the IKAN ALM session is terminated and a new session is opened, IKAN ALM reads the settings from the external Security System and synchronizes the external IKAN ALM User Groups with the definitions available in this external security system. In other words, if the adherence of a User ID to an external User Group changes permanently, this change must be configured in the external Security System, not in IKAN ALM.
On the other hand, a lot of User Groups can be defined that are only used for notifications and approvals. Managing these groups in an external security system may be impractical, since the User Groups are used by IKAN ALM only. For that reason, there exist internal User Groups which can be managed in IKAN ALM only and (as a consequence) are not synchronized with an external authorization system.
When adding/editing the User Groups, one should keep in mind the fact that, unlike the external User Groups, those internal groups are not automatically synchronized when the User logs in. To avoid situations where no User with System Admin rights can login anymore, IKAN ALM does not allow to set an internal User Group as the User Group with the Admin Access Rights.
IKAN ALM also has the concept of Nested User Groups. This feature allows User Groups to contain other User Groups. This means that User Groups defined in the external security system can be added to other (internal or external) IKAN ALM User Groups. These groups can then be used to assign certain roles in ALM, like for example assigning a group of users to the Project Admin role of a Project. This avoids the need to create specific principals and assign users in the external authentication system in order to give Users access to the correct IKAN ALM roles.
The Users Overview option allows:
-
defining additional information fields for User IDs that have been used to log in to IKAN ALM
-
archiving active User IDs that are no longer required, or re-activating archived User IDs
-
setting active User IDs as reserved, provided that this action does not exceed the maximum number of active reserved Users.
-
displaying a list of Users connected to IKAN ALM, with the possibility to disconnect them, if needed, before their session has timed out.
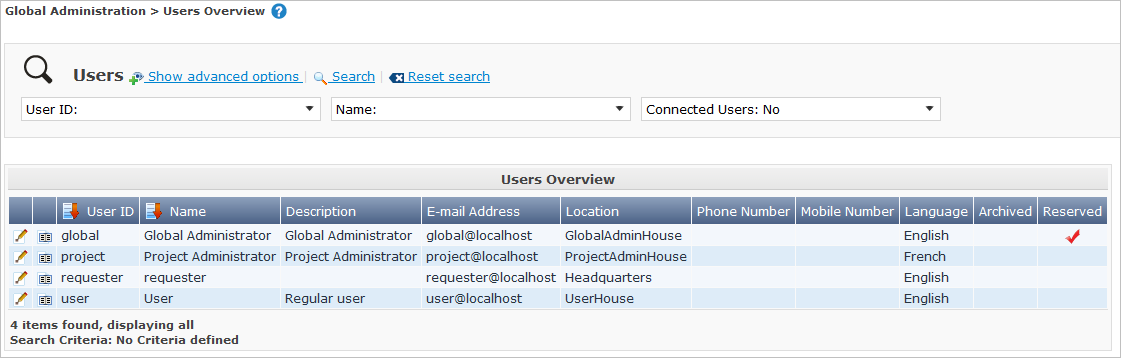
The Users Overview Screen
-
In the Global Administration context, select Users & Groups > Overview Users.
The following screen is displayed:
-
Define the required search criteria on the search panel.
The list of items on the overview will be automatically updated based on the selected criteria.
You can also:
-
click the Show/hide advanced options link to display or hide all available search criteria,
-
click the Search link to refresh the list based on the current search criteria,
-
click the Reset search link to clear the search fields.
-
-
Verify the information on the Users Overview panel.
The following information is available for each displayed User ID:
Field Meaning User ID
This field contains the User ID.
Name
This field contains the Name associated with the User ID.
Description
This field contains the defined description associated with the User ID.
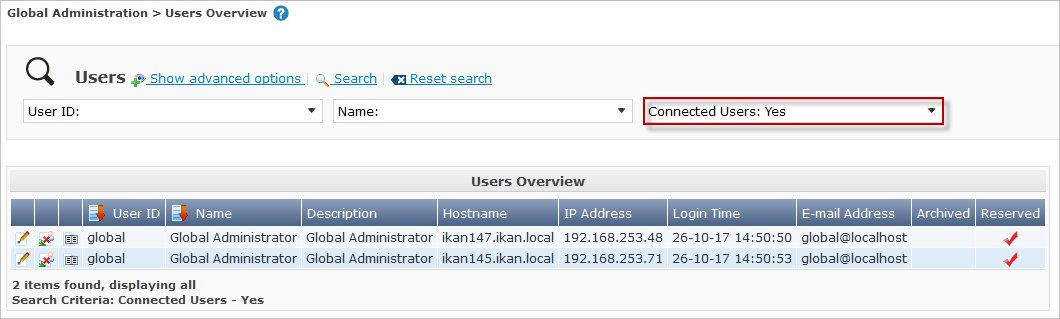
Host Name
This field contains the name of the Machine the User used to connect to IKAN ALM. If the IP address of the Machines is displayed, this means that the host name could not be resolved.
This field is only visible when the option Connected Users is selected in the Search User panel.
IP Address
This field contains the IP address of the Machine the User used to connect to IKAN ALM.
This field is only visible when the option Connected Users is selected in the Search User panel.
Login Time
This field contains the date and time the User connect to IKAN ALM.
This field is only visible when the option Connected Users is selected in the Search User panel.
E-mail Address
This field contains the E-mail Address associated with the User ID.
Location
This field contains the Location associated with the User ID.
This field is not displayed on the Connected Users Overview.
Phone Number
This field contains the Phone Number associated with the User ID.
This field is not displayed on the Connected Users Overview.
Mobile Number
This field contains the Mobile Number associated with the User ID.
This field is not displayed on the Connected Users Overview.
Language
This field contains the Language setting associated with the User ID.
There are three possibilities:
-
English
-
French
-
German
This field is not displayed on the Connected Users Overview.
Archived
This field contains a check mark if the User ID has been archived.
This field is empty for active names.
Reserved
This field contains a check mark if the User ID is a Reserved User ID. A Reserved non archived User ID may always log on to IKAN ALM, without occupying a Floating license. It is typically assigned to IKAN ALM Users with Global Admin Access Rights.
-
-
Depending on your access rights, the following links may be available:

Edit
This option is available to IKAN ALM Users with Global Administrator Access Rights. It allows editing a User definition. Editing User Settings

Disconnect
This option is available to IKAN ALM Users with Global Administrator Access Rights. It allows disconnecting Users before their session has timed out. Disconnecting Users

History
This option is available to all IKAN ALM Users. It allows viewing the User History. Viewing the User History
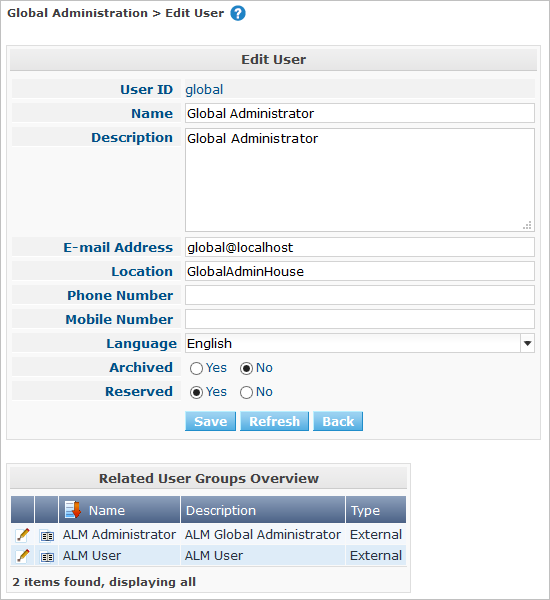
Editing User Settings
-
In the Global Administration context, select Users & Groups > Overview Users.
-
Click the
Edit link to change the selected User ID definition.The following screen is displayed:
Description:
-
At the top of the screen, the Edit User panel is displayed. Edit the fields as required.
You may also reactivate an archived User by clicking the No option button next to the archived field.
You may also mark a non reserved User as reserved, by clicking the Yes option button next to the reserved field. A reserved non archived user may always log in to IKAN ALM, without occupying a floating license. If the number is exceeded, the following message is displayed:
Error: Maximum number of reserved active Users (X) reached, where X is the maximum allowed number of reserved active users. You will have to expand your IKAN ALM license or archive other (obsolete) reserved User IDs, or mark other active reserved User IDs as non reserved, before you can reactive this User ID.
-
At the bottom of the screen, the Related User Groups Overview panel is displayed. The overview contains the definitions of the User Groups to which the selected User ID belongs. The membership of a User Group can be obtained inderectly, through a Nested User Group. In such a case the Parent Of field will contain the Nested User Group. See: User Groups
Users can edit their personal settings. See: Personal Settings
-
-
Edit the fields as required.
For a description of the fields, refer to the section The Users Overview Screen.
-
Click Save to save your changes.
You can also click:
-
Refresh to retrieve the settings from the database.
-
Back to return to the previous screen without saving the changes
-
Disconnecting Users
-
In the Global Administration context, select Users & Groups > Overview Users.
-
Set the option Connected Users to Yes to display the list of Users currently connected.
-
Click the
Disconnect link on the Users Overview panel to immediately disconnect the User.This will end the User’s session and disconnect him from IKAN ALM. As a result, the User has to log on again if he or she wants to continue his or her activity in IKAN ALM.
Viewing the User History
-
In the Global Administration context, select Users & Groups > Overview Users.
-
Click the
History link on the User Overview panel to display the User History View.On the Edit User screen you also have access to the User Group History View screen by clicking the History link on the User Groups Overview panel.
For more detailed information concerning this History View, refer to the section History and Event Logging.
Click Back to return to the Users Overview screen.
RELATED TOPICS |
User Groups
IKAN ALM uses the JAAS interface to base its User ID/Password authentication on existing Security Systems in your organization. This means that User IDs and their adherence to User Groups are maintained outside IKAN ALM. A User ID can only be used to log on to IKAN ALM and to define Your Personal Settings, if it exists in this external Security System.
Access Rights in IKAN ALM are based on the adherence of User IDs to User Groups. There are two types of User Groups: external and internal. The external User Groups must exist in the external Security System, before they can be defined and used in IKAN ALM. There is no automatic mechanism for importing external User Groups from the external Security System into IKAN ALM, as a lot of these User Groups may not be required in IKAN ALM.
Deleting an external User Group in IKAN ALM means that it is not known to IKAN ALM anymore. It is however not deleted in the external Security System.
It is possible to add a User ID to a User Group or to delete a User ID from an external User Group within IKAN ALM, but these actions have only a temporary effect. As soon as the IKAN ALM session is terminated and a new session is opened, IKAN ALM reads the settings from the external Security System and synchronizes the external IKAN ALM User Groups with the definitions available in this external security system. In other words, if the adherence of a User ID to an external User Group changes permanently, this change must be configured in the external Security System, not in IKAN ALM.
On the other hand, a lot of User Groups can be defined that are only used for notifications and approvals. Managing these groups in an external security system is impractical, since the User Groups are used by IKAN ALM only. For that reason, there exist internal User Groups which can be managed in IKAN ALM only and which are not synchronized with an external authorization system.
When adding/editing the User Groups, one should keep in mind the fact that, unlike the external User Groups, those internal are not automatically synchronized when the user logs in. To avoid situations where no User with System Admin rights may login anymore, IKAN ALM does not allow to set an internal User Group as the User Group with the Admin Access Rights.
IKAN ALM also has the concept of Nested User Groups. This feature allows User Groups to contain other User Groups. This means that User Groups defined in the external security system can be added to other (internal or external) IKAN ALM User Groups. These groups can then be used to assign certain roles in ALM, like for example assigning a group of users to the Project Admin role of a Project. This avoids the need to create specific principals and assign users in the external authentication system in order to give Users access to the correct IKAN ALM roles.
Refer to the following sections for detailed information:
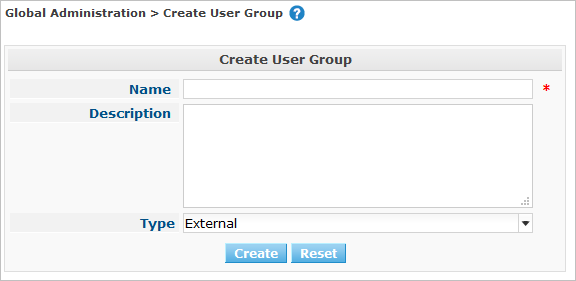
Creating a User Group
|
This option is only available if you have Global Administrator Access Rights in IKAN ALM. |
-
In the Global Administration context, select Users & Groups > Create User Group.
The following screen is displayed:
-
Fill out the fields in the Create User Group panel at the top of the screen. Fields marked with a red asterisk are mandatory:
Field Meaning Name
Enter the name of the new User Group in this field.
Description
Enter a description for the new User Group in this field.
Type
In this field, select the User Group type from the drop-down list.
The possible values are:
-
External: the User Group membership is synchronized with the external security system. This is done for each User individually at login.
-
Internal: the User Group membership is managed in IKAN ALM, unless it has (a) Nested external User Group(s).
For more information, refer to the section Editing a User Group.
-
-
Once you have filled out the fields, click Create.
The newly created User Group is added to the User Groups Overview panel at the bottom of the screen.
The User Groups Overview Screen
-
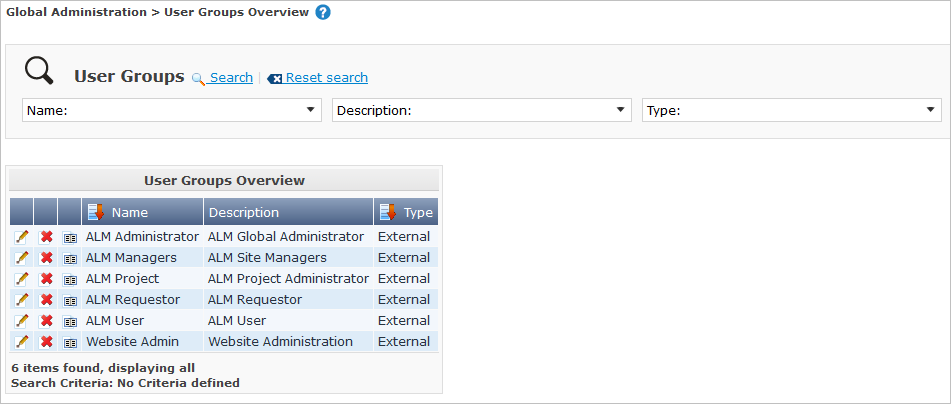
In the Global Administration context, select Users & Groups > Overview User Groups.
The following screen is displayed:
-
Define the required search criteria on the search panel.
The list of items on the overview will be automatically updated based on the selected criteria.
You can also:
-
click the Search link to refresh the list based on the current search criteria,
-
click the Reset search link to clear the search fields.
-
-
Verify the information on the User Groups Overview panel.
The following information is available for each displayed User Group:
Field Meaning Name
This field contains the defined User Group name.
Description
This field contains the defined description associated with the User Group.
Type
This field contains the User Group type which may be external or internal.
-
Depending on your access rights, the following links may be available:
Edit
This option is available to IKAN ALM Users with Global Administrator Access Rights. It allows editing a User Group definition. Editing a User Group

Delete
This option is available to IKAN ALM Users with Global Administrator Access Rights. It allows deleting a User Group definition. Deleting a User Group
History
This option is available to all IKAN ALM Users. It allows viewing the User Group History. Viewing the User Group History
Columns marked with the
 icon can be sorted alphabetically (ascending or descending).
Editing a User Group
-
In the Global Administration context, select Users & Groups > Overview User Groups.
The following screen is displayed:

-
Click the
Edit link in front of the User Group for which you want to modify the members.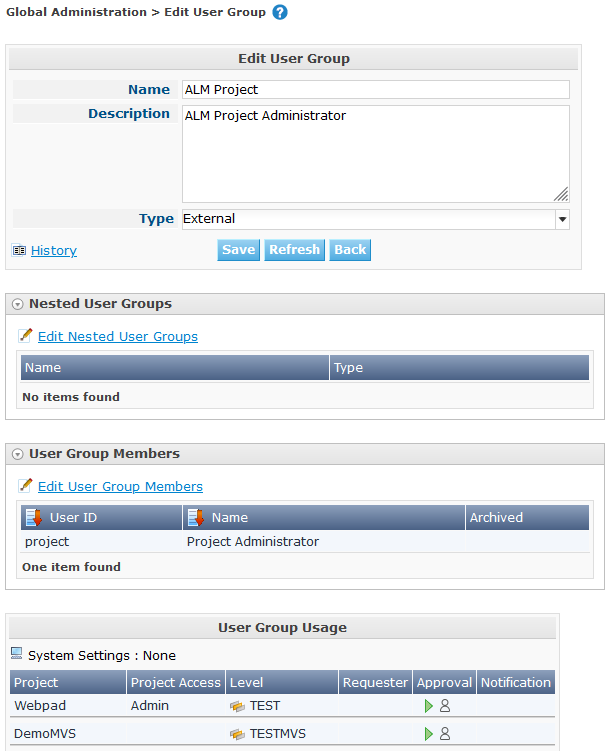
-
In the Edit User Group panel, edit the fields as required.
-
The Nested User Groups panel displays the User Groups that are a member of another User Group. This means they, as a child User Group, get the same access rights, receive the same notifications and have the same permissions as the users in the parent User Group.
Example 1. Nested User GroupUser "Alice" is a member of the "Contoso_Users" User Group. "Contoso_Users" is nested in the "Prod_Requesters" User Group. "Prod_Requesters" has requester rights on the PROD level of a project stream. This means that "Alice" also has requester rights to that PROD level.
-
The User Group Members panel displays the current members that are part of this User Group (See Editing the User Group Members).
-
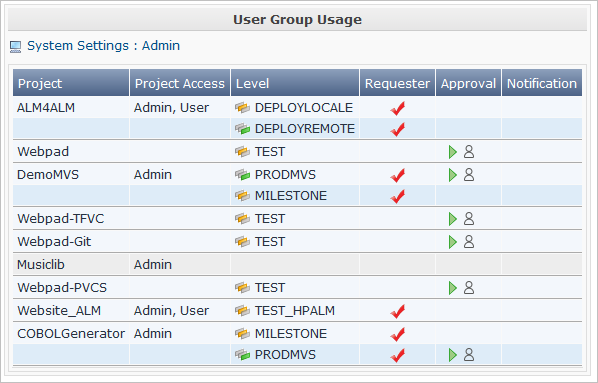
The User Group Usage panel displays the System Settings Access Rights and Levels and Projects the User Groups are connected to.
-
Click Save to confirm your changes.
This will bring you back to the User Groups Overview screen.
You can also click:
-
Refresh to retrieve the settings from the database.
-
Back to return to the previous screen without saving the changes
-
Editing the Nested User Group
-
On the Nested User Groups panel underneath the Edit User Group panel (See Editing a User Group), click the
Edit Nested User Groups link to change the selected Nested User Groups.The following screen is displayed:
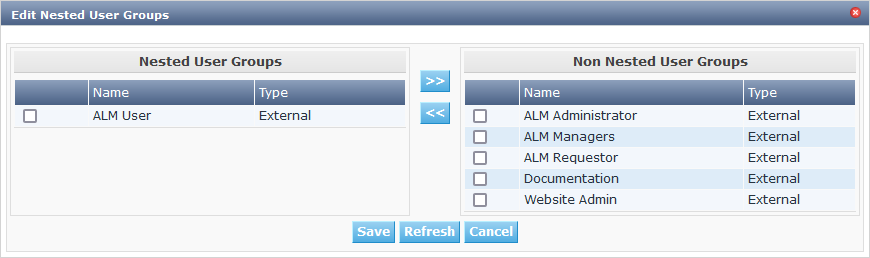
Edit the fields in the Edit Nested User Groups panel as required.
-
To add a User Group to the current User Group, select the User Group in the Non Nested User Groups list and click the << button.
-
To remove a User Group from the current User Group, select the User Group in the Nested User Groups list and click the >> button.
-
-
Click Save to save your changes.
You can also click:
-
Refresh to retrieve the settings from the database.
-
Cancel to return to the previous screen without saving the changes.
-
Editing the User Group Members
-
On the User Group Members panel underneath the Nested User Groups panel (See Editing a User Group), click the
Edit User Group Members link to change the selected User Group definition.The following screen is displayed:

Edit the fields in the Edit User Group Members panel as required.
Determine the allocation of User IDs to this User Group:
-
To add a User ID to this User Group, select the User ID in the Non Group Members list and click the << button.
-
To remove a User ID from this User Group, select the User ID in the Group Members list and click the >> button.
By default, archived Users are filtered out of the Non Group Members list. To display all the Users, including the archived ones, select the Show Archived Users check box.
-
-
Click Save to save your changes.
For external User Groups, changing the Group Members has only a temporary effect. As soon as a User’s IKAN ALM session is terminated and a new session is opened, IKAN ALM reads the settings from the external Security System and synchronizes the external IKAN ALM User Groups with the definitions available in this external security system. As a result a User added here will be deleted from the list, or vice versa.
The membership of internal User Groups may only be managed through this interface. However by adding (a) Nested external User Group(s) to an internal User Group, the User Group membership can be managed in the external Security System.
You can also click:
-
Refresh to retrieve the settings from the database.
-
Cancel to return to the previous screen without saving the changes.
-
Deleting a User Group
-
In the Global Administration context, select Users & Groups > Overview User Groups.
-
Click the
Delete link to delete the selected User Group definition.-
If the User Group is not connected to any other IKAN ALM Object, the following screen is displayed:
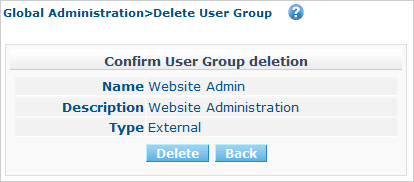
Click Delete to confirm the deletion or Back to return to the previous screen without deleting the entry.
-
If the User Group is still connected to IKAN ALM Objects on the System Project or Level Settings, the following dialog is displayed:
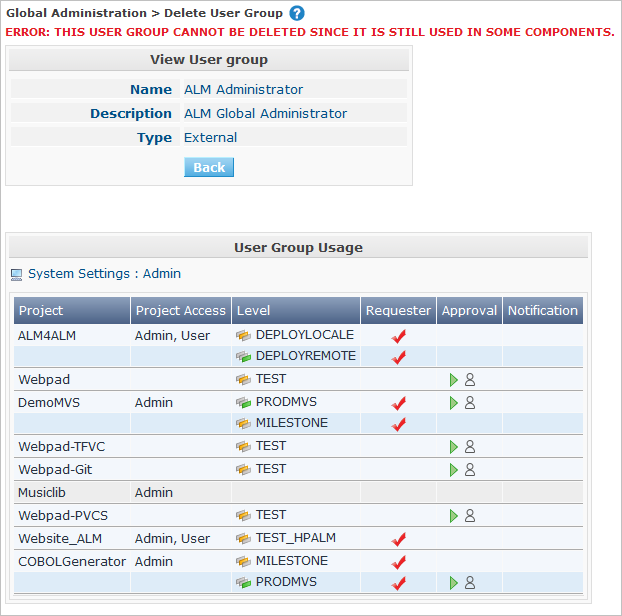
You will need to remove the User Group from the displayed connected IKAN ALM Objects, before you can delete the User Group.
-
Viewing the User Group History
-
In the Global Administration context, select Users & Groups > Overview User Groups.
-
Click the
History link to display the User Group History View.For more detailed information concerning this History View, refer to the section History and Event Logging.
Click Back to return to the User Groups Overview screen.