Version Control Repositories
IKAN ALM currently supports different types of Version Control Repositories (VCR):
The following sections explain how to define a VCR Repository so that the IKAN ALM Server can connect to it.
|
You must always install a VCR client on the IKAN ALM Server in order to interact with the VCR Repository. |
Creating a Repository
|
This option is only available if you have Global Administrator Access Rights in IKAN ALM. |
-
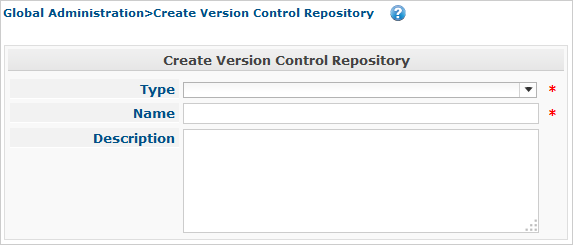
In the Global Administration context, select Version Control Repositories > Create.
The following screen is displayed:
-
Select the Type of Repository you want to create.
The Connection Details panel for the type of Repository you selected is displayed underneath.
-
Enter the Name of the Repository and add a Description.
-
Fill out the repository-specific Connection Details.
For more information on those details, refer to the appropriate sections:
The Repository Overview Screen
-
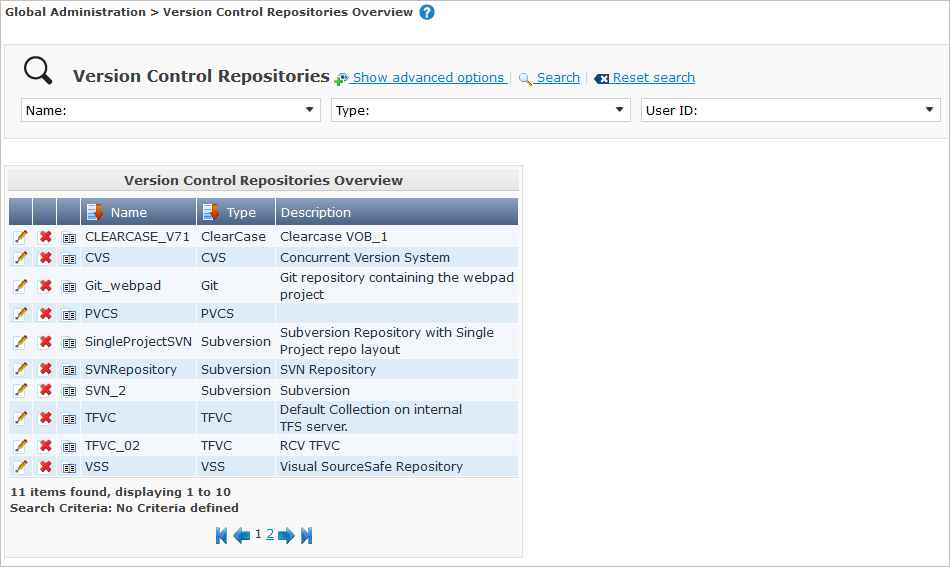
In the Global Administration context, select Version Control Repositories > Overview.
The overview of all defined Version Control Repositories is displayed.
-
Define the required search criteria on the search panel.
The list of items on the overview will be automatically updated based on the selected criteria.
You can also:
-
click the Show/hide advanced options link to display or hide all available search criteria,
-
click the Search link to refresh the list based on the current search criteria,
-
click the Reset search link to clear the search fields,
-
-
Verify the information on the Repositories Overview panel.
-
Depending on your access rights, the following links may be available on the Version Control Repositories Overview panel:

Edit
This option is available to IKAN ALM Users with Global Administrator Access Rights. It allows editing a Repository definition.

Delete
This option is available to IKAN ALM Users with Global Administrator Access Rights. It allows deleting a Repository definition.

History
This option is available to all IKAN ALM Users. It allows displaying the History of all create, update and delete operations performed on a Repository.
For more information, refer to the appropriate sections:
Subversion Repositories
Refer to the following sections for detailed information:
Creating a Subversion Repository
|
This option is only available if you have Global Administrator Access Rights in IKAN ALM. |
-
In the Global Administration context, select Version Control Repositories > Create.
-
Select Subversion from the drop-down list in the Type field.
The following screen is displayed:

-
Fill out the fields in the Create Subversion Repository screen.
Fields marked with a red asterisk are mandatory:
Field Meaning Type
Select the type of Version Control Repository you want to define. This field is mandatory.
After you have selected the VCR type, the appropriate Connection Details panel will be displayed underneath.
Name
Enter the name of the new Subversion Repository definition in this field. This field is mandatory.
Description
Enter a description for the new Subversion Repository in this field. This field is optional.
-
Fill out the fields in the Subversion Connection Details panel.
Fields marked with a red asterisk are mandatory:
Field Meaning Command Path
Enter the path to the Location where the Subversion Client command (
svn.exeorsvn) resides. This field is mandatory.User ID
Enter the User ID that IKAN ALM will use to access the Subversion Repository. This field is optional.
Password
Enter the Password that IKAN ALM will use to access the Subversion Repository. This field is optional.
The characters you enter are displayed as asterisks.
Repeat Password
Re-enter the Password that IKAN ALM will use to access the Subversion Repository.
Repository URL
Enter the URL of the machine hosting the Subversion Repository. This field is mandatory.
For more information regarding a correct Subversion Repository URL, refer to the section Subversion - General Information.
Tags Directory
Enter the Tags Directory for the Subversion Repository or accept the default setting.
Trunk Directory
Enter the Trunk Directory for the Subversion Repository or accept the default setting.
Repository Layout
Select the required Repository Layout option from the drop-down list.
The following options are available:
-
Project-oriented
-
Repository-oriented
-
Single Project-oriented
The selection of a Repository Layout is mandatory.
For more information regarding the different Repository Layouts, refer to the section Subversion - General Information.
Time-Out (Sec.)
Enter the Time-Out value in seconds. If IKAN ALM is not able to establish a connection with the Subversion Repository within the defined period, it will consider the Repository to be inaccessible.
The definition of a Time-Out value is mandatory.
Fetch Meta Properties
Select the Yes option button to automatically retrieve the Meta Properties set on source files in the Subversion VCR during the Retrieve code Phase. These Meta Properties can be used by the Build and Deploy Scripting Tool.
For more information regarding fetching Meta Properties, refer to the section Subversion - General Information.
-
-
Click Test Connection to verify if IKAN ALM can establish a connection to the Subversion Repository. If the test is successful, the following message is displayed:
Info: Could successfully establish a connection with the Repository.
If the test is not successful, the following screen is displayed:
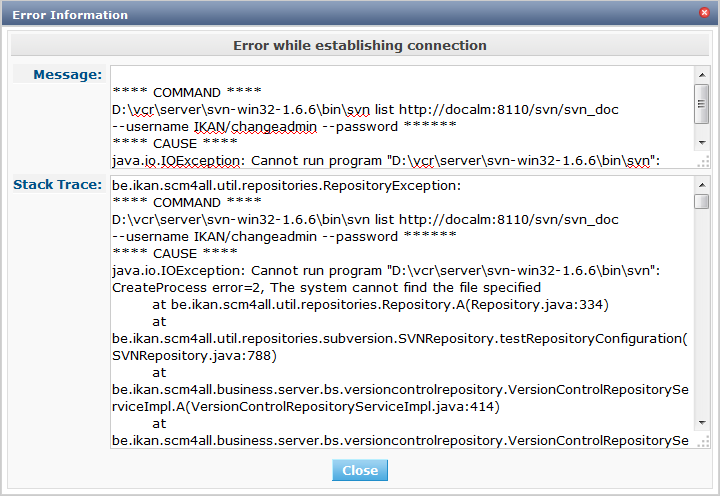
Correct the errors reported in the Stack Trace field and perform the test again.
-
Once the test is successful, click Create.
The newly created Subversion Repository is added to the Subversion Repositories Overview at the bottom of the screen.
The Subversion Repositories Overview Screen
-
In the Global Administration context, select Version Control Repositories > Overview.
The overview of all defined Version Control Repositories is displayed.
-
Specify Subversion in the Type field on the Search Version Control Repositories panel.
Use the other search criteria to only display the Subversion Repositories you are looking for.

If required, use the other search criteria to refine the items displayed on the overview.
The following options are available:
-
click the Show/hide advanced options link to display or hide all available search criteria,
-
the Search link to refresh the list based on the current search criteria,
-
the Reset search link to clear the search fields.
-
-
Verify the information on the Subversion Repositories Overview panel.
For a detailed description of the fields, refer to Creating a Subversion Repository.
-
Depending on your access rights, the following links may be available on the Subversion Repositories Overview panel:
Edit
This option is available to IKAN ALM Users with Global Administrator Access Rights. It allows editing a Subversion Repository definition.
Delete
This option is available to IKAN ALM Users with Global Administrator Access Rights. It allows deleting a Subversion Repository definition.
History
This option is available to all IKAN ALM Users. It allows displaying the History of all create, update and delete operations performed on a Subversion Repository.
Editing a Subversion Repository
-
In the Global Administration context, select Version Control Repositories > Overview.
The overview of all defined Version Control Repositories is displayed.
Use the search criteria on the Search Version Control Repository panel to only display the Subversion Repositories you are looking for.
-
Click the
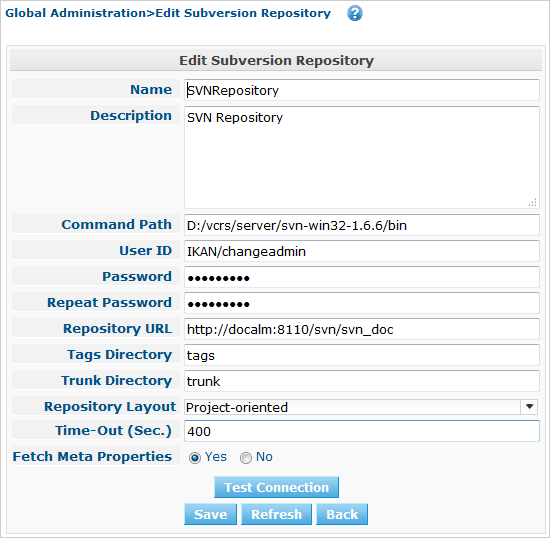
Edit link to change the selected Subversion Repository.The following screen is displayed:
-
Edit the fields as required.
For a description of the fields, refer to Creating a Subversion Repository.
Click Test Connection to verify if IKAN ALM can establish a connection to the Subversion Repository.
The Connected Projects panel displays the Projects the Repository is linked to.
-
Click Save to save your changes.
You can also click:
-
Refresh to retrieve the settings from the database.
-
Back to return to the previous screen without saving the changes
-
Deleting a Subversion Repository
-
In the Global Administration context, select Version Control Repositories > Overview.
The overview of all defined Version Control Repositories is displayed.
Use the search criteria on the Search Version Control Repository panel to only display the Subversion Repositories you are looking for.
-
Click the
Delete link to delete the selected Subversion Repository.If the Subversion Repository is not connected to any Project, the following screen is displayed:
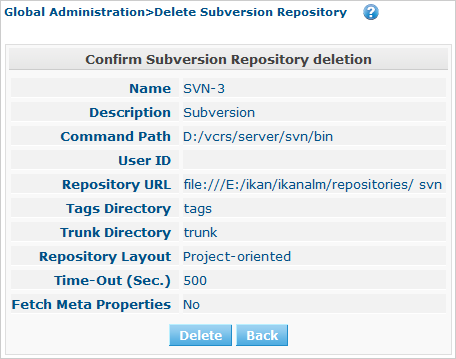
-
Click Delete to confirm the deletion.
You can also click Back to return to the previous screen without deleting the entry.
Note: If the Subversion Repository is connected to one or more Projects, the following screen is displayed:
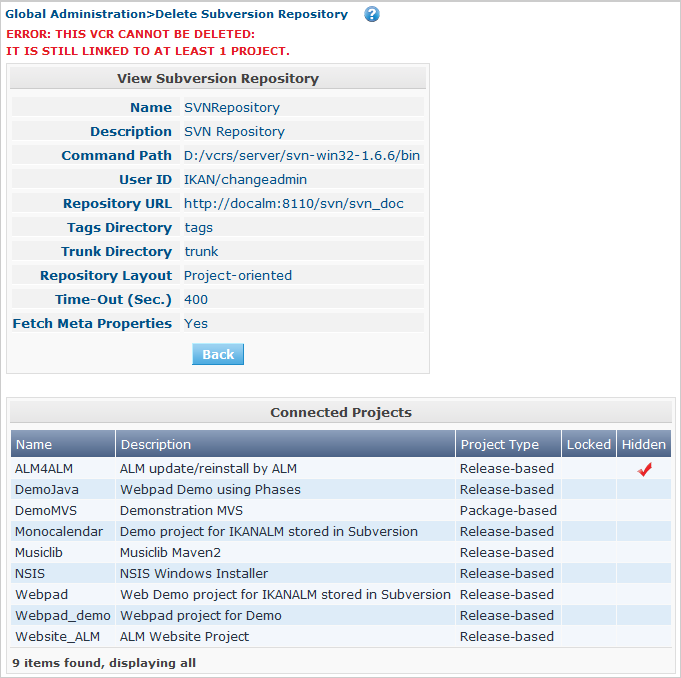
Before deleting the VCR, you must connect the reported Projects to another VCR.
Viewing the Subversion Repository History
-
In the Global Administration context, select Version Control Repositories > Overview.
The overview of all defined Version Control Repositories is displayed.
Use the search criteria on the Search Version Control Repository panel to only display the Subversion Repositories you are looking for.
-
Click the
History link to display the Subversion Repository History View.For more detailed information concerning this History View, refer to the section History and Event Logging.
-
Click Back to return to the Subversion Repositories Overview screen.
Git Repositories
Refer to the following sections for detailed information:
Creating a Git Repository
|
This option is only available if you have Global Administrator Access Rights in IKAN ALM. Before you can create the Git Version Control Repository in IKAN ALM, you must install a Git Client on the IKAN ALM Server. |
-
In the Global Administration context, select Version Control Repositories > Create.
-
Select Git from the drop-down list in the Type field.
The following screen is displayed:
-
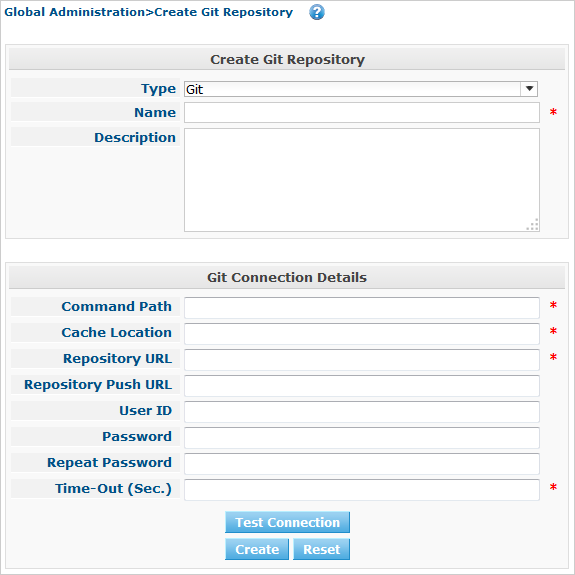
Fill out the fields in the Create Git Repository screen. Fields marked with a red asterisk are mandatory:
Field Meaning Type
Select the type of Version Control Repository you want to define. This field is mandatory.
After you have selected the VCR type, the appropriate Connection Details panel will be displayed underneath.
Name
Enter the name of the new Git Repository definition in this field. This field is mandatory.
Description
Enter a description for the new Git Repository in this field. This field is optional.
-
Fill out the fields in the Git Connection details panel. Fields marked with a red asterisk are mandatory:
Field Meaning Command Path
Enter the path to the Location where the Git Client command (git or git.exe) resides. This field is mandatory.
Cache Location
Enter the path to the Cache location for this Git Repository. This directory on the IKAN ALM Server is used to clone and cache the Git repository for the IKAN ALM Server and Web Application in order to speed up the Repository processes. Make sure that the access rights on this location are correctly configured for the Git process.
A sample location might be ALM_HOME/system/gitcache, e.g.,
c:/ALM/system/gitcache. It’s possible to share the Cache Location among different Git Repositories.Repository URL
Enter the URL of the Git Repository. This field is mandatory.
Valid URLs are of the following format:
-
/path/to/repo.git
-
file:///path/to/repo.git
-
ssh://[user @]host.xz[:port]/path/to/repo.git
-
[user@]host.xz:path/to/repo.git
-
git://host.xz[:port]/path/to/repo.git
-
http[s]://host.xz[:port]/path/to/repo.git
Warning: If you provide a user and, optionally, also a password in the dedicated input fields below, do not add them to the Repository (Push) URL, since IKAN ALM will insert those values in the final (Push) URL before executing any Repository command.
Repository Push URL
In case you want to use different protocols for Git read and push actions, you can specify a different URL (usually a protocol that demands authentication, ssh://, https:// or scp style URL) in this field for the push actions.
Refer to the description of the Repository URL for valid URL formats.
This field is optional.
User ID
Enter the User ID that IKAN ALM will use to access the Git Repository. This field is optional.
IKAN ALM will insert the value of the User ID in the final (Push) URL before executing any Repository command.
Password
Enter the Password that IKAN ALM will use to access the Git Repository. This field is optional.
The characters you enter are displayed as asterisks. IKAN ALM will insert the value of the Password in the final (Push) URL before executing any Repository commands. This is only the case for http(s) URLs. SSH and scp URLs need to function without providing a password.
Repeat Password
Re-enter the Password that IKAN ALM will use to access the Git Repository.
Time-Out (Sec.)
Enter the Time-Out value in seconds. If IKAN ALM is not able to establish a connection with the Git Repository within the defined period, it will consider the Repository to be inaccessible.
The definition of a Time-Out value is mandatory.
-
-
Click Test Connection to verify if IKAN ALM can establish a connection to the Git Repository. If the test is successful, the following message is displayed:
Info: Could successfully establish a connection with the Repository.
If the test is not successful, the following screen is displayed:
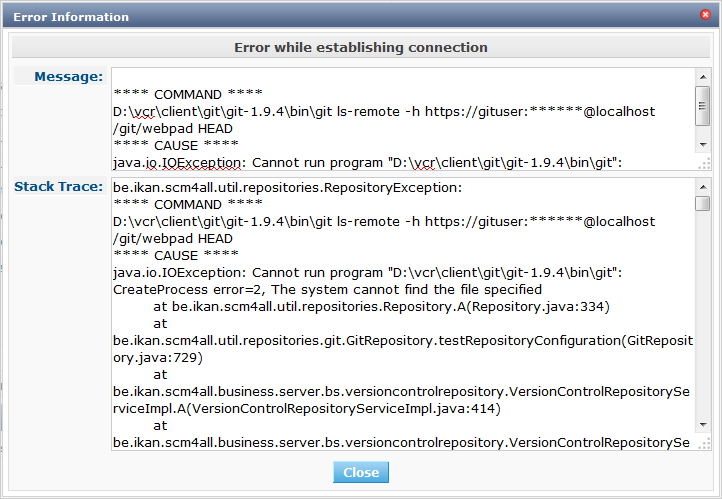
Correct the errors reported in the Stack Trace field and perform the test again.
-
Once the test is successful, click Create.
The newly created Git Repository is added to the Git Repositories Overview at the bottom of the screen.
The Git Repositories Overview Screen
-
In the Global Administration context, select Version Control Repositories > Overview.
The overview of all defined Version Control Repositories is displayed.
-
Specify Git in the Type field on the Search Version Control Repositories panel.
Use the other search criteria to only display the Git Repositories you are looking for.
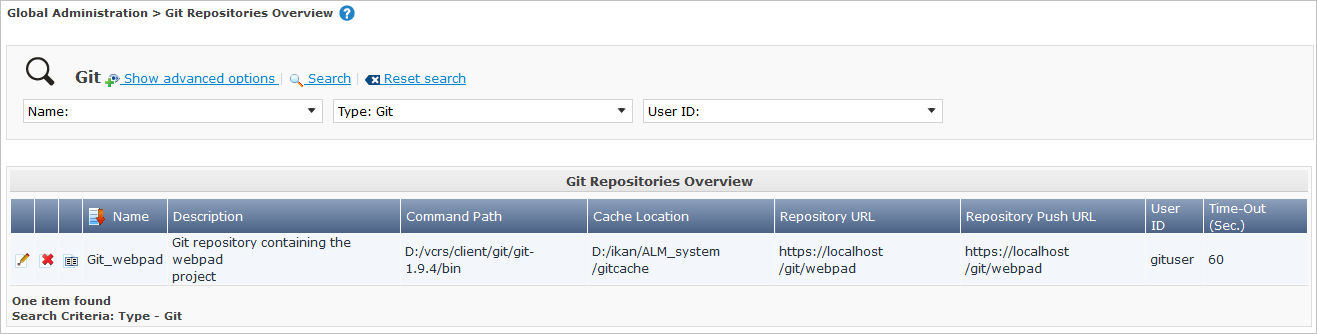
If required, use the other search criteria to refine the items displayed on the overview.
The following options are available:
-
click the Show/hide advanced options link to display or hide all available search criteria,
-
the Search link to refresh the list based on the current search criteria,
-
the Reset search link to clear the search fields.
-
-
Verify the information on the Git Repositories Overview panel.
For a detailed description of the fields, refer to Creating a Subversion Repository.
-
Depending on your access rights, the following links may be available on the Git Repositories Overview panel:
Edit
This option is available to IKAN ALM Users with Global Administrator Access Rights. It allows editing a Git Repository definition.
Delete
This option is available to IKAN ALM Users with Global Administrator Access Rights. It allows deleting a Git Repository definition.
History
This option is available to all IKAN ALM Users. It allows displaying the History of all create, update and delete operations performed on a Git Repository.
Editing a Git Repository
-
In the Global Administration context, select Version Control Repositories > Overview on the Submenu.
The overview of all defined Version Control Repositories is displayed.
Use the search criteria on the Search Version Control Repository panel to only display the Git Repositories you are looking for.
-
Click the
Edit link to change the selected Git Repository.The following screen is displayed:
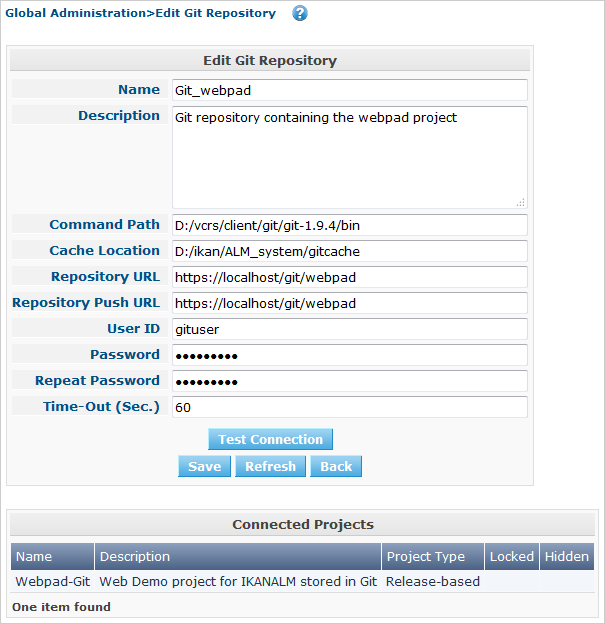
-
Edit the fields as required.
For a description of the fields, refer to Creating a Git Repository.
Click Test Connection to verify if IKAN ALM can establish a connection to the Git Repository.
The Connected Projects panel displays the Projects the Repository is linked to.
-
Click Save to save your changes.
You can also click:
-
Refresh to retrieve the settings from the database.
-
Back to return to the previous screen without saving the changes
-
Deleting a Git Repository
-
In the Global Administration context, select Version Control Repositories > Overview.
The overview of all defined Version Control Repositories is displayed.
Use the search criteria on the Search Version Control Repository panel to only display the Git Repositories you are looking for.
-
Click the
Delete link to delete the selected Git Repository.If the Git Repository is not connected to any Project, the following screen is displayed:
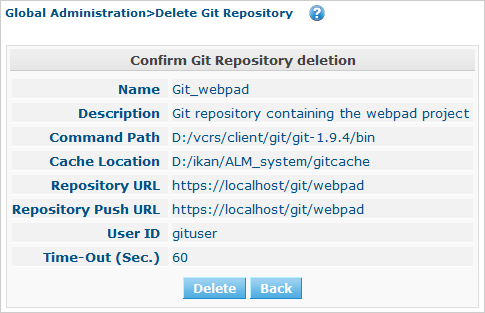
-
Click Delete to confirm the deletion.
You can also click Back to return to the previous screen without deleting the entry.
Note: If the Git Repository is connected to one or more Projects, the following screen is displayed:
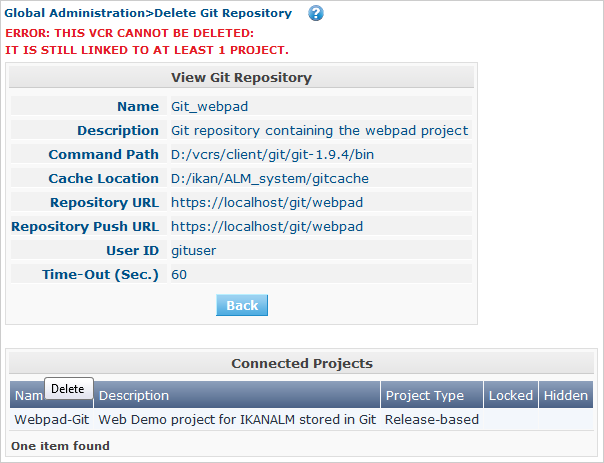
Before deleting the VCR, you must connect the reported Projects to another VCR.
Viewing the Git Repository History
-
In the Global Administration context, select Version Control Repositories > Overview.
The overview of all defined Version Control Repositories is displayed.
Use the search criteria on the Search Version Control Repository panel to only display the Git Repositories you are looking for.
-
Click the
History link to display the Git Repository History View.For more detailed information concerning this History View, refer to the section History and Event Logging.
-
Click Back to return to the Git Repositories Overview screen.
CVS Repositories
Refer to the following sections for detailed information:
Creating a CVS Repository
|
This option is only available if you have Global Administrator Access Rights in IKAN ALM. Before you can create the CVS Version Control Repository in IKAN ALM, you must install a CVS Client on the IKAN ALM Server. |
-
In the Global Administration context, select Version Control Repositories > Create.
-
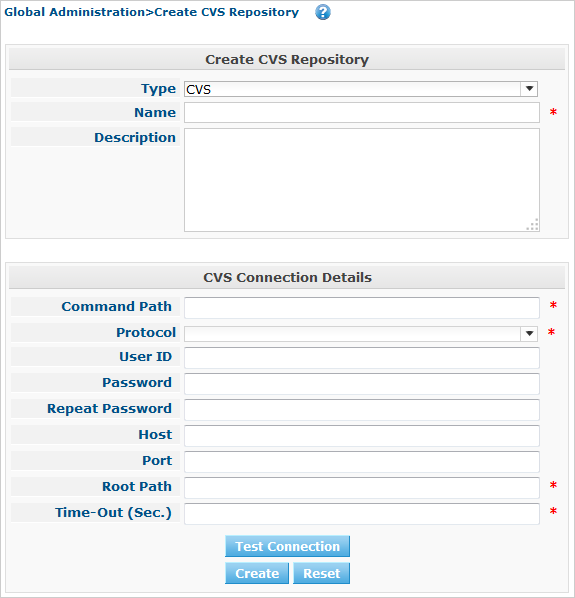
Select CVS from the drop-down list in the Type field.
The following screen is displayed:
-
Fill out the fields in the Create CVS Repository screen.
Fields marked with a red asterisk are mandatory:
Field Meaning Type
Select the type of Version Control Repository you want to define. This field is mandatory.
After you have selected the VCR type, the appropriate Connection Details panel will be displayed underneath.
Name
Enter the name of the new CVS Repository definition in this field. This field is mandatory.
Description
Enter a description for the new CVS Repository in this field. This field is optional.
-
Fill out the fields in the CVS Connection details panel.
Fields marked with a red asterisk are mandatory:
Field Meaning Command Path
Enter the path to the Location where the CVS Client command (
cvs.exeorcvs) resides on the IKAN ALM Server.Protocol
Select the Protocol from the drop-down list. This is the Protocol that will be used to connect to the CVS Repository.
The following Protocols are available:
-
local
-
pserver
-
rhosts
-
ntserver
-
gserver
-
sspi
-
server
-
ssh
-
ext
User ID
Enter the User ID that IKAN ALM will use to access the CVS Repository.
Password
Enter the Password that IKAN ALM will use to access the CVS Repository.
The characters you enter are displayed as asterisks.
Repeat Password
Re-enter the Password that IKAN ALM will use to access the CVS Repository.
Host
Enter the Machine name hosting the CVS Repository. This field is mandatory, except if the local protocol is used.
Port
Enter the Port number used to access the CVS Repository. This field may remain empty if the local Protocol is used, or if the default port number 2401 is used.
Root Path
Enter the repository CVS ROOT used to log in to CVS. This is the location containing the CVSROOT directory. For instance, if CVSROOT is located under E:/cvs/repository/CVSROOT, the Root Path is E:/cvs/repository.
This field is mandatory.
Time-Out (Sec.)
Enter the Time-Out value in seconds. If IKAN ALM is not able to establish a connection with the CVS Repository within the defined period, it will consider the Repository to be inaccessible.
The definition of a Time-Out value is mandatory.
-
-
Click Test Connection to verify if IKAN ALM can establish a connection to the CVS Repository. If the test is successful, the following message is displayed:
Info: Could successfully establish a connection with the Repository.
If the test is not successful, the following screen is displayed:
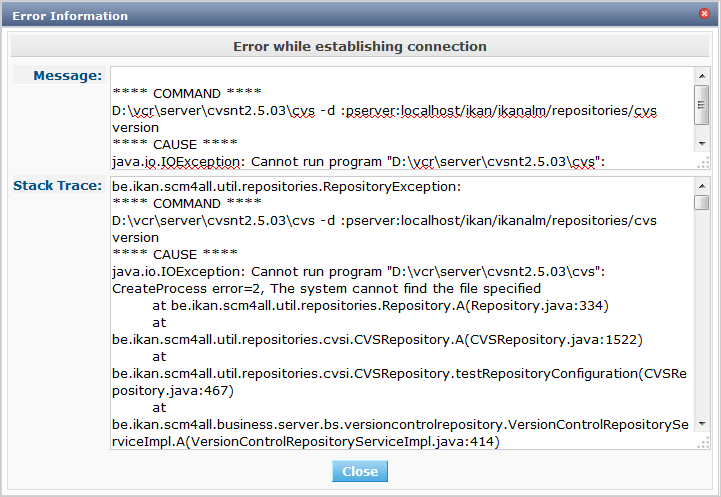
Correct the errors reported in the Stack Trace field and perform the test again.
-
Once the test is successful, click Create.
The newly created CVS Repository is added to the CVS Repositories Overview at the bottom of the screen.
The CVS Repositories Overview Screen
-
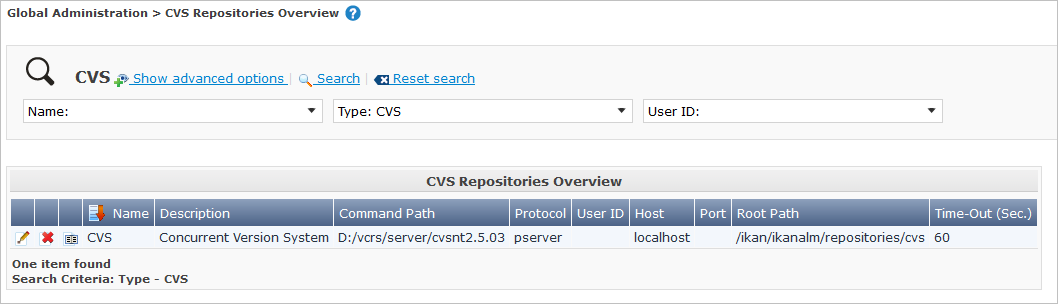
In the Global Administration context, select Version Control Repositories > Overview.
The overview of all defined Version Control Repositories is displayed.
-
Specify CVS in the Type field on the Search Version Control Repositories panel.
Use the other search criteria to only display the CVS Repositories you are looking for.
If required, use the other search criteria to refine the items displayed on the overview.
The following options are available:
-
click the Show/hide advanced options link to display or hide all available search criteria,
-
the Search link to refresh the list based on the current search criteria,
-
the Reset search link to clear the search fields.
-
-
Verify the information on the CVS Repositories Overview panel.
For a detailed description of the fields, refer to Creating a CVS Repository.
-
Depending on your access rights, the following links may be available on the CVS Repositories Overview panel:
Edit
This option is available to IKAN ALM Users with Global Administrator Access Rights. It allows editing a CVS Repository definition.
Delete
This option is available to IKAN ALM Users with Global Administrator Access Rights. It allows deleting a CVS Repository definition.
History
This option is available to all IKAN ALM Users. It allows displaying the History of all create, update and delete operations performed on a CVS Repository.
Editing a CVS Repository
-
In the Global Administration context, select Version Control Repositories > Overview.
The overview of all defined Version Control Repositories is displayed.
Use the search criteria on the Search Version Control Repository panel to only display the CVS Repositories you are looking for.
-
Click the
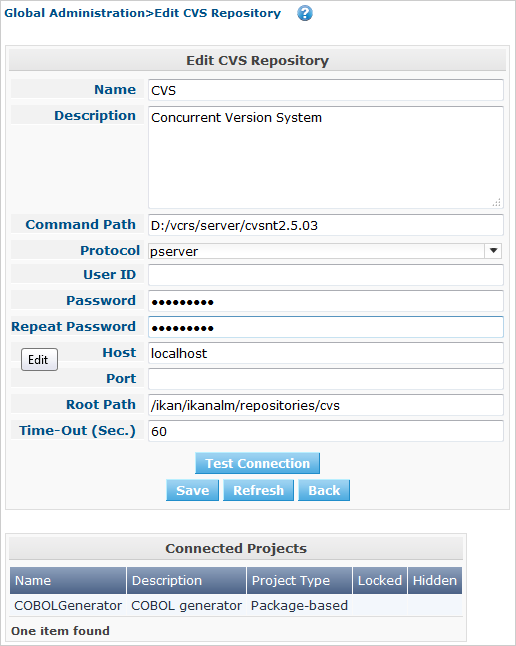
Edit link to change the selected CVS Repository.The following screen is displayed:
-
Edit the fields as required.
For a description of the fields, refer to Creating a CVS Repository.
Click Test Connection to verify if IKAN ALM can establish a connection to the CVS Repository.
The Connected Projects panel displays the Projects the Repository is linked to.
-
Click Save to save your changes.
You can also click:
-
Refresh to retrieve the settings from the database.
-
Back to return to the previous screen without saving the changes
-
Deleting a CVS Repository
-
In the Global Administration context, select Version Control Repositories > Overview.
The overview of all defined Version Control Repositories is displayed.
Use the search criteria on the Search Version Control Repository panel to only display the CVS Repositories you are looking for.
-
Click the
Delete link to delete the selected CVS Repository.If the CVS Repository is not connected to any Project, the following screen is displayed:
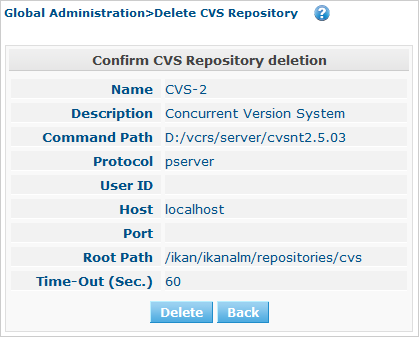
-
Click Delete to confirm the deletion.
You can also click Back to return to the previous screen without deleting the entry.
Note: If the CVS Repository is connected to one or more Projects, the following screen is displayed:
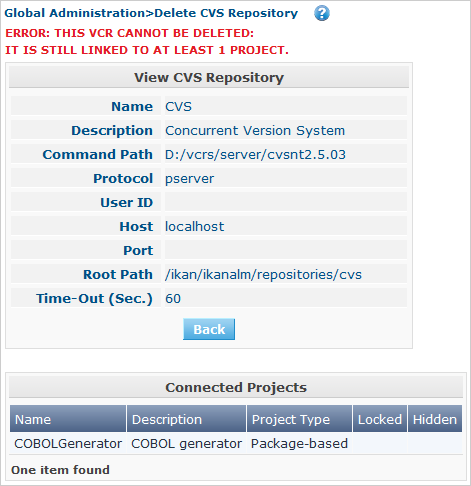
Before deleting the VCR, you must connect the reported Projects to another VCR.
Viewing the CVS Repository History
-
In the Global Administration context, select Version Control Repositories > Overview.
The overview of all defined Version Control Repositories is displayed.
Use the search criteria on the Search Version Control Repository panel to only display the CVS Repositories you are looking for.
-
Click the
History link to display the CVS Repository History View.For more detailed information concerning this History View, refer to the section History and Event Logging.
-
Click Back to return to the CVS Repositories Overview screen.
Visual SourceSafe (VSS) Repositories
Refer to the following sections for detailed information:
Creating a VSS Version Control Repository
|
This option is only available if you have Global Administrator Access Rights in IKAN ALM. Before you can create the VSS Version Control Repository in IKAN ALM, you must install a VSS Client on the IKAN ALM Server. |
-
In the Global Administration context, select Version Control Repositories > Create.
-
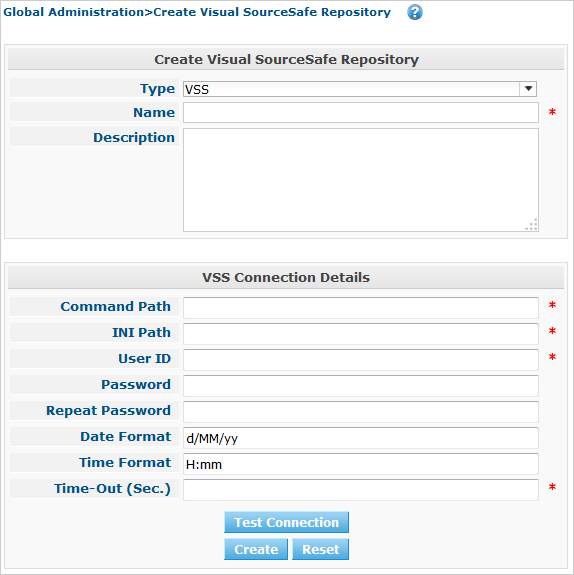
Select VSS from the drop-down list in the Type field.
The following screen is displayed:
-
Fill out the fields in the Create Visual SourceSafe Repository screen.
Fields marked with a red asterisk are mandatory:
Field Meaning Type
Select the type of Version Control Repository you want to define. This field is mandatory.
After you have selected the VCR type, the appropriate Connection Details panel will be displayed underneath.
Name
Enter the name of the new VSS Repository definition in this field. This field is mandatory.
Description
Enter a description for the new VSS Repository in this field. This field is optional.
-
Fill out the fields in the VSS Connection details panel.
Fields marked with a red asterisk are mandatory:
Field Meaning Command Path
Enter the required Command Path of the VSS Client (absolute path to the ss.exe file).
INI Path
Enter the VSS ROOT used to log in to VSS, or the ssdir environment variable (absolute path to the srcsafe.ini file).
User ID
Enter the User ID that IKAN ALM will use to access the VSS Repository.
Password
Enter the Password that IKAN ALM will use to access the VSS Repository.
The characters you enter are displayed as asterisks.
Repeat Password
Re-enter the Password that IKAN ALM will use to access the VSS Repository.
Date Format
Enter the Date Format that is in use on the system where the VSS Client is running.
Examples:
-
MM/dd/yyyy
-
dd/MM/yy
Time Format
Enter the Time Format that is used on the system where the VSS Client is running.
Example:
HH:mm
Time-Out (Sec.)
Enter the Time-Out value in seconds. If IKAN ALM is not able to establish a connection with the VSS Repository within the defined period, it will consider the Repository to be inaccessible.
The definition of a Time-Out value is mandatory.
-
-
Click Test Connection to verify if IKAN ALM can establish a connection to the VSS Repository. If the test is successful, the following message is displayed:
Info: Could successfully establish a connection with the Repository.
If the test is not successful, the following screen is displayed:
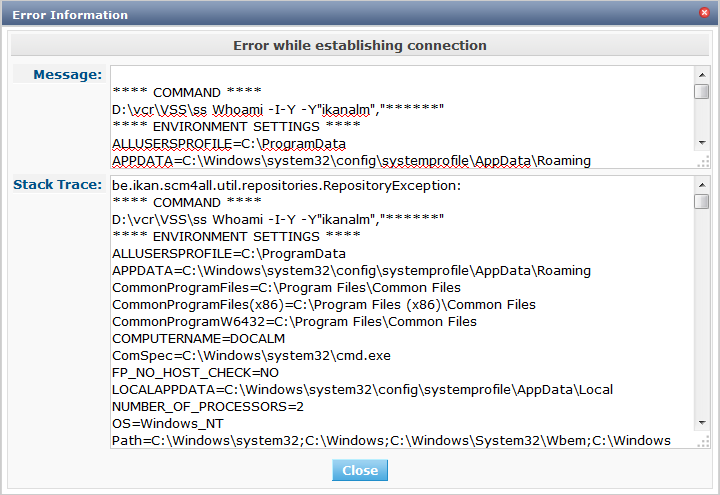
Correct the errors reported in the Stack Trace field and perform the test again.
-
Once the test is successful, click Create.
The newly created VSS Repository is added to the VSS Repositories Overview at the bottom of the screen.
The VSS Repositories Overview Screen
-
In the Global Administration context, select Version Control Repositories > Overview.
The overview of all defined Version Control Repositories is displayed.
-
Specify VSS in the Type field on the Search Version Control Repositories panel.
Use the other search criteria to only display the VSS Repositories you are looking for.
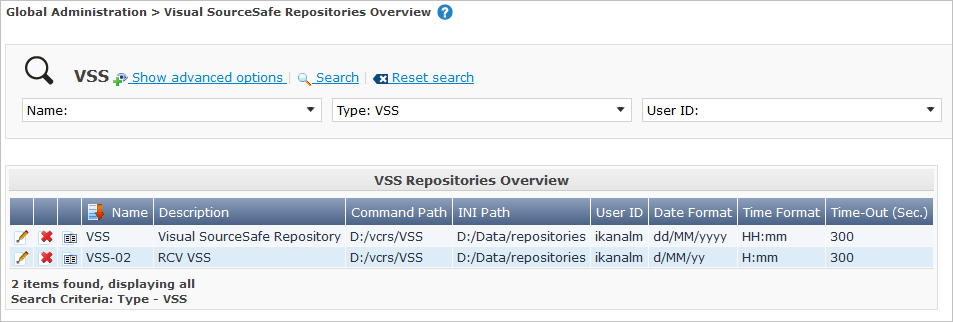
If required, use the other search criteria to refine the items displayed on the overview.
The following options are available:
-
click the Show/hide advanced options link to display or hide all available search criteria,
-
the Search link to refresh the list based on the current search criteria,
-
the Reset search link to clear the search fields.
-
-
Verify the information on the VSS Repositories Overview panel.
For a detailed description of the fields, refer to Creating a VSS Version Control Repository.
-
Depending on your access rights, the following links may be available on the VSS Repositories Overview panel:
Edit
This option is available to IKAN ALM Users with Global Administrator Access Rights. It allows editing a VSS Repository definition.
Delete
This option is available to IKAN ALM Users with Global Administrator Access Rights. It allows deleting a VSS Repository definition.
History
This option is available to all IKAN ALM Users. It allows displaying the History of all create, update and delete operations performed on a VSS Repository.
Editing a VSS Repository
-
In the Global Administration context, select Version Control Repositories > Overview.
The overview of all defined Version Control Repositories is displayed.
Use the search criteria on the Search Version Control Repository panel to only display the VSS Repositories you are looking for.
-
Click the
Edit link to change the selected VSS Repository.The following screen is displayed:
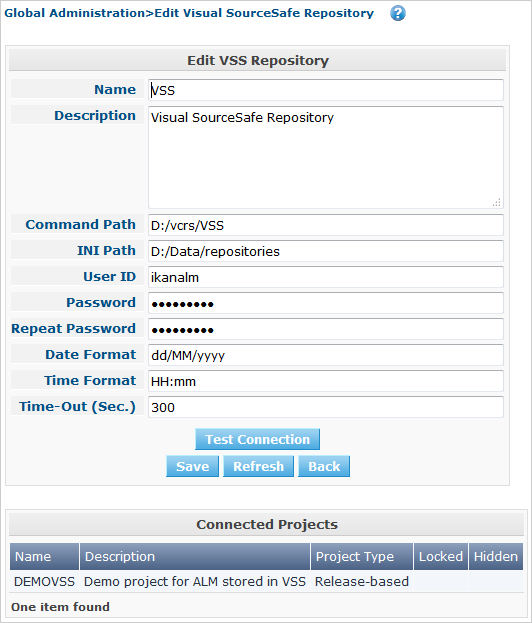
-
Edit the fields as required.
For a description of the fields, refer to Creating a VSS Version Control Repository.
Click Test Connection to verify if IKAN ALM can establish a connection to the VSS Repository.
The Connected Projects panel displays the Projects the Repository is linked to.
-
Click Save to save your changes.
You can also click:
-
Refresh to retrieve the settings from the database.
-
Back to return to the previous screen without saving the changes
-
Deleting a VSS Repository
-
In the Global Administration context, select Version Control Repositories > Overview.
The overview of all defined Version Control Repositories is displayed.
Use the search criteria on the Search Version Control Repository panel to only display the VSS Repositories you are looking for.
-
Click the
Delete link to delete the selected VSS Repository.If the VSS Repository is not connected to any Project, the following screen is displayed:
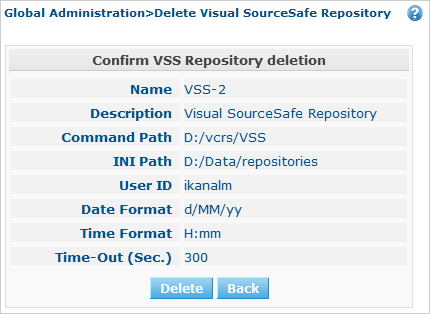
-
Click Delete to confirm the deletion.
You can also click Back to return to the previous screen without deleting the entry.
Note: If the VSS Repository is connected to one or more Projects, the following screen is displayed:
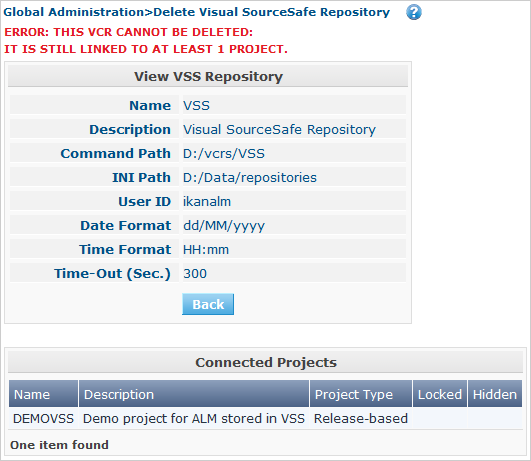
Before deleting the VCR, you must connect the reported Projects to another VCR.
Viewing the VSS Repository History
-
In the Global Administration context, select Version Control Repositories > Overview.
The overview of all defined Version Control Repositories is displayed.
Use the search criteria on the Search Version Control Repository panel to only display the VSS Repositories you are looking for.
-
Click the
History link to display the VSS Repository History View.For more detailed information concerning this History View, refer to the section History and Event Logging.
-
Click Back to return to the VSS Repositories Overview screen.
ClearCase Repositories
Refer to the following sections for detailed information:
Creating a ClearCase Repository
|
This option is only available if you have Global Administrator Access Rights in IKAN ALM. Before you can create the ClearCase Version Control Repository in IKAN ALM, you must install a ClearCase Client on the IKAN ALM Server. |
-
In the Global Administration context, select Version Control Repositories > Create.
-
Select from the drop-down list in the Type field.
The following screen is displayed:
-
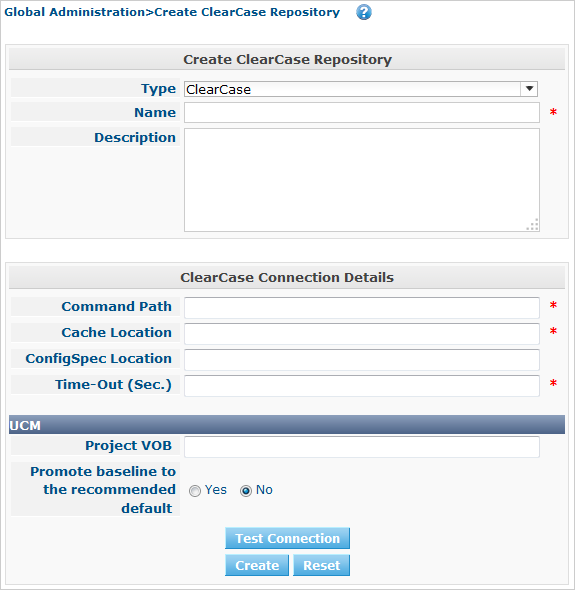
Fill out the fields in the Create ClearCase Repository screen.
Fields marked with a red asterisk are mandatory:
Field Meaning Type
Select the type of Version Control Repository you want to define. This field is mandatory.
After you have selected the VCR type, the appropriate Connection Details panel will be displayed underneath.
Name
Enter the name of the new ClearCase Repository definition in this field. This field is mandatory.
Description
Enter a description for the new ClearCase Repository in this field. This field is optional.
-
Fill out the fields in the ClearCase Connection details panel.
Fields marked with a red asterisk are mandatory:
Field Meaning Command Path
Enter the required Command Path for the new ClearCase Repository. This is the directory containing the ClearCase client command (cleartool) to connect with the ClearCase Repository.
Cache Location
Enter the path to the Cache location for this ClearCase Repository. This directory is used by the Scheduler to check whether there are modifications in a ClearCase VOB (Versioned Objects Base). A ClearCase View, containing the VOB, will be created in this directory.
On Windows, this path MUST be an UNC style path (\\server\share). If not, certain IKAN ALM operations will not function correctly.
ConfigSpec Location
In this field, enter the absolute path to your customized ClearCase Configuration specification files.
IKAN ALM will search this location for ConfigSpec files with names in the following format:
-
ConfigSpec_ProjectName_BranchID.vm
-
ConfigSpec_ProjectName.vm
-
ConfigSpec.vm
IKAN ALM looks first for the most specific match (including the Branch ID in the name).
If no match is found, IKAN ALM will look for the second best match (including the ProjectName).
If again no match is found, IKAN ALM will look for the general ConfigSpec.vm file.
If there is no ConfigSpec.vm available in the indicated location, the default ConfigSpec.vm available in the IKAN ALM classpath will be used.
Time-Out (Sec.)
Enter the Time-Out value in seconds. If IKAN ALM is not able to establish a connection with the ClearCase Repository within the defined period, it will consider the Repository to be inaccessible.
The definition of a Time-Out value is mandatory.
UCM - Project VOB
This field only applies, if the repository you want to connect to is a ClearCase UCM Repository.
Enter the name of the Project VOB in which the UCM has been created.
UCM - Promote baseline to default recommended
This field only applies, if the repository you want to connect to is a ClearCase UCM Repository.
Select YES, if you want to promote each tagged Build (Baseline) created by IKAN ALM to the default recommended Baseline.
Note: If you set the stream policy POLICY_CHSTREAM_UNRESTRICTED, the permission checking is skipped.
You can only use this option, if the account running the webserver, under which IKAN ALM is running, has the status of Project VOB Owner, Stream Owner, Root (Unix), Member of the ClearCase Administrators Group (ClearCase on Windows only), Local Administrator of the ClearCase LT Server Host (ClearCase LT on Windows only).
For more information, see the mkstream reference page in the ClearCase documentation.
Select NO, if you do not want to promote each tagged Build (Baseline) created by IKAN ALM to the default recommended Baseline.
In this case, this will be a manual process performed outside IKAN ALM.
-
-
Click Test Connection to verify if IKAN ALM can establish a connection to the ClearCase Repository. If the test is successful, the following message is displayed:
Info: Could successfully establish a connection with the Repository.
If the test is not successful, the following screen is displayed:
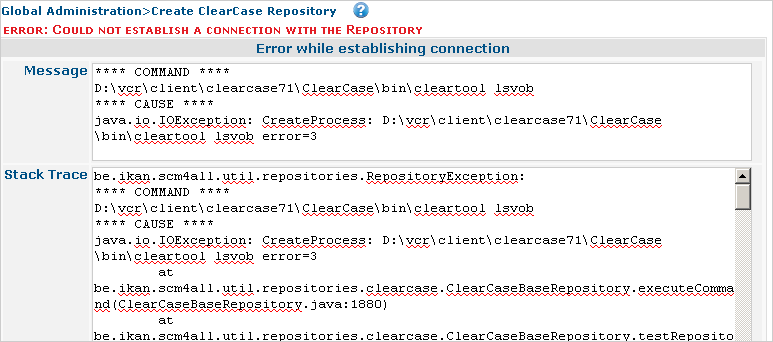
Correct the errors reported in the Stack Trace field and perform the test again.
-
Once the test is successful, click Create.
The newly created ClearCase Repository is added to the ClearCase Repositories Overview at the bottom of the screen.
The ClearCase Repositories Overview Screen
-
In the Global Administration context, select Version Control Repositories > Overview.
The overview of all defined Version Control Repositories is displayed.
-
Specify ClearCase in the Type field on the Search Version Control Repositories panel.
Use the other search criteria to only display the ClearCase Repositories you are looking for.
If required, use the other search criteria to refine the items displayed on the overview.
The following options are available:
-
click the Show/hide advanced options link to display or hide all available search criteria,
-
the Search link to refresh the list based on the current search criteria,
-
the Reset search link to clear the search fields.
-
-
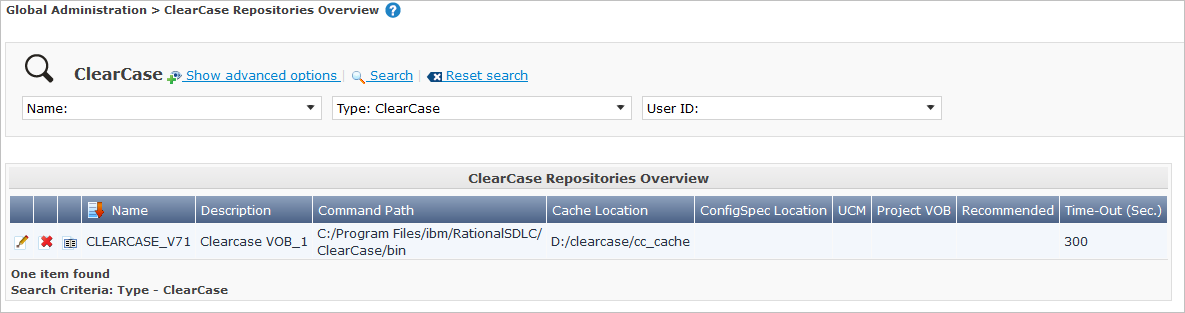
Verify the information on the ClearCase Repositories Overview panel.
For a detailed description of the fields, refer to Creating a ClearCase Repository.
-
Depending on your access rights, the following links may be available on the ClearCase Repositories Overview panel:
Edit
This option is available to IKAN ALM Users with Global Administrator Access Rights. It allows editing a ClearCase Repository definition.
Delete
This option is available to IKAN ALM Users with Global Administrator Access Rights. It allows deleting a ClearCase Repository definition.
History
This option is available to all IKAN ALM Users. It allows displaying the History of all create, update and delete operations performed on a ClearCase Repository.
Editing a ClearCase Repository
-
In the Global Administration context, select Version Control Repositories > Overview.
The overview of all defined Version Control Repositories is displayed.
Use the search criteria on the Search Version Control Repository panel to only display the ClearCase Repositories you are looking for.
-
Click the
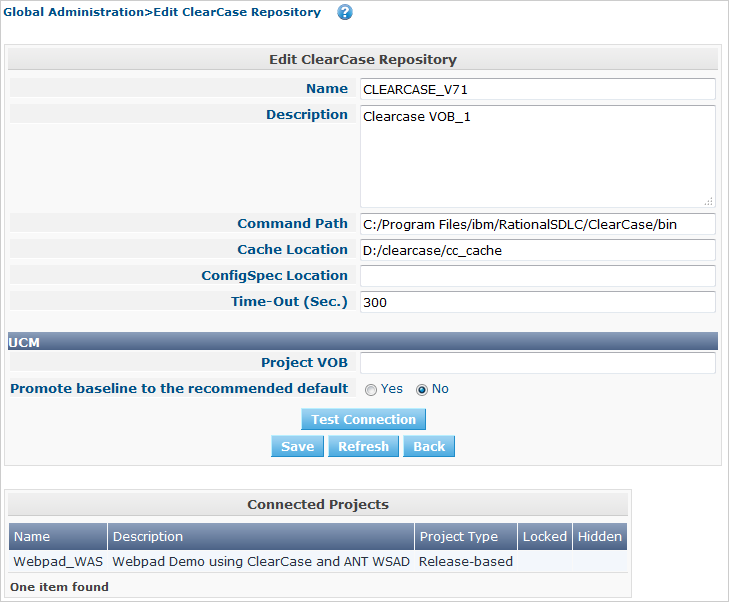
Edit link to change the selected ClearCase Repository.The following screen is displayed:
-
Edit the fields as required.
For a description of the fields, refer to Creating a ClearCase Repository.
Click Test Connection to verify if IKAN ALM can establish a connection to the ClearCase Repository.
The Connected Projects panel displays the Projects the Repository is linked to.
-
Click Save to save your changes.
You can also click:
-
Refresh to retrieve the settings from the database.
-
Back to return to the previous screen without saving the changes
-
Deleting a ClearCase Repository
-
In the Global Administration context, select Version Control Repositories > Overview.
The overview of all defined Version Control Repositories is displayed.
Use the search criteria on the Search Version Control Repository panel to only display the ClearCase Repositories you are looking for.
-
Click the
Delete link to delete the selected ClearCase Repository.If no Projects are connected to the Repository, the following screen is displayed:

-
Click Delete to confirm the deletion.
You can also click Back to return to the previous screen without deleting the entry.
Note: If one or more Projects are connected to the Repository, the following screen is displayed:

Before deleting the VCR, you must connect the reported Projects to another VCR.
Viewing the ClearCase Repository History
-
In the Global Administration context, select Version Control Repositories > Overview.
The overview of all defined Version Control Repositories is displayed.
Use the search criteria on the Search Version Control Repository panel to only display the ClearCase Repositories you are looking for.
-
Click the
History link to display the ClearCase Repository History View.For more detailed information concerning this History View, refer to the section History and Event Logging.
-
Click Back to return to the ClearCase Repositories Overview screen.
PVCS Repositories
Refer to the following sections for detailed information:
Creating a PVCS Repository
|
This option is only available if you have Global Administrator Access Rights in IKAN ALM. Before you can create the PVCS Version Control Repository in IKAN ALM, you must install a PVCS Client on the IKAN ALM Server. |
-
In the Global Administration context, select Version Control Repositories > Create.
-
Select from the drop-down list in the Type field.
The following screen is displayed:
-
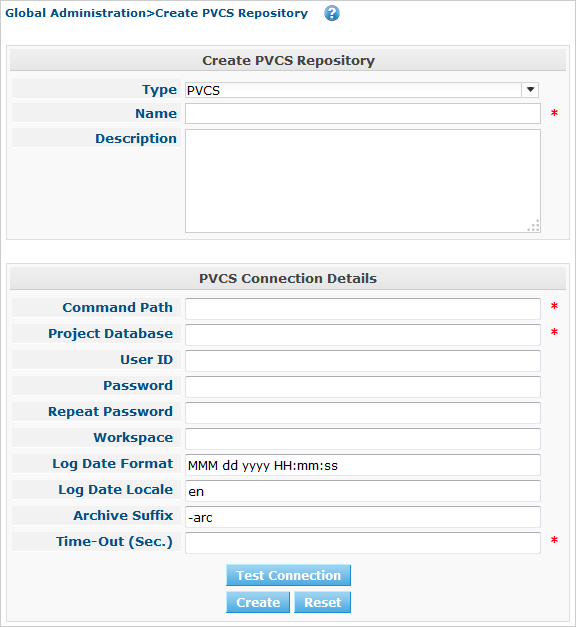
Fill out the fields in the Create PVCS Repository screen.
Fields marked with a red asterisk are mandatory:
Field Meaning Type
Select the type of Version Control Repository you want to define. This field is mandatory.
After you have selected the VCR type, the appropriate Connection Details panel will be displayed underneath.
Name
Enter the name of the new PVCS Repository definition in this field. This field is mandatory.
Description
Enter a description for the new PVCS Repository in this field. This field is optional.
-
Fill out the fields in the PVCS Connection details panel.
Fields marked with a red asterisk are mandatory:
Field Meaning Command Path
Enter the path to the PCLI executable. This field is mandatory.
Project Database
Enter the location of the Project Database. This field is mandatory.
User ID
Enter the User ID that IKAN ALM will use to access the PVCS Repository. This field is optional.
Password
Enter the Password that IKAN ALM will use to access the PVCS Repository. This field is optional.
The characters you enter are displayed as asterisks.
Repeat Password
Re-enter the Password that IKAN ALM will use to access the PVCS Repository.
Workspace
Enter the Workspace path to use. This field is optional. If none is specified, IKAN ALM will use the Root Workspace ("/RootWorkspace").
Log Date Format
Enter the Date format of modification dates output by the "pcli vlog" command, e.g., for the default format (MMM dd yyyy HH:mm:ss):
Oct 11 2014 11:53:04Log Date Locale
Enter the locale of the date format of modification dates output by the "pcli vlog" command, e.g., for the default format (MMM dd yyyy HH:mm:ss) :
Locale = "en" :
Oct 11 2014 11:53:04Locale = "nl" :
Okt
11 2014 11:53:04
This field is mandatory. The default value is “en”.
Archive Suffix
Enter the suffix for PVCS archive files.
This field is mandatory. The default value is "-arc"
Time-Out (Sec.)
Enter the Time-Out value in seconds. If IKAN ALM is not able to establish a connection with the PVCS Repository within the defined period, it will consider the Repository to be inaccessible.
The definition of a Time-Out value is mandatory.
-
Click Test Connection to verify if IKAN ALM can establish a connection to the PVCS Repository. If the test is successful, the following message is displayed:
Info: Could successfully establish a connection with the Repository.
If the test is not successful, the following screen is displayed:
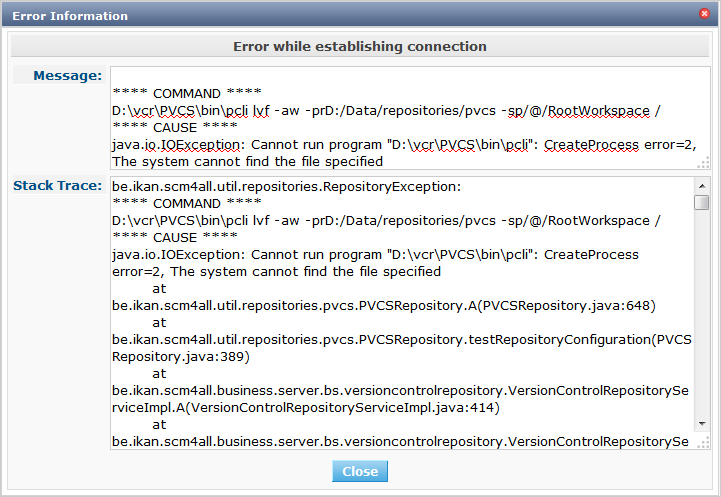
Correct the errors reported in the Stack Trace field and perform the test again.
-
Once the test is successful, click Create.
The newly created PVCS Repository is added to the PVCS Repositories Overview at the bottom of the screen.
The PVCS Repositories Overview Screen
-
In the Global Administration context, select Version Control Repositories > Overview.
The overview of all defined Version Control Repositories is displayed.
-
Specify PVCS in the Type field on the Search Version Control Repositories panel.
Use the other search criteria to only display the PVCS Repositories you are looking for.
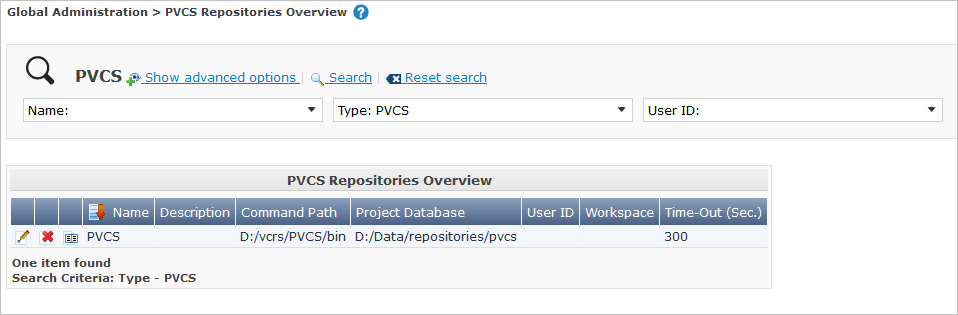
If required, use the other search criteria to refine the items displayed on the overview.
The following options are available:
-
click the Show/hide advanced options link to display or hide all available search criteria,
-
the Search link to refresh the list based on the current search criteria,
-
the Reset search link to clear the search fields.
-
-
Verify the information on the PVCS Repositories Overview panel.
For a detailed description of the fields, refer to Creating a PVCS Repository.
-
Depending on your access rights, the following links may be available on the PVCS Repositories Overview panel:
Edit
This option is available to IKAN ALM Users with Global Administrator Access Rights. It allows editing a PVCS Repository definition.
Delete
This option is available to IKAN ALM Users with Global Administrator Access Rights. It allows deleting a PVCS Repository definition.
History
This option is available to all IKAN ALM Users. It allows displaying the History of all create, update and delete operations performed on a PVCS Repository.
Editing a PVCS Repository
-
In the Global Administration context, select Version Control Repositories > Overview.
The overview of all defined Version Control Repositories is displayed.
Use the search criteria on the Search Version Control Repository panel to only display the PVCS Repositories you are looking for.
-
Click the
Edit link to change the selected PVCS Repository.The following screen is displayed:

-
Edit the fields as required.
For a description of the fields, refer to Creating a PVCS Repository.
Click Test Connection to verify if IKAN ALM can establish a connection to the PVCS Repository.
The Connected Projects panel displays the Projects the Repository is linked to.
-
Click Save to save your changes.
You can also click:
-
Refresh to retrieve the settings from the database.
-
Back to return to the previous screen without saving the changes
-
Deleting a PVCS Repository
-
In the Global Administration context, select Version Control Repositories > Overview.
The overview of all defined Version Control Repositories is displayed.
Use the search criteria on the Search Version Control Repository panel to only display the PVCS Repositories you are looking for.
-
Click the
Delete link to delete the selected PVCS Repository.If the PVCS Repository is not connected to any Project, the following screen is displayed:
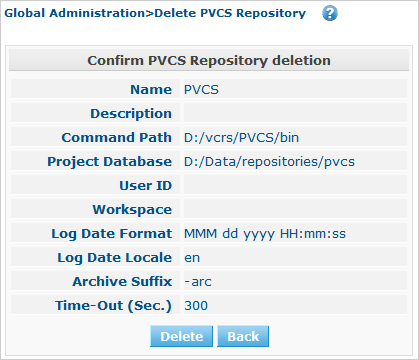
-
Click Delete to confirm the deletion.
You can also click Back to return to the previous screen without deleting the entry.
Note: If the PVCS Repository is connected to one or more Projects, the following screen is displayed:
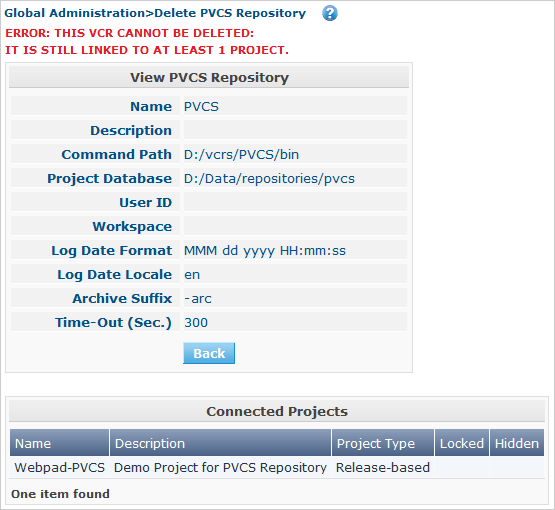
Before deleting the VCR, you must connect the reported Projects to a different VCR.
Viewing the PVCS Repository History
-
In the Global Administration context, select Version Control Repositories > Overview.
The overview of all defined Version Control Repositories is displayed.
Use the search criteria on the Search Version Control Repository panel to only display the PVCS Repositories you are looking for.
-
Click the
History link to display the PVCS Repository History View.For more detailed information concerning this History View, refer to the section History and Event Logging.
-
Click Back to return to the PVCS Repositories Overview screen.
TFVC Version Control Repositories
Refer to the following sections for detailed information:
Creating a TFVC Repository
|
This option is only available if you have Global Administrator Access Rights in IKAN ALM. Before you can create the TFVC Version Control Repository in IKAN ALM, you must install a TFVC Client (Team Explorer for MS Visual Studio or Team Explorer Everywhere for Team Foundation Server) on the IKAN ALM Server. |
-
In the Global Administration context, select Version Control Repositories > Create.
-
Select TFVC from the drop-down list in the Type field.
The following screen is displayed:
-
Fill out the fields in the Create TFVC Repository screen. Fields marked with a red asterisk are mandatory:
Field Meaning Type
Select the type of Version Control Repository you want to define. This field is mandatory.
After you have selected the VCR type, the appropriate Connection Details panel will be displayed underneath.
Name
Enter the name of the new TFVC Repository definition in this field. This field is mandatory.
Description
Enter a description for the new TFVC Repository in this field. This field is optional.
-
Fill out the fields in the TFVC Connection details panel. Fields marked with a red asterisk are mandatory:
Field Meaning Executable
Enter the location of the Team Foundation executable. This may be the tf.cmd from the TEE client, or the tf.exe from the TFVC command line client.
This field is mandatory.
Team Project Collection URL
Provide the URL to your Team Project Collection, in the following format:
http[s]://ServerName[:port]/path/to/collection.Some sample URLs for connecting to an on premises installation and a Visual Studio Online:
-
http://ikan_tfs:8080/tfs/DefaultCollection
-
https://ikan.visualstudio.com/DefaultCollection
This field is mandatory.
User ID
Enter the User ID that IKAN ALM will use to access the TFVC Repository. Repository.
This field is optional.
Password
Enter the Password that IKAN ALM will use to access the TFVC Repository. This field is optional.
The characters you enter are displayed as asterisks.
Repeat Password
Re-enter the Password that IKAN ALM will use to access the TFVC Repository.
Time-Out (Sec.)
Enter the Time-Out value in seconds. If IKAN ALM is not able to establish a connection with the TFVC Repository within the defined period, it will consider the Repository to be inaccessible.
The definition of a Time-Out value is mandatory.
-
-
Click Test Connection to verify if IKAN ALM can establish a connection to the TFVC Repository. If the test is successful, the following message is displayed:
Info: Could successfully establish a connection with the Repository.
If the test is not successful, the following screen is displayed:

Correct the errors reported in the Stack Trace field and perform the test again.
-
Once the test is successful, click Create.
The newly created TFVC Repository is added to the TFVC Repositories Overview at the bottom of the screen.
The TFVC Repositories Overview Screen
-
In the Global Administration context, select Version Control Repositories > Overview.
The overview of all defined Version Control Repositories is displayed.
-
Specify TFVC in the Type field on the Search Version Control Repositories panel.
Use the other search criteria to only display the TFVC Repositories you are looking for.
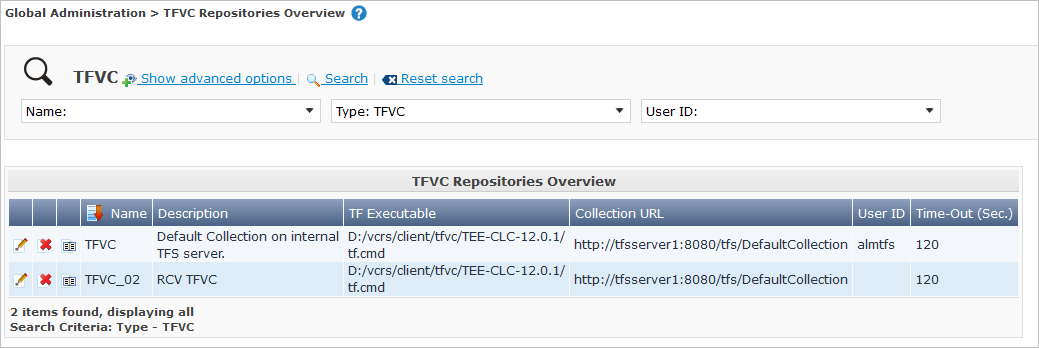
If required, use the other search criteria to refine the items displayed on the overview.
The following options are available:
-
click the Show/hide advanced options link to display or hide all available search criteria,
-
the Search link to refresh the list based on the current search criteria,
-
the Reset search link to clear the search fields.
-
-
Verify the information on the TFVC Repositories Overview panel.
For a detailed description of the fields, refer to Creating a TFVC Repository.
-
Depending on your access rights, the following links may be available on the TFVC Repositories Overview panel:
Edit
This option is available to IKAN ALM Users with Global Administrator Access Rights. It allows editing a TFVC Repository definition.
Delete
This option is available to IKAN ALM Users with Global Administrator Access Rights. It allows deleting a TFVC Repository definition.
History
This option is available to all IKAN ALM Users. It allows displaying the History of all create, update and delete operations performed on a TFVC Repository.
Editing a TFVC Repository
-
In the Global Administration context, select Version Control Repositories > Overview.
The overview of all defined Version Control Repositories is displayed.
Use the search criteria on the Search Version Control Repository panel to only display the TFVC Repositories you are looking for.
-
Click the
Edit link to change the selected TFVC Repository.The following screen is displayed:
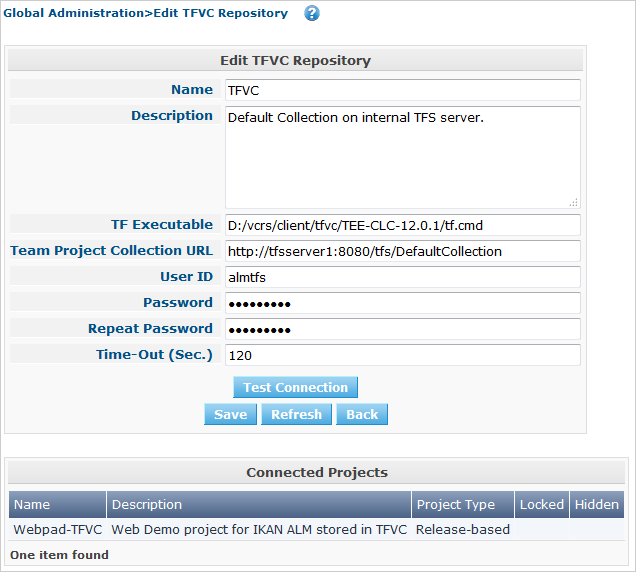
-
Edit the fields as required.
For a description of the fields, refer to Creating a TFVC Repository.
Click Test Connection to verify if IKAN ALM can establish a connection to the TFVC Repository.
The Connected Projects panel displays the Projects the Repository is linked to.
-
Click Save to save your changes.
You can also click:
-
Refresh to retrieve the settings from the database.
-
Back to return to the previous screen without saving the changes
-
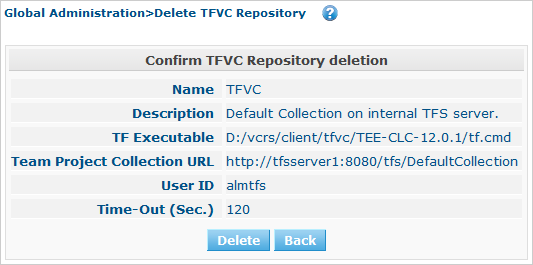
Deleting a TFVC Repository
-
In the Global Administration context, select Version Control Repositories > Overview.
The overview of all defined Version Control Repositories is displayed.
Use the search criteria on the Search Version Control Repository panel to only display the TFVC Repositories you are looking for.
-
Click the
Delete link to delete the selected TFVC Repository.If the TFVC Repository is not connected to any Project, the following screen is displayed:
-
Click Delete to confirm the deletion.
You can also click Back to return to the previous screen without deleting the entry.
Note: If the TFVC Repository is connected to one or more Projects, the following screen is displayed:

Before deleting the VCR, you must connect the reported Projects to another VCR.
Viewing the TFVC Repository History
-
In the Global Administration context, select Version Control Repositories > Overview.
The overview of all defined Version Control Repositories is displayed.
Use the search criteria on the Search Version Control Repository panel to only display the TFVC Repositories you are looking for.
-
Click the
History link to display the TFVC Repository History View.For more detailed information concerning this History View, refer to the section History and Event Logging.
-
Click Back to return to the TFVC Repositories Overview screen.