Package Build Groups
A Package Build Group establishes a relationship between Packages and allows transferring the latest builds from all or specific packages in such a Group before the execution of the build process of a Package.
This is, for example, useful for a Mainframe lifecycle in which copybooks may be modified in one Package, which is used by programs in other Packages. If those Packages are linked into a Package Build Group, the correct (version of the) copybooks will be transported at compilation time.
|
This chapter only describes how to create and manage a Package Build Group. To transfer Packages belonging to a Package Build Group when building a Package, a new core Phase has been added, namely the Transport Package Results Phase. This Phase must be inserted in the workflow of the Build Environment. For more details, refer to the description of this Phase in the appendix Phases - General Information. |
Refer to the following procedures for more information:
Creating a Package Build Group
-
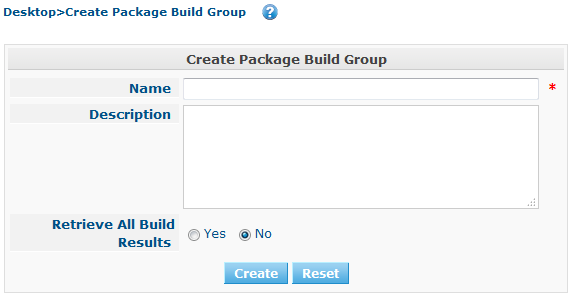
Select Packages > Create Package Build Group on the Main Menu.
The Create Package Build Group screen is displayed.
-
Fill out the fields. Fields marked with a red asterisk are mandatory:
Field Meaning Name
Enter the name of the new Package Build Group in this field. This field is mandatory.
Description
Enter a description for the new Package Build Group in this field. This field is optional.
Retrieve All Build Results
Select whether the “Transport Package Results” Phase should retrieve all build results of the other packages in the Package Group.
-
Yes
If you set this option to Yes, all build results of the connected Packages will be retrieved when a Package of the Package Build Group is built. In this case, the Dependency Levels of the Packages will be ignored.
-
No
Default value.
If you set this option to No, only the build results of the connected Packages with a lower Dependency Level will be retrieved when a Package of the Package Build Group is built.
The Dependency Level is specified when adding a package to the group. For more information on adding Packages and rearranging the order of Packages, refer to the section Adding a Package to a Package Build Group.
-
-
Once you have filled out the fields, click Create.
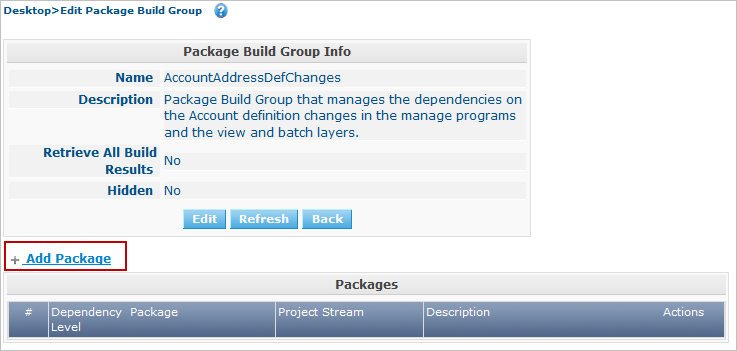
The Edit Package Build Group is displayed.
-
Next, you can add Packages using the Add Package link.
For more information, refer to the section Adding a Package to a Package Build Group.
The Package Build Groups Overview Screen
-
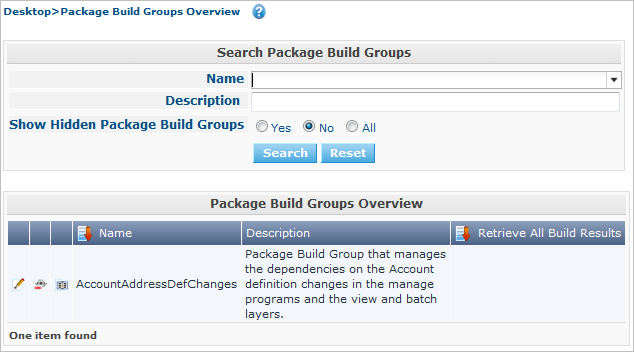
Select Packages > Overview Package Build Groups on the Main Menu.
The Package Build Groups Overview window is displayed.
-
Use the search criteria on the Search Package Build Groups panel to only display the Package Build Groups you are looking for.

The following options are available:
-
Show advanced options: to display all available search criteria.
-
Search: in principle it is not necessary to click the Search option. The results on the overview will be automatically synchronized in function of the selected criteria.
-
Reset search: to clear all search criteria and display the full list of items.
-
Select an existing filter from the drop-down list.
-
Save filter: to save the current search criteria for future use.
For more information on the usage of search panels and filters, refer to the sections and Defining Search Filters.
-
-
Depending on your access rights, the following links may be available on the Package Build Groups Overview panel:
 __
__Edit
This option allows editing the Package Build Group and/or its connected Packages. Editing a Package Build Group
 /
/ 
Hide / Show
This option allows hiding the selected Package Build Group.

History
This option allows to display the History of all create, update and delete operations performed on a Package Build Group.
Columns marked with the
 icon can be sorted alphabetically (ascending or descending).
Editing a Package Build Group
-
Select Packages > Overview Package Build Groups on the Main Menu.
-
On the Package Build Groups Overview panel, click the
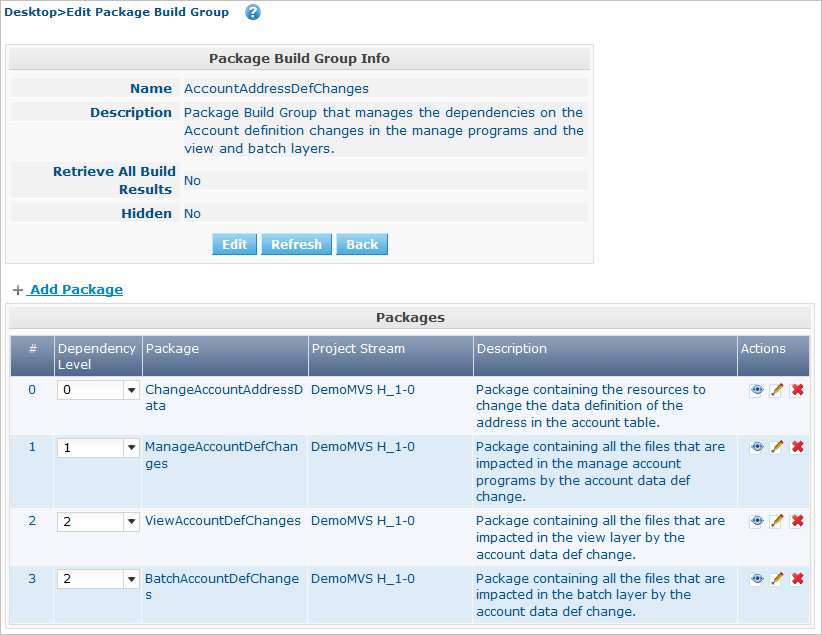
Edit link next to the Package Build Group you want to edit.The following screen is displayed.
-
Click the Edit button if you need to modify the definition of the Package Build Group.
The following pop-up window is displayed:

Edit the Package Build Group Information as required and click the Save button.
For more information on the different fields, refer to the section Creating a Package Build Group.
-
You can also add or remove packages and modify their order and Dependency Level.
For more information, refer to the section Adding a Package to a Package Build Group.
Adding a Package to a Package Build Group
-
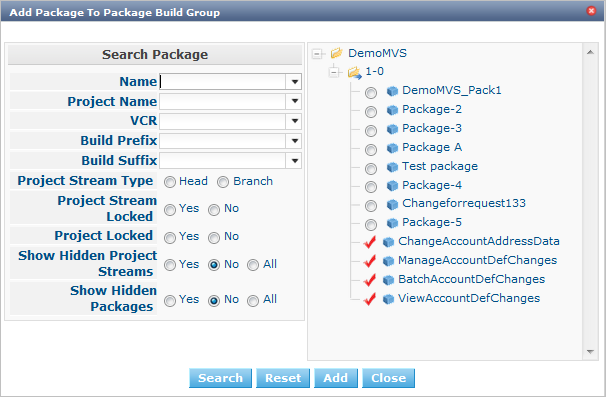
Click the Add Package link on the Edit Package Build Group screen or right-click the Packages overview table and select Add Package.
The following window is displayed.
-
Search for the Package you want to add.
You can search for the Package using the selection criteria on the Search Package panel on the left, or you can immediately use the tree view on the right to select the Package.
The following search criteria are available.
Field Meaning Name
Enter the name of the Package you want to add.
Project Name
Enter the name of the Project.
VCR
Enter the VCR name.
Build Prefix
Enter the Build prefix.
Build Suffix
Enter the Build suffix.
Project Stream Type
Enter the type of the Project Stream: Head or Branch.
Project Stream Locked
Indicate whether or not you want to display locked Project Streams.
Project Locked
Indicate whether or not you want to display locked Projects.
Show Hidden Project Streams
Indicate whether or not you want to display hidden Project Streams.
Show Hidden Packages
Indicate whether or not you want to display hidden Packages.
-
In the tree overview, select the Package you want to add.
Packages can only be part of one Package Build Group. If you try to add a Package that is part of another Package Build Group, an error is displayed. For example: Sample error message: A Package can only be part of one Package Build Group. Package ‘xyz’ is already part of Package Build Group 'zyx'
-
Click the Add button to add the Package.
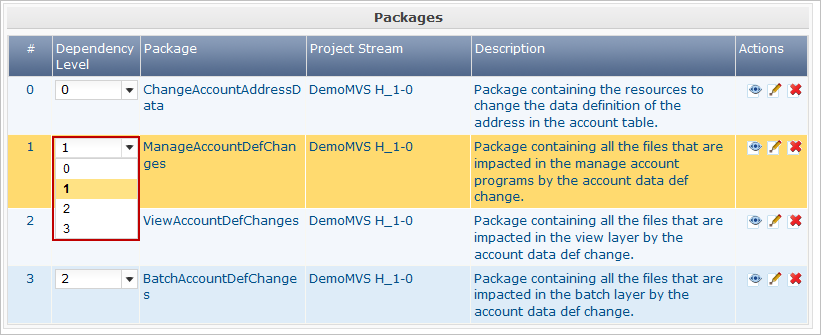
The Package will be added at the end of the list. You can change the order of the packages by changing the Dependency Level, or by dragging and dropping the Package to the appropriate place, as explained in steps 4 and 5.
Packages can only be added one at a time. Repeat this action for all the packages you want to add.
Once you have selected all the packages you want to add, click the Close button to close the window. The list of added Packages will be displayed on the Packages panel.
You can also click:
-
Search to refresh the tree with the selected search criteria.
-
Reset to clear the Search fields.
-
Close to return to the Edit Package Build Group screen.
-
-
Specify the Dependency Levels.
When a Package is built, the Transport Package Results Phase will only retrieve the latest Build Results of the Packages with a lower Dependency Level in the Package Build Group.
Exception: if the option Retrieve all Build Results is set to Yes, all Build Results will be retrieved regardless of their Dependency Level. Creating a Package Build Group
Modify the Dependency Level by selecting the appropriate level from the drop-down list.
-
Modifying the order of the packages.
If required, you can modify the order of the Packages in the Package Build Group.
Select the Package you want to reposition by clicking on it and dragging it to the required position on the Packages Overview. You can only move one Package at a time.
The orange line indicates the target position of the selected elements. Valid positions are indicated with a green bar above the selected elements, invalid positions with a red bar.
Example:
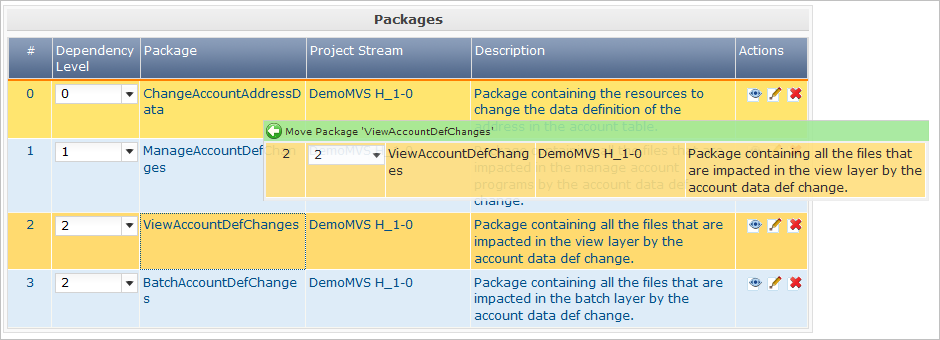
If you change the order of the Packages, the Dependency Level may change as well.
-
Viewing a Package’s settings.
-
To display a connected Package’s Settings, click the
 View link in the Actions column after the required Package.
The View Package screen is displayed. Viewing Package Settings
-
Click Back to return to the Edit Package Build Group screen.
-
-
Editing a Package’s settings
-
To modify a connected Package Settings, click the
Edit link in the Actions column after the required Package.The Edit Package screen is displayed. For more information on how to edit the Package, refer to Editing a Package.
-
Click Back to return to the Edit Package Build Group screen.
-
Removing a Package from a Package Build Group
-
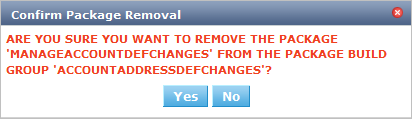
On the Packages panel of the Edit Package Build Group screen, click the
 Remove link after the required Package in the Actions column.
A pop-up window asking you to confirm the removal is displayed.
-
Click Yes to confirm the removal.
You can also click No to return to the previous screen without removing the Package.
|
If you remove one of the Packages, the Dependency Level of the other Packages may also change. |
Hiding/Showing a Package Build Group
Specifying that a Package Build Group is “hidden”, causes it not to be displayed by default on the Overview panels.
This can be very useful to hide older Package Build Groups, without losing the historical information associated with them.
-
Select Packages > Overview Package Build Groups on the Main Menu.
-
Click the
Hide link in front of the Package Build Group you want to hide.The icon in front of the Package Build Group changes to
. -
To “unhide” a hidden Package Build Group, click the
Show link.The icon will be changed appropriately.
A search criterion is available on the Search Package Build Group panel to specify whether or not you want to display hidden Package Build Groups.
Viewing the Package Build Group History
-
Select Packages > Overview Package Build Groups on the Main Menu.
-
Click the
History link on the Package Build Groups Overview panel to display the Package Build Group History View.For more detailed information concerning this History View, refer to the section History and Event Logging.
Click Back to return to the Package Build Groups Overview screen.